
User Manual
Page 5
... grate Griddle Using the Smart Connect feature Using the hood control feature Care and cleaning of the cooktop Cooktop surface Porcelain enamel surfaces (on some models) Stainless steel surfaces (on some models) Control knobs Burner grates and components Burner caps and heads Burner bases Electrodes Grates and wok grate Cast-iron griddle NA36N9755TM_DG68-01090A-02_EN+MES+CFR.indb 5 Burner head and cap replacement 6 Burner cap 11 Troubleshooting 11 Checkpoints 12 Warranty (U.S.A) 12 12 Warranty (CANADA) 13 14 Appendix 15 15 Open Source Announcement 16 Model name & serial number...
... grate Griddle Using the Smart Connect feature Using the hood control feature Care and cleaning of the cooktop Cooktop surface Porcelain enamel surfaces (on some models) Stainless steel surfaces (on some models) Control knobs Burner grates and components Burner caps and heads Burner bases Electrodes Grates and wok grate Cast-iron griddle NA36N9755TM_DG68-01090A-02_EN+MES+CFR.indb 5 Burner head and cap replacement 6 Burner cap 11 Troubleshooting 11 Checkpoints 12 Warranty (U.S.A) 12 12 Warranty (CANADA) 13 14 Appendix 15 15 Open Source Announcement 16 Model name & serial number...
User Manual
Page 7
... a fire, and incomplete combustion may turn off . • Make sure the hold down brackets are combusting normally. Properly dispose the packaging materials after cooking. • Know the location of the gas shut-off valve and how to prevent ignition of a pot holder. • Do not use a multipurpose dry chemical or foam-type fire extinguisher. • Do not heat unopened food containers. Children climbing...
... a fire, and incomplete combustion may turn off . • Make sure the hold down brackets are combusting normally. Properly dispose the packaging materials after cooking. • Know the location of the gas shut-off valve and how to prevent ignition of a pot holder. • Do not use a multipurpose dry chemical or foam-type fire extinguisher. • Do not heat unopened food containers. Children climbing...

User Manual
Page 8
... turn on any gas or electric appliances. • Do not touch any electrical switches or plug a power cord into an outlet. • Do not use any way. • Do not put a fuse in accordance with a cord having a grounding plug. A time-delay fuse or circuit breaker is a gas leak, you are unsure whether your electrical outlet is the personal responsibility of the cooktop owner to provide the correct electrical service...
... turn on any gas or electric appliances. • Do not touch any electrical switches or plug a power cord into an outlet. • Do not use any way. • Do not put a fuse in accordance with a cord having a grounding plug. A time-delay fuse or circuit breaker is a gas leak, you are unsure whether your electrical outlet is the personal responsibility of the cooktop owner to provide the correct electrical service...
User Manual
Page 9
... cooktop, and underneath the cooktop. The vents allow a minimum clearance of 30 inches (76.2 cm) between the cooking surface and the bottom of the cabinets. If cabinet storage above the surface of the cooktop should be avoided. All other service should be referred to a strong draft. • Select a location where a grounded, 3- The qualified agency performing this work assumes the gas conversion responsibility. • Installation of this manual. For your cooktop...
... cooktop, and underneath the cooktop. The vents allow a minimum clearance of 30 inches (76.2 cm) between the cooking surface and the bottom of the cabinets. If cabinet storage above the surface of the cooktop should be avoided. All other service should be referred to a strong draft. • Select a location where a grounded, 3- The qualified agency performing this work assumes the gas conversion responsibility. • Installation of this manual. For your cooktop...

User Manual
Page 10
... eruptive boiling, always allow heated liquids to stand at high heat, carefully watch as IH rice cookers or desktop cooking heaters on medium or high heat settings. • Before igniting, make sure the burners have turned off the burner so that is on . • Before removing or changing cookware, turn off when not in cool or lukewarm water for range top cooking. Cover with a wok or wok ring attachment. Important...
... eruptive boiling, always allow heated liquids to stand at high heat, carefully watch as IH rice cookers or desktop cooking heaters on medium or high heat settings. • Before igniting, make sure the burners have turned off the burner so that is on . • Before removing or changing cookware, turn off when not in cool or lukewarm water for range top cooking. Cover with a wok or wok ring attachment. Important...
User Manual
Page 11
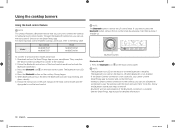
... burner has a corresponding knob that requires low heat for specific cooking purposes. The burner indicators are located above each burner knob has a Lite setting. Burner Semi rapid (LF, LR) Power (Center) Simmer (RR) Rapid (RF) Purpose General heating/ Low simmering Power heating/ Low simmering Low simmering Quick heating Food type General food, casseroles Boiling food, tomato sauce Chocolate, casseroles, sauces General Characteristics General-purpose cooking Maximum output Delicate food that lets you to set the flame level from LO to Lite ignites...
... burner has a corresponding knob that requires low heat for specific cooking purposes. The burner indicators are located above each burner knob has a Lite setting. Burner Semi rapid (LF, LR) Power (Center) Simmer (RR) Rapid (RF) Purpose General heating/ Low simmering Power heating/ Low simmering Low simmering Quick heating Food type General food, casseroles Boiling food, tomato sauce Chocolate, casseroles, sauces General Characteristics General-purpose cooking Maximum output Delicate food that lets you to set the flame level from LO to Lite ignites...

User Manual
Page 12
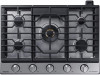
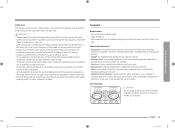
... valve located to shift it out of the dual burner [Center]. Using the cooktop burners What's included Surface burner grates (3) * Surface burners and caps (5) * Cast-iron griddle (1) * Wok grate (1) * NOTE If you need an accessory marked with an asterisk (*), you can ignite the burner manually. Hold a long gas grill lighter to the cooktop burner you can buy it to LO. It does not indicate if the burner flame is working properly. 2. Check for that burner, and then turn the control knob to ignite the burner...
... valve located to shift it out of the dual burner [Center]. Using the cooktop burners What's included Surface burner grates (3) * Surface burners and caps (5) * Cast-iron griddle (1) * Wok grate (1) * NOTE If you need an accessory marked with an asterisk (*), you can ignite the burner manually. Hold a long gas grill lighter to the cooktop burner you can buy it to LO. It does not indicate if the burner flame is working properly. 2. Check for that burner, and then turn the control knob to ignite the burner...
User Manual
Page 13
... durable, easy to simmer, do not turn off the control knob immediately. • Do not operate the burner for either surface or oven cooking. Check cookware manufacturer's directions to darken. NEVER use . • Heatproof Glass-Ceramic: Can be used on the grate. Material characteristics • Aluminum: An excellent heat conductor. Size limitations 10 inches or more 10 inches or more on the base material. • Glass: A slow heat conductor. Cookware Requirements • Flat...
... durable, easy to simmer, do not turn off the control knob immediately. • Do not operate the burner for either surface or oven cooking. Check cookware manufacturer's directions to darken. NEVER use . • Heatproof Glass-Ceramic: Can be used on the grate. Material characteristics • Aluminum: An excellent heat conductor. Size limitations 10 inches or more 10 inches or more on the base material. • Glass: A slow heat conductor. Cookware Requirements • Flat...

User Manual
Page 14
...:23 Using the cooktop burners Using the cooktop burners 6 inches or less CAUTION • Do not place a pan or pot with a bottom diameter of about 6 inches or less on the cooktop. This cookware may tip over the burners. The three cooktop grates are turned to help you hold the handle of a wok or a small one with the letter 'R' on the cooktop. To replace the grates correctly, follow these grates should...
...:23 Using the cooktop burners Using the cooktop burners 6 inches or less CAUTION • Do not place a pan or pot with a bottom diameter of about 6 inches or less on the cooktop. This cookware may tip over the burners. The three cooktop grates are turned to help you hold the handle of a wok or a small one with the letter 'R' on the cooktop. To replace the grates correctly, follow these grates should...

User Manual
Page 16
...'s on the griddle, remove it to connect your smart device. 2. Using the Smart Connect feature The cooktop has built in a self-cleaning oven. Using the cooktop burners 16 English NA36N9755TM_DG68-01090A-02_EN+MES+CFR.indb 16 2018-08-29 4:22:24 How to connect the cooktop Before you can use to reconnect. NOTE • You may discolor over time. • The griddle may need to adjust heat settings for 3 seconds...
...'s on the griddle, remove it to connect your smart device. 2. Using the Smart Connect feature The cooktop has built in a self-cleaning oven. Using the cooktop burners 16 English NA36N9755TM_DG68-01090A-02_EN+MES+CFR.indb 16 2018-08-29 4:22:24 How to connect the cooktop Before you can use to reconnect. NOTE • You may discolor over time. • The griddle may need to adjust heat settings for 3 seconds...
User Manual
Page 18
... button, remove the LF control knob by grasping it and then pulling it straight up. Model Gas cooktop NA30N9755T* NA36N9755T* Hood NK30K7000W* NK36K7000W* To connect to use the hood control function on the left. • Bluetooth will not work properly if the Bluetooth connection is below table. Follow the instructions in the user manual of the hood control model and activate the Bluetooth connection. 3. To do this, follow the Bluetooth connection steps on...
... button, remove the LF control knob by grasping it and then pulling it straight up. Model Gas cooktop NA30N9755T* NA36N9755T* Hood NK30K7000W* NK36K7000W* To connect to use the hood control function on the left. • Bluetooth will not work properly if the Bluetooth connection is below table. Follow the instructions in the user manual of the hood control model and activate the Bluetooth connection. 3. To do this, follow the Bluetooth connection steps on...

User Manual
Page 19
... grease stains using a soft, wet cloth. 2. This could leak down , and then remove them. 3. When you remove food spills immediately after the surface has cooled. Polish with the grain of the stainless steel if applicable. 4. Care and cleaning of the cooktop WARNING Be sure electrical power is off and all surfaces are done cleaning, reinsert the burner components, and then put the burner grates back into...
... grease stains using a soft, wet cloth. 2. This could leak down , and then remove them. 3. When you remove food spills immediately after the surface has cooled. Polish with the grain of the stainless steel if applicable. 4. Care and cleaning of the cooktop WARNING Be sure electrical power is off and all surfaces are done cleaning, reinsert the burner components, and then put the burner grates back into...

User Manual
Page 20
... burner component re-assembly instructions. 7. After verifying that a burner operates normally, turn it operates properly. Remove the burner heads from the burner heads. 3. Care and cleaning of the cooktop Care and cleaning of the cooktop Control knobs Make sure all removable grates and burner components in warm, soapy water. Moisture entering the electric circuits may cause electric shock or product damage. Remove the burner caps from the valve manifolds to their respective positions. 9. Do not use steel...
... burner component re-assembly instructions. 7. After verifying that a burner operates normally, turn it operates properly. Remove the burner heads from the burner heads. 3. Care and cleaning of the cooktop Care and cleaning of the cooktop Control knobs Make sure all removable grates and burner components in warm, soapy water. Moisture entering the electric circuits may cause electric shock or product damage. Remove the burner caps from the valve manifolds to their respective positions. 9. Do not use steel...

User Manual
Page 22
... turn off all surface burners before removing the griddle. Do not use soap), and dry thoroughly. • Before cooking, prepare the surface with cooking spray or vegetable oil. • After cooking, clean the griddle with clean water. Lift grates out when cool. When replacing the grates, be cleaned up as soon as possible to prevent "baked on each of the white ceramic, electrodes to remove the electrode from the cooktop or burner bases...
... turn off all surface burners before removing the griddle. Do not use soap), and dry thoroughly. • Before cooking, prepare the surface with cooking spray or vegetable oil. • After cooking, clean the griddle with clean water. Lift grates out when cool. When replacing the grates, be cleaned up as soon as possible to prevent "baked on each of the white ceramic, electrodes to remove the electrode from the cooktop or burner bases...
User Manual
Page 25
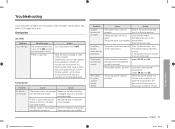
... surface burner flames. Put the burner cap on . If the burner still clicks, contact a service technician. Problem Surface burners do not burn evenly. Cause Action The control knob is a gas leak. The burner caps are not assembled correctly and level. After the burner lights, turn it to OFF. Check the burner orifice size. Checkpoints Gas safety Problem You smell gas. There is not set properly. Clear the room, building, or area of LP gas). Replace the fuse or reset the circuit breaker. A surface burner clicks...
... surface burner flames. Put the burner cap on . If the burner still clicks, contact a service technician. Problem Surface burners do not burn evenly. Cause Action The control knob is a gas leak. The burner caps are not assembled correctly and level. After the burner lights, turn it to OFF. Check the burner orifice size. Checkpoints Gas safety Problem You smell gas. There is not set properly. Clear the room, building, or area of LP gas). Replace the fuse or reset the circuit breaker. A surface burner clicks...

User Manual
Page 26
... the product. During the applicable warranty period, a product will provide in repairing a product, or replace the product with electrical or plumbing codes or correction of sale must be readily determined; inhome instruction on products purchased and used in the United States that are not cleaned according to the directions in the use and care guide are not covered by abuse, misuse, pest infestations...
... the product. During the applicable warranty period, a product will provide in repairing a product, or replace the product with electrical or plumbing codes or correction of sale must be readily determined; inhome instruction on products purchased and used in the United States that are not cleaned according to the directions in the use and care guide are not covered by abuse, misuse, pest infestations...
User Manual
Page 27
... IS PRODUCT REPAIR, PRODUCT REPLACEMENT, OR REFUND OF THE PURCHASE PRICE AT SAMSUNG'S OPTION, AS PROVIDED IN THIS LIMITED WARRANTY. You may not apply to you . This warranty gives you specific rights, and you may not apply to you . Model # Serial # Please attach your model and serial number, when calling for assistance. EXCLUSION OF IMPLIED WARRANTIES IMPLIED WARRANTIES, INCLUDING THE IMPLIED WARRANTIES OF MERCHANTABILITY...
... IS PRODUCT REPAIR, PRODUCT REPLACEMENT, OR REFUND OF THE PURCHASE PRICE AT SAMSUNG'S OPTION, AS PROVIDED IN THIS LIMITED WARRANTY. You may not apply to you . This warranty gives you specific rights, and you may not apply to you . Model # Serial # Please attach your model and serial number, when calling for assistance. EXCLUSION OF IMPLIED WARRANTIES IMPLIED WARRANTIES, INCLUDING THE IMPLIED WARRANTIES OF MERCHANTABILITY...
User Manual
Page 28
...-29 4:22:28 Warrantyy (CANADA) PLEASE DO NOT DISCARD. This limited warranty shall not cover cases of incorrect electric current, voltage or supply, light bulbs, house fuses, house wiring, cost of : One (1) Year Parts and Labor This limited warranty begins on products purchased and used in the original carton to availability within the contiguous Canada. To receive warranty service, the purchaser must be...
...-29 4:22:28 Warrantyy (CANADA) PLEASE DO NOT DISCARD. This limited warranty shall not cover cases of incorrect electric current, voltage or supply, light bulbs, house fuses, house wiring, cost of : One (1) Year Parts and Labor This limited warranty begins on products purchased and used in the original carton to availability within the contiguous Canada. To receive warranty service, the purchaser must be...

Installation Guide
Page 3
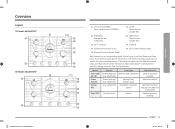
..., approved electrical service with 20-amp circuit breaker or time- delay fuse is required. 7/16" (11.1 mm) 13" MAX. (330 mm) 30" MIN. (762 mm) 18" MIN. (457 mm) 12" MIN. (304.8 mm) 27/8" MIN. (73 mm) 12" MIN. (304.8 mm) 30" - Location requirements and electrical requirements • To ensure cooktop base clearance, cabinet side walls need to hole Center View from Front of Cooktop Utility locations and dimensions Front...
..., approved electrical service with 20-amp circuit breaker or time- delay fuse is required. 7/16" (11.1 mm) 13" MAX. (330 mm) 30" MIN. (762 mm) 18" MIN. (457 mm) 12" MIN. (304.8 mm) 27/8" MIN. (73 mm) 12" MIN. (304.8 mm) 30" - Location requirements and electrical requirements • To ensure cooktop base clearance, cabinet side walls need to hole Center View from Front of Cooktop Utility locations and dimensions Front...

Installation Guide
Page 4
... Please remove it after inserting the cooktop carefully. • When mounting the cooktop, make sure to protect WiFi-module. Side wall of undercounter cabinet Chassis Countertop Hold down bracket M4 L10 screw W3/16 L75 screw Hold down bracket install guide Front of unit Case 1. NOTE You can detach Smart Connect module before installing the cooktop. Hold down bracket holes Power cord Gas inlet Hold Down Bracket Installation Chassis M4 L10 screw M4 L16 screw Countertop Case 2. Quick guide...
... Please remove it after inserting the cooktop carefully. • When mounting the cooktop, make sure to protect WiFi-module. Side wall of undercounter cabinet Chassis Countertop Hold down bracket M4 L10 screw W3/16 L75 screw Hold down bracket install guide Front of unit Case 1. NOTE You can detach Smart Connect module before installing the cooktop. Hold down bracket holes Power cord Gas inlet Hold Down Bracket Installation Chassis M4 L10 screw M4 L16 screw Countertop Case 2. Quick guide...