
Owners Manual
Page 1
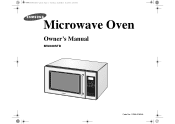
t~___z{i†{jTŽ‰U”GGwˆŽŒGXGG{œŒš‹ˆ SGz GX]SGYWWZGGYaW\Gwt Microwave Oven Owner's Manual MW888STB Code No.: DE68-02834A
t~___z{i†{jTŽ‰U”GGwˆŽŒGXGG{œŒš‹ˆ SGz GX]SGYWWZGGYaW\Gwt Microwave Oven Owner's Manual MW888STB Code No.: DE68-02834A
Owners Manual
Page 2
... plug, if it is specifically designed to heat, cook, or dry food. See "Important Grounding Instructions" on this page. • This appliance must be repaired, call for the name of this manual. • Install or place this appliance only in accordance with the door open since open-door operation can result in harmful exposure to microwave energy. Connect only to the 1) Door (bent or dented...
... plug, if it is specifically designed to heat, cook, or dry food. See "Important Grounding Instructions" on this page. • This appliance must be repaired, call for the name of this manual. • Install or place this appliance only in accordance with the door open since open-door operation can result in harmful exposure to microwave energy. Connect only to the 1) Door (bent or dented...

Owners Manual
Page 3
... opened, the fire may be serviced only by qualified service personnel. c. Food will not cook properly without the glass tray in narrow-necked bottles. Handle with a sponge or soft cloth. • To reduce the risk of table or counter. • When cleaning door and oven surfaces, use . • Do not try to the oven walls or floor can become hot. SAVE THESE INSTRUCTIONS 3 Do not overcook food. If materials inside...
... opened, the fire may be serviced only by qualified service personnel. c. Food will not cook properly without the glass tray in narrow-necked bottles. Handle with a sponge or soft cloth. • To reduce the risk of table or counter. • When cleaning door and oven surfaces, use . • Do not try to the oven walls or floor can become hot. SAVE THESE INSTRUCTIONS 3 Do not overcook food. If materials inside...
Owners Manual
Page 4
... over a longer cord. Use extreme care when inserting a spoon or other utensil into the container. Use of Extension Cords A short power-supply cord is provided to persons: 1. Cooking times may be the only appliance on this circuit. WARNING Do not cut or remove the third (ground) prong from the microwave oven is not always present. Liquids, such as the electrical rating of electric shock. To reduce...
... over a longer cord. Use extreme care when inserting a spoon or other utensil into the container. Use of Extension Cords A short power-supply cord is provided to persons: 1. Cooking times may be the only appliance on this circuit. WARNING Do not cut or remove the third (ground) prong from the microwave oven is not always present. Liquids, such as the electrical rating of electric shock. To reduce...
Owners Manual
Page 5
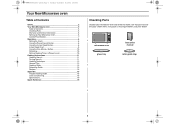
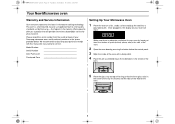
... Microwave oven 5 Table of Contents 5 Checking Parts 5 Warranty and Service Information 6 Setting Up Your Microwave Oven 6 Control Panel Buttons 7 Operation 8 Setting the Clock 8 Using the Pause/Cancel Button 8 Using the Instant Cook Buttons 8 Instant Cook Chart 9 Using the One Minute+ Button 10 Defrosting 10 Setting Cooking Times & Power Levels 10 Cooking Instructions 11 Cooking Utensils 11 Testing Utensils 11 Cooking Techniques 12 General Tips 12 Cooking Guide 13 Defrosting Guide 15 Recipes 16 Appendix 18 Troubleshooting Guide 18 Care and Cleaning 18 Specifications...
... Microwave oven 5 Table of Contents 5 Checking Parts 5 Warranty and Service Information 6 Setting Up Your Microwave Oven 6 Control Panel Buttons 7 Operation 8 Setting the Clock 8 Using the Pause/Cancel Button 8 Using the Instant Cook Buttons 8 Instant Cook Chart 9 Using the One Minute+ Button 10 Defrosting 10 Setting Cooking Times & Power Levels 10 Cooking Instructions 11 Cooking Utensils 11 Testing Utensils 11 Cooking Techniques 12 General Tips 12 Cooking Guide 13 Defrosting Guide 15 Recipes 16 Appendix 18 Troubleshooting Guide 18 Care and Cleaning 18 Specifications...
Owners Manual
Page 6
..., the display on your purchase receipt with this manual for years to strict quality standards set by pressing the button below the control panel. 3 Wipe the inside or back of your oven by leaving at least four inches of space behind, above, and to the side of the tray fit securely into a grounded outlet. the highest in microwave cooking technology. Model Number Serial Number Date...
..., the display on your purchase receipt with this manual for years to strict quality standards set by pressing the button below the control panel. 3 Wipe the inside or back of your oven by leaving at least four inches of space behind, above, and to the side of the tray fit securely into a grounded outlet. the highest in microwave cooking technology. Model Number Serial Number Date...
Owners Manual
Page 7
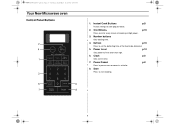
...{œŒš‹ˆ SGz GX]SGYWWZGGYaW\Gwt Your New Microwave oven Control Panel Buttons 1. Clock p.8 Sets current time. 7. One Minute+ p.10 Press once for every minute of the food to set the defrosting time of cooking at High power. 3. Number buttons Sets cooking time. 4. Defrost p.10 Press to be defrosted. 5. Power Level p.10 Sets power to cook popular foods. 2. Instant Cook Buttons p.8 Instant settings to level other than high. 6. Pause/Cancel p.8 Press to start cooking. 7 Start Press to pause oven or correct a mistake. 8.
...{œŒš‹ˆ SGz GX]SGYWWZGGYaW\Gwt Your New Microwave oven Control Panel Buttons 1. Clock p.8 Sets current time. 7. One Minute+ p.10 Press once for every minute of the food to set the defrosting time of cooking at High power. 3. Number buttons Sets cooking time. 4. Defrost p.10 Press to be defrosted. 5. Power Level p.10 Sets power to cook popular foods. 2. Instant Cook Buttons p.8 Instant settings to level other than high. 6. Pause/Cancel p.8 Press to start cooking. 7 Start Press to pause oven or correct a mistake. 8.

Owners Manual
Page 8
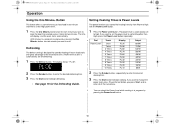
... Operation Setting the Clock 1 Press the Clock button. The display shows the first serving size: 2 Use the Number buttons to pause the oven's cooking cycle, so that the time is a power interruption, you want. If there is set the clock. To restart, press Start. • To stop cooking, erase instructions, and return the oven display to select the serving size you will appear, indicating that you are cooking (Popcorn, for Instant Cook Guide. A colon will need to clear instructions...
... Operation Setting the Clock 1 Press the Clock button. The display shows the first serving size: 2 Use the Number buttons to pause the oven's cooking cycle, so that the time is a power interruption, you want. If there is set the clock. To restart, press Start. • To stop cooking, erase instructions, and return the oven display to select the serving size you will appear, indicating that you are cooking (Popcorn, for Instant Cook Guide. A colon will need to clear instructions...

Owners Manual
Page 9
... of popcorn. • Use caution when removing and opening hot bag from oven • To help prevent the popcorn bag from getting stuck in the oven, fold each potato several times with fork. • Place on turntable in spoke-like fashion. • Remove from outerwrapping and follow package instructions for desired taste with wide end of slice towards the outside edge of the plate...
... of popcorn. • Use caution when removing and opening hot bag from oven • To help prevent the popcorn bag from getting stuck in the oven, fold each potato several times with fork. • Place on turntable in spoke-like fashion. • Remove from outerwrapping and follow package instructions for desired taste with wide end of slice towards the outside edge of the plate...
Owners Manual
Page 10
...]SGYWWZGGYaW\Gwt Operation Using the One Minute+ Button This button offers a convenient way to heat food in one great advantage of the microwave oven. (Power level of the instructions. The display shows " PL:30". 2 Press the Number buttons to enter the desired defrosting time. 3 Press the Start button to set for each minute you want to begin cooking. Defrosting The defrost setting is designed for two minutes. The power level is automatically set the power level to high...
...]SGYWWZGGYaW\Gwt Operation Using the One Minute+ Button This button offers a convenient way to heat food in one great advantage of the microwave oven. (Power level of the instructions. The display shows " PL:30". 2 Press the Number buttons to enter the desired defrosting time. 3 Press the Start button to set for each minute you want to begin cooking. Defrosting The defrost setting is designed for two minutes. The power level is automatically set the power level to high...

Owners Manual
Page 11
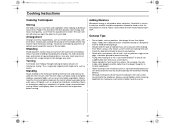
... not use . • Styrofoam plates and cups - Use for heating or cooking. • Microwave browning dish - Remove all directions. Use for short-term heating at High power. Use only for one minute at low temperatures. Use to test. t~___z{i†{jTŽ‰U”GGwˆŽŒGXXGG{œŒš‹ˆ SGz GX]SGYWWZGGYaW\Gwt Cooking Instructions Cooking Utensils Recommended Use • Glass and glass...
... not use . • Styrofoam plates and cups - Use for heating or cooking. • Microwave browning dish - Remove all directions. Use for short-term heating at High power. Use only for one minute at low temperatures. Use to test. t~___z{i†{jTŽ‰U”GGwˆŽŒGXXGG{œŒš‹ˆ SGz GX]SGYWWZGGYaW\Gwt Cooking Instructions Cooking Utensils Recommended Use • Glass and glass...
Owners Manual
Page 12
... cook for a few minutes after the oven stops. Food at a low power level to complete cooking in the microwave build up internal heat and continue to distribute heat evenly. To prevent overcooking, place thin or delicate parts toward the outside of the turntable where they receive more quickly, so stir from the microwave and instruct children to do not heat the cookware, the heat is uneven in the microwave oven...
... cook for a few minutes after the oven stops. Food at a low power level to complete cooking in the microwave build up internal heat and continue to distribute heat evenly. To prevent overcooking, place thin or delicate parts toward the outside of the turntable where they receive more quickly, so stir from the microwave and instruct children to do not heat the cookware, the heat is uneven in the microwave oven...

Owners Manual
Page 13
... to 2 lbs. Cook Time/Power Level Directions Cooking Time: 8-11 min. / lb. 170° -180°F Power Level: High(Hi). Power Level: High(Hi). t~___z{i†{jTŽ‰U”GGwˆŽŒGXZGG{œŒš‹ˆ SGz GX]SGYWWZGGYaW\Gwt Cooking Instructions Cooking Guide GUIDE for Cooking Poultry in Your Microwave • Place poultry on a microwave-safe roasting rack in a microwave-safe dish. • Cover poultry with...
... to 2 lbs. Cook Time/Power Level Directions Cooking Time: 8-11 min. / lb. 170° -180°F Power Level: High(Hi). Power Level: High(Hi). t~___z{i†{jTŽ‰U”GGwˆŽŒGXZGG{œŒš‹ˆ SGz GX]SGYWWZGGYaW\Gwt Cooking Instructions Cooking Guide GUIDE for Cooking Poultry in Your Microwave • Place poultry on a microwave-safe roasting rack in a microwave-safe dish. • Cover poultry with...
Owners Manual
Page 14
...; Generally, the denser the food, the longer the standing time. (Standing time refers to the time necessary for Cooking Eggs in Your Microwave • Never cook eggs in the shell, and never warm hard-cooked eggs in a baking dish without overlapping or layering. A lighter cover of rack. Arrange steaks on the turntable before cooking is needed. Cook until fish flakes easily with wax paper. Cook until set...
...; Generally, the denser the food, the longer the standing time. (Standing time refers to the time necessary for Cooking Eggs in Your Microwave • Never cook eggs in the shell, and never warm hard-cooked eggs in a baking dish without overlapping or layering. A lighter cover of rack. Arrange steaks on the turntable before cooking is needed. Cook until fish flakes easily with wax paper. Cook until set...

Owners Manual
Page 15
...; SGz GX]SGYWWZGGYaW\Gwt Cooking Instructions Defrosting Guide • Unwrap food. Food Beef Chuck Roast up to 5 lbs Steaks up to 5 lbs Ground Beef up to 3 lbs Pork Spareribs up to 3 lbs Pork Chops up to 3 lbs Microwave Time at half time. 4-7 min / lb Place on plate or rack. 6-9 min / lb Microwave until pliable, then separate and rearrange. Turn over twice. break apart...
...; SGz GX]SGYWWZGGYaW\Gwt Cooking Instructions Defrosting Guide • Unwrap food. Food Beef Chuck Roast up to 5 lbs Steaks up to 5 lbs Ground Beef up to 3 lbs Pork Spareribs up to 3 lbs Pork Chops up to 3 lbs Microwave Time at half time. 4-7 min / lb Place on plate or rack. 6-9 min / lb Microwave until pliable, then separate and rearrange. Turn over twice. break apart...

Owners Manual
Page 16
...136;ŽŒGX]GG{œŒš‹ˆ SGz GX]SGYWWZGGYaW\Gwt Cooking Instructions Recipes Beef and Barley Stew 1½ lbs. Cover with lid. Remove bay leaf before serving. Broccoli and Cheese Casserole ¼ cup butter or margarine ...combine beef, onion, flour, and Worcestershire; Stir in peas. Cover with lid. Cover with lid. mix well. Stir in red pepper. Stir in cheese until carrots and beef are tender, stirring 2 to 50 minutes until melted. 4. beef stew cubes, cut into ½-inch pieces ½ cup chopped onion 2 Tbs. Cook at High for 45 to 3 times...
...136;ŽŒGX]GG{œŒš‹ˆ SGz GX]SGYWWZGGYaW\Gwt Cooking Instructions Recipes Beef and Barley Stew 1½ lbs. Cover with lid. Remove bay leaf before serving. Broccoli and Cheese Casserole ¼ cup butter or margarine ...combine beef, onion, flour, and Worcestershire; Stir in peas. Cover with lid. Cover with lid. mix well. Stir in red pepper. Stir in cheese until carrots and beef are tender, stirring 2 to 50 minutes until melted. 4. beef stew cubes, cut into ½-inch pieces ½ cup chopped onion 2 Tbs. Cook at High for 45 to 3 times...

Owners Manual
Page 17
... chopped green chilies 1-2 tsp. Add remaining ingredients; Reduce power to Medium and cook for 3 to 5 minutes until liquid boils and thickens slightly (1-2 min.); salt 1 tsp. drippings. 3. turn back a corner to cool slightly. 2. stir once. ...cut into ½-inch pieces ¼ cup chopped onion 2 tsp. Cover with lid. Makes 6 servings. Cook uncovered, at High until tender. 2. pepper 2½ Tbs. In a 2-quart casserole, combine potatoes and ¼ cup water. Place bacon on a paper towel. Cook at High for 10 minutes; celery seed 1/8 tsp. Drain and set aside to vent...
... chopped green chilies 1-2 tsp. Add remaining ingredients; Reduce power to Medium and cook for 3 to 5 minutes until liquid boils and thickens slightly (1-2 min.); salt 1 tsp. drippings. 3. turn back a corner to cool slightly. 2. stir once. ...cut into ½-inch pieces ¼ cup chopped onion 2 tsp. Cover with lid. Makes 6 servings. Cook uncovered, at High until tender. 2. pepper 2½ Tbs. In a 2-quart casserole, combine potatoes and ¼ cup water. Place bacon on a paper towel. Cook at High for 10 minutes; celery seed 1/8 tsp. Drain and set aside to vent...

Owners Manual
Page 18
... the door is on . • Remove the plug from breaking, handle it carefully and do not put it in use a soft cloth to clean and care for door damage. • Press Cancel twice and re-enter all cooking instructions. Dry with very mild soap and water. The oven's display works, but the power won't come on the same circuit can damage the magnetron tube or glass tray. Operating another...
... the door is on . • Remove the plug from breaking, handle it carefully and do not put it in use a soft cloth to clean and care for door damage. • Press Cancel twice and re-enter all cooking instructions. Dry with very mild soap and water. The oven's display works, but the power won't come on the same circuit can damage the magnetron tube or glass tray. Operating another...

Owners Manual
Page 19
... Quick Reference Specifications Model Number Oven Cavity Controls Timer Power Source Power Output Outside Dimensions Oven Cavity Dimensions Net/Gross Weight MW888STB 0.8 cu.ft 10 power levels, including defrost 99 minutes, 99 seconds 220 VAC, 60 Hz 800 Watts 489 cm(W) X 274.5 cm(H) X 383 cm(D) 330 cm(W) X 200.8 cm(H) X 328.5 cm(D) 12.5/14 kg Feature Set Clock One Minute+ Cooking Instant Cook Buttons Defrost Set Cooking Time and Power Levels Operation 1. Press CLOCK again. 1. Press the POWER LEVEL button. Press START to select serving size. 1. Press the button...
... Quick Reference Specifications Model Number Oven Cavity Controls Timer Power Source Power Output Outside Dimensions Oven Cavity Dimensions Net/Gross Weight MW888STB 0.8 cu.ft 10 power levels, including defrost 99 minutes, 99 seconds 220 VAC, 60 Hz 800 Watts 489 cm(W) X 274.5 cm(H) X 383 cm(D) 330 cm(W) X 200.8 cm(H) X 328.5 cm(D) 12.5/14 kg Feature Set Clock One Minute+ Cooking Instant Cook Buttons Defrost Set Cooking Time and Power Levels Operation 1. Press CLOCK again. 1. Press the POWER LEVEL button. Press START to select serving size. 1. Press the button...

Owners Manual
Page 20
Printed in Malaysia t~___z{i†{jTŽ‰U”GGwˆŽŒGYWGG{œŒš‹ˆ SGz GX]SGYWWZGGYaW\Gwt ELECTRONICS Samsung Electronics Co., Ltd.
Printed in Malaysia t~___z{i†{jTŽ‰U”GGwˆŽŒGYWGG{œŒš‹ˆ SGz GX]SGYWWZGGYaW\Gwt ELECTRONICS Samsung Electronics Co., Ltd.


