

Owners Manual
Page 1
Microwave Oven Owner's Manual MW640WA MW640BA MW650WA MW650BA One Minute + INSTANT COOKING Popcorn Pizza Defrost Beverage 1 2 3 4 5 6 7 8 9 Power Level 0 Clock Pause Cancel Start Code No. : DE68-01931A-01
Microwave Oven Owner's Manual MW640WA MW640BA MW650WA MW650BA One Minute + INSTANT COOKING Popcorn Pizza Defrost Beverage 1 2 3 4 5 6 7 8 9 Power Level 0 Clock Pause Cancel Start Code No. : DE68-01931A-01
Owners Manual
Page 2
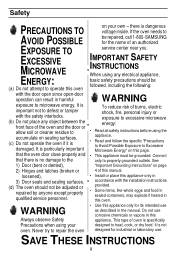
... to repair the oven • Use this appliance. Do not use corrosive chemicals or vapors in harmful exposure to microwave energy. there is specifically designed to heat, cook, or dry food. If the oven needs to be followed, including the following: WARNING To reduce risk of burns, electric shock, fire, personal injury or exposure to excessive microwave energy: • Read all safety instructions before using...
... to repair the oven • Use this appliance. Do not use corrosive chemicals or vapors in harmful exposure to microwave energy. there is specifically designed to heat, cook, or dry food. If the oven needs to be followed, including the following: WARNING To reduce risk of burns, electric shock, fire, personal injury or exposure to excessive microwave energy: • Read all safety instructions before using...
Owners Manual
Page 3
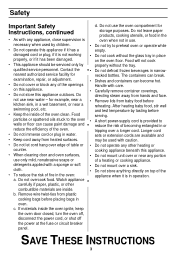
... oils stuck to the oven walls or floor can become hot. Do not leave paper products, cooking utensils, or food in the oven when not in water. • Keep cord away from heated surfaces. • Do not let cord hang over edge of table or counter. • When cleaning door and oven surfaces, use near any of the oven clean. Handle with care. • Carefully remove container coverings, directing steam away from hands...
... oils stuck to the oven walls or floor can become hot. Do not leave paper products, cooking utensils, or food in the oven when not in water. • Keep cord away from heated surfaces. • Do not let cord hang over edge of table or counter. • When cleaning door and oven surfaces, use near any of the oven clean. Handle with care. • Carefully remove container coverings, directing steam away from hands...
Owners Manual
Page 4
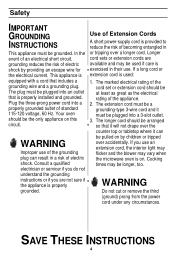
... Cords A short power-supply cord is equipped with a cord that includes a grounding wire and a grounding plug. Longer cord sets or extension cords are not sure if the appliance is properly installed and grounded. The extension cord must be a grounding-type 3-wire cord and it can result in their use an extension cord, the interior light may flicker and the blower may vary when the microwave oven is used if care...
... Cords A short power-supply cord is equipped with a cord that includes a grounding wire and a grounding plug. Longer cord sets or extension cords are not sure if the appliance is properly installed and grounded. The extension cord must be a grounding-type 3-wire cord and it can result in their use an extension cord, the interior light may flicker and the blower may vary when the microwave oven is used if care...
Owners Manual
Page 5
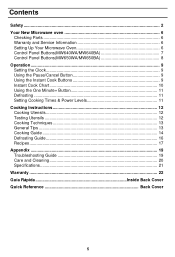
...6 Control Panel Buttons(MW640WA/MW640BA 7 Control Panel Buttons(MW650WA/MW650BA 8 Operation ...9 Setting the Clock 9 Using the Pause/Cancel Button 9 Using the Instant Cook Buttons 9 Instant Cook Chart 10 Using the One Minute+ Button 11 Defrosting ...11 Setting Cooking Times & Power Levels 11 Cooking Instructions 12 Cooking Utensils 12 Testing Utensils 12 Cooking Techniques 13 General Tips ...13 Cooking Guide 14 Defrosting Guide 16 Recipes...17 Appendix ...19 Troubleshooting Guide 19 Care and Cleaning 20 Specifications...21 Warranty ...22 Guía Rápida Inside Back Cover...
...6 Control Panel Buttons(MW640WA/MW640BA 7 Control Panel Buttons(MW650WA/MW650BA 8 Operation ...9 Setting the Clock 9 Using the Pause/Cancel Button 9 Using the Instant Cook Buttons 9 Instant Cook Chart 10 Using the One Minute+ Button 11 Defrosting ...11 Setting Cooking Times & Power Levels 11 Cooking Instructions 12 Cooking Utensils 12 Testing Utensils 12 Cooking Techniques 13 General Tips ...13 Cooking Guide 14 Defrosting Guide 16 Recipes...17 Appendix ...19 Troubleshooting Guide 19 Care and Cleaning 20 Specifications...21 Warranty ...22 Guía Rápida Inside Back Cover...
Owners Manual
Page 6
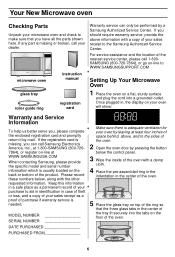
... in, the display on -line at WWW.SAMSUNGUSA.COM When contacting Samsung, please provide the specific model and serial number information which is adequate ventilation for your oven by leaving at least four inches of space behind, above information with a copy of your sales receipt to the Samsung Authorized Service Center. microwave oven glass tray roller guide ring instruction manual registration card Warranty service can call Samsung Electronics America...
... in, the display on -line at WWW.SAMSUNGUSA.COM When contacting Samsung, please provide the specific model and serial number information which is adequate ventilation for your oven by leaving at least four inches of space behind, above information with a copy of your sales receipt to the Samsung Authorized Service Center. microwave oven glass tray roller guide ring instruction manual registration card Warranty service can call Samsung Electronics America...
Owners Manual
Page 7
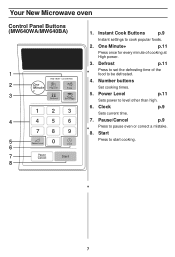
... oven or correct a mistake. 8. Pause/Cancel p.9 Press to be defrosted. 4. Number buttons Set cooking times. 5. Defrost p.11 Press to set the defrosting time of cooking at High power. 3. Power Level p.11 Sets power to cook popular foods. 2. Instant Cook Buttons p.9 Instant settings to level other than high. 6. Clock p.9 Sets current time. 7. Start Press to start cooking. 7 Your New Microwave oven Control Panel Buttons (MW640WA/MW640BA) 1 INSTANT COOKING 2 One Minute Popcorn Pizza + 3 Defrost Beverage 123 4 456 78 9 5 Power Level 0 Clock...
... oven or correct a mistake. 8. Pause/Cancel p.9 Press to be defrosted. 4. Number buttons Set cooking times. 5. Defrost p.11 Press to set the defrosting time of cooking at High power. 3. Power Level p.11 Sets power to cook popular foods. 2. Instant Cook Buttons p.9 Instant settings to level other than high. 6. Clock p.9 Sets current time. 7. Start Press to start cooking. 7 Your New Microwave oven Control Panel Buttons (MW640WA/MW640BA) 1 INSTANT COOKING 2 One Minute Popcorn Pizza + 3 Defrost Beverage 123 4 456 78 9 5 Power Level 0 Clock...
Owners Manual
Page 8
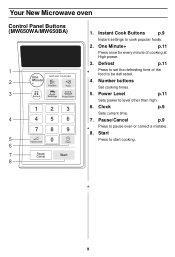
... buttons Set cooking times. 5. Power Level p.11 Sets power to pause oven or correct a mistake. 8. Clock p.9 Sets current time. 7. Pause/Cancel p.9 Press to level other than high. 6. Your New Microwave oven Control Panel Buttons (MW650WA/MW650BA) 1 One INSTANT COOKING 2 Minute + Popcorn Pizza 3 Defrost Beverage Frozen Dinner 123 4 456 78 9 5 Power Level 0 Clock 6 7 Pause Cancel Start 8 1. Start Press to be defrosted. 4. One Minute+ p.11 Press once for every minute of the food to start cooking. 8 Defrost p.11 Press to set the defrosting...
... buttons Set cooking times. 5. Power Level p.11 Sets power to pause oven or correct a mistake. 8. Clock p.9 Sets current time. 7. Pause/Cancel p.9 Press to level other than high. 6. Your New Microwave oven Control Panel Buttons (MW650WA/MW650BA) 1 One INSTANT COOKING 2 Minute + Popcorn Pizza 3 Defrost Beverage Frozen Dinner 123 4 456 78 9 5 Power Level 0 Clock 6 7 Pause Cancel Start 8 1. Start Press to be defrosted. 4. One Minute+ p.11 Press once for every minute of the food to start cooking. 8 Defrost p.11 Press to set the defrosting...
Owners Manual
Page 9
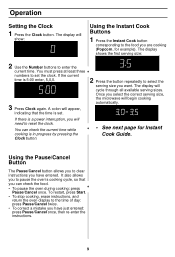
... time is a power interruption, you can check the current time while cooking is 5:00 enter, 5,0,0. 3 Press Clock again. A colon will show: Using the Instant Cook Buttons 1 Press the Instant Cook button corresponding to set . The display will need to clear instructions you are cooking (Popcorn, for Instant Cook Guide. Using the Pause/Cancel Button The Pause/Cancel button allows you to reset the clock. To restart, press Start. • To stop cooking, erase instructions, and return the oven display...
... time is a power interruption, you can check the current time while cooking is 5:00 enter, 5,0,0. 3 Press Clock again. A colon will show: Using the Instant Cook Buttons 1 Press the Instant Cook button corresponding to set . The display will need to clear instructions you are cooking (Popcorn, for Instant Cook Guide. Using the Pause/Cancel Button The Pause/Cancel button allows you to reset the clock. To restart, press Start. • To stop cooking, erase instructions, and return the oven display...

Owners Manual
Page 10
..., open the door and reposition the bag, close the door and press start. • Remove package from getting stuck in the oven, fold each end of the bag up one inch ( ) before placing the bag in the oven. • After heating, stir well. Note The cooking time of 3.0 oz. microwave-popcorn depends on a microwave-safe plate with wide end of slice towards the outside edge...
..., open the door and reposition the bag, close the door and press start. • Remove package from getting stuck in the oven, fold each end of the bag up one inch ( ) before placing the bag in the oven. • After heating, stir well. Note The cooking time of 3.0 oz. microwave-popcorn depends on a microwave-safe plate with wide end of slice towards the outside edge...

Owners Manual
Page 11
... food. Add minutes to a program in progress by pressing the One Minute+ button for the Defrosting Guide. Setting Cooking Times & Power Levels The power level lets you want to set for two minutes. If you press Start, and re-enter all of the instructions. 3 Press the Start button to something other than High, press the Power Level button repeatedly. The display shows " PL:30". You can check the Power Level while cooking is automatically set...
... food. Add minutes to a program in progress by pressing the One Minute+ button for the Defrosting Guide. Setting Cooking Times & Power Levels The power level lets you want to set for two minutes. If you press Start, and re-enter all of the instructions. 3 Press the Start button to something other than High, press the Power Level button repeatedly. The display shows " PL:30". You can check the Power Level while cooking is automatically set...

Owners Manual
Page 12
... opening for heating or cooking. • Microwave browning dish - Testing Utensils If you are labeled "Microwave Safe." Follow the directions provided with your oven. Check the food in a microwave, and can melt and leave an unhealthy residue on the food. • Wax paper - Use these if they absorb excess moisture and prevent spattering. Limited Use • Aluminum foil - Cooking Instructions Cooking Utensils Recommended Use • Glass and glass...
... opening for heating or cooking. • Microwave browning dish - Testing Utensils If you are labeled "Microwave Safe." Follow the directions provided with your oven. Check the food in a microwave, and can melt and leave an unhealthy residue on the food. • Wax paper - Use these if they absorb excess moisture and prevent spattering. Limited Use • Aluminum foil - Cooking Instructions Cooking Utensils Recommended Use • Glass and glass...

Owners Manual
Page 13
... absorbs more energy and heats more microwave energy. Food at a low power level to the cookware. The oven will be heated at the outside to help it cook. Shielding Shield food with a delicate texture should be covered or allowed to cook for a few minutes after the oven stops. Turning Turn foods over and cause severe burns. • Some ingredients heat faster than the dough. Roasts need shielding include poultry...
... absorbs more energy and heats more microwave energy. Food at a low power level to the cookware. The oven will be heated at the outside to help it cook. Shielding Shield food with a delicate texture should be covered or allowed to cook for a few minutes after the oven stops. Turning Turn foods over and cause severe burns. • Some ingredients heat faster than the dough. Roasts need shielding include poultry...

Owners Manual
Page 14
... following temperatures are removal temperatures. Power Level: High(Hi). Food Cook Time/Power Level Directions Whole Cooking Time: Place chicken breast-side down on roasting rack. meat near the bone is no longer pink. The temperature of the food will rise during the standing time. Cook Time/Power Level Cooking Time: 7-10 min. / lb. for 115° F - Well Done Directions Place roast fat-side down on roasting rack. Cover with vented plastic wrap. for...
... following temperatures are removal temperatures. Power Level: High(Hi). Food Cook Time/Power Level Directions Whole Cooking Time: Place chicken breast-side down on roasting rack. meat near the bone is no longer pink. The temperature of the food will rise during the standing time. Cook Time/Power Level Cooking Time: 7-10 min. / lb. for 115° F - Well Done Directions Place roast fat-side down on roasting rack. Cover with vented plastic wrap. for...
Owners Manual
Page 15
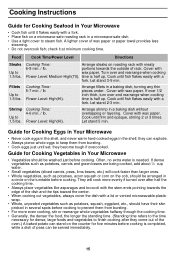
... cooking time. • Generally, the denser the food, the longer the standing time. (Standing time refers to the time necessary for Cooking Eggs in Your Microwave • Never cook eggs in the shell, and never warm hard-cooked eggs in a microwave-safe dish. • Use a tight cover to 1.5 lbs. check it flakes easily with a fork. • Place fish on a microwave-safe roasting rack in the shell; Food Cook Time/Power Level Directions...
... cooking time. • Generally, the denser the food, the longer the standing time. (Standing time refers to the time necessary for Cooking Eggs in Your Microwave • Never cook eggs in the shell, and never warm hard-cooked eggs in a microwave-safe dish. • Use a tight cover to 1.5 lbs. check it flakes easily with a fork. • Place fish on a microwave-safe roasting rack in the shell; Food Cook Time/Power Level Directions...

Owners Manual
Page 16
... on plate or rack. Microwave until pliable, then break apart and remove defrosted portions at half time. 16 Turn over twice. Microwave Time: 6-8 min / lb Let Stand: 5-10 min. Place on plate or rack. Microwave Time: 9-11 min / lb Let Stand: 5-10 min. Microwave until a wooden pick can be easily inserted in center, break apart and rearrange at half time. Place on plate or rack. Cooking Instructions Defrosting Guide • Unwrap food. Microwave...
... on plate or rack. Microwave until pliable, then break apart and remove defrosted portions at half time. 16 Turn over twice. Microwave Time: 6-8 min / lb Let Stand: 5-10 min. Place on plate or rack. Microwave Time: 9-11 min / lb Let Stand: 5-10 min. Microwave until a wooden pick can be easily inserted in center, break apart and rearrange at half time. Place on plate or rack. Cooking Instructions Defrosting Guide • Unwrap food. Microwave...
Owners Manual
Page 19
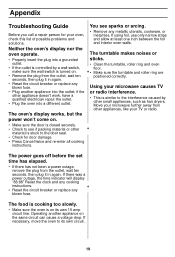
... using foil, use only narrow strips and allow at least one inch between the foil and interior oven walls. Neither the oven's display nor the oven operate. • Properly insert the plug into a different outlet. If there was a power outage, the time indicator will display "88:88" Reset the clock and any cooking instructions. • Reset the circuit breaker or replace any blown fuse. Appendix Troubleshooting Guide Before you call a repair person for door...
... using foil, use only narrow strips and allow at least one inch between the foil and interior oven walls. Neither the oven's display nor the oven operate. • Properly insert the plug into a different outlet. If there was a power outage, the time indicator will display "88:88" Reset the clock and any cooking instructions. • Reset the circuit breaker or replace any blown fuse. Appendix Troubleshooting Guide Before you call a repair person for door...
Owners Manual
Page 20
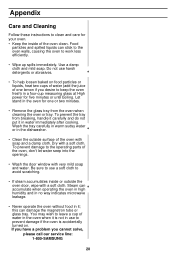
...; Clean the outside the oven door, wipe with a soft cloth. Do not use to prevent damage if the oven is accidentally turned on food particles or liquids, heat two cups of water (add the juice of one or two minutes. • Remove the glass tray from breaking, handle it carefully and do not put it ; this can stick to the oven walls, causing the oven to work less...
...; Clean the outside the oven door, wipe with a soft cloth. Do not use to prevent damage if the oven is accidentally turned on food particles or liquids, heat two cups of water (add the juice of one or two minutes. • Remove the glass tray from breaking, handle it carefully and do not put it ; this can stick to the oven walls, causing the oven to work less...
Owners Manual
Page 22
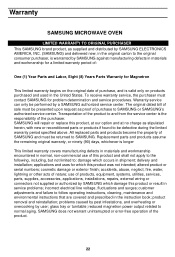
... systems, utilities, services, parts, supplies, accessories, applications, installations, repairs, external wiring or connectors not supplied or authorized by a SAMSUNG authorized service center. customer adjustments and failure to follow operating instructions, cleaning, maintenance and environmental instructions that are covered and prescribed in shipment; incorrect electrical line voltage, fluctuations and surges; All replaced parts and products become the property of nature; Warranty SAMSUNG MICROWAVE OVEN LLIIMMIITTEEDDWWAARRRRAANNTTYYTTOOOORRIIGGIINNAALLPPUURRCCHHAASSEERR This...
... systems, utilities, services, parts, supplies, accessories, applications, installations, repairs, external wiring or connectors not supplied or authorized by a SAMSUNG authorized service center. customer adjustments and failure to follow operating instructions, cleaning, maintenance and environmental instructions that are covered and prescribed in shipment; incorrect electrical line voltage, fluctuations and surges; All replaced parts and products become the property of nature; Warranty SAMSUNG MICROWAVE OVEN LLIIMMIITTEEDDWWAARRRRAANNTTYYTTOOOORRIIGGIINNAALLPPUURRCCHHAASSEERR This...

Owners Manual
Page 28
... SAMSUNG ELECTRONICS AMERICA, INC. April. 2002 Printed in Malaysia If you are cooking (for each minute of cooking. 2. Use the Number buttons to the food you want to set cooking time. 3. The time will display and the oven will start. 1. Press the buttons(0-9) sequentially to select serving size. 1. Press the button repeatedly to enter the desired defrosting time. 3. Press START to something other than High, press the POWER LEVEL button repeatedly. 2. Quick Reference Feature Operation Set Clock...
... SAMSUNG ELECTRONICS AMERICA, INC. April. 2002 Printed in Malaysia If you are cooking (for each minute of cooking. 2. Use the Number buttons to the food you want to set cooking time. 3. The time will display and the oven will start. 1. Press the buttons(0-9) sequentially to select serving size. 1. Press the button repeatedly to enter the desired defrosting time. 3. Press START to something other than High, press the POWER LEVEL button repeatedly. 2. Quick Reference Feature Operation Set Clock...


