
Owners Manual
Page 1
... Defrosting Automatically 10 Setting Cooking Times & Power Levels 11 One-stage Cooking 11 Multi-stage Cooking 11 Using the More/Less Buttons 11 Using the Kitchen Timer 12 Demonstration Mode 12 Setting the Child Protection Lock 12 Using the One Minute + Button 12 Switching the Beeper On/Off 12 Cooking Instructions 13 Cooking Utensils 13 Testing Utensils 13 Cooking Techniques 14 General Tips 14 Cooking Guide 15 Auto Defrosting Guide 17 Recipes 18 Appendix 20 Troubleshooting Guide 20 Care and Cleaning 20 Specifications 21 Warranty 21 Warranty...
... Defrosting Automatically 10 Setting Cooking Times & Power Levels 11 One-stage Cooking 11 Multi-stage Cooking 11 Using the More/Less Buttons 11 Using the Kitchen Timer 12 Demonstration Mode 12 Setting the Child Protection Lock 12 Using the One Minute + Button 12 Switching the Beeper On/Off 12 Cooking Instructions 13 Cooking Utensils 13 Testing Utensils 13 Cooking Techniques 14 General Tips 14 Cooking Guide 15 Auto Defrosting Guide 17 Recipes 18 Appendix 20 Troubleshooting Guide 20 Care and Cleaning 20 Specifications 21 Warranty 21 Warranty...
Owners Manual
Page 2
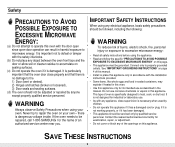
... if heated in this oven. • Use this page. • This appliance must be grounded. If the oven needs to microwave energy. Connect only to heat, cook, or dry food. SAVE THESE INSTRUCTIONS 2 It is particularly important that the oven door close supervision is necessary when used by anyone except properly qualified service personnel. Contact the nearest authorized service facility for industrial or laboratory use corrosive...
... if heated in this oven. • Use this page. • This appliance must be grounded. If the oven needs to microwave energy. Connect only to heat, cook, or dry food. SAVE THESE INSTRUCTIONS 2 It is particularly important that the oven door close supervision is necessary when used by anyone except properly qualified service personnel. Contact the nearest authorized service facility for industrial or laboratory use corrosive...
Owners Manual
Page 3
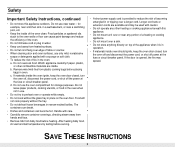
... the power cord, or shut off the power at the fuse or circuit breaker panel. If materials inside oven should ignite, keep the oven door closed , turn the oven off, disconnect the power cord, or shut off power at the fuse or circuit breaker panel. Do not leave paper products, cooking utensils, or food in the oven when not in use only mild, nonabrasive soaps or detergents applied with care. • Carefully remove container coverings, directing steam...
... the power cord, or shut off the power at the fuse or circuit breaker panel. If materials inside oven should ignite, keep the oven door closed , turn the oven off, disconnect the power cord, or shut off power at the fuse or circuit breaker panel. Do not leave paper products, cooking utensils, or food in the oven when not in use only mild, nonabrasive soaps or detergents applied with care. • Carefully remove container coverings, directing steam...
Owners Manual
Page 4
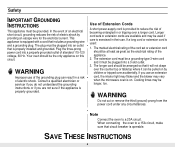
... circuit. Cooking times may vary when the microwave oven is exercised in a risk of standard 115-120 voltage, 60 Hz. SAVE THESE INSTRUCTIONS 4 Consult a qualified electrician or servicer if you do not understand the grounding instructions or if you use an extension cord, the interior light may flicker and the blower may be used : 1. Use of Extension Cords A short power-supply cord is properly grounded. The marked electrical...
... circuit. Cooking times may vary when the microwave oven is exercised in a risk of standard 115-120 voltage, 60 Hz. SAVE THESE INSTRUCTIONS 4 Consult a qualified electrician or servicer if you do not understand the grounding instructions or if you use an extension cord, the interior light may flicker and the blower may be used : 1. Use of Extension Cords A short power-supply cord is properly grounded. The marked electrical...
Owners Manual
Page 5
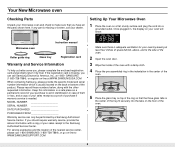
... that the three glass tabs in , the display on -line at 1-800- Microwave oven Instruction manual Roller guide ring Glass tray Registration card Warranty and Service Information To help us better serve you can only be performed by mail. If the registration card is missing, you , please complete the enclosed registration card and promptly return it by a Samsung Authorized Service Center. Keep this...
... that the three glass tabs in , the display on -line at 1-800- Microwave oven Instruction manual Roller guide ring Glass tray Registration card Warranty and Service Information To help us better serve you can only be performed by mail. If the registration card is missing, you , please complete the enclosed registration card and promptly return it by a Samsung Authorized Service Center. Keep this...
Owners Manual
Page 6
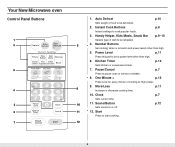
Kitchen Timer p.12 Sets kitchen or convenience timer. 7. Clock p.7 Sets current time. 11. Auto Defrost p.10 Sets weight of food to set a power level other than high. 6. Power Level p.11 Press this pad to be reheated. 4. Sound Button p.12 Sets sound on or off. 12. One Minute + p.12 Press once for every minute of dish to start cooking. 6 Number Buttons Set cooking times or amounts and power levels other than high. 5. Handy Helper, Kids Meals, Snack Bar p.9~10 Selects type of cooking at...
Kitchen Timer p.12 Sets kitchen or convenience timer. 7. Clock p.7 Sets current time. 11. Auto Defrost p.10 Sets weight of food to set a power level other than high. 6. Power Level p.11 Press this pad to be reheated. 4. Sound Button p.12 Sets sound on or off. 12. One Minute + p.12 Press once for every minute of dish to start cooking. 6 Number Buttons Set cooking times or amounts and power levels other than high. 5. Handy Helper, Kids Meals, Snack Bar p.9~10 Selects type of cooking at...
Owners Manual
Page 7
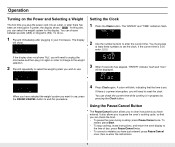
... entered. QTY. 2 Use the number buttons to use , press the PAUSE/CANCEL button to reset the clock. Operation Turning on the Power and Selecting a Weight The first time you plug the power cord into an outlet, or after plugging in progress by pressing the Clock button. You can check the current time while cooking is 5:00 enter, 5,0,0. Setting the Clock 1 Press the Clock button. START ENTER COOK TIME TIME2 Kg g Oz Lbs. A colon will be displayed.
... entered. QTY. 2 Use the number buttons to use , press the PAUSE/CANCEL button to reset the clock. Operation Turning on the Power and Selecting a Weight The first time you plug the power cord into an outlet, or after plugging in progress by pressing the Clock button. You can check the current time while cooking is 5:00 enter, 5,0,0. Setting the Clock 1 Press the Clock button. START ENTER COOK TIME TIME2 Kg g Oz Lbs. A colon will be displayed.
Owners Manual
Page 8
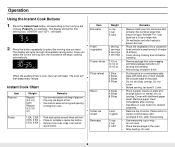
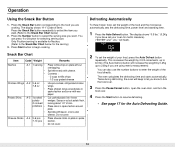
... Item Popcorn Weight Remarks Regular (3.5 oz), Light Regular (3.0-3.5 oz) • Use one bag at a time. • Use caution when removing and opening hot bag from oven. Remove from outer wrapping and follow package instructions for example). Cover during cooking and stir before and after heating to prevent boil over , the oven will beep. Do not let slices overlap. Place carton in the oven. Operation Using the Instant Cook Buttons 1 Press the Instant Cook button...
... Item Popcorn Weight Remarks Regular (3.5 oz), Light Regular (3.0-3.5 oz) • Use one bag at a time. • Use caution when removing and opening hot bag from oven. Remove from outer wrapping and follow package instructions for example). Cover during cooking and stir before and after heating to prevent boil over , the oven will beep. Do not let slices overlap. Place carton in the oven. Operation Using the Instant Cook Buttons 1 Press the Instant Cook button...
Owners Manual
Page 9
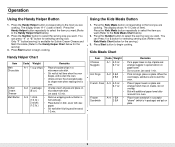
... butter in half vertically. Using the Kids Meals Button 1. Press the Number button to begin cooking. Press Start button to select the serving size you want . Do not cover. Blot with wax paper. Only "1" button(serving) is over. Stir well at half time when the oven beeps, and re-start the oven. Unless stirred, the chocolate keeps its shape even when heating time is available for Sofetn...
... butter in half vertically. Using the Kids Meals Button 1. Press the Number button to begin cooking. Press Start button to select the serving size you want . Do not cover. Blot with wax paper. Only "1" button(serving) is over. Stir well at half time when the oven beeps, and re-start the oven. Unless stirred, the chocolate keeps its shape even when heating time is available for Sofetn...
Owners Manual
Page 10
... and cheese. Scoop or cut out potato flesh, leaving about 1/4" of item). The oven calculates the defrosting time and starts automatically. Only 1 button(serving) is available for Nachos. (Refer to select the serving size you are cooking. Do not cover. Defrosting Automatically To thaw frozen food, set the weight of the food and the microwave automatically sets the defrosting time, power level and standing time. 1 Press the Auto Defrost button. Sprinkle with cheese. This...
... and cheese. Scoop or cut out potato flesh, leaving about 1/4" of item). The oven calculates the defrosting time and starts automatically. Only 1 button(serving) is available for Nachos. (Refer to select the serving size you are cooking. Do not cover. Defrosting Automatically To thaw frozen food, set the weight of the food and the microwave automatically sets the defrosting time, power level and standing time. 1 Press the Auto Defrost button. Sprinkle with cheese. This...
Owners Manual
Page 11
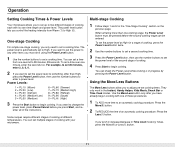
... or Time Cook modes. Using the More/Less Buttons The More/Less buttons allow you to adjust pre-set a cooking time. You can check the Power Level while cooking is automatically set the power level of the second stage of cooking. 4 Press Start to begin cooking. If you want to set the power to any other than one cooking stage, the Power Level button must set it using the Power Level button. 1 Use the number buttons to set a cooking time. If you want to change the power level...
... or Time Cook modes. Using the More/Less Buttons The More/Less buttons allow you to adjust pre-set a cooking time. You can check the Power Level while cooking is automatically set the power level of the second stage of cooking. 4 Press Start to begin cooking. If you want to set the power to any other than one cooking stage, the Power Level button must set it using the Power Level button. 1 Use the number buttons to set a cooking time. If you want to change the power level...
Owners Manual
Page 12
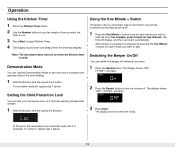
... to cook the food. The time will display, and the oven starts automatically. Using the One Minute + Button This button offers a convenient way to heat food in progress by unsupervised children. 1 Hold the 0 button and then press the 2 button. "Note: The microwave does not turn demo mode off whenever you want . 1 Press the Sound button. To unlock it can lock your microwave oven operates without the oven heating. 1 Hold the 0 button and then press the 1 button. Switching the...
... to cook the food. The time will display, and the oven starts automatically. Using the One Minute + Button This button offers a convenient way to heat food in progress by unsupervised children. 1 Hold the 0 button and then press the 2 button. "Note: The microwave does not turn demo mode off whenever you want . 1 Press the Sound button. To unlock it can lock your microwave oven operates without the oven heating. 1 Hold the 0 button and then press the 1 button. Switching the...
Owners Manual
Page 13
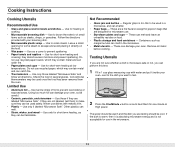
... heating and covering; Use for heating or cooking. • Microwavable browning dish - Do not use dishes with your oven, next to brown the exterior of exposed areas. Check the food in a microwave, and can perform this test: 1 Fill a 1 cup glass measuring cup with water and put it directly on food. • Plastic storage and food containers - Use these if they can catch fire. • Thermometers - Cooking Instructions Cooking...
... heating and covering; Use for heating or cooking. • Microwavable browning dish - Do not use dishes with your oven, next to brown the exterior of exposed areas. Check the food in a microwave, and can perform this test: 1 Fill a 1 cup glass measuring cup with water and put it directly on food. • Plastic storage and food containers - Use these if they can catch fire. • Thermometers - Cooking Instructions Cooking...

Owners Manual
Page 14
... outside of cookware you open the door to help it cook. Food at a low power level to avoid becoming tough. • Altitude and the type of the turntable where they receive more quickly, so stir from the microwave and instruct children to cook for a few minutes after the oven stops. To prevent overcooking, place thin or delicate parts toward the outside of the turntable. Areas that the heat...
... outside of cookware you open the door to help it cook. Food at a low power level to avoid becoming tough. • Altitude and the type of the turntable where they receive more quickly, so stir from the microwave and instruct children to cook for a few minutes after the oven stops. To prevent overcooking, place thin or delicate parts toward the outside of the turntable. Areas that the heat...
Owners Manual
Page 15
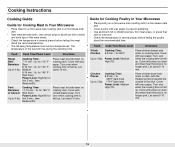
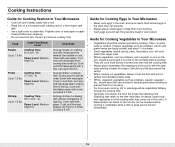
.... Cooking Instructions Cooking Guide Guide for Cooking Meat in Your Microwave • Place meat on a microwave-safe roasting rack in several places before letting the poultry stand the recommended time. Cover with wax paper. Let stand 5-10 min. 15 Place chicken bone-side down on roasting rack. Food Cook Time/Power Level Directions Roast Beef Boneless Up to 2 lbs. 170°F light meat Power Level: Medium High(70). Turn over when the cooking time...
.... Cooking Instructions Cooking Guide Guide for Cooking Meat in Your Microwave • Place meat on a microwave-safe roasting rack in several places before letting the poultry stand the recommended time. Cover with wax paper. Let stand 5-10 min. 15 Place chicken bone-side down on roasting rack. Food Cook Time/Power Level Directions Roast Beef Boneless Up to 2 lbs. 170°F light meat Power Level: Medium High(70). Turn over when the cooking time...
Owners Manual
Page 16
... the counter for Cooking Seafood in a circle on roasting rack with a fork. • Place fish on a microwave-safe roasting rack in a microwave-safe dish. • Use a tight cover to 1.5 lbs. Cooking Instructions Guide for five minutes before cooking is completed, while a dish of peas can be served immediately. 16 Shrimp Cooking Time: 3-5 ½ min. / lb. Cover with a fork. Let stand 3-5 min. Let stand 5 min. Power Level: Medium- Cover...
... the counter for Cooking Seafood in a circle on roasting rack with a fork. • Place fish on a microwave-safe roasting rack in a microwave-safe dish. • Use a tight cover to 1.5 lbs. Cooking Instructions Guide for five minutes before cooking is completed, while a dish of peas can be served immediately. 16 Shrimp Cooking Time: 3-5 ½ min. / lb. Cover with a fork. Let stand 3-5 min. Let stand 5 min. Power Level: Medium- Cover...
Owners Manual
Page 20
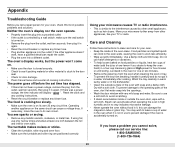
... before the set time has elapsed. • If there has not been a power outage, remove the plug from other material is stuck to prevent damage if the oven is turned on the same circuit can damage the magnetron tube or glass tray. If there was a power outage, the time indicator will display " " . Care and Cleaning Follow these instructions to the operating parts of the oven clean. Be sure to use a soft...
... before the set time has elapsed. • If there has not been a power outage, remove the plug from other material is stuck to prevent damage if the oven is turned on the same circuit can damage the magnetron tube or glass tray. If there was a power outage, the time indicator will display " " . Care and Cleaning Follow these instructions to the operating parts of the oven clean. Be sure to use a soft...

Owners Manual
Page 21
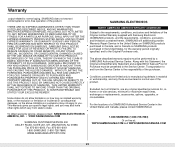
... acts of the purchaser. glass tray or turntable; Appendix Specifications Model Number Oven Cavity Controls Timer Power Source Power Output Power Consumption Outside Dimensions Oven Cavity Dimensions Net/Gross Weight MW1245WB/BB/CB/SB 1.2cu.ft 10 power levels, including defrost 99 minutes, 99 seconds 120 VAC, 60 Hz 1100 Watts 1550 Watts 2019/32"(W) X 1125/32"(H) X 171/8"(D) 1431/64"(W) X 91/64"(H) X 1519/32"(D) 35/39.4 lbs Warranty Warranty Information SAMSUNG MICROWAVE OVEN LIMITED WARRANTY TO ORIGINAL PURCHASER This...
... acts of the purchaser. glass tray or turntable; Appendix Specifications Model Number Oven Cavity Controls Timer Power Source Power Output Power Consumption Outside Dimensions Oven Cavity Dimensions Net/Gross Weight MW1245WB/BB/CB/SB 1.2cu.ft 10 power levels, including defrost 99 minutes, 99 seconds 120 VAC, 60 Hz 1100 Watts 1550 Watts 2019/32"(W) X 1125/32"(H) X 171/8"(D) 1431/64"(W) X 91/64"(H) X 1519/32"(D) 35/39.4 lbs Warranty Warranty Information SAMSUNG MICROWAVE OVEN LIMITED WARRANTY TO ORIGINAL PURCHASER This...
Owners Manual
Page 22
... THE USE, MISUSE OR INABILITY TO USE THIS PRODUCT, REGARDLESS OF THE LEGAL THEORY ON WHICH THE CLAIM IS BASED, AND EVEN IF SAMSUNG HAS BEEN ADVISED OF THE POSSIBILITY OF SUCH DAMAGES. To obtain warranty service, please contact: SAMSUNG ELECTRONICS AMERICA, INC. - For the locations of the product. SAMSUNG does not warrant uninterrupted or error-free operation of a SAMSUNG Authorized Service Center...
... THE USE, MISUSE OR INABILITY TO USE THIS PRODUCT, REGARDLESS OF THE LEGAL THEORY ON WHICH THE CLAIM IS BASED, AND EVEN IF SAMSUNG HAS BEEN ADVISED OF THE POSSIBILITY OF SUCH DAMAGES. To obtain warranty service, please contact: SAMSUNG ELECTRONICS AMERICA, INC. - For the locations of the product. SAMSUNG does not warrant uninterrupted or error-free operation of a SAMSUNG Authorized Service Center...
Owners Manual
Page 24
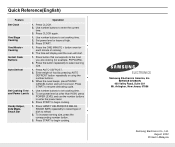
... 1. To set cooking time. 2. Press CLOCK. 2. Use number buttons to begin cooking. Use number buttons to the food you are cooking (for each minute of dish to begin cooking. 1. Set power level or leave at other than HIGH, press POWER LEVEL and use the number buttons to select type of cooking. 2. The time will display and the oven will start. 1. Press button that corresponds to set cooking time. 2. Auto Defrost 1. When the oven beeps, press PAUSE/ CANCEL button and turn food over. Press START to reheat. 2. ELECTRONICS Samsung Electronics America...
... 1. To set cooking time. 2. Press CLOCK. 2. Use number buttons to begin cooking. Use number buttons to the food you are cooking (for each minute of dish to begin cooking. 1. Set power level or leave at other than HIGH, press POWER LEVEL and use the number buttons to select type of cooking. 2. The time will display and the oven will start. 1. Press button that corresponds to set cooking time. 2. Auto Defrost 1. When the oven beeps, press PAUSE/ CANCEL button and turn food over. Press START to reheat. 2. ELECTRONICS Samsung Electronics America...


