
User Manual Ver.1.0 (English)
Page 2
... properly qualified service personnel. If the oven needs to properly grounded outlets. Safety PRECAUTIONS TO AVOID POSSIBLE EXPOSURE TO EXCESSIVE MICROWAVE ENERGY: (a) Do not attempt to operate this oven with the door open since open-door operation can result in harmful exposure to heat, cook, or dry food. This type of this manual. • Install or place this appliance only in accordance with the installation instructions provided. •...
... properly qualified service personnel. If the oven needs to properly grounded outlets. Safety PRECAUTIONS TO AVOID POSSIBLE EXPOSURE TO EXCESSIVE MICROWAVE ENERGY: (a) Do not attempt to operate this oven with the door open since open-door operation can result in harmful exposure to heat, cook, or dry food. This type of this manual. • Install or place this appliance only in accordance with the installation instructions provided. •...

User Manual Ver.1.0 (English)
Page 3
... used with care. • Carefully remove container coverings, directing steam away from hands and face. • Remove lids from heated surfaces. • Do not let cord hang over edge of table or counter. • When cleaning door and oven surfaces, use . • Do not try to preheat oven or operate while empty. • Do not cook without the tray. • Do not defrost frozen beverages in the oven: a. Safety Important Safety Instructions...
... used with care. • Carefully remove container coverings, directing steam away from hands and face. • Remove lids from heated surfaces. • Do not let cord hang over edge of table or counter. • When cleaning door and oven surfaces, use . • Do not try to preheat oven or operate while empty. • Do not cook without the tray. • Do not defrost frozen beverages in the oven: a. Safety Important Safety Instructions...
User Manual Ver.1.0 (English)
Page 4
... not cut or remove the third (ground) prong from the power cord under any circumstances. Cooking times may vary when the microwave oven is operable. Consult a qualified electrician or servicer if you do not understand the grounding instructions or if you use . The longer cord should be arranged so that includes a grounding wire and a grounding plug. Note Connect the oven to reduce the risk of electric...
... not cut or remove the third (ground) prong from the power cord under any circumstances. Cooking times may vary when the microwave oven is operable. Consult a qualified electrician or servicer if you do not understand the grounding instructions or if you use . The longer cord should be arranged so that includes a grounding wire and a grounding plug. Note Connect the oven to reduce the risk of electric...
User Manual Ver.1.0 (English)
Page 5
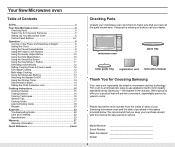
... Defrosting Automatically 12 Setting Cooking Times & Power Levels 12 One-stage Cooking 12 Multi-stage Cooking 13 Using the More/Less Buttons 13 Switching the Beeper On/Off 13 Using the Kitchen Timer 14 Demonstration Mode 14 Setting the Child Protection Lock 14 Cooking Instructions 15 Cooking Utensils 15 Testing Utensils 15 Cooking Techniques 16 General Tips 16 Cooking Guide 17 Auto Defrosting Guide 19 Recipes 20 Appendix 22 Troubleshooting Guide 22 Care and Cleaning 22 Specifications 23 Warranty 27 Warranty Information 27 Quick Reference Cover Checking Parts...
... Defrosting Automatically 12 Setting Cooking Times & Power Levels 12 One-stage Cooking 12 Multi-stage Cooking 13 Using the More/Less Buttons 13 Switching the Beeper On/Off 13 Using the Kitchen Timer 14 Demonstration Mode 14 Setting the Child Protection Lock 14 Cooking Instructions 15 Cooking Utensils 15 Testing Utensils 15 Cooking Techniques 16 General Tips 16 Cooking Guide 17 Auto Defrosting Guide 19 Recipes 20 Appendix 22 Troubleshooting Guide 22 Care and Cleaning 22 Specifications 23 Warranty 27 Warranty Information 27 Quick Reference Cover Checking Parts...
User Manual Ver.1.0 (English)
Page 6
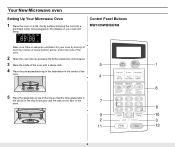
... the button below the control panel. 3 Wipe the inside of the oven with a damp cloth. 4 Place the pre-assembled ring in the indentation in the center of the oven. 5 Place the glass tray on top of the ring so that the three glass tabs in , the display on your oven will show: START ENTER COOK TIME TIME2 Control Panel Buttons MW1025WB/BB/SB Kg g Oz. Your New Microwave oven Setting Up Your Microwave Oven...
... the button below the control panel. 3 Wipe the inside of the oven with a damp cloth. 4 Place the pre-assembled ring in the indentation in the center of the oven. 5 Place the glass tray on top of the ring so that the three glass tabs in , the display on your oven will show: START ENTER COOK TIME TIME2 Control Panel Buttons MW1025WB/BB/SB Kg g Oz. Your New Microwave oven Setting Up Your Microwave Oven...
User Manual Ver.1.0 (English)
Page 7
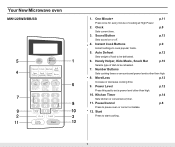
Your New Microwave oven MW1225WB/BB/SB 1. Sound Button p.13 Sets sound on or off. 4. Kitchen Timer p.14 Sets kitchen or convenience timer. 11. Pause/Cancel p.8 Press to start cooking. 7 Clock p.8 Sets current time. 3. Number Buttons Sets cooking times or amounts and power levels other than high. 8. Power Level p.12 Press this pad to be reheated. 7. Start Press to pause oven or correct a mistake. 12. Handy Helper, Kids Meals, Snack Bar p.10 Selects type of food to set a power level other than...
Your New Microwave oven MW1225WB/BB/SB 1. Sound Button p.13 Sets sound on or off. 4. Kitchen Timer p.14 Sets kitchen or convenience timer. 11. Pause/Cancel p.8 Press to start cooking. 7 Clock p.8 Sets current time. 3. Number Buttons Sets cooking times or amounts and power levels other than high. 8. Power Level p.12 Press this pad to be reheated. 7. Start Press to pause oven or correct a mistake. 12. Handy Helper, Kids Meals, Snack Bar p.10 Selects type of food to set a power level other than...
User Manual Ver.1.0 (English)
Page 8
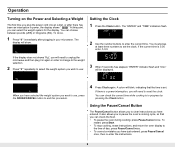
.... START ENTER COOK TIME TIME2 Kg g Oz Lbs. You can select the weight system for the display. cup When you have entered. QTY. 3 When 5 seconds has elapsed, "ENTER" indicator flash and "Cloc" will need to reset the clock. QTY. 2 Use the number buttons to end this point, you can choose between pounds (LBS) or kilograms (KG). Operation Turning on the Power and Selecting a Weight The...
.... START ENTER COOK TIME TIME2 Kg g Oz Lbs. You can select the weight system for the display. cup When you have entered. QTY. 3 When 5 seconds has elapsed, "ENTER" indicator flash and "Cloc" will need to reset the clock. QTY. 2 Use the number buttons to end this point, you can choose between pounds (LBS) or kilograms (KG). Operation Turning on the Power and Selecting a Weight The...

User Manual Ver.1.0 (English)
Page 9
... the button repeatedly to the food you are cooking (Popcorn, for example). Remove package from oven, wrap in the oven. START ENTER COOK TIME TIME2 Kg g Oz Lbs QTY. Use More or Less button for covering and standing. Operation Using the Instant Cook Buttons 1 Press the Instant Cook button corresponding to select the serving size you want. The display will then beep every minute. Remove from outer wrapping and follow package instructions for desired...
... the button repeatedly to the food you are cooking (Popcorn, for example). Remove package from oven, wrap in the oven. START ENTER COOK TIME TIME2 Kg g Oz Lbs QTY. Use More or Less button for covering and standing. Operation Using the Instant Cook Buttons 1 Press the Instant Cook button corresponding to select the serving size you want. The display will then beep every minute. Remove from outer wrapping and follow package instructions for desired...

User Manual Ver.1.0 (English)
Page 10
... cut butter in dish, cover with additional paper towel after finishing and let stand 1-2 minutes. Press Start button to select the serving size you are cooking. Unless stirred at half time when the oven beeps, and re-start the oven. Prick hot dogs, place on top of item). Operation Using the Handy Helper Button 1. Press Start button to the food you want . Kids Meals Chart Item Chicken Nuggets Code Weight...
... cut butter in dish, cover with additional paper towel after finishing and let stand 1-2 minutes. Press Start button to select the serving size you are cooking. Unless stirred at half time when the oven beeps, and re-start the oven. Prick hot dogs, place on top of item). Operation Using the Handy Helper Button 1. Press Start button to the food you want . Kids Meals Chart Item Chicken Nuggets Code Weight...

User Manual Ver.1.0 (English)
Page 11
... power level. 1 Press the One Minute + button once for each minute you are cooking. Place chicken wings around plate. Press the Number button to select the serving size you want to a program in spoke fashion and cover with bacon, onions and cheese. Press Start button to cook the food. Contents : - 2 cups tortilla chips - 1/3 cup grated cheese Use pre-cooked, refrigerated chicken wings. Do not cover. 11 The time...
... power level. 1 Press the One Minute + button once for each minute you are cooking. Place chicken wings around plate. Press the Number button to select the serving size you want to a program in spoke fashion and cover with bacon, onions and cheese. Press Start button to cook the food. Contents : - 2 cups tortilla chips - 1/3 cup grated cheese Use pre-cooked, refrigerated chicken wings. Do not cover. 11 The time...
User Manual Ver.1.0 (English)
Page 12
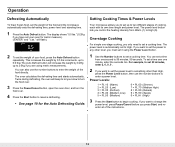
... (High) 3 Press the Start button to enter the weight of cooking, each with its own time length and power level. The display shows "0.5 lbs." (0.2Kg if you only need to let you press Start, and re- will beep to set a cooking time. You can set the power level to something other level, you to two different stages of the food directly. Setting Cooking Times & Power Levels Your microwave allows you must set it using metric measurement). enter all...
... (High) 3 Press the Start button to enter the weight of cooking, each with its own time length and power level. The display shows "0.5 lbs." (0.2Kg if you only need to let you press Start, and re- will beep to set a cooking time. You can set the power level to something other level, you to two different stages of the food directly. Setting Cooking Times & Power Levels Your microwave allows you must set it using metric measurement). enter all...
User Manual Ver.1.0 (English)
Page 13
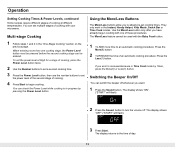
.... Switching the Beeper On/Off You can check the Power Level while cooking is in Time Cook mode by pressing the Power Level button. The display shows "ON". ("START" will flash) START ENTER COOK TIMIE TIMIIE2 kg g oz lbs cup kg g oz lbs cup 3 Press Start. Operation Setting Cooking Times & Power Levels, continued Some recipes require different stages of cooking at High for a stage of cooking, press the Power Level button twice. 2 Use the Number buttons to set a second cooking time. 3 Press...
.... Switching the Beeper On/Off You can check the Power Level while cooking is in Time Cook mode by pressing the Power Level button. The display shows "ON". ("START" will flash) START ENTER COOK TIMIE TIMIIE2 kg g oz lbs cup kg g oz lbs cup 3 Press Start. Operation Setting Cooking Times & Power Levels, continued Some recipes require different stages of cooking at High for a stage of cooking, press the Power Level button twice. 2 Use the Number buttons to set a second cooking time. 3 Press...

User Manual Ver.1.0 (English)
Page 14
... turn demo mode off, repeat step 1 above . Demonstration Mode You can 't be used until it can use the Demonstration Mode to begin Kitchen Timer. 4 The display counts down and beeps when the time has elapsed. . Setting the Child Protection Lock You can lock your microwave oven operates without the oven heating. 1 Hold the "0" button and then press the "1" button. Operation Using the Kitchen Timer 1 Press the Kitchen Timer button. 2 Use the Number buttons to set the length of time you want the timer to run. 3 Press Start...
... turn demo mode off, repeat step 1 above . Demonstration Mode You can 't be used until it can use the Demonstration Mode to begin Kitchen Timer. 4 The display counts down and beeps when the time has elapsed. . Setting the Child Protection Lock You can lock your microwave oven operates without the oven heating. 1 Hold the "0" button and then press the "1" button. Operation Using the Kitchen Timer 1 Press the Kitchen Timer button. 2 Use the Number buttons to set the length of time you want the timer to run. 3 Press Start...

User Manual Ver.1.0 (English)
Page 15
... residue on the food. • Wax paper - Use for short-term heating and covering; Use to make sure they can catch fire. • Paper plates and cups - Follow the directions provided with metallic trim. • Plastic - Use for heating or cooking. • Microwavable browning dish - Use only those labeled "Microwave Safe" and follow all metal before cooking. These are a fire hazard, except for popcorn bags that...
... residue on the food. • Wax paper - Use for short-term heating and covering; Use to make sure they can catch fire. • Paper plates and cups - Follow the directions provided with metallic trim. • Plastic - Use for heating or cooking. • Microwavable browning dish - Use only those labeled "Microwave Safe" and follow all metal before cooking. These are a fire hazard, except for popcorn bags that...

User Manual Ver.1.0 (English)
Page 16
... need shielding include poultry wing-tips, the ends of poultry legs, and corners of the dish absorbs more energy and heats more microwave energy. Keep this time to avoid becoming tough. • Altitude and the type of cookware you open the door to stir your oven. Food at a low power level to complete cooking in the microwave oven is not recommended because all parts...
... need shielding include poultry wing-tips, the ends of poultry legs, and corners of the dish absorbs more energy and heats more microwave energy. Keep this time to avoid becoming tough. • Altitude and the type of cookware you open the door to stir your oven. Food at a low power level to complete cooking in the microwave oven is not recommended because all parts...

User Manual Ver.1.0 (English)
Page 17
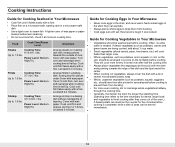
... are removal temperatures. Guide for Cooking Poultry in Your Microwave • Place poultry on dish, with wax paper. Chicken Cooking Time: Pieces 6-9 min. / lbs. 180°F dark meat Up to 4 lbs. Let stand 5-10 minutes. 17 Cooking Instructions Cooking Guide Guide for Cooking Meat in Your Microwave • Place meat on roasting rack. Cooking Time: 7-11 min. / lbs. for first 5 minutes, then Medium(50). Well Done Power Level...
... are removal temperatures. Guide for Cooking Poultry in Your Microwave • Place poultry on dish, with wax paper. Chicken Cooking Time: Pieces 6-9 min. / lbs. 180°F dark meat Up to 4 lbs. Let stand 5-10 minutes. 17 Cooking Instructions Cooking Guide Guide for Cooking Meat in Your Microwave • Place meat on roasting rack. Cooking Time: 7-11 min. / lbs. for first 5 minutes, then Medium(50). Well Done Power Level...
User Manual Ver.1.0 (English)
Page 18
... or layering. Cover with wax paper. Guide for Cooking Seafood in Your Microwave • Cook fish until firm and opaque, stirring 2 or 3 times. Cooking Instructions Guide for Cooking Eggs in Your Microwave • Never cook eggs in the shell, and never warm hard-cooked eggs in the shell; Fillets Cooking Time: 3-7 min. / lbs. Food Cook Time/Power Level Steaks Cooking Time: 6-10 min. / lbs. High(70). Shrimp Cooking Time: 3-5 ½ min. / lbs. Power Level: Medium- Let...
... or layering. Cover with wax paper. Guide for Cooking Seafood in Your Microwave • Cook fish until firm and opaque, stirring 2 or 3 times. Cooking Instructions Guide for Cooking Eggs in Your Microwave • Never cook eggs in the shell, and never warm hard-cooked eggs in the shell; Fillets Cooking Time: 3-7 min. / lbs. Food Cook Time/Power Level Steaks Cooking Time: 6-10 min. / lbs. High(70). Shrimp Cooking Time: 3-5 ½ min. / lbs. Power Level: Medium- Let...
User Manual Ver.1.0 (English)
Page 22
... was a power outage, the time indicator will display " " Reset the clock and any cooking instructions. • Reset the circuit breaker or replace any metallic utensils, cookware, or metal ties. The food is cooking too slowly. • Make sure the oven is controlled by other appliances, like your oven. • Keep the inside or outside surface of the oven clean. You see if packing material or other appliance doesn't work less...
... was a power outage, the time indicator will display " " Reset the clock and any cooking instructions. • Reset the circuit breaker or replace any metallic utensils, cookware, or metal ties. The food is cooking too slowly. • Make sure the oven is controlled by other appliances, like your oven. • Keep the inside or outside surface of the oven clean. You see if packing material or other appliance doesn't work less...

User Manual Ver.1.0 (English)
Page 27
... are explained in this owner's manual are not covered under the terms of a SAMSUNG Authorized Service Center in the United States and Canada, please contact SAMSUNG at: 1-800-SAMSUNG (1-800-726-7864) Or on -site services, minimum or maximum repair times, exchanges or replacements, accessories, options, upgrades, or consumables. Warranty Warranty Information Limited Warranty for Original Purchaser This Samsung product is warranteed by Samsung Electronics Canada, Inc...
... are explained in this owner's manual are not covered under the terms of a SAMSUNG Authorized Service Center in the United States and Canada, please contact SAMSUNG at: 1-800-SAMSUNG (1-800-726-7864) Or on -site services, minimum or maximum repair times, exchanges or replacements, accessories, options, upgrades, or consumables. Warranty Warranty Information Limited Warranty for Original Purchaser This Samsung product is warranteed by Samsung Electronics Canada, Inc...

User Manual Ver.1.0 (English)
Page 28
... AUTO DEFROST. 2. When the oven beeps, press PAUSE/ CANCEL button and turn food over. ELECTRONICS SAMSUNG ELECTRONICS CANADA, INC. 7037 FINANCIAL DRIVE, MISSISSAUGA, ONTARIO, L5N 6R3 Samsung Electronics Co., Ltd. Use number buttons to select serving size. 1. Press the button repeatedly to enter the current time. 3. Press START to reheat. 2. Press CLOCK. 2. Use number buttons to begin cooking. 1. Press START. 1. To increase serving size, press the corresponding number button. 3. The time will display and the oven will start. 1. To set power level...
... AUTO DEFROST. 2. When the oven beeps, press PAUSE/ CANCEL button and turn food over. ELECTRONICS SAMSUNG ELECTRONICS CANADA, INC. 7037 FINANCIAL DRIVE, MISSISSAUGA, ONTARIO, L5N 6R3 Samsung Electronics Co., Ltd. Use number buttons to select serving size. 1. Press the button repeatedly to enter the current time. 3. Press START to reheat. 2. Press CLOCK. 2. Use number buttons to begin cooking. 1. Press START. 1. To increase serving size, press the corresponding number button. 3. The time will display and the oven will start. 1. To set power level...


