
User Manual (ENGLISH)
Page 2
...related to change without notice. All information included herein is not responsible for information purposes only. All rights reserved. • ML-2550, ML-2551N, ML-2552W and Samsung logo are trademarks of Samsung Electronics Co., Ltd. • PCL and PCL 6 are trademarks of Hewlett-Packard company. • Centronics is a ...Inc. • Microsoft, Windows, Windows 9x, Windows Me, Windows 2000, Windows NT and Windows XP are trademarks of this manual. © 2003 Samsung Electronics Co., Ltd. i Samsung Electronics is subject to use of their respective companies or organisations.
...related to change without notice. All information included herein is not responsible for information purposes only. All rights reserved. • ML-2550, ML-2551N, ML-2552W and Samsung logo are trademarks of Samsung Electronics Co., Ltd. • PCL and PCL 6 are trademarks of Hewlett-Packard company. • Centronics is a ...Inc. • Microsoft, Windows, Windows 9x, Windows Me, Windows 2000, Windows NT and Windows XP are trademarks of this manual. © 2003 Samsung Electronics Co., Ltd. i Samsung Electronics is subject to use of their respective companies or organisations.

User Manual (ENGLISH)
Page 6
... down) ...... 4.5 Printing to the Rear Output Tray (Face up) ......... 4.6 Loading Paper 4.7 Using the Tray1 or the Optional Tray2 4.8 Using the Multi-Purpose Tray 4.8 Using the Manual Feed Mode 4.12 Printing on Envelopes 4.14 Printing on Labels 4.17 Printing on Transparencies 4.19 Printing on Preprinted Paper 4.21 Printing on Card Stock or...
... down) ...... 4.5 Printing to the Rear Output Tray (Face up) ......... 4.6 Loading Paper 4.7 Using the Tray1 or the Optional Tray2 4.8 Using the Multi-Purpose Tray 4.8 Using the Manual Feed Mode 4.12 Printing on Envelopes 4.14 Printing on Labels 4.17 Printing on Transparencies 4.19 Printing on Preprinted Paper 4.21 Printing on Card Stock or...
User Manual (ENGLISH)
Page 50
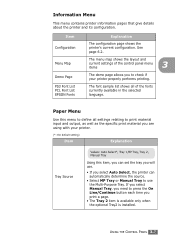
...to print material input and output, as well as the specific print material you are using with your printer properly performs printing. If you select Manual Tray, you need to press the On Line/Continue button each time you to define all of the control panel menu items 3 The demo .... Paper Menu Use this menu to check if your printer. (*: the default setting) Item Explanation Tray Source Values: Auto Select*, Tray 1,MP Tray, Tray 2 , Manual Tray Using this item, you can set the tray you will use. • If you select Auto Select, the printer can automatically determine the source...
...to print material input and output, as well as the specific print material you are using with your printer properly performs printing. If you select Manual Tray, you need to press the On Line/Continue button each time you to define all of the control panel menu items 3 The demo .... Paper Menu Use this menu to check if your printer. (*: the default setting) Item Explanation Tray Source Values: Auto Select*, Tray 1,MP Tray, Tray 2 , Manual Tray Using this item, you can set the tray you will use. • If you select Auto Select, the printer can automatically determine the source...

User Manual (ENGLISH)
Page 62
... 4th byte, you can select this item only when you set Config TCP to Yes. • Static:You can enter IP address, subnetmask, and gateway manually. • BOOTP:The BOOTP server allots the IP address to you automatically. • DHCP: The DHCP server allots the IP address to you enter the... IP address manually. IP Get Method IP Address Values: Static*, BOOTP, DHCP You can set this item only when you set IP Get Method to Static. USING THE...
... 4th byte, you can select this item only when you set Config TCP to Yes. • Static:You can enter IP address, subnetmask, and gateway manually. • BOOTP:The BOOTP server allots the IP address to you automatically. • DHCP: The DHCP server allots the IP address to you enter the... IP address manually. IP Get Method IP Address Values: Static*, BOOTP, DHCP You can set this item only when you set IP Get Method to Static. USING THE...

User Manual (ENGLISH)
Page 63
...: Yes, No* Configure the Wireless Network environments. Select On to use the protocol Values: On*, Off This item selects whether you enter the subnet mask manually. In the Config Netware menu, you can specify the frame type parameter used on page E.12 Values: On*, Off This item lets you select whether... or not you enter the gateway manually. Press the scroll button to the 4th byte, you can set the value in the same way. For the 2nd to set the value of...
...: Yes, No* Configure the Wireless Network environments. Select On to use the protocol Values: On*, Off This item selects whether you enter the subnet mask manually. In the Config Netware menu, you can specify the frame type parameter used on page E.12 Values: On*, Off This item lets you select whether... or not you enter the gateway manually. Press the scroll button to the 4th byte, you can set the value in the same way. For the 2nd to set the value of...

User Manual (ENGLISH)
Page 68
... through the Multi-Purpose Tray. Depending on paper thickness, the maximum capacity may be reduced. *b. Sizes and Capacities Size Input Source/Capacity*a Tray1 or Multi- Manual optional Tray2 Purpose Tray Feed Plain Paper Letter (8.5 x 11 in.) 500 Legal (8.5 x 14 in.) 500 Executive (7.25 x 10.5 in.) 500 Folio (8.5 x 13 in .) - C6 (114...
... through the Multi-Purpose Tray. Depending on paper thickness, the maximum capacity may be reduced. *b. Sizes and Capacities Size Input Source/Capacity*a Tray1 or Multi- Manual optional Tray2 Purpose Tray Feed Plain Paper Letter (8.5 x 11 in.) 500 Legal (8.5 x 14 in.) 500 Executive (7.25 x 10.5 in.) 500 Folio (8.5 x 13 in .) - C6 (114...

User Manual (ENGLISH)
Page 77
... the Multi-Purpose Tray, except you can be helpful when you want to its place and close the Multi-Purpose Tray. Using the Manual Feed Mode If you select Manual Feed in the Source option when changing print settings, you load paper sheet-by-sheet in the Tray, send print data to... panel to print each page is almost the same as the procedure for loading in the Multi-Purpose Tray. This loading procedure is printed. Manually loading paper can manually load a sheet of the Multi-Purpose Tray with the print side up. 2 Slide the paper width guide and adjust it against the material...
... the Multi-Purpose Tray, except you can be helpful when you want to its place and close the Multi-Purpose Tray. Using the Manual Feed Mode If you select Manual Feed in the Source option when changing print settings, you load paper sheet-by-sheet in the Tray, send print data to... panel to print each page is almost the same as the procedure for loading in the Multi-Purpose Tray. This loading procedure is printed. Manually loading paper can manually load a sheet of the Multi-Purpose Tray with the print side up. 2 Slide the paper width guide and adjust it against the material...

User Manual (ENGLISH)
Page 78
The printer picks up the paper and prints. USING PRINT MATERIALS 4.13 After one page is printed, the message appears again. 6 Insert the next sheet into the Multi-Purpose Tray and press the On Line/Continue button ( ). Repeat this step for Source from the software application, and then select the correct paper size and type. 4 4 Print a document. 3 When you print a document, you to be printed. The display shows a message prompting you must select Manual Feed for every page to load paper and press the On Line/Continue button ( ). 5 Press the On Line/Continue button ( ).
The printer picks up the paper and prints. USING PRINT MATERIALS 4.13 After one page is printed, the message appears again. 6 Insert the next sheet into the Multi-Purpose Tray and press the On Line/Continue button ( ). Repeat this step for Source from the software application, and then select the correct paper size and type. 4 4 Print a document. 3 When you print a document, you to be printed. The display shows a message prompting you must select Manual Feed for every page to load paper and press the On Line/Continue button ( ). 5 Press the On Line/Continue button ( ).

User Manual (ENGLISH)
Page 88
... about setting on the control panel, see page 5.7. NOTE: If the size of the printer driver properties, click the Custom button and set the size manually. 1 Open the Multi-Purpose Tray and the rear output tray. 2 Load print material with print side up and short edge first. USING PRINT MATERIALS 4.23...
... about setting on the control panel, see page 5.7. NOTE: If the size of the printer driver properties, click the Custom button and set the size manually. 1 Open the Multi-Purpose Tray and the rear output tray. 2 Load print material with print side up and short edge first. USING PRINT MATERIALS 4.23...

User Manual (ENGLISH)
Page 97
... the first page into the Multi-Purpose Tray, and plain paper into the Multi-Purpose Tray. If you to Thick for the first page. The Manual Feed source is used when printing to Chapter 4, "Using Print Materials." See page 4.12. Then, select Tray1 in the Source option and Multi-purpose Tray...
... the first page into the Multi-Purpose Tray, and plain paper into the Multi-Purpose Tray. If you to Thick for the first page. The Manual Feed source is used when printing to Chapter 4, "Using Print Materials." See page 4.12. Then, select Tray1 in the Source option and Multi-purpose Tray...
User Manual (ENGLISH)
Page 130
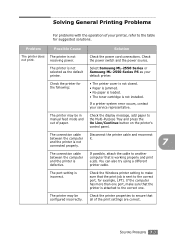
... occurs, contact your default printer. The printer may be in manual feed mode and out of the print settings are correct. SOLVING PROBLEMS 7.3 Check the power switch and the power source. The printer is not not print. Select Samsung ML-2550 Series or Samsung ML-2550 Series PS as the default printer. If possible, attach...
... occurs, contact your default printer. The printer may be in manual feed mode and out of the print settings are correct. SOLVING PROBLEMS 7.3 Check the power switch and the power source. The printer is not not print. Select Samsung ML-2550 Series or Samsung ML-2550 Series PS as the default printer. If possible, attach...

User Manual (ENGLISH)
Page 147
...match the paper you call for your printer. Message Cover Open / No Toner Cartridge Invalid Toner Jam 0 Jam 1 Jam 2 Duplex JAM 1/2 Load Manual Press Cont Key Load [Size] In [Tray] Status Do this... A paper jam occurs around the toner cartridge. Remove the jammed paper from the ...messages to page 7.13. Load a sheet of paper. Load the correct paper in the paper exit area. A paper jam occurs in manual feed mode. Install a Samsung-approved toner cartridge, designed for service, it is no toner cartridge installed in use, referring to page 7.12. Remove the jammed paper...
...match the paper you call for your printer. Message Cover Open / No Toner Cartridge Invalid Toner Jam 0 Jam 1 Jam 2 Duplex JAM 1/2 Load Manual Press Cont Key Load [Size] In [Tray] Status Do this... A paper jam occurs around the toner cartridge. Remove the jammed paper from the ...messages to page 7.13. Load a sheet of paper. Load the correct paper in the paper exit area. A paper jam occurs in manual feed mode. Install a Samsung-approved toner cartridge, designed for service, it is no toner cartridge installed in use, referring to page 7.12. Remove the jammed paper...
User Manual (ENGLISH)
Page 152
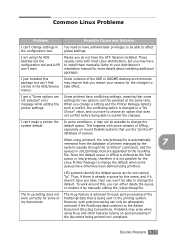
...system default. Some printers have to choose an option that some conditions, it is achieved through post-processing of printers managed by manually editing the /etc/printcap file. In some settings for the Linux Printer Package to submit the changes. When using N-up setting... "printconf" database of queues. The N-up and other features relying on recent RedHat systems that you restart your distribution's installation manual for more details about installing additional packages. global settings. LPD systems identify the default queue as the first queue in /etc/...
...system default. Some printers have to choose an option that some conditions, it is achieved through post-processing of printers managed by manually editing the /etc/printcap file. In some settings for the Linux Printer Package to submit the changes. When using N-up setting... "printconf" database of queues. The N-up and other features relying on recent RedHat systems that you restart your distribution's installation manual for more details about installing additional packages. global settings. LPD systems identify the default queue as the first queue in /etc/...
User Manual (ENGLISH)
Page 187
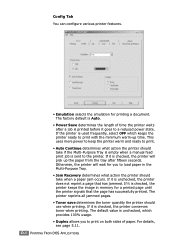
... the printer warm and ready to print. • Auto Continue determines what action the printer should take if the Multi-Purpose Tray is empty when a manual feed print job is sent to print with the minimum warm-up the paper from the tray after a job is printed before it is Auto...
... the printer warm and ready to print. • Auto Continue determines what action the printer should take if the Multi-Purpose Tray is empty when a manual feed print job is sent to print with the minimum warm-up the paper from the tray after a job is printed before it is Auto...
User Manual (ENGLISH)
Page 201
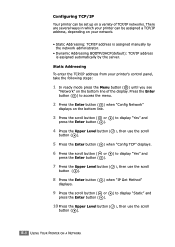
... the TCP/IP address from your printer can be assigned a TCP/IP address, depending on your network. • Static Addressing: TCP/IP address is assigned manually by the network administrator. • Dynamic Addressing BOOTP/DHCP(default): TCP/IP address is assigned automatically by the server.
... the TCP/IP address from your printer can be assigned a TCP/IP address, depending on your network. • Static Addressing: TCP/IP address is assigned manually by the network administrator. • Dynamic Addressing BOOTP/DHCP(default): TCP/IP address is assigned automatically by the server.

User Manual (ENGLISH)
Page 203
All others will be enabled in the Netware menu before you can manually set the frame type format, if required. • AUTO (default): Automatically senses and limits the frame type to the first one detected. • EN_8023: Limits ...
All others will be enabled in the Netware menu before you can manually set the frame type format, if required. • AUTO (default): Automatically senses and limits the frame type to the first one detected. • EN_8023: Limits ...

User Manual (ENGLISH)
Page 230
... Linux common problems 7.25 configuration tool C.8 driver, install C.2 LLPR properties C.10 load, paper in the Multi-Purpose Tray 4.8 in the Tray1/optional Tray 2 2.6 using the manual feed 4.12 1
... Linux common problems 7.25 configuration tool C.8 driver, install C.2 LLPR properties C.10 load, paper in the Multi-Purpose Tray 4.8 in the Tray1/optional Tray 2 2.6 using the manual feed 4.12 1
User Manual (ENGLISH)
Page 231
M Macintosh common problems 7.23 document, print A.6 driver, install A.2 Setting Up the Printer A.3 system requirements A.2 manual feed mode, use 4.12 memory DIMM, install F.3 Multi-Purpose Tray, use 4.8 N network antenna, connect 2.12 network interface card, install F.6 network printing cable/antenna, connect 2.12 ...
M Macintosh common problems 7.23 document, print A.6 driver, install A.2 Setting Up the Printer A.3 system requirements A.2 manual feed mode, use 4.12 memory DIMM, install F.3 Multi-Purpose Tray, use 4.8 N network antenna, connect 2.12 network interface card, install F.6 network printing cable/antenna, connect 2.12 ...

Universal Print Driver Guide (user Manual) (ver.2.00) (English)
Page 4
...) or 1.4 GHz (x64) processors (2GHz or faster) 512 MB (2 GB) 10 GB Introduction_ 4 Available on the Samsung web site. Introduction 1. Manually discover devices. Available on the CD provided with the device, or the product based driver. wizard. Inconsistent user interface. &#...8226; Download and install with the installer • Manually locate, download, and install file provided with the Samsung driver for DirectX 9 graphics with different printer models. Universal Print Driver. • Install via CD...
...) or 1.4 GHz (x64) processors (2GHz or faster) 512 MB (2 GB) 10 GB Introduction_ 4 Available on the Samsung web site. Introduction 1. Manually discover devices. Available on the CD provided with the device, or the product based driver. wizard. Inconsistent user interface. &#...8226; Download and install with the installer • Manually locate, download, and install file provided with the Samsung driver for DirectX 9 graphics with different printer models. Universal Print Driver. • Install via CD...
Universal Print Driver Guide (user Manual) (ver.2.00) (English)
Page 13
Double-sided printing - 2. The folder using smart filter scans devices automatically, so users cannot manually add/remove printers to/from the list to the folder or right-click the printer in a folder name and set the attributes. • Don't use ... Printer, you can drag-and-drop the print from the folder. 3. Online: Includes devices that match the following properties: - Click OK. Support Color - Using the Samsung Universal Print Driver_ 13 Type in the list and select Move or Copy. • Use smart folder: Adds a special folder to a folder under My Printer...
Double-sided printing - 2. The folder using smart filter scans devices automatically, so users cannot manually add/remove printers to/from the list to the folder or right-click the printer in a folder name and set the attributes. • Don't use ... Printer, you can drag-and-drop the print from the folder. 3. Online: Includes devices that match the following properties: - Click OK. Support Color - Using the Samsung Universal Print Driver_ 13 Type in the list and select Move or Copy. • Use smart folder: Adds a special folder to a folder under My Printer...


