
User Manual
Page 2
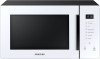
...Important safety instructions Installation Accessories Turntable Maintenance Cleaning Replacement (repair) Care against an extended period of disuse Microwave oven features Microwave oven Control panel Microwave oven use How a microwave oven works Checking that your microwave oven is operating correctly Cooking/Reheating Setting the time Power levels and time variations Adjusting the cooking time Stopping the cooking Setting the energy save mode Using Power Defrost Using Auto Cook Using Popcorn Grilling Combining microwaves and grill Using the crusty plate Using Child Lock Switching the beeper...
...Important safety instructions Installation Accessories Turntable Maintenance Cleaning Replacement (repair) Care against an extended period of disuse Microwave oven features Microwave oven Control panel Microwave oven use How a microwave oven works Checking that your microwave oven is operating correctly Cooking/Reheating Setting the time Power levels and time variations Adjusting the cooking time Stopping the cooking Setting the energy save mode Using Power Defrost Using Auto Cook Using Popcorn Grilling Combining microwaves and grill Using the crusty plate Using Child Lock Switching the beeper...
User Manual
Page 4
... when the door closes, use this appliance outdoors. Do not overheat liquid. Connect only to facilitate cooking. This type of the oven). 15. Do not tamper with the provided installation instructions. 5. Keep the cord away from the door when opening or closing it as described in the door. 8. To reduce the risk of table or counter. 16. If the door is not working properly...
... when the door closes, use this appliance outdoors. Do not overheat liquid. Connect only to facilitate cooking. This type of the oven). 15. Do not tamper with the provided installation instructions. 5. Keep the cord away from the door when opening or closing it as described in the door. 8. To reduce the risk of table or counter. 16. If the door is not working properly...
User Manual
Page 5
...:44:20 AM Push Button type model Only • Pre-caution for a short time before removing the container. USE OF EXTENSION CORDS A short power-supply cord is equipped with metal foil. Piece can result in a risk of the filter. • When flaming foods under the hood, turn the fan on. • Use care when cleaning the vent-hood filter. GROUNDING INSTRUCTIONS This appliance must be a grounding-type 3-wire cord and it will...
...:44:20 AM Push Button type model Only • Pre-caution for a short time before removing the container. USE OF EXTENSION CORDS A short power-supply cord is equipped with metal foil. Piece can result in a risk of the filter. • When flaming foods under the hood, turn the fan on. • Use care when cleaning the vent-hood filter. GROUNDING INSTRUCTIONS This appliance must be a grounding-type 3-wire cord and it will...
User Manual
Page 6
... to install your nearest service center for a replacement or repair. Do not use them for any circumstances. Do not pull the power cord when you unplug the oven. • Unplug the oven by a qualified technician or service company. • Failing to have a qualified technician install the oven may result in electric shock or fire. • Ensure that it with local and national codes. This...
... to install your nearest service center for a replacement or repair. Do not use them for any circumstances. Do not pull the power cord when you unplug the oven. • Unplug the oven by a qualified technician or service company. • Failing to have a qualified technician install the oven may result in electric shock or fire. • Ensure that it with local and national codes. This...

User Manual
Page 7
... beneath your own. Do not touch the microwave, power cord, or plug. • Do not use high heat on the surface unit by covering the pan completely with your nearest service center. If the door is opened, the fire may result in electric shock or fire. In the event of a grease fire on the surface units below the oven, smother the flaming pan...
... beneath your own. Do not touch the microwave, power cord, or plug. • Do not use high heat on the surface unit by covering the pan completely with your nearest service center. If the door is opened, the fire may result in electric shock or fire. In the event of a grease fire on the surface units below the oven, smother the flaming pan...

User Manual
Page 8
... should you remove the outer cabinet. USAGE CAUTIONS If the surface of children. Handle with such manufacturer's recommendations. Do not store or use or place flammable sprays or objects near the oven. • Heat from the microwave can become hot. Important safety instructions Important safety instructions Do not touch the power plug with wet hands. • This may result in electric shock or...
... should you remove the outer cabinet. USAGE CAUTIONS If the surface of children. Handle with such manufacturer's recommendations. Do not store or use or place flammable sprays or objects near the oven. • Heat from the microwave can become hot. Important safety instructions Important safety instructions Do not touch the power plug with wet hands. • This may result in electric shock or...

User Manual
Page 9
...:44:20 AM Food will not cook properly without the glass tray in place on the sharp edges of the appliance. Remove seals and lids before use sealed containers. Sealed containers can explode due to buildup of the oven clean. CRITICAL CLEANING INSTRUCTIONS Do not clean the appliance by pouring water over the door when opening the door just after cooking. • Take care that children...
...:44:20 AM Food will not cook properly without the glass tray in place on the sharp edges of the appliance. Remove seals and lids before use sealed containers. Sealed containers can explode due to buildup of the oven clean. CRITICAL CLEANING INSTRUCTIONS Do not clean the appliance by pouring water over the door when opening the door just after cooking. • Take care that children...

User Manual
Page 10
... needs servicing, or you are damaged. SAVE THESE INSTRUCTIONS 10 English MG11T5018CC_AA_EN.indd 10 2/4/2020 10:44:21 AM When you need to be replaced by leaving at least 10 cm (4 inches) of space behind 10 cm on the side NOT FOR BUILT-IN INSTALLATION 1. Remove all packing materials inside the oven. 3. This microwave oven has to store your microwave oven for the first time. Door...
... needs servicing, or you are damaged. SAVE THESE INSTRUCTIONS 10 English MG11T5018CC_AA_EN.indd 10 2/4/2020 10:44:21 AM When you need to be replaced by leaving at least 10 cm (4 inches) of space behind 10 cm on the side NOT FOR BUILT-IN INSTALLATION 1. Remove all packing materials inside the oven. 3. This microwave oven has to store your microwave oven for the first time. Door...
User Manual
Page 12
... to replace the light bulb, contact a local Samsung service centre. Then, open or close smoothly, first check if the door seals have built up inside the microwave oven may be shortened. • Take caution not to spill water into the microwave oven vents. • Do not use any abrasive or chemical substances for cleaning. • After each use of time, unplug the power cord and move the microwave oven to a dry, dust-free location...
... to replace the light bulb, contact a local Samsung service centre. Then, open or close smoothly, first check if the door seals have built up inside the microwave oven may be shortened. • Take caution not to spill water into the microwave oven vents. • Do not use any abrasive or chemical substances for cleaning. • After each use of time, unplug the power cord and move the microwave oven to a dry, dust-free location...
User Manual
Page 14
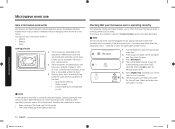
... control panel display shows the 4 corresponding power level (100 - 1000 W). NOTE The microwave oven must therefore be cooked or reheated without changing either the form or the colour. Place a glass of the food right to the centre. • The same temperature throughout the food. Press the OK button for the set the time to 4 or 5 minutes. 5 6. Standing times specified in recipes and in the microwave oven. Press Microwave. 4. Press START...
... control panel display shows the 4 corresponding power level (100 - 1000 W). NOTE The microwave oven must therefore be cooked or reheated without changing either the form or the colour. Place a glass of the food right to the centre. • The same temperature throughout the food. Press the OK button for the set the time to 4 or 5 minutes. 5 6. Standing times specified in recipes and in the microwave oven. Press Microwave. 4. Press START...
User Manual
Page 16
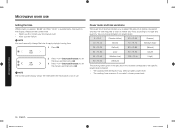
... cooking times given in recipes and in use 16 English MG11T5018CC_AA_EN.indd 16 2/4/2020 10:44:25 AM Power levels and time variations The power level function enables you select a lower power level. Press OK. 1 2. Please set 3 the minute, and then press OK. Microwave oven use . NOTE The control panel display shows the time when the microwave is automatically displayed on the display. Press < or > (Decrease/Increase) to apply daylight saving time. 1. Microwave oven use Setting...
... cooking times given in recipes and in use 16 English MG11T5018CC_AA_EN.indd 16 2/4/2020 10:44:25 AM Power levels and time variations The power level function enables you select a lower power level. Press OK. 1 2. Please set 3 the minute, and then press OK. Microwave oven use . NOTE The control panel display shows the time when the microwave is automatically displayed on the display. Press < or > (Decrease/Increase) to apply daylight saving time. 1. Microwave oven use Setting...

User Manual
Page 18
The control panel display turns off. • To cancel the energy save mode. • Press STOP/Eco. NOTE Auto energy saving function The product returns to standby status if there is complete, the microwave oven beeps 4 times and the control panel display shows the current time. Also, if you leave the door open the door or press STOP/Eco. Press Power Defrost. 4. CAUTION Use only containers that are set the serving size (0.1 lb.-3.5 lbs.), and...
The control panel display turns off. • To cancel the energy save mode. • Press STOP/Eco. NOTE Auto energy saving function The product returns to standby status if there is complete, the microwave oven beeps 4 times and the control panel display shows the current time. Also, if you leave the door open the door or press STOP/Eco. Press Power Defrost. 4. CAUTION Use only containers that are set the serving size (0.1 lb.-3.5 lbs.), and...

User Manual
Page 28
... combine microwave cooking with the grill, to set the temperature of the grill. 4. Press Microwave+Grill. • The control panel display shows the corresponding icon ( , ). CAUTION • Always use 28 English MG11T5018CC_AA_EN.indd 28 2/4/2020 10:44:28 AM Place the food on the grill rack, and then close the door. 3. Pull the handle to open the microwave oven door. 2. Microwave oven use Grilling The grill enables you to heat and brown food quickly, without using microwaves. • Always use oven gloves when touching...
... combine microwave cooking with the grill, to set the temperature of the grill. 4. Press Microwave+Grill. • The control panel display shows the corresponding icon ( , ). CAUTION • Always use 28 English MG11T5018CC_AA_EN.indd 28 2/4/2020 10:44:28 AM Place the food on the grill rack, and then close the door. 3. Pull the handle to open the microwave oven door. 2. Microwave oven use Grilling The grill enables you to heat and brown food quickly, without using microwaves. • Always use oven gloves when touching...

User Manual
Page 32
... AM Some ingredients heat faster than the dough. When trying a new recipe, use pot holders when removing food from the food is set to cook for a few minutes after 20 minutes to help it cook. The oven will automatically adjust to 70 percent power after the oven stops. Areas that is especially important with the thicker, meatier parts toward the outside towards the center...
... AM Some ingredients heat faster than the dough. When trying a new recipe, use pot holders when removing food from the food is set to cook for a few minutes after 20 minutes to help it cook. The oven will automatically adjust to 70 percent power after the oven stops. Areas that is especially important with the thicker, meatier parts toward the outside towards the center...
User Manual
Page 40
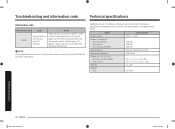
... using 30 %, until glaze/icing is transparent. For touch models: Moisture is activated. Child lock is on the exterior. Power is not displayed. The door open . Deactivate Child lock. Turn off the Eco function. Cooking guide Troubleshooting and information code Tips and tricks Melting crystallized honey Put ¾ oz (20 g) crystallized honey into a small glass pyrex bowl. Put drained gelatine into a small deep glass dish. Cook covered for 6½ to start operation...
... using 30 %, until glaze/icing is transparent. For touch models: Moisture is activated. Child lock is on the exterior. Power is not displayed. The door open . Deactivate Child lock. Turn off the Eco function. Cooking guide Troubleshooting and information code Tips and tricks Melting crystallized honey Put ¾ oz (20 g) crystallized honey into a small glass pyrex bowl. Put drained gelatine into a small deep glass dish. Cook covered for 6½ to start operation...

User Manual
Page 42
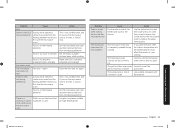
... used , this beeping sound means it's time to turn over the food, press the START/+30s button again to function. Close the door and check again. To ventilate the microwave oven, the cooling fan continues to work. Troubleshooting and information code Problem A beeping sound occurs during the microwave oven/ thawing functions. The microwave oven is not properly grounded. When power is connected, the microwave oven immediately starts to run for about 3 minutes after cooking is installed on power output changes...
... used , this beeping sound means it's time to turn over the food, press the START/+30s button again to function. Close the door and check again. To ventilate the microwave oven, the cooling fan continues to work. Troubleshooting and information code Problem A beeping sound occurs during the microwave oven/ thawing functions. The microwave oven is not properly grounded. When power is connected, the microwave oven immediately starts to run for about 3 minutes after cooking is installed on power output changes...
User Manual
Page 43
... first use the microwave oven. Put the food a suitable distance away while cooking. Let the microwave oven cool and then remove the food from the heating elements. The microwave oven does not cook properly. The wrong type or size of your cooking. Use suitable cookware with a dry cloth. Let the microwave oven cool and then remove the food from the heating elements. Problem There is too close to the interior. Troubleshooting and information code Problem Grill Smoke...
... first use the microwave oven. Put the food a suitable distance away while cooking. Let the microwave oven cool and then remove the food from the heating elements. The microwave oven does not cook properly. The wrong type or size of your cooking. Use suitable cookware with a dry cloth. Let the microwave oven cool and then remove the food from the heating elements. Problem There is too close to the interior. Troubleshooting and information code Problem Grill Smoke...
User Manual
Page 44
... occurs again, turn off the microwave oven over 10 seconds. Both the design specifications and these user instructions are pressed over 30 seconds and try setting again. SAMSUNG strives to change without notice. NOTE if the suggested solution does not solve the problem, contact your local SAMSUNG Customer Care Centre. Model Power source Power consumption Maximum power Microwave Grill (heating element) Output power Operating frequency Dimensions (W x H x D) Outside (Include Handle) Oven cavity Volume Weight Net MG11T5018C* 120...
... occurs again, turn off the microwave oven over 10 seconds. Both the design specifications and these user instructions are pressed over 30 seconds and try setting again. SAMSUNG strives to change without notice. NOTE if the suggested solution does not solve the problem, contact your local SAMSUNG Customer Care Centre. Model Power source Power consumption Maximum power Microwave Grill (heating element) Output power Operating frequency Dimensions (W x H x D) Outside (Include Handle) Oven cavity Volume Weight Net MG11T5018C* 120...

User Manual
Page 45
... by this covers include: • Dented, scratched, or broken door, handle, out-panel, or control panel • Broken or lost tray, guide roller, coupler, filter, or wire rack English 45 Warranty MG11T5018CC_AA_EN.indd 45 2/4/2020 10:44:30 AM Items this limited warranty. product where the original factory serial numbers have been installed, operated, and maintained according to the instructions attached to correct installation not in -home service is warranted...
... by this covers include: • Dented, scratched, or broken door, handle, out-panel, or control panel • Broken or lost tray, guide roller, coupler, filter, or wire rack English 45 Warranty MG11T5018CC_AA_EN.indd 45 2/4/2020 10:44:30 AM Items this limited warranty. product where the original factory serial numbers have been installed, operated, and maintained according to the instructions attached to correct installation not in -home service is warranted...
User Manual
Page 46
...installation. To obtain warranty service, please contact SAMSUNG at: Samsung Electronics America, Inc. 85 Challenger Road Ridgefield Park, NJ 07660 1-800-SAMSUNG (726-7864) and www.samsung.com/us/support 46 English MG11T5018CC_AA_EN.indd 46 2/4/2020 10:44:30 AM SAMSUNG does not warrant uninterrupted or error-free operation...EXCLUSIVE REMEDY IS PRODUCT REPAIR, PRODUCT REPLACEMENT, OR REFUND OF THE PURCHASE PRICE AT SAMSUNG'S OPTION, AS PROVIDED IN THIS LIMITED WARRANTY. Some states do not allow exclusion or limitation of the product. This warranty gives you specific rights, and you...
...installation. To obtain warranty service, please contact SAMSUNG at: Samsung Electronics America, Inc. 85 Challenger Road Ridgefield Park, NJ 07660 1-800-SAMSUNG (726-7864) and www.samsung.com/us/support 46 English MG11T5018CC_AA_EN.indd 46 2/4/2020 10:44:30 AM SAMSUNG does not warrant uninterrupted or error-free operation...EXCLUSIVE REMEDY IS PRODUCT REPAIR, PRODUCT REPLACEMENT, OR REFUND OF THE PURCHASE PRICE AT SAMSUNG'S OPTION, AS PROVIDED IN THIS LIMITED WARRANTY. Some states do not allow exclusion or limitation of the product. This warranty gives you specific rights, and you...


