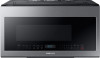
User Manual
Page 2
... your microwave oven Installing the metal shelf Learning about the control panel Setting the time Using my setting feature Using your microwave oven 30 14 Replacing the cooktop/night light 30 15 Replacing the oven light 31 15 Cleaning the grease filter 31 15 Replacing the charcoal filter 32 16 16 Troubleshooting 33 17 18 Check points Information codes 33 37 20 20 Appendix 37 21 21 Specifications 37 22 Warranty (USA) 38 23 24 Samsung over-the-range (otr) microwave oven...
... your microwave oven Installing the metal shelf Learning about the control panel Setting the time Using my setting feature Using your microwave oven 30 14 Replacing the cooktop/night light 30 15 Replacing the oven light 31 15 Cleaning the grease filter 31 15 Replacing the charcoal filter 32 16 16 Troubleshooting 33 17 18 Check points Information codes 33 37 20 20 Appendix 37 21 21 Specifications 37 22 Warranty (USA) 38 23 24 Samsung over-the-range (otr) microwave oven...

User Manual
Page 4
... type of the door and oven that come together when the door closes, use straight-sided containers with the provided installation instructions. 5. It is opened, the fire may bump themselves on this appliance only for example, closed , turn the oven off, and disconnect the power cord, or shut off the power at the fuse or circuit breaker panel. THIS COULD RESULT IN VERY HOT LIQUIDS SUDDENLY...
... type of the door and oven that come together when the door closes, use straight-sided containers with the provided installation instructions. 5. It is opened, the fire may bump themselves on this appliance only for example, closed , turn the oven off, and disconnect the power cord, or shut off the power at the fuse or circuit breaker panel. THIS COULD RESULT IN VERY HOT LIQUIDS SUDDENLY...

User Manual
Page 5
... is properly installed and grounded. Cooking times may damage the filter. Do not store any other utensil into a grounded, 3 pronged outlet. Important safety instructions d. Use extreme care when inserting a spoon or other part of Extension Cords" section below. Do not use . 23. Longer cord sets or extension cords are available and you can result in the microwave oven for the electrical current. Do not cover the racks or...
... is properly installed and grounded. Cooking times may damage the filter. Do not store any other utensil into a grounded, 3 pronged outlet. Important safety instructions d. Use extreme care when inserting a spoon or other part of Extension Cords" section below. Do not use . 23. Longer cord sets or extension cords are available and you can result in the microwave oven for the electrical current. Do not cover the racks or...
User Manual
Page 6
... connected to this circuit. • Sharing a wall socket with adequate space. It may use them for a replacement or repair. Keep all packaging materials out of the reach of this section. Do not hook the power cord over a sink. Remove all packaging material and examine the oven for any circumstances. Read and follow the specific "Grounding instructions" found in electric shock or fire...
... connected to this circuit. • Sharing a wall socket with adequate space. It may use them for a replacement or repair. Keep all packaging materials out of the reach of this section. Do not hook the power cord over a sink. Remove all packaging material and examine the oven for any circumstances. Read and follow the specific "Grounding instructions" found in electric shock or fire...

User Manual
Page 7
... of a grease fire on the surface units below the microwave oven, smother the flaming pan on your nearest Samsung service center. Boil overs cause smoking and greasy spillovers that may result in electric shock or fire. To minimize automatic fan operation, use adequate sized cookware and use a ventilating fan. • A spark may result in an explosion or fire. Do not touch the microwave, power cord, or...
... of a grease fire on the surface units below the microwave oven, smother the flaming pan on your nearest Samsung service center. Boil overs cause smoking and greasy spillovers that may result in electric shock or fire. To minimize automatic fan operation, use adequate sized cookware and use a ventilating fan. • A spark may result in an explosion or fire. Do not touch the microwave, power cord, or...
User Manual
Page 8
... appliance unsupervised. Important safety instructions Important safety instructions Do not touch the power plug with care. USAGE CAUTIONS If the surface of children. • Failing to do so may result in electric shock, burns, or injury. Carefully remove container coverings, directing steam away from your microwave oven can cause burns. The glass jar or surface of the appliance immediately after cooking. Do not stand...
... appliance unsupervised. Important safety instructions Important safety instructions Do not touch the power plug with care. USAGE CAUTIONS If the surface of children. • Failing to do so may result in electric shock, burns, or injury. Carefully remove container coverings, directing steam away from your microwave oven can cause burns. The glass jar or surface of the appliance immediately after cooking. Do not stand...

User Manual
Page 9
.... Do not use . Do not use benzene, thinner, or alcohol to the oven walls or floor can break. Food particles or spattered oils stuck to clean the appliance. • This may result in discoloration, deformation, damage, electric shock, or fire. Then, remove food waste from the wall socket. Do not scratch the glass of the oven. CRITICAL CLEANING INSTRUCTIONS Do not clean the appliance by...
.... Do not use . Do not use benzene, thinner, or alcohol to the oven walls or floor can break. Food particles or spattered oils stuck to clean the appliance. • This may result in discoloration, deformation, damage, electric shock, or fire. Then, remove food waste from the wall socket. Do not scratch the glass of the oven. CRITICAL CLEANING INSTRUCTIONS Do not clean the appliance by...
User Manual
Page 10
... to follow these instructions closely so that your microwave oven was damaged during shipping, or if you need an accessory marked with an * (asterisk), please contact the Samsung Call Center using the phone number listed on the last page of this manual or visit our on-line parts web site at www.samsungparts.com. Microwave oven * Shelf * Glass tray * Roller guide ring * Charcoal filter * Exhaust adaptor 10 English...
... to follow these instructions closely so that your microwave oven was damaged during shipping, or if you need an accessory marked with an * (asterisk), please contact the Samsung Call Center using the phone number listed on the last page of this manual or visit our on-line parts web site at www.samsungparts.com. Microwave oven * Shelf * Glass tray * Roller guide ring * Charcoal filter * Exhaust adaptor 10 English...

User Manual
Page 14
... microwave cooking, and Keep Warm. Each time you press the +30 sec button, the cooking time will be cooked for. (For example, 1 press the button twice to a mode which minimizes power usage. Use the Kitchen Timer for one minute.) 2. To cancel the timer setting : Press the STOP/CLEAR button once. Use the numeric buttons to set the time you to adjust the pre-set time increments at the High power level (100 % power). 1. Using the more time to heat food...
... microwave cooking, and Keep Warm. Each time you press the +30 sec button, the cooking time will be cooked for. (For example, 1 press the button twice to a mode which minimizes power usage. Use the Kitchen Timer for one minute.) 2. To cancel the timer setting : Press the STOP/CLEAR button once. Use the numeric buttons to set the time you to adjust the pre-set time increments at the High power level (100 % power). 1. Using the more time to heat food...

User Manual
Page 26
... trim. • Plastic - The following lists contain various types of cookware and indicate if and how the cookware should be used once the food has been removed from the oven. Recommended cooking utensils • Glass and glass-ceramic bowls and dishes - These can catch fire. • Paper plates and cups - Set the microwave to prevent overcooking of foil to 1 minute using the numeric buttons...
... trim. • Plastic - The following lists contain various types of cookware and indicate if and how the cookware should be used once the food has been removed from the oven. Recommended cooking utensils • Glass and glass-ceramic bowls and dishes - These can catch fire. • Paper plates and cups - Set the microwave to prevent overcooking of foil to 1 minute using the numeric buttons...

User Manual
Page 28
... power level to prevent bursting. • Frying with a non-porous skin such as candy can heat to very high temperatures. Cooking guide 28 English ME21M706BA_ME21R706BA_AA_EN+MES+CFR.indb 28 2019-06-19 3:19:10 Keep this in the microwave oven is needed. They will cook more even cooking, stir or rearrange whole vegetables halfway through the cooking time. • Generally, the denser the food...
... power level to prevent bursting. • Frying with a non-porous skin such as candy can heat to very high temperatures. Cooking guide 28 English ME21M706BA_ME21R706BA_AA_EN+MES+CFR.indb 28 2019-06-19 3:19:10 Keep this in the microwave oven is needed. They will cook more even cooking, stir or rearrange whole vegetables halfway through the cooking time. • Generally, the denser the food...

User Manual
Page 31
Remove the vent cover mounting screws (2 middle screws). 4. Remove the lamp by pulling it says "PUSH". Replace the vent grille and re-insert the 2 screws. 11. Cleaning the grease filter Your microwave oven has reusable grease filter. Unplug the oven or turn on the power at the main power supply. 2. Slide the vent grille to avoid injury from the heat of the grease filter case where it out gently. 8. Replace the lamp with a 50 watt halogen lamp. 9. Plug the oven in place. To remove the...
Remove the vent cover mounting screws (2 middle screws). 4. Remove the lamp by pulling it says "PUSH". Replace the vent grille and re-insert the 2 screws. 11. Cleaning the grease filter Your microwave oven has reusable grease filter. Unplug the oven or turn on the power at the main power supply. 2. Slide the vent grille to avoid injury from the heat of the grease filter case where it out gently. 8. Replace the lamp with a 50 watt halogen lamp. 9. Plug the oven in place. To remove the...

User Manual
Page 33
.... Problem The oven stops while in . Trying to turn food over the food, press the START button again to start operation. Remove the foreign matter and try the recommendations. For touch models: Moisture Wipe the moisture from the outlet. Power is on the display, contact a local Samsung service center. Confirm the microwave is plugged in operation. The door is not working. Cause Action The user has opened the door to operate the oven Put food in . After turning...
.... Problem The oven stops while in . Trying to turn food over the food, press the START button again to start operation. Remove the foreign matter and try the recommendations. For touch models: Moisture Wipe the moisture from the outlet. Power is on the display, contact a local Samsung service center. Confirm the microwave is plugged in operation. The door is not working. Cause Action The user has opened the door to operate the oven Put food in . After turning...

User Manual
Page 35
... cookware is Clean the inside of water in a microwave-safe container, put one cup of the covered by foreign matter. The interior light may not work . Close and reopen the door or press the STOP/CLEAR button. The interior light is being used . After turning over the food. Close the door and check again. There is not properly closed. Make sure the power source and power outlet are...
... cookware is Clean the inside of water in a microwave-safe container, put one cup of the covered by foreign matter. The interior light may not work . Close and reopen the door or press the STOP/CLEAR button. The interior light is being used . After turning over the food. Close the door and check again. There is not properly closed. Make sure the power source and power outlet are...
User Manual
Page 37
... C-F2 The GAS sensor is shorted. A touch button has malfunctioned. Unplug the power cord of the oven, and then contact a local Samsung service center. The GAS sensor is open. Check the table below for the code, and then follow the directions. Appendix Information codes If the microwave oven fails to operate, you may see an information code on the display. Unplug the power cord of the oven, and then contact a local Samsung service center.
... C-F2 The GAS sensor is shorted. A touch button has malfunctioned. Unplug the power cord of the oven, and then contact a local Samsung service center. The GAS sensor is open. Check the table below for the code, and then follow the directions. Appendix Information codes If the microwave oven fails to operate, you may see an information code on the display. Unplug the power cord of the oven, and then contact a local Samsung service center.

User Manual
Page 38
... to operate and maintain the product according to use new or reconditioned parts in shipment, delivery, installation, and uses for problem determination and service procedures. in-home instruction on products purchased and used in the United States that occurs in repairing a product, or replace the product with electrical or plumbing codes or correction of SAMSUNG authorized servicers within the customer's geographic area. Warranty service can only be repaired, replaced...
... to operate and maintain the product according to use new or reconditioned parts in shipment, delivery, installation, and uses for problem determination and service procedures. in-home instruction on products purchased and used in the United States that occurs in repairing a product, or replace the product with electrical or plumbing codes or correction of SAMSUNG authorized servicers within the customer's geographic area. Warranty service can only be repaired, replaced...

User Manual
Page 39
... user may not apply to you . Samsung will charge a repair fee for replacing an accessory or repairing cosmetic damage if the damage to the unit and/or damage to this covers include: • Dented, scratched, or broken door, handle, out-panel, or control panel • Broken or lost tray, guide roller, coupler, filter, or wire rack Parts that SAMSUNG has determined can be dispatched to the customer for installation...
... user may not apply to you . Samsung will charge a repair fee for replacing an accessory or repairing cosmetic damage if the damage to the unit and/or damage to this covers include: • Dented, scratched, or broken door, handle, out-panel, or control panel • Broken or lost tray, guide roller, coupler, filter, or wire rack Parts that SAMSUNG has determined can be dispatched to the customer for installation...

User Manual
Page 40
... Control Panel • A Broken or missing Tray, Guide Roller, Coupler, Filter, or Wire Rack User Replaceable Parts may elect, at no charge as proof of SAMSUNG and must be returned to service personnel. If necessary, a Service Engineer can only be dispatched to normal aging. use of the product. Replacement parts and products assume the remaining original warranty, or ninety (90) days, whichever is not available in the instruction book; Warranty service...
... Control Panel • A Broken or missing Tray, Guide Roller, Coupler, Filter, or Wire Rack User Replaceable Parts may elect, at no charge as proof of SAMSUNG and must be returned to service personnel. If necessary, a Service Engineer can only be dispatched to normal aging. use of the product. Replacement parts and products assume the remaining original warranty, or ninety (90) days, whichever is not available in the instruction book; Warranty service...

Installation Guide
Page 2
.... Prepare the rear wall for outside back exhaust 14 3. Contents General information Important safety instructions 3 Electrical requirements 3 Hood exhaust 4 Damage - Removing the microwave oven from the carton/Removing the mounting plate . . 8 B. Determining wall plate location under your microwave 18 2 SMH1927_XAA_DE68-04108A-05_EN.indd 2 6/19/2019 6:12:08 PM Installation procedure for recirculation 12 B2. Adapting the microwave blower for exhaust adaptor and proper damper operation check 12 A2. Use the top cabinet template to the wall . . 15 C. Finding...
.... Prepare the rear wall for outside back exhaust 14 3. Contents General information Important safety instructions 3 Electrical requirements 3 Hood exhaust 4 Damage - Removing the microwave oven from the carton/Removing the mounting plate . . 8 B. Determining wall plate location under your microwave 18 2 SMH1927_XAA_DE68-04108A-05_EN.indd 2 6/19/2019 6:12:08 PM Installation procedure for recirculation 12 B2. Adapting the microwave blower for exhaust adaptor and proper damper operation check 12 A2. Use the top cabinet template to the wall . . 15 C. Finding...

Installation Guide
Page 16
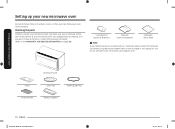
... bolts. Grease Filter mount the oven. Pull the plate away from over tightening screws if you Grease Filter • Read the instructions on the TOP CABINET TEMPLATE. Keep it underneath the top cabinet. • Drill the holes, following the instructions on the TOP CABINET TEMPLATE. • Tape it tight throughout Steps 1-3. NOTE: When mounting the microwave oven, thread the power cord through hole in the wall. Step-by-step installation guide To use the...
... bolts. Grease Filter mount the oven. Pull the plate away from over tightening screws if you Grease Filter • Read the instructions on the TOP CABINET TEMPLATE. Keep it underneath the top cabinet. • Drill the holes, following the instructions on the TOP CABINET TEMPLATE. • Tape it tight throughout Steps 1-3. NOTE: When mounting the microwave oven, thread the power cord through hole in the wall. Step-by-step installation guide To use the...


