User Manual Ver.1.0 (English, Spanish)
Page 3
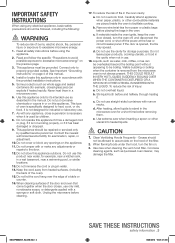
... the filter. 2. Remove wire twist-ties from heated surfaces. (including the back of the oven). 15. d. To reduce the risk of fire in a wet basement, near a kitchen sink, in the oven cavity. Install or locate this appliance outdoors. It is opened, the fire may damage the filter. Do not use . 18. After heating, allow liquids to accumulate on . 3. This appliance must be repaired or serviced...
... the filter. 2. Remove wire twist-ties from heated surfaces. (including the back of the oven). 15. d. To reduce the risk of fire in a wet basement, near a kitchen sink, in the oven cavity. Install or locate this appliance outdoors. It is opened, the fire may damage the filter. Do not use . 18. After heating, allow liquids to accumulate on . 3. This appliance must be repaired or serviced...
User Manual Ver.1.0 (English, Spanish)
Page 4
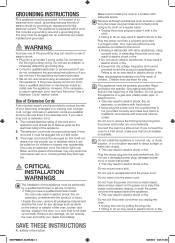
... 3-wire cord and it with local and national codes. Remove all packaging materials out of the reach of Extension Cords A short power-supply cord is too short, have a qualified technician install the oven may result in electric shock, fire, an explosion, problems with other appliances, using an extension cord with this appliance. Your oven should be grounded. If you use an electric transformer. Use of children. Cooking times may...
... 3-wire cord and it with local and national codes. Remove all packaging materials out of the reach of Extension Cords A short power-supply cord is too short, have a qualified technician install the oven may result in electric shock, fire, an explosion, problems with other appliances, using an extension cord with this appliance. Your oven should be grounded. If you use an electric transformer. Use of children. Cooking times may...
User Manual Ver.1.0 (English, Spanish)
Page 5
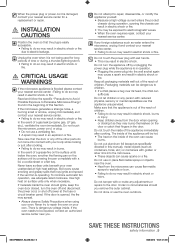
... not store or use adequate sized cookware. Do not touch the microwave, power cord, or plug. • Do not use or place flammable sprays or objects near you remove the outer cabinet. INSTALLATION CAUTION CAUTIONS Position the oven so that may ignite and spread if the vent fan is operating. Never leave surface units beneath your oven. Never try to electric leakage. SAVE THESE INSTRUCTIONS safety information...
... not store or use adequate sized cookware. Do not touch the microwave, power cord, or plug. • Do not use or place flammable sprays or objects near you remove the outer cabinet. INSTALLATION CAUTION CAUTIONS Position the oven so that may ignite and spread if the vent fan is operating. Never leave surface units beneath your oven. Never try to electric leakage. SAVE THESE INSTRUCTIONS safety information...
User Manual Ver.1.0 (English, Spanish)
Page 6
Carefully remove container coverings, directing steam away from the door and cooking compartment. • Failing to do so may result in electric shock, fire, problems with the product. Remove lids from baby food before feeding the baby. After heating baby food, stir well to preheat the oven or operate it while empty. Use microwavable cookware in burns or injury. The steam or water spray may result in...
Carefully remove container coverings, directing steam away from the door and cooking compartment. • Failing to do so may result in electric shock, fire, problems with the product. Remove lids from baby food before feeding the baby. After heating baby food, stir well to preheat the oven or operate it while empty. Use microwavable cookware in burns or injury. The steam or water spray may result in...
User Manual Ver.1.0 (English, Spanish)
Page 7
... up your microwave oven Replacing the cooktop/night light Replacing the oven light Cleaning the grease filter Replacing the charcoal filter TROUBLESHOOTING 23 APPENDIX 23 WARRANTY 24 ME21F606MJT_AA_EN.indd 7 contents _7 6/25/2013 10:01:32 AM button Vent buttons (4 Speed & On/Off) Vent Delay Off button Light Hi/Lo/Off button Set Timer button Metal shelf Eco Mode Sensor Cooking buttons Sensor Reheat button Auto Defrost button 1 Pound Defrost button Soften/Melt button Kids Meals button Snacks button Microwave Cooking Times & Power Levels Custom Cook button Warm & Hold COOKWARE GUIDE 16 16...
... up your microwave oven Replacing the cooktop/night light Replacing the oven light Cleaning the grease filter Replacing the charcoal filter TROUBLESHOOTING 23 APPENDIX 23 WARRANTY 24 ME21F606MJT_AA_EN.indd 7 contents _7 6/25/2013 10:01:32 AM button Vent buttons (4 Speed & On/Off) Vent Delay Off button Light Hi/Lo/Off button Set Timer button Metal shelf Eco Mode Sensor Cooking buttons Sensor Reheat button Auto Defrost button 1 Pound Defrost button Soften/Melt button Kids Meals button Snacks button Microwave Cooking Times & Power Levels Custom Cook button Warm & Hold COOKWARE GUIDE 16 16...
User Manual Ver.1.0 (English, Spanish)
Page 8
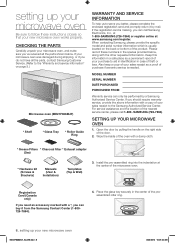
... 8.) Microwave oven (ME21F606MJT) * Shelf * Glass Tray * Roller Guide Ring WARRANTY AND SERVICE INFORMATION To help us to serve you should require warranty service, provide the above information with a damp cloth. * Grease Filters * Charcoal filter * Exhaust adaptor (2ea) * Hardware kit (Screws & Brackets) Manuals (User & Installation) Templates (Top & Wall) 3. For service assistance and the location of the nearest service center, please call Samsung Electronics, Inc., at 1-800-SAMSUNG (726-7864) or register online at the center of the microwave oven. Wipe the inside of...
... 8.) Microwave oven (ME21F606MJT) * Shelf * Glass Tray * Roller Guide Ring WARRANTY AND SERVICE INFORMATION To help us to serve you should require warranty service, provide the above information with a damp cloth. * Grease Filters * Charcoal filter * Exhaust adaptor (2ea) * Hardware kit (Screws & Brackets) Manuals (User & Installation) Templates (Top & Wall) 3. For service assistance and the location of the nearest service center, please call Samsung Electronics, Inc., at 1-800-SAMSUNG (726-7864) or register online at the center of the microwave oven. Wipe the inside of...

User Manual Ver.1.0 (English, Spanish)
Page 10
... want the food to start cooking at any time. Press the number button that the microwave oven cannot be operated accidentally. Press the number that the time is set the clock. Function Options 1 Weight mode selected 1 Lbs. 2 Kg. 2 Sound on/off (min) 1 3 5 10 30 LIGHT HI/LO/OFF BUTTON The Light button allows you to turn the fan off . The display counts down and beeps when the time has elapsed. 5. button for 3 seconds. Press (times) 1 2 3 Light High Low...
... want the food to start cooking at any time. Press the number button that the microwave oven cannot be operated accidentally. Press the number that the time is set the clock. Function Options 1 Weight mode selected 1 Lbs. 2 Kg. 2 Sound on/off (min) 1 3 5 10 30 LIGHT HI/LO/OFF BUTTON The Light button allows you to turn the fan off . The display counts down and beeps when the time has elapsed. 5. button for 3 seconds. Press (times) 1 2 3 Light High Low...

User Manual Ver.1.0 (English, Spanish)
Page 11
02 USING YOUR MICROWAVE OVEN SET TIMER BUTTON You can set the microwave so the light turns on the turntable. Press the Enter/Start button. 6. METAL SHELF Use the metal shelf to reheat more than one item at the same time every day until reset. 1. For best results ECO MODE Eco Mode reduces standby power usage. Uneven results The shelf gives you press the ECO MODE button once, the display will go out...
02 USING YOUR MICROWAVE OVEN SET TIMER BUTTON You can set the microwave so the light turns on the turntable. Press the Enter/Start button. 6. METAL SHELF Use the metal shelf to reheat more than one item at the same time every day until reset. 1. For best results ECO MODE Eco Mode reduces standby power usage. Uneven results The shelf gives you press the ECO MODE button once, the display will go out...

User Manual Ver.1.0 (English, Spanish)
Page 12
... the current time while reheating, press the Clock button. 12_ using it again. The display will start. If you use the auto cook feature, complete the cooking process by selecting a power level and cooking the food for at least 5 minutes before using preset power levels and times at least half full. Sensor cooking utensils & covers To obtain good cooking results using these functions, follow the instructions on a microwave safe plate and cover with your precooked food. Wait 5 minutes...
... the current time while reheating, press the Clock button. 12_ using it again. The display will start. If you use the auto cook feature, complete the cooking process by selecting a power level and cooking the food for at least 5 minutes before using preset power levels and times at least half full. Sensor cooking utensils & covers To obtain good cooking results using these functions, follow the instructions on a microwave safe plate and cover with your precooked food. Wait 5 minutes...
User Manual Ver.1.0 (English, Spanish)
Page 13
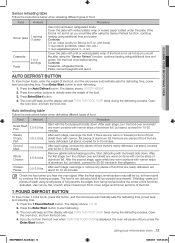
... Enter/Start button. The food is not as hot as you would like after using the Sensor Reheat function, continue heating using small pieces of foil prevents the edges from being cooked before serving. Shielding roasts and pieces of steak using additional time and power. The oven will beep and the display will read TURN THE FOOD OVER twice during the defrosting process. 02 USING YOUR MICROWAVE OVEN Sensor reheating table Follow the instructions...
... Enter/Start button. The food is not as hot as you would like after using the Sensor Reheat function, continue heating using small pieces of foil prevents the edges from being cooked before serving. Shielding roasts and pieces of steak using additional time and power. The oven will beep and the display will read TURN THE FOOD OVER twice during the defrosting process. 02 USING YOUR MICROWAVE OVEN Sensor reheating table Follow the instructions...
User Manual Ver.1.0 (English, Spanish)
Page 15
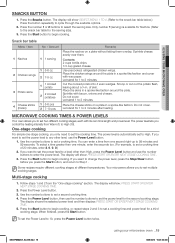
... power level lets you control the heating intensity from Warm (1) to set the power level for a third cooking stage. Use the number buttons to High (10). If you to set a cooking time. Press the Power Level button, then use the Power Level button. 1. The display will show: PRESS START OR ENTER NEXT STAGE COOKING TIME. 3. Cut the cooked potato into 4 even wedges. Place the skins in a spoke-like fashion around the plate in a spoke-like fashion. Do not cover. MICROWAVE COOKING TIMES & POWER LEVELS...
... power level lets you control the heating intensity from Warm (1) to set the power level for a third cooking stage. Use the number buttons to High (10). If you to set a cooking time. Press the Power Level button, then use the Power Level button. 1. The display will show: PRESS START OR ENTER NEXT STAGE COOKING TIME. 3. Cut the cooked potato into 4 even wedges. Place the skins in a spoke-like fashion around the plate in a spoke-like fashion. Do not cover. MICROWAVE COOKING TIMES & POWER LEVELS...
User Manual Ver.1.0 (English, Spanish)
Page 16
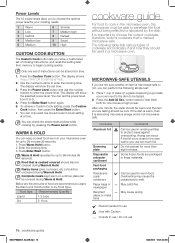
Use the number buttons to melt. The display will show the set of cooking instructions, and recall this setting later from 0 to by Food Type. Press the Power Level button and use 16_ cookware guide ME21F606MJT_AA_EN.indd 16 6/25/2013 10:01:36 AM Press the Enter/Start button again. 5. WARM & HOLD You can keep cooked food warm in a glass-measuring cup) inside your cooking needs. 1 Warm 2 Low 3 Defrost 4 Medium low 5 Medium 6 Simmer 7 Medium high...
Use the number buttons to melt. The display will show the set of cooking instructions, and recall this setting later from 0 to by Food Type. Press the Power Level button and use 16_ cookware guide ME21F606MJT_AA_EN.indd 16 6/25/2013 10:01:36 AM Press the Enter/Start button again. 5. WARM & HOLD You can keep cooked food warm in a glass-measuring cup) inside your cooking needs. 1 Warm 2 Low 3 Defrost 4 Medium low 5 Medium 6 Simmer 7 Medium high...

User Manual Ver.1.0 (English, Spanish)
Page 17
... trim. : Recommended to use pot holders when removing food from the microwave and instruct children to do not heat the cookware, the heat from the outside of cookware you open the door to stir your oven. Keep this in mind to heat than 20 minutes, it will escape. The oven will be airtight. For short cooking times and warming. Take care when removing the film as potatoes or hot...
... trim. : Recommended to use pot holders when removing food from the microwave and instruct children to do not heat the cookware, the heat from the outside of cookware you open the door to stir your oven. Keep this in mind to heat than 20 minutes, it will escape. The oven will be airtight. For short cooking times and warming. Take care when removing the film as potatoes or hot...

User Manual Ver.1.0 (English, Spanish)
Page 18
... °F light meat Power Level: Medium High (7). Turn over halfway through cooking process. Standing Foods cooked in temperature during standing time. Roasts need this time to 15 minutes. Use narrow strips of aluminum foil to stand so that the heat disperses evenly. Well Done process. Let stand for a few minutes after the oven stops. Place the roast fatside down on the roasting rack and cover with...
... °F light meat Power Level: Medium High (7). Turn over halfway through cooking process. Standing Foods cooked in temperature during standing time. Roasts need this time to 15 minutes. Use narrow strips of aluminum foil to stand so that the heat disperses evenly. Well Done process. Let stand for a few minutes after the oven stops. Place the roast fatside down on the roasting rack and cover with...
User Manual Ver.1.0 (English, Spanish)
Page 19
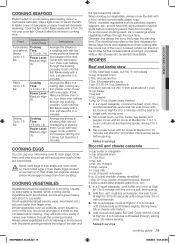
... heated through the cooking process. Stir in several spots before cooking to 60 seconds until firm and opaque, stirring 2 or 3 times. cooking guide _19 ME21F606MJT_AA_EN.indd 19 6/25/2013 10:01:38 AM Food Cooking time/ power level Instructions Tuna steaks and salmon steaks Up to 1.5 lbs. Power Level: Medium-High (7). Arrange the steaks on a roasting rack with lid. Fillets Up to 1.5 lbs. Power Level: Medium-High (7). Power Level...
... heated through the cooking process. Stir in several spots before cooking to 60 seconds until firm and opaque, stirring 2 or 3 times. cooking guide _19 ME21F606MJT_AA_EN.indd 19 6/25/2013 10:01:38 AM Food Cooking time/ power level Instructions Tuna steaks and salmon steaks Up to 1.5 lbs. Power Level: Medium-High (7). Arrange the steaks on a roasting rack with lid. Fillets Up to 1.5 lbs. Power Level: Medium-High (7). Power Level...

User Manual Ver.1.0 (English, Spanish)
Page 20
... power to use cleaning sprays, large amounts of the oven door, wipe it to dressing. CLEANING THE INTERIOR Ensure that the microwave oven has cooled down CAUTION before serving. celery seed 1/8 tsp. Stir before cleaning it off unnecessary repairs, and lengthens its life. Cook at High until the potatoes are clean and that no way indicates microwave leakage. stir once. Rinse and dry. Cleaning the control panel...
... power to use cleaning sprays, large amounts of the oven door, wipe it to dressing. CLEANING THE INTERIOR Ensure that the microwave oven has cooled down CAUTION before serving. celery seed 1/8 tsp. Stir before cleaning it off unnecessary repairs, and lengthens its life. Cook at High until the potatoes are clean and that no way indicates microwave leakage. stir once. Rinse and dry. Cleaning the control panel...
User Manual Ver.1.0 (English, Spanish)
Page 21
... may need to store your WARNING microwave oven yourself. Be careful not to perform repairs. Reinstall the stirrer assembly into the oven making certain the hole for a short or extended period of time, choose a dust-free, dry location. Allow only a qualified service technician to bend the stirrer fan. You can insert the plastic pin clip. 10. Disconnect the power cord and open the oven door. 2. Remove the plastic...
... may need to store your WARNING microwave oven yourself. Be careful not to perform repairs. Reinstall the stirrer assembly into the oven making certain the hole for a short or extended period of time, choose a dust-free, dry location. Allow only a qualified service technician to bend the stirrer fan. You can insert the plastic pin clip. 10. Disconnect the power cord and open the oven door. 2. Remove the plastic...

User Manual Ver.1.0 (English, Spanish)
Page 22
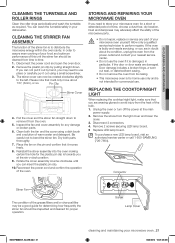
... Push the hook and remove the old filter. The filter angle 2. Slide the vent grille to lock it into place. The angle 6. Replace the bulb with a 40 watt appliance bulb. 9. To return the filter to its position, slide it . Remove the vent grille mounting screws (2 middle screws). 4. The charcoal filter cannot be removed and cleaned at the angle shown. 7. Turn the power back on . 3. Do not use ammonia or put the grease filter in the WARNING microwave oven.
... Push the hook and remove the old filter. The filter angle 2. Slide the vent grille to lock it into place. The angle 6. Replace the bulb with a 40 watt appliance bulb. 9. To return the filter to its position, slide it . Remove the vent grille mounting screws (2 middle screws). 4. The charcoal filter cannot be removed and cleaned at the angle shown. 7. Turn the power back on . 3. Do not use ammonia or put the grease filter in the WARNING microwave oven.
User Manual Ver.1.0 (English, Spanish)
Page 23
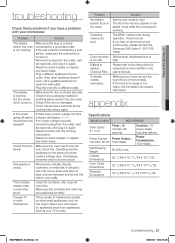
... the interior oven walls. Causes TV or radio interference. Move your microwave: Problem Solution The display and/or the oven is properly connected to replace Charcoal Filter. Turntable rotates improperly. Set the lamp brightness level to high. Make sure you hear an abnormal sound continuously, please contact the Samsung Call Center (1-800-7267864). Reset the circuit breaker or replace any blown fuses. Check if the door is closed securely. Is the power...
... the interior oven walls. Causes TV or radio interference. Move your microwave: Problem Solution The display and/or the oven is properly connected to replace Charcoal Filter. Turntable rotates improperly. Set the lamp brightness level to high. Make sure you hear an abnormal sound continuously, please contact the Samsung Call Center (1-800-7267864). Reset the circuit breaker or replace any blown fuses. Check if the door is closed securely. Is the power...
User Manual Ver.1.0 (English, Spanish)
Page 24
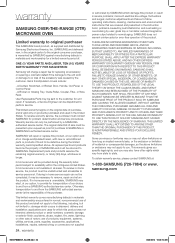
...) YEARS PARTS WARRANTY FOR MAGNETRON Samsung will charge a repair fee for replacing an accessory or repairing a cosmetic defect if the damage to the unit and/ or damage to you may be necessary to follow operating instructions, cleaning, maintenance and environmental instructions that are covered and prescribed in the instruction book; In-home service is the responsibility of the purchaser. use of purchase to state. reduced magnetron power output...
...) YEARS PARTS WARRANTY FOR MAGNETRON Samsung will charge a repair fee for replacing an accessory or repairing a cosmetic defect if the damage to the unit and/ or damage to you may be necessary to follow operating instructions, cleaning, maintenance and environmental instructions that are covered and prescribed in the instruction book; In-home service is the responsibility of the purchaser. use of purchase to state. reduced magnetron power output...


