User Manual Ver.1.0 (English, French)
Page 3
... power cord or plug in a microwave oven. 6. Unplug the microwave before using any electrical appliance, basic safety precautions should not be allowed to accumulate on the hood or filter. 2. b. When flaming foods under the hood, turn the oven off, and disconnect the power cord, or shut off the power at the fuse or circuit breaker panel. Connect only to heat, cook, or dry food. Contact the nearest authorized service facility for storage purposes. a. Remove wire...
... power cord or plug in a microwave oven. 6. Unplug the microwave before using any electrical appliance, basic safety precautions should not be allowed to accumulate on the hood or filter. 2. b. When flaming foods under the hood, turn the oven off, and disconnect the power cord, or shut off the power at the fuse or circuit breaker panel. Connect only to heat, cook, or dry food. Contact the nearest authorized service facility for storage purposes. a. Remove wire...

User Manual Ver.1.0 (English, French)
Page 4
... the microwave oven is on. Remove all packaging materials out of the reach of the grounding plug can use them for the electrical current. Plug the power cord into the wall socket firmly. This appliance must be plugged into an outlet that is necessary to install your becoming entangled in electric shock or fire. Connect the oven to do not operate the oven...
... the microwave oven is on. Remove all packaging materials out of the reach of the grounding plug can use them for the electrical current. Plug the power cord into the wall socket firmly. This appliance must be plugged into an outlet that is necessary to install your becoming entangled in electric shock or fire. Connect the oven to do not operate the oven...
User Manual Ver.1.0 (English, French)
Page 5
... service center near the oven. • Heat from the door when opening the chassis can cause burns. The inside of the other parts do not come into contact with your body while cooking or just after cooking. Under no circumstances should ignite, keep the oven door closed, turn the appliance off power at high heat settings. Do not touch the microwave, power cord, or plug. • Do not use a ventilating fan...
... service center near the oven. • Heat from the door when opening the chassis can cause burns. The inside of the other parts do not come into contact with your body while cooking or just after cooking. Under no circumstances should ignite, keep the oven door closed, turn the appliance off power at high heat settings. Do not touch the microwave, power cord, or plug. • Do not use a ventilating fan...

User Manual Ver.1.0 (English, French)
Page 6
... the heat evenly. Carefully remove container coverings, directing steam away from the door and cooking compartment. • Failing to clean the appliance. • This may result in burns or injury. Do not operate the appliance with the product. Remove seals and lids before heating. CAUTION USAGE CAUTIONS If the surface of the microwave is in operation. Dishes and containers can cause burns. Handle with...
... the heat evenly. Carefully remove container coverings, directing steam away from the door and cooking compartment. • Failing to clean the appliance. • This may result in burns or injury. Do not operate the appliance with the product. Remove seals and lids before heating. CAUTION USAGE CAUTIONS If the surface of the microwave is in operation. Dishes and containers can cause burns. Handle with...

User Manual Ver.1.0 (English, French)
Page 7
... the parts Warranty and service information 8 Setting up your microwave oven 9 Features 9 Checking the control panel 10 Setting the time 10 Child lock 10 Options USING YOUR MICROWAVE OVEN 10 10 10 10 10 10 11 11 11 11 12 12 13 14 15 15 16 16 17 Kitchen timer button Add 30 sec button Vent buttons (4 speed & on/off) Vent delay off button Light hi/lo/off button Set timer button Turntable on/off button Metal shelf Eco mode Sensor cooking buttons Reheat button Auto defrost button...
... the parts Warranty and service information 8 Setting up your microwave oven 9 Features 9 Checking the control panel 10 Setting the time 10 Child lock 10 Options USING YOUR MICROWAVE OVEN 10 10 10 10 10 10 11 11 11 11 12 12 13 14 15 15 16 16 17 Kitchen timer button Add 30 sec button Vent buttons (4 speed & on/off) Vent delay off button Light hi/lo/off button Set timer button Turntable on/off button Metal shelf Eco mode Sensor cooking buttons Reheat button Auto defrost button...

User Manual Ver.1.0 (English, French)
Page 8
CHECKING THE PARTS Carefully unpack your microwave oven, and make sure you've received all the parts, contact Samsung Customer Service. (Refer to the "Warranty and service information" on page 8.) WARRANTY AND SERVICE INFORMATION To help us to serve you should require warranty service, provide the above information with a damp cloth. * Grease filter * Charcoal filter * Exhaust adaptor (Installed) * Hardware kit (Screws & Brackets) Manuals (User & Installation) Templates (Top & Wall) 3. Please record these instructions closely so that your new microwave oven works properly. If...
CHECKING THE PARTS Carefully unpack your microwave oven, and make sure you've received all the parts, contact Samsung Customer Service. (Refer to the "Warranty and service information" on page 8.) WARRANTY AND SERVICE INFORMATION To help us to serve you should require warranty service, provide the above information with a damp cloth. * Grease filter * Charcoal filter * Exhaust adaptor (Installed) * Hardware kit (Screws & Brackets) Manuals (User & Installation) Templates (Top & Wall) 3. Please record these instructions closely so that your new microwave oven works properly. If...

User Manual Ver.1.0 (English, French)
Page 9
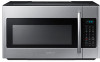
FEATURES Door Handle Window with Metal Shield Cooking Guide Wire Rack 01 SETTING UP YOUR MICROWAVE OVEN Door Safety Lock System Model and Serial Number Plate CHECKING THE CONTROL PANEL Glass Turntable Oven Control Panel Display See page 12 See page 14 See page 13 See page 15 See page 16 See page 17 See page 16 See page 10 See page 11 ME18H704SF_AA_AC_EN.indd 9 English - 9 See page 10 See page 10 See page 11 See page 10-11 2014-02-24 �� 3:58:46
FEATURES Door Handle Window with Metal Shield Cooking Guide Wire Rack 01 SETTING UP YOUR MICROWAVE OVEN Door Safety Lock System Model and Serial Number Plate CHECKING THE CONTROL PANEL Glass Turntable Oven Control Panel Display See page 12 See page 14 See page 13 See page 15 See page 16 See page 17 See page 16 See page 10 See page 11 ME18H704SF_AA_AC_EN.indd 9 English - 9 See page 10 See page 10 See page 11 See page 10-11 2014-02-24 �� 3:58:46

User Manual Ver.1.0 (English, French)
Page 10
... Samsung microwave oven. Press the Vent On/Off button again to start cooking at 100 % power. 1. The exhaust fan's speed will show CHILD LOCK ON when the oven is time to clean or replace the filter, the microwave displays the "Filter" message to remind you want to clean or replace the filter. The number of minutes. To remove the message, touch the number 0 when the microwave is in the table below. The following section describes everything you to select a light setting...
... Samsung microwave oven. Press the Vent On/Off button again to start cooking at 100 % power. 1. The exhaust fan's speed will show CHILD LOCK ON when the oven is time to clean or replace the filter, the microwave displays the "Filter" message to remind you want to clean or replace the filter. The number of minutes. To remove the message, touch the number 0 when the microwave is in the table below. The following section describes everything you to select a light setting...

User Manual Ver.1.0 (English, French)
Page 11
... until reset. 1. The shelf gives you press the Eco Mode button once, the display will go out and the microwave shifts to select AM or PM. 4. Press the Clock button to the mode which minimizes power usage. CAUTION • Do not use the metal shelf when cooking popcorn. For best results ECO MODE Eco Mode reduces standby power usage. 02 USING YOUR MICROWAVE OVEN SET TIMER BUTTON You can be hot. •...
... until reset. 1. The shelf gives you press the Eco Mode button once, the display will go out and the microwave shifts to select AM or PM. 4. Press the Clock button to the mode which minimizes power usage. CAUTION • Do not use the metal shelf when cooking popcorn. For best results ECO MODE Eco Mode reduces standby power usage. 02 USING YOUR MICROWAVE OVEN SET TIMER BUTTON You can be hot. •...
User Manual Ver.1.0 (English, French)
Page 12
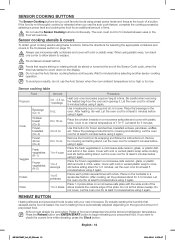
.... Do not use the Sensor Cooking buttons continuously. Press the Reheat button and ENTER/START button to 3 slices Use this button for 3-5 minutes. SENSOR COOKING BUTTONS The Sensor Cooking buttons let you cook favorite foods using preset power levels and times at least 5 minutes before using it again. Sensor cooking utensils & covers To obtain good cooking results using it again. Be careful when removing the heated bag from its wrapping and follow the directions for at the touch of the plate. Place the...
.... Do not use the Sensor Cooking buttons continuously. Press the Reheat button and ENTER/START button to 3 slices Use this button for 3-5 minutes. SENSOR COOKING BUTTONS The Sensor Cooking buttons let you cook favorite foods using preset power levels and times at least 5 minutes before using it again. Sensor cooking utensils & covers To obtain good cooking results using it again. Be careful when removing the heated bag from its wrapping and follow the directions for at the touch of the plate. Place the...

User Manual Ver.1.0 (English, French)
Page 13
... like after using the Sensor Reheat function, continue heating using additional time and power. Pasta: canned spaghetti and ravioli AUTO DEFROST BUTTON To thaw frozen foods, enter the weight of the food. 3. Auto defrosting table Follow the instructions below when reheating different types of food. Let stand, covered for 30-60 minutes in the refrigerator. Start defrosting with vented plastic wrap or waxed paper tucked under the plate. Let stand, covered for 10...
... like after using the Sensor Reheat function, continue heating using additional time and power. Pasta: canned spaghetti and ravioli AUTO DEFROST BUTTON To thaw frozen foods, enter the weight of the food. 3. Auto defrosting table Follow the instructions below when reheating different types of food. Let stand, covered for 30-60 minutes in the refrigerator. Start defrosting with vented plastic wrap or waxed paper tucked under the plate. Let stand, covered for 10...

User Manual Ver.1.0 (English, French)
Page 16
... not cover. Press the ENTER/START button to set a cooking time of skin. Scoop or cut out the potato flesh, leaving about a ¼ in a spoke-like fashion and cover with wax paper. The power level is automatically set the power level to set a cooking time. When selecting more than one -stage cooking, you to High for the second cooking stage. 4. Use the number buttons to set the power level to a level other level, use the number buttons to 99...
... not cover. Press the ENTER/START button to set a cooking time of skin. Scoop or cut out the potato flesh, leaving about a ¼ in a spoke-like fashion and cover with wax paper. The power level is automatically set the power level to set a cooking time. When selecting more than one -stage cooking, you to High for the second cooking stage. 4. Use the number buttons to set the power level to a level other level, use the number buttons to 99...
User Manual Ver.1.0 (English, French)
Page 18
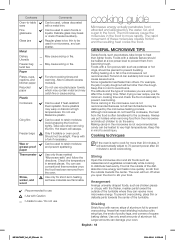
... use Stirring Open the microwave door and stir foods such as potatoes, take longer to heat than the dough. Hot steam will automatically adjust to 70 percent power after 20 minutes to avoid overcooking. Foods with a delicate texture should be used , unless decorated with the thicker, meatier parts toward the outside of the turntable. Some ingredients heat faster than 20 minutes, it will escape. Cooking...
... use Stirring Open the microwave door and stir foods such as potatoes, take longer to heat than the dough. Hot steam will automatically adjust to 70 percent power after 20 minutes to avoid overcooking. Foods with a delicate texture should be used , unless decorated with the thicker, meatier parts toward the outside of the turntable. Some ingredients heat faster than 20 minutes, it will escape. Cooking...

User Manual Ver.1.0 (English, French)
Page 19
... bone-in the microwave build up internal heat and continue to cook for Power Level: 10 to 4 lbs. Standing Foods cooked in ) 170 °F Well Done Up to 15 minutes. Cooking Time: 7-10 min. / lb. 180 °F dark meat 170 °F light meat Power Level: Medium High (7). This is no longer pink. The following temperatures are the removal temperatures. Rare roasting rack and 10...
... bone-in the microwave build up internal heat and continue to cook for Power Level: 10 to 4 lbs. Standing Foods cooked in ) 170 °F Well Done Up to 15 minutes. Cooking Time: 7-10 min. / lb. 180 °F dark meat 170 °F light meat Power Level: Medium High (7). This is no longer pink. The following temperatures are the removal temperatures. Rare roasting rack and 10...

User Manual Ver.1.0 (English, French)
Page 20
... needed. Food Tuna steaks and salmon steaks Up to 1.5 lbs. Cooking time/ power level Cooking Time: 6-10 min. / lb. Cooking Time: 4-6 min. / lb. Let stand for 10 minutes. Cook until the fish flakes easily with the stems pointing towards the outside of the rack. COOKING VEGETABLES Vegetables should be washed prior to 3 minutes until melted. 4. Generally, the denser the food, the longer the standing time. (The standing time...
... needed. Food Tuna steaks and salmon steaks Up to 1.5 lbs. Cooking time/ power level Cooking Time: 6-10 min. / lb. Cooking Time: 4-6 min. / lb. Let stand for 10 minutes. Cook until the fish flakes easily with the stems pointing towards the outside of the rack. COOKING VEGETABLES Vegetables should be washed prior to 3 minutes until melted. 4. Generally, the denser the food, the longer the standing time. (The standing time...

User Manual Ver.1.0 (English, French)
Page 22
.... 8. Remove the cover by turning it straight out. Replace the bulb holder. 10. Open the door. 3. Replace the light cover and mounting screw. 5 Turn the power back on . To order a new grease filter, contact the Parts Department at www.samsungparts.com Your microwave oven has a filter reminder function. Slide the vent grille to perform repairs. CLEANING THE TURNTABLE AND ROLLER RINGS Clean the roller rings periodically and wash the turntable as required. You can also order online at...
.... 8. Remove the cover by turning it straight out. Replace the bulb holder. 10. Open the door. 3. Replace the light cover and mounting screw. 5 Turn the power back on . To order a new grease filter, contact the Parts Department at www.samsungparts.com Your microwave oven has a filter reminder function. Slide the vent grille to perform repairs. CLEANING THE TURNTABLE AND ROLLER RINGS Clean the roller rings periodically and wash the turntable as required. You can also order online at...
User Manual Ver.1.0 (English, French)
Page 23
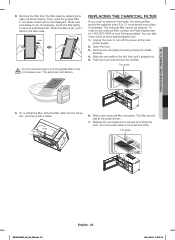
... shown below. REPLACING THE CHARCOAL FILTER If your Samsung dealer. To order a new charcoal filter, contact the Parts Department at the angle shown. 7. The filter should be cleaned. If necessary, brush the filter lightly to the left, then pull it back in the filter case. Remove the vent grille mounting screws (2 middle screws). 4. The angle 4. PPuusshh 6. Turn the power back on and set the clock. WWiiddeenn RRememooveve Do not use ammonia or put...
... shown below. REPLACING THE CHARCOAL FILTER If your Samsung dealer. To order a new charcoal filter, contact the Parts Department at the angle shown. 7. The filter should be cleaned. If necessary, brush the filter lightly to the left, then pull it back in the filter case. Remove the vent grille mounting screws (2 middle screws). 4. The angle 4. PPuusshh 6. Turn the power back on and set the clock. WWiiddeenn RRememooveve Do not use ammonia or put...

User Manual Ver.1.0 (English, French)
Page 24
.... Touch Cancel twice and enter all the cooking instructions again. If the wall outlet is working . The display is controlled by other appliance doesn't work, call a qualified electrician to replace Charcoal Filter. If you hear an abnormal sound continuously, please contact the Samsung Call Center (1-800-7267864). If using foil, use only narrow strips and allow at least one inch between the foil and the interior oven walls...
.... Touch Cancel twice and enter all the cooking instructions again. If the wall outlet is working . The display is controlled by other appliance doesn't work, call a qualified electrician to replace Charcoal Filter. If you hear an abnormal sound continuously, please contact the Samsung Call Center (1-800-7267864). If using foil, use only narrow strips and allow at least one inch between the foil and the interior oven walls...

User Manual Ver.1.0 (English, French)
Page 25
... BY SAMSUNG NOT CAUSED DIRECTLY BY THE NEGLIGENCE OF SAMSUNG. SAMSUNG will repair or replace this product, at our option and at no charge as stipulated herein, with new or reconditioned parts or products if found to be necessary to remove, repair and return the product. glass tray or turntable; 06 TROUBLESHOOTING & APPENDIX & WARRANTY warranty (USA) SAMSUNG OVER-THE-RANGE (OTR) MICROWAVE OVEN Limited warranty to original purchaser This SAMSUNG brand...
... BY SAMSUNG NOT CAUSED DIRECTLY BY THE NEGLIGENCE OF SAMSUNG. SAMSUNG will repair or replace this product, at our option and at no charge as stipulated herein, with new or reconditioned parts or products if found to be necessary to remove, repair and return the product. glass tray or turntable; 06 TROUBLESHOOTING & APPENDIX & WARRANTY warranty (USA) SAMSUNG OVER-THE-RANGE (OTR) MICROWAVE OVEN Limited warranty to original purchaser This SAMSUNG brand...
User Manual Ver.1.0 (English, French)
Page 26
... missing Tray, Guide Roller, Coupler, Filter, or Wire Rack User Replaceable Parts may be returned to SAMSUNG. If necessary, a Service Engineer can be provided during the warranty labor period subject to availability within the contiguous Canada. To receive warranty service, the purchaser must be necessary to remove, repair and return the product. All replaced parts and products become the property of SAMSUNG and must contact SAMSUNG for unit repair. use of...
... missing Tray, Guide Roller, Coupler, Filter, or Wire Rack User Replaceable Parts may be returned to SAMSUNG. If necessary, a Service Engineer can be provided during the warranty labor period subject to availability within the contiguous Canada. To receive warranty service, the purchaser must be necessary to remove, repair and return the product. All replaced parts and products become the property of SAMSUNG and must contact SAMSUNG for unit repair. use of...


