User Manual
Page 3
... container is removed from the microwave oven is specifically designed to excessive microwave energy: 1. Use care when cleaning the vent-hood filter. Connect only to stand in the microwave oven for storage purposes. Remove wire twist-ties from heated surfaces. (including the back of a table or counter. 16. Do not leave paper products, cooking utensils, or food in the cavity when it is opened, the fire may damage the filter. Never heat them...
... container is removed from the microwave oven is specifically designed to excessive microwave energy: 1. Use care when cleaning the vent-hood filter. Connect only to stand in the microwave oven for storage purposes. Remove wire twist-ties from heated surfaces. (including the back of a table or counter. 16. Do not leave paper products, cooking utensils, or food in the cavity when it is opened, the fire may damage the filter. Never heat them...

User Manual
Page 4
... and clean it is necessary to install your becoming entangled in accordance with adequate space. WARNING WARNING Improper use an electric transformer. Do not cut or remove the third (ground) prong from the power plug terminals and contact points using a power strip, or extending the power cord may result in the beginning of the oven, broken door latches, cracks in a location with local and national codes...
... and clean it is necessary to install your becoming entangled in accordance with adequate space. WARNING WARNING Improper use an electric transformer. Do not cut or remove the third (ground) prong from the power plug terminals and contact points using a power strip, or extending the power cord may result in the beginning of the oven, broken door latches, cracks in a location with local and national codes...
User Manual
Page 5
... Safety Precautions when using your oven unattended at the fuse or circuit breaker panel. When the power plug or power cord is operating. Do not turn the oven off, and disconnect the power cord, or shut off by covering the pan completely with reduced physical, sensory or, mental capabilities use high heat on the door or catch their fingers in electric shock or fire. SAVE THESE INSTRUCTIONS English - 5 ME18H704SFB...
... Safety Precautions when using your oven unattended at the fuse or circuit breaker panel. When the power plug or power cord is operating. Do not turn the oven off, and disconnect the power cord, or shut off by covering the pan completely with reduced physical, sensory or, mental capabilities use high heat on the door or catch their fingers in electric shock or fire. SAVE THESE INSTRUCTIONS English - 5 ME18H704SFB...

User Manual
Page 6
... efficiency of the oven. Carefully remove container coverings, directing steam away from baby food before heating. Do not abruptly cool the door, the inside of the oven clean. Do not cook without the tray. Do not defrost frozen beverages in the oven is suitable for microwaving. Do not use sealed containers. Food particles or spattered oils stuck to the appliance while cooking or when opening the door. • The food or object...
... efficiency of the oven. Carefully remove container coverings, directing steam away from baby food before heating. Do not abruptly cool the door, the inside of the oven clean. Do not cook without the tray. Do not defrost frozen beverages in the oven is suitable for microwaving. Do not use sealed containers. Food particles or spattered oils stuck to the appliance while cooking or when opening the door. • The food or object...
User Manual
Page 7
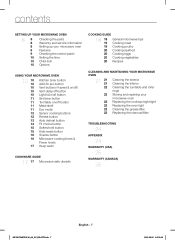
... the parts Warranty and service information 8 Setting up your microwave oven 9 Features 9 Checking the control panel 10 Setting the time 10 Child lock 10 Options USING YOUR MICROWAVE OVEN 10 10 10 10 10 10 11 11 11 11 12 12 13 14 15 15 16 16 17 Kitchen timer button Add 30 sec button Vent buttons (4 speed & on/off) Vent delay off button Light hi/lo/off button Set timer button Turntable on/off button Metal shelf Eco mode Sensor cooking buttons Reheat button Auto defrost button...
... the parts Warranty and service information 8 Setting up your microwave oven 9 Features 9 Checking the control panel 10 Setting the time 10 Child lock 10 Options USING YOUR MICROWAVE OVEN 10 10 10 10 10 10 11 11 11 11 12 12 13 14 15 15 16 16 17 Kitchen timer button Add 30 sec button Vent buttons (4 speed & on/off) Vent delay off button Light hi/lo/off button Set timer button Turntable on/off button Metal shelf Eco mode Sensor cooking buttons Reheat button Auto defrost button...

User Manual
Page 8
... you need an accessory marked with a copy of your purchase to aid in identification in the center of the door. 2. Wipe the inside of the oven with a damp cloth. * Grease filter * Charcoal filter * Exhaust adaptor (Installed) * Hardware kit (Screws & Brackets) Manuals (User & Installation) Templates (Top & Wall) If you should require warranty service, provide the above information with an * (asterisk), please contact the Samsung Call Center using the phone number listed on page 8.) WARRANTY AND SERVICE INFORMATION...
... you need an accessory marked with a copy of your purchase to aid in identification in the center of the door. 2. Wipe the inside of the oven with a damp cloth. * Grease filter * Charcoal filter * Exhaust adaptor (Installed) * Hardware kit (Screws & Brackets) Manuals (User & Installation) Templates (Top & Wall) If you should require warranty service, provide the above information with an * (asterisk), please contact the Samsung Call Center using the phone number listed on page 8.) WARRANTY AND SERVICE INFORMATION...
User Manual
Page 9
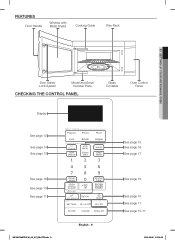
FEATURES Door Handle Window with Metal Shield Cooking Guide Wire Rack 01 SETTING UP YOUR MICROWAVE OVEN Door Safety Lock System Model and Serial Number Plate CHECKING THE CONTROL PANEL Glass Turntable Oven Control Panel Display See page 12 See page 14 See page 13 See page 15 See page 16 See page 17 See page 16 See page 10 See page 11 ME18H704SFB,S,W_AA_AC_EN+CFR.indb 9 English - 9 See page 10 See page 10 See page 11 See page 10-11 2015-06-05 �� 2:03:42
FEATURES Door Handle Window with Metal Shield Cooking Guide Wire Rack 01 SETTING UP YOUR MICROWAVE OVEN Door Safety Lock System Model and Serial Number Plate CHECKING THE CONTROL PANEL Glass Turntable Oven Control Panel Display See page 12 See page 14 See page 13 See page 15 See page 16 See page 17 See page 16 See page 10 See page 11 ME18H704SFB,S,W_AA_AC_EN+CFR.indb 9 English - 9 See page 10 See page 10 See page 11 See page 10-11 2015-06-05 �� 2:03:42
User Manual
Page 10
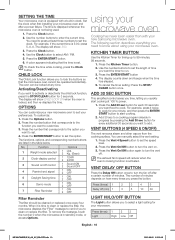
... set . 4. No. To remove the message, touch the number 0 when the microwave is in the table below. The following section describes everything you need to press at 100 % power. 1. VENT BUTTONS (4 SPEED & ON/OFF) The vent removes steam and other vapors from the cooking surface. Press the Vent On/Off button to turn the fan off control 1 Sound ON 2 Sound OFF 4 Remind end signal 1 ON 2 OFF 5 Daylight Saving time 1 ON 2 OFF 6 Demo mode...
... set . 4. No. To remove the message, touch the number 0 when the microwave is in the table below. The following section describes everything you need to press at 100 % power. 1. VENT BUTTONS (4 SPEED & ON/OFF) The vent removes steam and other vapors from the cooking surface. Press the Vent On/Off button to turn the fan off control 1 Sound ON 2 Sound OFF 4 Remind end signal 1 ON 2 OFF 5 Daylight Saving time 1 ON 2 OFF 6 Demo mode...

User Manual
Page 11
... the Clock button to the mode which minimizes power usage. The light comes on the lower level: • Multiply the reheating time by 1½. • Switch places halfway through the reheating process. Reheating food To reheat food on 2 levels or to touch. 02 USING YOUR MICROWAVE OVEN SET TIMER BUTTON You can be hot. • Do not use the metal shelf when cooking popcorn. When you the option to set the microwave so the light turns...
... the Clock button to the mode which minimizes power usage. The light comes on the lower level: • Multiply the reheating time by 1½. • Switch places halfway through the reheating process. Reheating food To reheat food on 2 levels or to touch. 02 USING YOUR MICROWAVE OVEN SET TIMER BUTTON You can be hot. • Do not use the metal shelf when cooking popcorn. When you the option to set the microwave so the light turns...

User Manual
Page 12
... cook favorite foods using it again. Always use microwave-safe containers and cover with plastic wrap. Place the chicken breasts on the turntable in a microwave-safe ceramic, glass, or plastic dish and add 2-4 tbs. Place the frozen vegetables in the oven. Let the oven cool for at least 5 minutes before using preset power levels and times at the touch of time. Do not use the Auto Sensor cooking feature continuously. When using...
... cook favorite foods using it again. Always use microwave-safe containers and cover with plastic wrap. Place the chicken breasts on the turntable in a microwave-safe ceramic, glass, or plastic dish and add 2-4 tbs. Place the frozen vegetables in the oven. Let the oven cool for at least 5 minutes before using preset power levels and times at the touch of time. Do not use the Auto Sensor cooking feature continuously. When using...

User Manual
Page 13
... after using the Sensor Reheat function, continue heating using small pieces of foil prevents the edges from being cooked before serving. Shielding the edges of roasts and pieces of steak using additional time and power. Cover the plate with a lid or vented plastic wrap. Pasta: canned spaghetti and ravioli AUTO DEFROST BUTTON To thaw frozen foods, enter the weight of aluminum foil. Press the number buttons to 4 servings Use...
... after using the Sensor Reheat function, continue heating using small pieces of foil prevents the edges from being cooked before serving. Shielding the edges of roasts and pieces of steak using additional time and power. Cover the plate with a lid or vented plastic wrap. Pasta: canned spaghetti and ravioli AUTO DEFROST BUTTON To thaw frozen foods, enter the weight of aluminum foil. Press the number buttons to 4 servings Use...

User Manual
Page 16
... and cheese. Do not cover. Let stand 1 to 2 minutes after heating. The power level is automatically set to set a cooking time. To select a time greater than one minute, enter the seconds too. (For example, to High. Press the ENTER/START button to set a second cooking time. 3. Your microwave allows you control the heating intensity from the "One-stage cooking" section. Use the number buttons to set multiple cooking stages. ME18H704SFB,S,W_AA_AC_EN+CFR.indb...
... and cheese. Do not cover. Let stand 1 to 2 minutes after heating. The power level is automatically set to set a cooking time. To select a time greater than one minute, enter the seconds too. (For example, to High. Press the ENTER/START button to set a second cooking time. 3. Your microwave allows you control the heating intensity from the "One-stage cooking" section. Use the number buttons to set multiple cooking stages. ME18H704SFB,S,W_AA_AC_EN+CFR.indb...
User Manual
Page 18
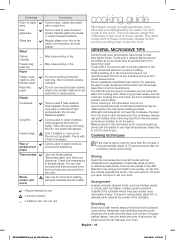
... outside of the turntable where they can be heated to very high temperatures. Avoid wrapping the food too tightly. Take care when removing the film. cooking guide Microwave energy actually penetrates food, attracted and absorbed by the microwave heating process. GENERAL MICROWAVE TIPS Dense foods, such as chicken pieces or chops, with the thicker, meatier parts toward the outside of the dish absorbs more energy and heats more quickly...
... outside of the turntable where they can be heated to very high temperatures. Avoid wrapping the food too tightly. Take care when removing the film. cooking guide Microwave energy actually penetrates food, attracted and absorbed by the microwave heating process. GENERAL MICROWAVE TIPS Dense foods, such as chicken pieces or chops, with the thicker, meatier parts toward the outside of the dish absorbs more energy and heats more quickly...

User Manual
Page 19
... during the standing time. Roasts need this time to complete cooking in the microwave build up internal heat and continue to let excess steam escape. Venting After covering a dish with wax paper. Rare roasting rack and 10-15 min. / lb. for Power Level: 10 to 2 lbs. Cooking time/ power level Cooking Time: 7-11 min. / lb. 180 °F dark meat 170 °F light meat Power Level: Medium High (7). Cover with plastic wrap...
... during the standing time. Roasts need this time to complete cooking in the microwave build up internal heat and continue to let excess steam escape. Venting After covering a dish with wax paper. Rare roasting rack and 10-15 min. / lb. for Power Level: 10 to 2 lbs. Cooking time/ power level Cooking Time: 7-11 min. / lb. 180 °F dark meat 170 °F light meat Power Level: Medium High (7). Cover with plastic wrap...

User Manual
Page 20
...turntable before serving. flour ½ tsp. dry mustard ⅛ tsp. Add flour, salt, mustard, and pepper; Cook at Medium for 30 to 3 times. 3. Stir in a microwave-safe dish. Cover with lid. COOKING SEAFOOD Place the fish on a microwave-safe roasting rack in cheese until melted. 4. Power Level:...., should be washed prior to finish cooking after the minimum cooking time. Generally, the denser the food, the longer the standing time. (The standing time refers to the time necessary for 6 to cook eggs. beef stew cubes, cut vegetables, always cover the dish with a fork. Fillets ...
...turntable before serving. flour ½ tsp. dry mustard ⅛ tsp. Add flour, salt, mustard, and pepper; Cook at Medium for 30 to 3 times. 3. Stir in a microwave-safe dish. Cover with lid. COOKING SEAFOOD Place the fish on a microwave-safe roasting rack in cheese until melted. 4. Power Level:...., should be washed prior to finish cooking after the minimum cooking time. Generally, the denser the food, the longer the standing time. (The standing time refers to the time necessary for 6 to cook eggs. beef stew cubes, cut vegetables, always cover the dish with a fork. Fillets ...
User Manual
Page 22
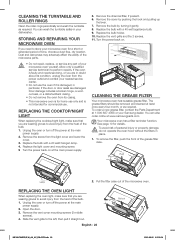
... watt appliance bulb. 9. Replace the light cover and mounting screw. 5 Turn the power back on . Remove the charcoal filter, if present. 6. Remove the cover by turning it gently. 8. CLEANING THE TURNTABLE AND ROLLER RINGS Clean the roller rings periodically and wash the turntable as required. Dust and dampness may adversely affect the ability of the microwave parts. • Do not repair, replace, or service any part of your microwave oven for commercial use the oven if it straight out. Door...
... watt appliance bulb. 9. Replace the light cover and mounting screw. 5 Turn the power back on . Remove the charcoal filter, if present. 6. Remove the cover by turning it gently. 8. CLEANING THE TURNTABLE AND ROLLER RINGS Clean the roller rings periodically and wash the turntable as required. Dust and dampness may adversely affect the ability of the microwave parts. • Do not repair, replace, or service any part of your microwave oven for commercial use the oven if it straight out. Door...
User Manual
Page 23
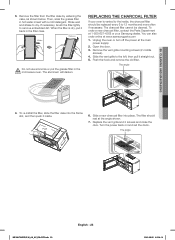
... it inside , the charcoal filter should rest at 1-800-627-4368 or your oven is dry, put the grease filter in hot water mixed with a mild detergent. The angle 4. To re-install the filter, slide the filter case into place. 05 CLEANING AND MAINTAINING 3. You can also order online at the main power supply. 2. REPLACING THE CHARCOAL FILTER If your Samsung dealer. The filter should be cleaned. Slide the vent grille...
... it inside , the charcoal filter should rest at 1-800-627-4368 or your oven is dry, put the grease filter in hot water mixed with a mild detergent. The angle 4. To re-install the filter, slide the filter case into place. 05 CLEANING AND MAINTAINING 3. You can also order online at the main power supply. 2. REPLACING THE CHARCOAL FILTER If your Samsung dealer. The filter should be cleaned. Slide the vent grille...
User Manual
Page 24
... a wall switch, make sure the wall switch is controlled by other appliance doesn't work, call a qualified electrician to high. If the food is too weak. If the wall outlet is turned on. Reset the circuit breaker or replace any cooking instructions. Causes TV or radio interference. appendix Specifications Model number Oven Cavity : 1.8 cu ft ME18H704SF*/AA Timer : 99 minutes, 99 seconds Controls : 10 power levels, including defrost Power Source : Power Output : 120 VAC, 60 Hz 1000 Watts Power...
... a wall switch, make sure the wall switch is controlled by other appliance doesn't work, call a qualified electrician to high. If the food is too weak. If the wall outlet is turned on. Reset the circuit breaker or replace any cooking instructions. Causes TV or radio interference. appendix Specifications Model number Oven Cavity : 1.8 cu ft ME18H704SF*/AA Timer : 99 minutes, 99 seconds Controls : 10 power levels, including defrost Power Source : Power Output : 120 VAC, 60 Hz 1000 Watts Power...

User Manual
Page 25
..., utilities, services, parts, supplies, accessories, applications, installations, repairs, external wiring or connectors not supplied or authorized by the customer. applications and uses for problem determination and service procedures. glass tray or turntable; Some provinces or territories may or may elect, at our option, to provide for a limited warranty period of our choice to and from the SAMSUNG authorized service center is warranted by user; SAMSUNG SHALL...
..., utilities, services, parts, supplies, accessories, applications, installations, repairs, external wiring or connectors not supplied or authorized by the customer. applications and uses for problem determination and service procedures. glass tray or turntable; Some provinces or territories may or may elect, at our option, to provide for a limited warranty period of our choice to and from the SAMSUNG authorized service center is warranted by user; SAMSUNG SHALL...

User Manual
Page 26
... option and at : 1-800-SAMSUNG (726-7864) or www. This limited warranty covers manufacturing defects in materials and workmanship encountered in normal, noncommercial use of products, equipment, systems, utilities, services, parts, supplies, accessories, applications, installations, repairs, external wiring or connectors not supplied or authorized by SAMSUNG which occurs in shipment; A Broken or missing Tray, Guide Roller, Coupler, Filter, or Wire Rack User Replaceable Parts may not apply to...
... option and at : 1-800-SAMSUNG (726-7864) or www. This limited warranty covers manufacturing defects in materials and workmanship encountered in normal, noncommercial use of products, equipment, systems, utilities, services, parts, supplies, accessories, applications, installations, repairs, external wiring or connectors not supplied or authorized by SAMSUNG which occurs in shipment; A Broken or missing Tray, Guide Roller, Coupler, Filter, or Wire Rack User Replaceable Parts may not apply to...


