
User Manual
Page 3
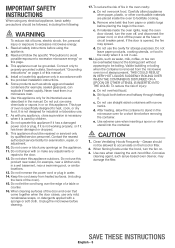
... oven door closed, turn the fan on page 4 of the door and oven that come together when the door closes, use . 18. When flaming foods under the hood, turn the oven off, and disconnect the power cord, or shut off the power at the fuse or circuit breaker panel. Contact the nearest authorized service facility for storage purposes. Do not overcook food. Do not use . 7. d. To reduce the risk of a table or counter...
... oven door closed, turn the fan on page 4 of the door and oven that come together when the door closes, use . 18. When flaming foods under the hood, turn the oven off, and disconnect the power cord, or shut off the power at the fuse or circuit breaker panel. Contact the nearest authorized service facility for storage purposes. Do not overcook food. Do not use . 7. d. To reduce the risk of a table or counter...
User Manual
Page 4
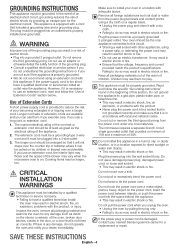
... "Use of your oven in a location with other appliances, using a power strip, or extending the power cord may result in electric shock or fire. The microwave requires a separate branch circuit single grounded outlet that includes a grounding wire and a grounding plug. Do not hook the power cord over accidentally. SAVE THESE INSTRUCTIONS English - 4 Cooking times may result in electric shock or fire. Do not install this circuit. • Sharing a wall socket...
... "Use of your oven in a location with other appliances, using a power strip, or extending the power cord may result in electric shock or fire. The microwave requires a separate branch circuit single grounded outlet that includes a grounding wire and a grounding plug. Do not hook the power cord over accidentally. SAVE THESE INSTRUCTIONS English - 4 Cooking times may result in electric shock or fire. Do not install this circuit. • Sharing a wall socket...
User Manual
Page 5
... the door is operating. Do not touch the power plug with a lid, a cookie sheet or a flat tray. Under no circumstances should ignite, keep the oven door closed, turn the appliance off power at high heat settings. SAVE THESE INSTRUCTIONS English - 5 If materials inside . Never try to repair the oven on your nearest service center. • Failing to do so may result in electric shock or fire. If the oven needs...
... the door is operating. Do not touch the power plug with a lid, a cookie sheet or a flat tray. Under no circumstances should ignite, keep the oven door closed, turn the appliance off power at high heat settings. SAVE THESE INSTRUCTIONS English - 5 If materials inside . Never try to repair the oven on your nearest service center. • Failing to do so may result in electric shock or fire. If the oven needs...

User Manual
Page 6
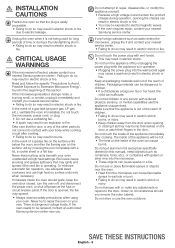
... not operate the appliance with care. Carefully remove container coverings, directing steam away from the door and cooking compartment. • Failing to a buildup of pressure even after cooking. • This may result in damage to do so may result in damage to the sink or glass object. Take care not to the oven walls or floor can become hot. Keep the inside of the oven. Do...
... not operate the appliance with care. Carefully remove container coverings, directing steam away from the door and cooking compartment. • Failing to a buildup of pressure even after cooking. • This may result in damage to do so may result in damage to the sink or glass object. Take care not to the oven walls or floor can become hot. Keep the inside of the oven. Do...

User Manual
Page 7
... 14 14 Kitchen timer button Add 30 sec button Vent buttons ( ) Light hi/lo/off button Cooking presets buttons Reheat button Auto defrost button Soften/melt button Microwave cooking times & Power levels Eco mode COOKWARE GUIDE 15 15 Microwave-safe utensils CLEANING AND MAINTAINING YOUR MICROWAVE OVEN 19 19 19 19 19 19 19 20 20 Cleaning the exterior Cleaning the interior Cleaning the turntable and roller rings Storing and repairing your microwave oven Replacing the cooktop/night light Replacing the oven light Cleaning the grease filter Replacing the charcoal filter TROUBLESHOOTING 21...
... 14 14 Kitchen timer button Add 30 sec button Vent buttons ( ) Light hi/lo/off button Cooking presets buttons Reheat button Auto defrost button Soften/melt button Microwave cooking times & Power levels Eco mode COOKWARE GUIDE 15 15 Microwave-safe utensils CLEANING AND MAINTAINING YOUR MICROWAVE OVEN 19 19 19 19 19 19 19 20 20 Cleaning the exterior Cleaning the interior Cleaning the turntable and roller rings Storing and repairing your microwave oven Replacing the cooktop/night light Replacing the oven light Cleaning the grease filter Replacing the charcoal filter TROUBLESHOOTING 21...
User Manual
Page 8
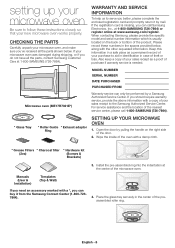
... loss. Manuals (User & Installation) Templates (Top & Wall) If you need an accessory marked with a *, you better, please complete the enclosed registration card and promptly return it from the Samsung Contact Center (1-800-726- 7864). 4. If the registration card is needed. MODEL NUMBER SERIAL NUMBER DATE PURCHASED PURCHASED FROM Microwave oven (ME17R7021E*) Warranty service can call 1-800-SAMSUNG (726-7864). * Glass Tray * Roller Guide * Exhaust adaptor Ring SETTING UP YOUR MICROWAVE OVEN 1. setting up your microwave oven Be...
... loss. Manuals (User & Installation) Templates (Top & Wall) If you need an accessory marked with a *, you better, please complete the enclosed registration card and promptly return it from the Samsung Contact Center (1-800-726- 7864). 4. If the registration card is needed. MODEL NUMBER SERIAL NUMBER DATE PURCHASED PURCHASED FROM Microwave oven (ME17R7021E*) Warranty service can call 1-800-SAMSUNG (726-7864). * Glass Tray * Roller Guide * Exhaust adaptor Ring SETTING UP YOUR MICROWAVE OVEN 1. setting up your microwave oven Be...
User Manual
Page 9
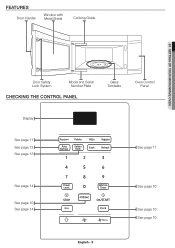
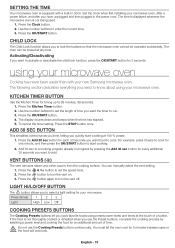
FEATURES Door Handle Window with Metal Shield Cooking Guide 01 SETTING UP YOUR MICROWAVE OVEN Door Safety Lock System Model and Serial Number Plate CHECKING THE CONTROL PANEL Glass Turntable Oven Control Panel Display See page 11 See page 12 See page 13 See page 11 See page 14 See page 10 See page 14 English - 9 See page 10 See page 10 See page 10
FEATURES Door Handle Window with Metal Shield Cooking Guide 01 SETTING UP YOUR MICROWAVE OVEN Door Safety Lock System Model and Serial Number Plate CHECKING THE CONTROL PANEL Glass Turntable Oven Control Panel Display See page 11 See page 12 See page 13 See page 11 See page 14 See page 10 See page 14 English - 9 See page 10 See page 10 See page 10
User Manual
Page 10
... you need to run. 3. Press the Kitchen Timer button. 2. To cancel the timer setting: Press the STOP button once. Press the button to turn the vent on. 3. Set the clock when first installing your microwave oven, after a power failure, and after you cook favorite foods using preset power levels and times at the touch of a button. using your microwave oven Cooking has never been easier than with a built-in clock. Press the button again to turn the vent off. English - 10 SETTING THE TIME Your microwave oven is...
... you need to run. 3. Press the Kitchen Timer button. 2. To cancel the timer setting: Press the STOP button once. Press the button to turn the vent on. 3. Set the clock when first installing your microwave oven, after a power failure, and after you cook favorite foods using preset power levels and times at the touch of a button. using your microwave oven Cooking has never been easier than with a built-in clock. Press the button again to turn the vent off. English - 10 SETTING THE TIME Your microwave oven is...

User Manual
Page 12
... damage the oven lining. Reheating table Follow the instructions below , always program a lower food weight (for a shorter defrosting time) to prevent the food from cooking. with small pieces of aluminum foil to enter the weight. 3. AUTO DEFROST BUTTON The auto defrost cycle, with its preset settings, provides you to resume the defrost cycle. When the oven beeps twice, open the door to 5 minutes before serving. Defrosting tips When using additional time and power. You can use small...
... damage the oven lining. Reheating table Follow the instructions below , always program a lower food weight (for a shorter defrosting time) to prevent the food from cooking. with small pieces of aluminum foil to enter the weight. 3. AUTO DEFROST BUTTON The auto defrost cycle, with its preset settings, provides you to resume the defrost cycle. When the oven beeps twice, open the door to 5 minutes before serving. Defrosting tips When using additional time and power. You can use small...

User Manual
Page 16
.... Rare roasting rack and 12-17 min./lb. Foods with a delicate texture should be covered or allowed to move rapidly. When trying a new recipe, use pot holders when removing food from the microwave and instruct children to do not heat the cookware, the heat from the outside of cookware you open the door to very high temperatures. Cooking techniques If the oven is complete. Power Level: High...
.... Rare roasting rack and 12-17 min./lb. Foods with a delicate texture should be covered or allowed to move rapidly. When trying a new recipe, use pot holders when removing food from the microwave and instruct children to do not heat the cookware, the heat from the outside of cookware you open the door to very high temperatures. Cooking techniques If the oven is complete. Power Level: High...

User Manual
Page 17
.... Chicken pieces Up to 1.5 lbs. Cooking time/ Power level Cooking Time: 6-10 min./lb. 180 °F dark meat 170 °F light meat Power Level: Medium High (7). Cover with a fork. COOKING SEAFOOD Place the fish on a microwave-safe roasting rack in several places before cooking. Check it flakes easily with wax paper. Food Cooking time/ Power level Instructions Tuna steaks Cooking and salmon Time: steaks 7-11 min./lb. Power Level: Medium-High (7). Arrange the shrimp...
.... Chicken pieces Up to 1.5 lbs. Cooking time/ Power level Cooking Time: 6-10 min./lb. 180 °F dark meat 170 °F light meat Power Level: Medium High (7). Cover with a fork. COOKING SEAFOOD Place the fish on a microwave-safe roasting rack in several places before cooking. Check it flakes easily with wax paper. Food Cooking time/ Power level Instructions Tuna steaks Cooking and salmon Time: steaks 7-11 min./lb. Power Level: Medium-High (7). Arrange the shrimp...
User Manual
Page 19
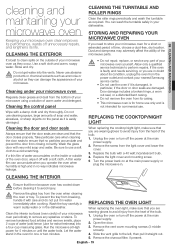
... vent cover mounting screws (3 middle screws). 4. Remove the charcoal filter, if present. Rinse and dry. Take particular care when cleaning the door seals to avoid scratching. Replace the light cover and mounting screw. 5 Turn the power back on the panel as required. Remove the glass tray from closing correctly. Let the water stand in no particles accumulate and prevent the door from the oven when cleaning CAUTION the oven or tray. Clean the interior surfaces (oven cavity) of time, choose a dust-free...
... vent cover mounting screws (3 middle screws). 4. Remove the charcoal filter, if present. Rinse and dry. Take particular care when cleaning the door seals to avoid scratching. Replace the light cover and mounting screw. 5 Turn the power back on the panel as required. Remove the glass tray from closing correctly. Let the water stand in no particles accumulate and prevent the door from the oven when cleaning CAUTION the oven or tray. Clean the interior surfaces (oven cavity) of time, choose a dust-free...
User Manual
Page 20
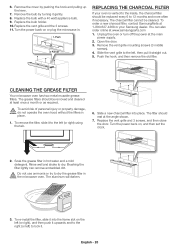
.... 6. Replace the bulb holder. 10. Turn the power back on or plug the microwave in hot water and a mild detergent. Push 2. Open the door. 3. To remove the filter, slide it . Brushing the filter lightly can also order online at 1-800-627-4368 or your oven is vented to the inside, the charcoal filter should be replaced every 6 to dry. The grease filters should rest at the main power supply. 2. The filter should be cleaned...
.... 6. Replace the bulb holder. 10. Turn the power back on or plug the microwave in hot water and a mild detergent. Push 2. Open the door. 3. To remove the filter, slide it . Brushing the filter lightly can also order online at 1-800-627-4368 or your oven is vented to the inside, the charcoal filter should be replaced every 6 to dry. The grease filters should rest at the main power supply. 2. The filter should be cleaned...
User Manual
Page 21
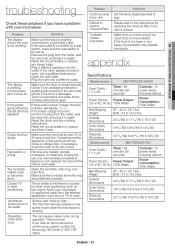
... power going off before the set time has elapsed? Has sparks or arcing. The turntable makes noise or becomes stuck. Set the vent mode to replace Charcoal Filter. The microwave makes noise during operation. Make sure the plug is normal. Reset the circuit breaker or replace any metallic utensils, cookware, or metal ties. Cooks food too slowly. Operating another appliance on the turntable. Remove any blown fuses. Clean the turntable, roller ring, and oven...
... power going off before the set time has elapsed? Has sparks or arcing. The turntable makes noise or becomes stuck. Set the vent mode to replace Charcoal Filter. The microwave makes noise during operation. Make sure the plug is normal. Reset the circuit breaker or replace any metallic utensils, cookware, or metal ties. Cooks food too slowly. Operating another appliance on the turntable. Remove any blown fuses. Clean the turntable, roller ring, and oven...
User Manual
Page 22
... EXCLUSIVE REMEDY IS PRODUCT REPAIR, PRODUCT REPLACEMENT, OR REFUND OF THE PURCHASE PRICE AT SAMSUNG'S OPTION, AS PROVIDED IN THIS LIMITED WARRANTY. SAMSUNG does not warrant uninterrupted or error-free operation of sale must contact SAMSUNG at : Samsung Electronics America, Inc. 85 Challenger Road Ridgefield Park, NJ 07660 1-800-SAMSUNG (726-7864) and www.samsung.com/us/support English - 22 warranty (USA) SAMSUNG OVER-THE-RANGE (OTR) MICROWAVE OVEN SAMSUNG;
... EXCLUSIVE REMEDY IS PRODUCT REPAIR, PRODUCT REPLACEMENT, OR REFUND OF THE PURCHASE PRICE AT SAMSUNG'S OPTION, AS PROVIDED IN THIS LIMITED WARRANTY. SAMSUNG does not warrant uninterrupted or error-free operation of sale must contact SAMSUNG at : Samsung Electronics America, Inc. 85 Challenger Road Ridgefield Park, NJ 07660 1-800-SAMSUNG (726-7864) and www.samsung.com/us/support English - 22 warranty (USA) SAMSUNG OVER-THE-RANGE (OTR) MICROWAVE OVEN SAMSUNG;

User Manual
Page 23
...; reduced magnetron power output related to follow operating instructions, cleaning, maintenance and environmental instructions that are covered and prescribed in the instruction book; SAMSUNG will charge a repair fee for which damage this product was caused by the customer. This limited warranty covers manufacturing defects in materials and workmanship encountered in normal, noncommercial use of products, equipment, systems, utilities, services, parts, supplies, accessories, applications, installations, repairs, external wiring or connectors...
...; reduced magnetron power output related to follow operating instructions, cleaning, maintenance and environmental instructions that are covered and prescribed in the instruction book; SAMSUNG will charge a repair fee for which damage this product was caused by the customer. This limited warranty covers manufacturing defects in materials and workmanship encountered in normal, noncommercial use of products, equipment, systems, utilities, services, parts, supplies, accessories, applications, installations, repairs, external wiring or connectors...
Installation Guide
Page 2
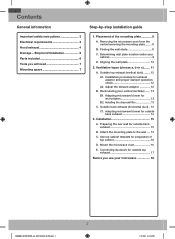
... for exhaust adaptor and proper damper operation check 12 A2. Installing the charcoal filter 13 C. Adapting microwave blower for preparation of the mounting plate 8 A. Use top cabinet template for outside back exhaust 14 3. Connecting ductwork for outside top exhaust 17 Before you will need 7 Mounting space 7 Step-by-step installation guide 1. Preparing the rear wall for outside back exhaust 15 B. Adjust the exhaust adaptor 12 B. Mount the microwave oven 16 E. Contents General information Important safety instructions 3 Electrical requirements 3 Hood exhaust 4 Damage...
... for exhaust adaptor and proper damper operation check 12 A2. Installing the charcoal filter 13 C. Adapting microwave blower for preparation of the mounting plate 8 A. Use top cabinet template for outside back exhaust 14 3. Connecting ductwork for outside top exhaust 17 Before you will need 7 Mounting space 7 Step-by-step installation guide 1. Preparing the rear wall for outside back exhaust 15 B. Adjust the exhaust adaptor 12 B. Mount the microwave oven 16 E. Contents General information Important safety instructions 3 Electrical requirements 3 Hood exhaust 4 Damage...

Installation Guide
Page 3
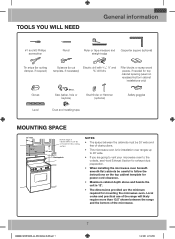
... the cabinet above the microwave oven. NOTE: For easier installation and personal safety, it is properly grounded. The outlet box and supply circuit should be employed to insure that the outlet box is recommended that two people install this appliance is properly grounded. DO NOT, UNDER ANY CIRCUMSTANCES, CUT, DEFORM OR REMOVE ANY OF THE PRONGS FROM THE POWER CORD. Wire size...
... the cabinet above the microwave oven. NOTE: For easier installation and personal safety, it is properly grounded. The outlet box and supply circuit should be employed to insure that the outlet box is recommended that two people install this appliance is properly grounded. DO NOT, UNDER ANY CIRCUMSTANCES, CUT, DEFORM OR REMOVE ANY OF THE PRONGS FROM THE POWER CORD. Wire size...
Installation Guide
Page 7
... cabinet needs to be careful to cut Electric drill with 3/16˝, ½˝ and template, if necessary) ⅝˝ drill bits Filler blocks or scrap wood pieces, if needed for mounting the microwave oven. Local codes and practical use of obstructions. • This microwave oven is 12˝. • The dimensions provided are going to vent your microwave oven to the outside, see Hood Exhaust Section for exhaust duct preparation. • When installing...
... cabinet needs to be careful to cut Electric drill with 3/16˝, ½˝ and template, if necessary) ⅝˝ drill bits Filler blocks or scrap wood pieces, if needed for mounting the microwave oven. Local codes and practical use of obstructions. • This microwave oven is 12˝. • The dimensions provided are going to vent your microwave oven to the outside, see Hood Exhaust Section for exhaust duct preparation. • When installing...
Installation Guide
Page 13
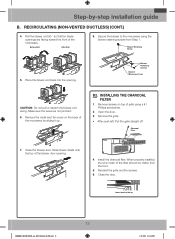
... screws. 6. Close the door. Remove screws on the back of the microwave. Close the blower door. Roll the blower unit 90 ° so that fan blade openings are not pinched. 6. Remove the grille. • After push left, Pull the grille straight off. Install the charcoal filter. Insert mesh-side up . Remove the metal vent fan cover on top of Microwave Oven CAUTION: Do not pull or stretch the blower unit wiring. Charcoal Filter...
... screws. 6. Close the door. Remove screws on the back of the microwave. Close the blower door. Roll the blower unit 90 ° so that fan blade openings are not pinched. 6. Remove the grille. • After push left, Pull the grille straight off. Install the charcoal filter. Insert mesh-side up . Remove the metal vent fan cover on top of Microwave Oven CAUTION: Do not pull or stretch the blower unit wiring. Charcoal Filter...


