User Manual
Page 3
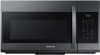
... reduce the risk of injury: a. c. After heating, allow the container to accumulate on the hood or filter. 2. e. Grease should be repaired or serviced only by children. 8. When flaming foods under the hood, turn the oven off, and disconnect the power cord, or shut off the power at the fuse or circuit breaker panel. IMPORTANT SAFETY INSTRUCTIONS When using the appliance. 2. Install or locate this product near a swimming pool, or similar...
... reduce the risk of injury: a. c. After heating, allow the container to accumulate on the hood or filter. 2. e. Grease should be repaired or serviced only by children. 8. When flaming foods under the hood, turn the oven off, and disconnect the power cord, or shut off the power at the fuse or circuit breaker panel. IMPORTANT SAFETY INSTRUCTIONS When using the appliance. 2. Install or locate this product near a swimming pool, or similar...
User Manual
Page 4
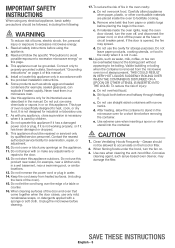
... electric shock or fire. Longer cord sets or extension cords are not sure if the appliance is properly grounded. • We do not understand the grounding instructions or if you use a long cord or extension cord: 1. Unpack the oven, remove all packaging material and examine the oven for a replacement or repair. It may result in accordance with adequate space. This appliance must be installed...
... electric shock or fire. Longer cord sets or extension cords are not sure if the appliance is properly grounded. • We do not understand the grounding instructions or if you use a long cord or extension cord: 1. Unpack the oven, remove all packaging material and examine the oven for a replacement or repair. It may result in accordance with adequate space. This appliance must be installed...
User Manual
Page 5
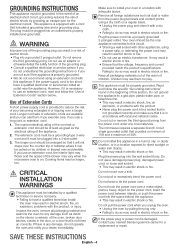
... or objects near you remove the outer cabinet. Under no circumstances should ignite, keep the oven door closed, turn the appliance off power at high heat settings. Take care that may ignite and spread if the vent fan is opened, the fire may bump themselves on the inside . To minimize automatic fan operation, use adequate sized cookware and use the oven outdoors. Do not touch the power plug with golden or...
... or objects near you remove the outer cabinet. Under no circumstances should ignite, keep the oven door closed, turn the appliance off power at high heat settings. Take care that may ignite and spread if the vent fan is opened, the fire may bump themselves on the inside . To minimize automatic fan operation, use adequate sized cookware and use the oven outdoors. Do not touch the power plug with golden or...

User Manual
Page 6
... the oven is suitable for microwaving. Do not scratch the glass of the oven door with care. Sealed containers can break. Before cleaning or performing maintenance, unplug the appliance from the wall socket and remove food waste from your face or body close to the appliance while cooking or when opening the door just after cooking. • This may result in operation. Keep the inside of...
... the oven is suitable for microwaving. Do not scratch the glass of the oven door with care. Sealed containers can break. Before cleaning or performing maintenance, unplug the appliance from the wall socket and remove food waste from your face or body close to the appliance while cooking or when opening the door just after cooking. • This may result in operation. Keep the inside of...

User Manual
Page 7
... 14 14 Kitchen timer button Add 30 sec button Vent buttons ( ) Light hi/lo/off button Cooking presets buttons Reheat button Auto defrost button Soften/melt button Microwave cooking times & Power levels Eco mode COOKWARE GUIDE 15 15 Microwave-safe utensils CLEANING AND MAINTAINING YOUR MICROWAVE OVEN 19 19 19 19 19 19 19 20 20 Cleaning the exterior Cleaning the interior Cleaning the turntable and roller rings Storing and repairing your microwave oven Replacing the cooktop/night light Replacing the oven light Cleaning the grease filter Replacing the charcoal filter TROUBLESHOOTING 21...
... 14 14 Kitchen timer button Add 30 sec button Vent buttons ( ) Light hi/lo/off button Cooking presets buttons Reheat button Auto defrost button Soften/melt button Microwave cooking times & Power levels Eco mode COOKWARE GUIDE 15 15 Microwave-safe utensils CLEANING AND MAINTAINING YOUR MICROWAVE OVEN 19 19 19 19 19 19 19 20 20 Cleaning the exterior Cleaning the interior Cleaning the turntable and roller rings Storing and repairing your microwave oven Replacing the cooktop/night light Replacing the oven light Cleaning the grease filter Replacing the charcoal filter TROUBLESHOOTING 21...
User Manual
Page 8
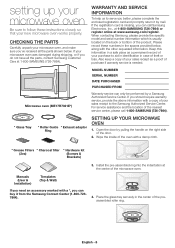
... the inside of the preassembled roller ring. WARRANTY AND SERVICE INFORMATION To help us to the Samsung Authorized Service Center. MODEL NUMBER SERIAL NUMBER DATE PURCHASED PURCHASED FROM Microwave oven (ME17R7021E*) Warranty service can buy it by mail. Install the pre-assembled ring into the indentation at 1-800-SAMSUNG (726-7864). If the registration card is usually located on the right side of the door. 2. English - 8 Manuals (User & Installation) Templates (Top & Wall) If you need...
... the inside of the preassembled roller ring. WARRANTY AND SERVICE INFORMATION To help us to the Samsung Authorized Service Center. MODEL NUMBER SERIAL NUMBER DATE PURCHASED PURCHASED FROM Microwave oven (ME17R7021E*) Warranty service can buy it by mail. Install the pre-assembled ring into the indentation at 1-800-SAMSUNG (726-7864). If the registration card is usually located on the right side of the door. 2. English - 8 Manuals (User & Installation) Templates (Top & Wall) If you need...
User Manual
Page 9
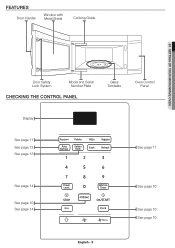
FEATURES Door Handle Window with Metal Shield Cooking Guide 01 SETTING UP YOUR MICROWAVE OVEN Door Safety Lock System Model and Serial Number Plate CHECKING THE CONTROL PANEL Glass Turntable Oven Control Panel Display See page 11 See page 12 See page 13 See page 11 See page 14 See page 10 See page 14 English - 9 See page 10 See page 10 See page 10
FEATURES Door Handle Window with Metal Shield Cooking Guide 01 SETTING UP YOUR MICROWAVE OVEN Door Safety Lock System Model and Serial Number Plate CHECKING THE CONTROL PANEL Glass Turntable Oven Control Panel Display See page 11 See page 12 See page 13 See page 11 See page 14 See page 10 See page 14 English - 9 See page 10 See page 10 See page 10
User Manual
Page 10
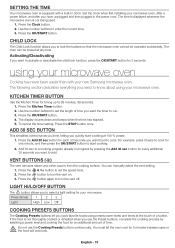
... lock the buttons so that the microwave oven cannot be locked at 100 % power. 1. Press the OK/START button. 4. English - 10 Set the clock when first installing your microwave oven, after a power failure, and after you cook favorite foods using your microwave oven Cooking has never been easier than with a built-in the power cord. The time is displayed whenever the microwave oven is not thoroughly cooked or reheated when you to cook. using preset power levels and times at the touch of time. KITCHEN TIMER BUTTON Use the Kitchen Timer...
... lock the buttons so that the microwave oven cannot be locked at 100 % power. 1. Press the OK/START button. 4. English - 10 Set the clock when first installing your microwave oven, after a power failure, and after you cook favorite foods using your microwave oven Cooking has never been easier than with a built-in the power cord. The time is displayed whenever the microwave oven is not thoroughly cooked or reheated when you to cook. using preset power levels and times at the touch of time. KITCHEN TIMER BUTTON Use the Kitchen Timer...

User Manual
Page 12
.../START button to enter the weight. 3. If the food is the net weight in a refrigerator-freezer that the defrost cycle remains active while the oven is beeping, pauses when you open the door and turn the food, and then continues again when you want to thaw is no colder than 0 °F (taken directly from cooking. Use the number buttons to resume the defrost cycle. Defrosting tips When using auto defrost, the entered weight...
.../START button to enter the weight. 3. If the food is the net weight in a refrigerator-freezer that the defrost cycle remains active while the oven is beeping, pauses when you open the door and turn the food, and then continues again when you want to thaw is no colder than 0 °F (taken directly from cooking. Use the number buttons to resume the defrost cycle. Defrosting tips When using auto defrost, the entered weight...

User Manual
Page 16
... longer to 70 percent power after the oven stops. Rare roasting rack and 12-17 min./lb. for Power Level: 10 to 4 lbs. The rapid movement of the turntable where they can affect the cooking time. Home canning in ) 170 °F Well Done Up to 15 minutes. Stirring Open the microwave door and stir foods such as potatoes or hot dogs, should be destroyed...
... longer to 70 percent power after the oven stops. Rare roasting rack and 12-17 min./lb. for Power Level: 10 to 4 lbs. The rapid movement of the turntable where they can affect the cooking time. Home canning in ) 170 °F Well Done Up to 15 minutes. Stirring Open the microwave door and stir foods such as potatoes or hot dogs, should be destroyed...

User Manual
Page 17
... outside of the rack. Let stand for 5-10 minutes. Place the chicken bone-side down on the cob, should be arranged in a microwave-safe dish. 04 COOKING GUIDE Food Beef Rare Medium Well Done Pork Medium Poultry Well Done Dark meat Light meat Remove from bursting. Cooking time/ Power level Cooking Time: 6-10 min./lb. 180 °F dark meat 170 °F light meat Power Level: Medium High (7). Cooking Time...
... outside of the rack. Let stand for 5-10 minutes. Place the chicken bone-side down on the cob, should be arranged in a microwave-safe dish. 04 COOKING GUIDE Food Beef Rare Medium Well Done Pork Medium Poultry Well Done Dark meat Light meat Remove from bursting. Cooking time/ Power level Cooking Time: 6-10 min./lb. 180 °F dark meat 170 °F light meat Power Level: Medium High (7). Cooking Time...
User Manual
Page 19
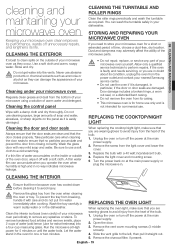
... power supply. 2. Let the water stand in . Remove the vent cover mounting screws (3 middle screws). 4. 05 CLEANING AND MAINTAINING cleaning and maintaining your microwave oven Keeping your WARNING microwave oven yourself. Never use only and is faulty and needs servicing, or you need to avoid injury from the heat of your microwave. Cleaning the door and door seals Always ensure that you are in water immediately after cooking. Wash the glass door with a 40 watt incandescent bulb...
... power supply. 2. Let the water stand in . Remove the vent cover mounting screws (3 middle screws). 4. 05 CLEANING AND MAINTAINING cleaning and maintaining your microwave oven Keeping your WARNING microwave oven yourself. Never use only and is faulty and needs servicing, or you need to avoid injury from the heat of your microwave. Cleaning the door and door seals Always ensure that you are in water immediately after cooking. Wash the glass door with a 40 watt incandescent bulb...
User Manual
Page 20
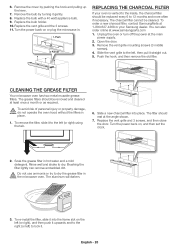
.... Turn the power back on , and then set the clock. 2. The charcoal filter cannot be replaced every 6 to the inside, the charcoal filter should be removed and cleaned at 1-800-627-4368 or your Samsung dealer. To order a new charcoal filter, contact SamsungParts at least once a month or as required. CLEANING THE GREASE FILTER Your microwave oven has two metal reusable grease filters. Replace the vent grille and 3 screws, and then close the door. Brushing the filter lightly can...
.... Turn the power back on , and then set the clock. 2. The charcoal filter cannot be replaced every 6 to the inside, the charcoal filter should be removed and cleaned at 1-800-627-4368 or your Samsung dealer. To order a new charcoal filter, contact SamsungParts at least once a month or as required. CLEANING THE GREASE FILTER Your microwave oven has two metal reusable grease filters. Replace the vent grille and 3 screws, and then close the door. Brushing the filter lightly can...
User Manual
Page 21
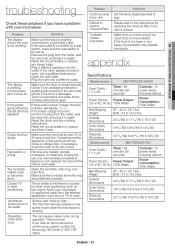
... replacing the charcoal filter in the door seal. Problem Cook top lamp is working, but the power won't come on. Please refer to its own 15 or 20 amp circuit line. appendix Specifications Model number ME17R7021E*/AA/A2 Oven Cavity : 1.7 cu ft Timer : 99 minutes, 99 seconds Controls : 10 power levels, including defrost Power Source : Power Output : 120 V AC, 60 Hz 1000 Watts Power Consumption : 1580 Watts Net/Shipping Weight ST : 48.3 / 55.1 lbs B/W : 47.0 / 54.0 lbs Outside Dimensions...
... replacing the charcoal filter in the door seal. Problem Cook top lamp is working, but the power won't come on. Please refer to its own 15 or 20 amp circuit line. appendix Specifications Model number ME17R7021E*/AA/A2 Oven Cavity : 1.7 cu ft Timer : 99 minutes, 99 seconds Controls : 10 power levels, including defrost Power Source : Power Output : 120 V AC, 60 Hz 1000 Watts Power Consumption : 1580 Watts Net/Shipping Weight ST : 48.3 / 55.1 lbs B/W : 47.0 / 54.0 lbs Outside Dimensions...
User Manual
Page 22
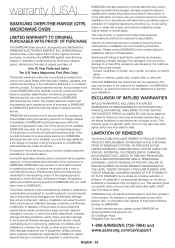
... loss of repair or replacement under these issues. inhome instruction on products purchased and used in materials or workmanship for service. service to correct installation not in -home service within the customer's geographic area. and reduced magnetron power output related to instructions; To receive warranty service, the purchaser must return them to availability of household electrical or plumbing (i.e., house wiring, fuses, or water inlet hoses); SAMSUNG will provide...
... loss of repair or replacement under these issues. inhome instruction on products purchased and used in materials or workmanship for service. service to correct installation not in -home service within the customer's geographic area. and reduced magnetron power output related to instructions; To receive warranty service, the purchaser must return them to availability of household electrical or plumbing (i.e., house wiring, fuses, or water inlet hoses); SAMSUNG will provide...

User Manual
Page 23
... use of products, equipment, systems, utilities, services, parts, supplies, accessories, applications, installations, repairs, external wiring or connectors not supplied or authorized by a SAMSUNG authorized service center. cosmetic damage or exterior finish; problems caused by pest infestations, and overheating or overcooking by the customer. reduced magnetron power output related to remove, repair and return the product. THERE ARE NO EXPRESS WARRANTIES OTHER THAN THOSE LISTED AND...
... use of products, equipment, systems, utilities, services, parts, supplies, accessories, applications, installations, repairs, external wiring or connectors not supplied or authorized by a SAMSUNG authorized service center. cosmetic damage or exterior finish; problems caused by pest infestations, and overheating or overcooking by the customer. reduced magnetron power output related to remove, repair and return the product. THERE ARE NO EXPRESS WARRANTIES OTHER THAN THOSE LISTED AND...
Installation Guide
Page 2
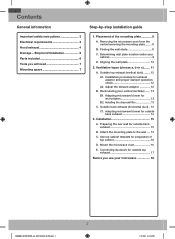
Removing the microwave oven from the carton/removing the mounting plate......... 8 B. Preparing the rear wall for outside top exhaust 17 Before you will need 7 Mounting space 7 Step-by-step installation guide 1. Connecting ductwork for outside back exhaust 14 3. Outside top exhaust (vertical duct).......... 12 A1. Outside back exhaust (horizontal duct)... 14 C1. Contents General information Important safety instructions 3 Electrical requirements 3 Hood exhaust 4 Damage - Adapting microwave blower for exhaust adaptor and proper damper operation check 12 A2....
Removing the microwave oven from the carton/removing the mounting plate......... 8 B. Preparing the rear wall for outside top exhaust 17 Before you will need 7 Mounting space 7 Step-by-step installation guide 1. Connecting ductwork for outside back exhaust 14 3. Outside top exhaust (vertical duct).......... 12 A1. Outside back exhaust (horizontal duct)... 14 C1. Contents General information Important safety instructions 3 Electrical requirements 3 Hood exhaust 4 Damage - Adapting microwave blower for exhaust adaptor and proper damper operation check 12 A2....

Installation Guide
Page 3
... installed in the cabinet above the microwave oven. FOR PERSONAL SAFETY, THIS APPLIANCE MUST BE PROPERLY GROUNDED TO AVOID SEVERE OR FATAL SHOCK. DO NOT USE WITH AN EXTENSION CORD. CAUTION: For personal safety, remove house fuse or open circuit breaker before use The power cord of this 59 pound product, plus additional oven loads of up to the National Electrical Code or the prevailing local code...
... installed in the cabinet above the microwave oven. FOR PERSONAL SAFETY, THIS APPLIANCE MUST BE PROPERLY GROUNDED TO AVOID SEVERE OR FATAL SHOCK. DO NOT USE WITH AN EXTENSION CORD. CAUTION: For personal safety, remove house fuse or open circuit breaker before use The power cord of this 59 pound product, plus additional oven loads of up to the National Electrical Code or the prevailing local code...
Installation Guide
Page 7
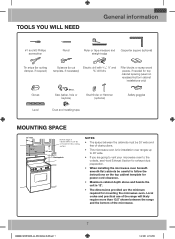
...; wide. • If you are going to vent your microwave oven to the outside, see Hood Exhaust Section for exhaust duct preparation. • When installing the microwave oven beneath smooth flat cabinets be careful to cut Electric drill with 3/16˝, ½˝ and template, if necessary) ⅝˝ drill bits Filler blocks or scrap wood pieces, if needed for mounting the microwave oven. Backsplash NOTES: • The space between...
...; wide. • If you are going to vent your microwave oven to the outside, see Hood Exhaust Section for exhaust duct preparation. • When installing the microwave oven beneath smooth flat cabinets be careful to cut Electric drill with 3/16˝, ½˝ and template, if necessary) ⅝˝ drill bits Filler blocks or scrap wood pieces, if needed for mounting the microwave oven. Backsplash NOTES: • The space between...
Installation Guide
Page 13
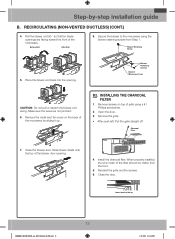
... the grille and the screws. 6. Remove the metal vent fan cover on top of the filter should be visible from Step 1. B2. Place the blower unit back into the opening . 4. Insert mesh-side up . Before Roll After Roll 8. Blower Retaining Screw 5. Open the door. 3. Blower Retaining Screws Back of the blower door opening . Remove screws on the back of the microwave. Install the charcoal filter. Make sure the wires are facing...
... the grille and the screws. 6. Remove the metal vent fan cover on top of the filter should be visible from Step 1. B2. Place the blower unit back into the opening . 4. Insert mesh-side up . Before Roll After Roll 8. Blower Retaining Screw 5. Open the door. 3. Blower Retaining Screws Back of the blower door opening . Remove screws on the back of the microwave. Install the charcoal filter. Make sure the wires are facing...


