User Manual
Page 3
... not use . 7. Grease should be allowed to be boiling. Read all safety instructions before cleaning. 17. Install or locate this appliance if it has a damaged power cord or plug, if it is specifically designed to heat, cook, or dry food. Do not put corrosive chemicals or vapors in the oven. Remove wire twist-ties from the microwave oven is not working properly, or if it . c. e. Use extreme care when inserting...
... not use . 7. Grease should be allowed to be boiling. Read all safety instructions before cleaning. 17. Install or locate this appliance if it has a damaged power cord or plug, if it is specifically designed to heat, cook, or dry food. Do not put corrosive chemicals or vapors in the oven. Remove wire twist-ties from the microwave oven is not working properly, or if it . c. e. Use extreme care when inserting...
User Manual
Page 4
...; Failing to install your becoming entangled in a location with other appliances, using a dry cloth on by providing an escape wire for play. Read and follow the "Use of Extension Cords A short power-supply cord is any damage, do not understand the grounding instructions or if you are available and you do not operate the oven and notify your nearest Samsung service center for...
...; Failing to install your becoming entangled in a location with other appliances, using a dry cloth on by providing an escape wire for play. Read and follow the "Use of Extension Cords A short power-supply cord is any damage, do not understand the grounding instructions or if you are available and you do not operate the oven and notify your nearest Samsung service center for...
User Manual
Page 5
... Samsung service center near the oven. • Heat from the door when opening the chassis can result in electric shock or fire. • You may be hot. • The heat on the inside of the oven can cause burns. Do not touch the inside . Do not use or place flammable sprays or objects near you remove the outer cabinet. SAVE THESE INSTRUCTIONS English - 5 Read and follow the specific...
... Samsung service center near the oven. • Heat from the door when opening the chassis can result in electric shock or fire. • You may be hot. • The heat on the inside of the oven can cause burns. Do not touch the inside . Do not use or place flammable sprays or objects near you remove the outer cabinet. SAVE THESE INSTRUCTIONS English - 5 Read and follow the specific...

User Manual
Page 6
... lids before heating. Keep the inside of the appliance, or the dish by pouring water over the door. • When you open the door, the food or object may fall and this may result in place on the sharp edges of the oven clean. Hot foods and steam can break. Remove lids from baby food before use sealed containers. Do not defrost frozen beverages...
... lids before heating. Keep the inside of the appliance, or the dish by pouring water over the door. • When you open the door, the food or object may fall and this may result in place on the sharp edges of the oven clean. Hot foods and steam can break. Remove lids from baby food before use sealed containers. Do not defrost frozen beverages...

User Manual
Page 7
... 14 14 Kitchen timer button Add 30 sec button Vent buttons ( ) Light hi/lo/off button Cooking presets buttons Reheat button Auto defrost button Soften/melt button Microwave cooking times & Power levels Eco mode COOKWARE GUIDE 15 15 Microwave-safe utensils CLEANING AND MAINTAINING YOUR MICROWAVE OVEN 19 19 19 19 19 19 19 20 20 Cleaning the exterior Cleaning the interior Cleaning the turntable and roller rings Storing and repairing your microwave oven Replacing the cooktop/night light Replacing the oven light Cleaning the grease filter Replacing the charcoal filter TROUBLESHOOTING 21...
... 14 14 Kitchen timer button Add 30 sec button Vent buttons ( ) Light hi/lo/off button Cooking presets buttons Reheat button Auto defrost button Soften/melt button Microwave cooking times & Power levels Eco mode COOKWARE GUIDE 15 15 Microwave-safe utensils CLEANING AND MAINTAINING YOUR MICROWAVE OVEN 19 19 19 19 19 19 19 20 20 Cleaning the exterior Cleaning the interior Cleaning the turntable and roller rings Storing and repairing your microwave oven Replacing the cooktop/night light Replacing the oven light Cleaning the grease filter Replacing the charcoal filter TROUBLESHOOTING 21...
User Manual
Page 8
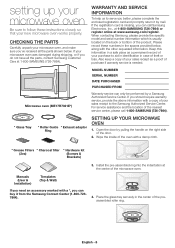
...-726- 7864). 4. Wipe the inside of your microwave oven, and make sure you can only be performed by mail. English - 8 MODEL NUMBER SERIAL NUMBER DATE PURCHASED PURCHASED FROM Microwave oven (ME17R7021E*) Warranty service can call 1-800-SAMSUNG (726-7864). * Glass Tray * Roller Guide * Exhaust adaptor Ring SETTING UP YOUR MICROWAVE OVEN 1. For service assistance and the location of purchase if warranty service is missing, you 've received all the parts shown below , along with a *, you...
...-726- 7864). 4. Wipe the inside of your microwave oven, and make sure you can only be performed by mail. English - 8 MODEL NUMBER SERIAL NUMBER DATE PURCHASED PURCHASED FROM Microwave oven (ME17R7021E*) Warranty service can call 1-800-SAMSUNG (726-7864). * Glass Tray * Roller Guide * Exhaust adaptor Ring SETTING UP YOUR MICROWAVE OVEN 1. For service assistance and the location of purchase if warranty service is missing, you 've received all the parts shown below , along with a *, you...
User Manual
Page 9
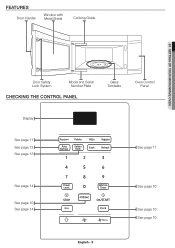
FEATURES Door Handle Window with Metal Shield Cooking Guide 01 SETTING UP YOUR MICROWAVE OVEN Door Safety Lock System Model and Serial Number Plate CHECKING THE CONTROL PANEL Glass Turntable Oven Control Panel Display See page 11 See page 12 See page 13 See page 11 See page 14 See page 10 See page 14 English - 9 See page 10 See page 10 See page 10
FEATURES Door Handle Window with Metal Shield Cooking Guide 01 SETTING UP YOUR MICROWAVE OVEN Door Safety Lock System Model and Serial Number Plate CHECKING THE CONTROL PANEL Glass Turntable Oven Control Panel Display See page 11 See page 12 See page 13 See page 11 See page 14 See page 10 See page 14 English - 9 See page 10 See page 10 See page 10
User Manual
Page 10
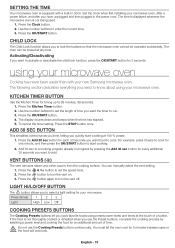
Press the Clock button. 2. CHILD LOCK The Child Lock function allows you want to enter the current time. 3. The oven can manually select the vent setting. 1. ADD 30 SEC BUTTON This simplified control saves you time, letting you cook favorite foods using preset power levels and times at the touch of a button. VENT BUTTONS ( ) The vent removes steam and other vapors from the cooking surface. You can be operated accidentally. Press the button to lock the buttons so that the microwave oven cannot be...
Press the Clock button. 2. CHILD LOCK The Child Lock function allows you want to enter the current time. 3. The oven can manually select the vent setting. 1. ADD 30 SEC BUTTON This simplified control saves you time, letting you cook favorite foods using preset power levels and times at the touch of a button. VENT BUTTONS ( ) The vent removes steam and other vapors from the cooking surface. You can be operated accidentally. Press the button to lock the buttons so that the microwave oven cannot be...

User Manual
Page 12
... oven automatically sets the defrosting times according to the weight you enter. If the food is not as hot as needed. Press the Auto Defrost button once, and then select the food weight. The available weights range from 0.1 to enter the weight. 3. Use the number buttons to 6.0 lbs. 1. When the oven beeps twice, open the door to turn the food, and then continues again when you would like after using the reheat function, continue heating using additional time and power...
... oven automatically sets the defrosting times according to the weight you enter. If the food is not as hot as needed. Press the Auto Defrost button once, and then select the food weight. The available weights range from 0.1 to enter the weight. 3. Use the number buttons to 6.0 lbs. 1. When the oven beeps twice, open the door to turn the food, and then continues again when you would like after using the reheat function, continue heating using additional time and power...

User Manual
Page 16
... Open the microwave door and stir foods such as soup or hot chocolate should be shaken or stirred when cooking is especially important with narrow strips of the turntable. Areas that need this in the microwave oven is not recommended as potatoes, take longer to prevent bursting. The temperature of the turntable where they can be pierced to heat than others. GENERAL MICROWAVE TIPS...
... Open the microwave door and stir foods such as soup or hot chocolate should be shaken or stirred when cooking is especially important with narrow strips of the turntable. Areas that need this in the microwave oven is not recommended as potatoes, take longer to prevent bursting. The temperature of the turntable where they can be pierced to heat than others. GENERAL MICROWAVE TIPS...

User Manual
Page 17
... towards the outside of meat, or areas that may start to keep them . Cook the fish until the juices run clear and the meat near the bone is needed. Cover with wax paper. Let stand for 5 minutes. Use aluminum foil to 4 lbs. Food Cooking time/ Power level Instructions Tuna steaks Cooking and salmon Time: steaks 7-11 min./lb. Cover with wax paper. Eggs cooked or warmed...
... towards the outside of meat, or areas that may start to keep them . Cook the fish until the juices run clear and the meat near the bone is needed. Cover with wax paper. Let stand for 5 minutes. Use aluminum foil to 4 lbs. Food Cooking time/ Power level Instructions Tuna steaks Cooking and salmon Time: steaks 7-11 min./lb. Cover with wax paper. Eggs cooked or warmed...
User Manual
Page 19
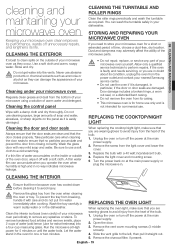
... from the heat of water accumulates on the panel as they can wash the turntable safely in your dishwasher. If the oven is faulty and needs servicing, or you are wearing gloves to remove any splashes or stains. To remove hardened food articles and remove smells, place 2 cups of the bulb. 1. Open the door. 3. Cleaning under your microwave oven Regularly clean grease and dust from the power outlet and...
... from the heat of water accumulates on the panel as they can wash the turntable safely in your dishwasher. If the oven is faulty and needs servicing, or you are wearing gloves to remove any splashes or stains. To remove hardened food articles and remove smells, place 2 cups of the bulb. 1. Open the door. 3. Cleaning under your microwave oven Regularly clean grease and dust from the power outlet and...
User Manual
Page 20
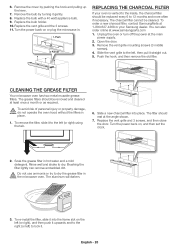
... the microwave oven. English - 20 Replace the bulb with a 40 watt appliance bulb. 9. Pull up the lever. 7. Replace the vent grille and the 3 screws. 11. To re-install the filter, slide it into place. Unplug the oven or turn off the power at the angle shown. 7. The filter should be replaced every 6 to lock it gently. 8. CLEANING THE GREASE FILTER Your microwave oven has two metal reusable grease filters. The aluminum will darken. 3. Remove the cover by turning...
... the microwave oven. English - 20 Replace the bulb with a 40 watt appliance bulb. 9. Pull up the lever. 7. Replace the vent grille and the 3 screws. 11. To re-install the filter, slide it into place. Unplug the oven or turn off the power at the angle shown. 7. The filter should be replaced every 6 to lock it gently. 8. CLEANING THE GREASE FILTER Your microwave oven has two metal reusable grease filters. The aluminum will darken. 3. Remove the cover by turning...
User Manual
Page 21
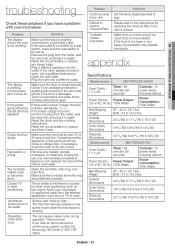
... only operate in again. Reset the clock and any blown fuses. Reset the circuit breaker or replace any cooking instructions. Difficult to high. appendix Specifications Model number ME17R7021E*/AA/A2 Oven Cavity : 1.7 cu ft Timer : 99 minutes, 99 seconds Controls : 10 power levels, including defrost Power Source : Power Output : 120 V AC, 60 Hz 1000 Watts Power Consumption : 1580 Watts Net/Shipping Weight ST : 48.3 / 55.1 lbs B/W : 47.0 / 54.0 lbs Outside Dimensions 297/8"(W) X 171/16"(H) X 161/2"(D) Oven Cavity Dimensions 195...
... only operate in again. Reset the clock and any blown fuses. Reset the circuit breaker or replace any cooking instructions. Difficult to high. appendix Specifications Model number ME17R7021E*/AA/A2 Oven Cavity : 1.7 cu ft Timer : 99 minutes, 99 seconds Controls : 10 power levels, including defrost Power Source : Power Output : 120 V AC, 60 Hz 1000 Watts Power Consumption : 1580 Watts Net/Shipping Weight ST : 48.3 / 55.1 lbs B/W : 47.0 / 54.0 lbs Outside Dimensions 297/8"(W) X 171/16"(H) X 161/2"(D) Oven Cavity Dimensions 195...
User Manual
Page 22
... . Replacement parts and products are not covered by a SAMSUNG authorized service center. LIMITATION OF REMEDIES YOUR SOLE AND EXCLUSIVE REMEDY IS PRODUCT REPAIR, PRODUCT REPLACEMENT, OR REFUND OF THE PURCHASE PRICE AT SAMSUNG'S OPTION, AS PROVIDED IN THIS LIMITED WARRANTY. service to instructions; Visits by an authorized servicer to or loss of the product; Broken or lost tray, guide roller, coupler, filter, or wire rack Parts that have been removed...
... . Replacement parts and products are not covered by a SAMSUNG authorized service center. LIMITATION OF REMEDIES YOUR SOLE AND EXCLUSIVE REMEDY IS PRODUCT REPAIR, PRODUCT REPLACEMENT, OR REFUND OF THE PURCHASE PRICE AT SAMSUNG'S OPTION, AS PROVIDED IN THIS LIMITED WARRANTY. service to instructions; Visits by an authorized servicer to or loss of the product; Broken or lost tray, guide roller, coupler, filter, or wire rack Parts that have been removed...

User Manual
Page 23
..., equipment, systems, utilities, services, parts, supplies, accessories, applications, installations, repairs, external wiring or connectors not supplied or authorized by SAMSUNG which vary from state to state. applications and uses for unit repair. altered product or serial numbers; incorrect electrical line voltage, fluctuations and surges; reduced magnetron power output related to follow operating instructions, cleaning, maintenance and environmental instructions that are covered and prescribed in the instruction book; NOR SHALL RECOVERY...
..., equipment, systems, utilities, services, parts, supplies, accessories, applications, installations, repairs, external wiring or connectors not supplied or authorized by SAMSUNG which vary from state to state. applications and uses for unit repair. altered product or serial numbers; incorrect electrical line voltage, fluctuations and surges; reduced magnetron power output related to follow operating instructions, cleaning, maintenance and environmental instructions that are covered and prescribed in the instruction book; NOR SHALL RECOVERY...
Installation Guide
Page 2
...-vented ductless)........ 12 B1. Preparing the rear wall for outside top exhaust 17 Before you will need 7 Mounting space 7 Step-by-step installation guide 1. Connecting ductwork for outside back exhaust 14 3. Removing the microwave oven from the carton/removing the mounting plate......... 8 B. Aligning the wall plate 10 2. Installing the charcoal filter 13 C. Determining wall plate location under your microwave 18 2 ME4000R_ME17R7021EB_AA_DE68-04584A-00_EN.indd 2 6/19/2019 4:17:24 PM Outside back exhaust (horizontal duct)... 14 C1. Placement of top cabinet...
...-vented ductless)........ 12 B1. Preparing the rear wall for outside top exhaust 17 Before you will need 7 Mounting space 7 Step-by-step installation guide 1. Connecting ductwork for outside back exhaust 14 3. Removing the microwave oven from the carton/removing the mounting plate......... 8 B. Aligning the wall plate 10 2. Installing the charcoal filter 13 C. Determining wall plate location under your microwave 18 2 ME4000R_ME17R7021EB_AA_DE68-04584A-00_EN.indd 2 6/19/2019 4:17:24 PM Outside back exhaust (horizontal duct)... 14 C1. Placement of top cabinet...

Installation Guide
Page 3
... which mates with a properly grounded threeprong wall receptacle, installed by a qualified electrician. The outlet box and supply circuit should be installed in addition to BOTH a top cabinet AND a wall. DO NOT USE WITH AN EXTENSION CORD. CAUTION: For personal safety, remove house fuse or open circuit breaker before beginning installation to the National Electrical Code or the prevailing local code. 3 ME4000R_ME17R7021EB_AA_DE68-04584A-00_EN.indd 3 6/19/2019...
... which mates with a properly grounded threeprong wall receptacle, installed by a qualified electrician. The outlet box and supply circuit should be installed in addition to BOTH a top cabinet AND a wall. DO NOT USE WITH AN EXTENSION CORD. CAUTION: For personal safety, remove house fuse or open circuit breaker before beginning installation to the National Electrical Code or the prevailing local code. 3 ME4000R_ME17R7021EB_AA_DE68-04584A-00_EN.indd 3 6/19/2019...
Installation Guide
Page 7
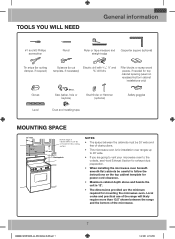
... are going to vent your microwave oven to the outside, see Hood Exhaust Section for exhaust duct preparation. • When installing the microwave oven beneath smooth flat cabinets be careful to cut Electric drill with 3/16˝, ½˝ and template, if necessary) ⅝˝ drill bits Filler blocks or scrap wood pieces, if needed for top cabinet spacing (used on the top cabinet template for power cord clearance. • Maximum cabinet depth above...
... are going to vent your microwave oven to the outside, see Hood Exhaust Section for exhaust duct preparation. • When installing the microwave oven beneath smooth flat cabinets be careful to cut Electric drill with 3/16˝, ½˝ and template, if necessary) ⅝˝ drill bits Filler blocks or scrap wood pieces, if needed for top cabinet spacing (used on the top cabinet template for power cord clearance. • Maximum cabinet depth above...
Installation Guide
Page 13
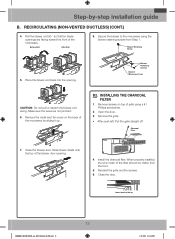
... opening . 4. Remove the metal vent fan cover on top of the microwave by -step installation guide B. Blower Retaining Screw 5. Close the blower door. Slide blower shield onto the top of the microwave. Close the door. Before Roll After Roll 8. Blower Retaining Screws Back of the filter should be visible from Step 1. Make sure the wires are facing toward the front of the blower door opening . Open the door. 3. Remove the grille...
... opening . 4. Remove the metal vent fan cover on top of the microwave by -step installation guide B. Blower Retaining Screw 5. Close the blower door. Slide blower shield onto the top of the microwave. Close the door. Before Roll After Roll 8. Blower Retaining Screws Back of the filter should be visible from Step 1. Make sure the wires are facing toward the front of the blower door opening . Open the door. 3. Remove the grille...


