
User Manual
Page 2
... control panel Clock Settings Child Lock Eco mode Smart Control Voice Control Auto Connectivity My settings Using your microwave oven Kitchen Timer Vent Fan (High/Mid/Low/Off) Cooktop Lamp (High/Low/Off) Turntable (On/Off) STOP/CLEAR Eco button +30sec button Accessory Combination Guide Popcorn Cookie Slim Fry Example for Slim Fry operation Auto Cook Example for Auto Cook operation Defrost Microwave Convection Bake/Roast Speed Bake/Roast Cookware for cooking with speed bake/roast Food suitable for speed bake/roast Speed Bake/Roast Cooking Guide Grill Keep Warm Steam Clean...
... control panel Clock Settings Child Lock Eco mode Smart Control Voice Control Auto Connectivity My settings Using your microwave oven Kitchen Timer Vent Fan (High/Mid/Low/Off) Cooktop Lamp (High/Low/Off) Turntable (On/Off) STOP/CLEAR Eco button +30sec button Accessory Combination Guide Popcorn Cookie Slim Fry Example for Slim Fry operation Auto Cook Example for Auto Cook operation Defrost Microwave Convection Bake/Roast Speed Bake/Roast Cookware for cooking with speed bake/roast Food suitable for speed bake/roast Speed Bake/Roast Cooking Guide Grill Keep Warm Steam Clean...

User Manual
Page 3
... Guide for cooking eggs in your microwave Guide for cooking vegetables in your microwave Cleaning and maintaining your microwave oven Cleaning the exterior Cleaning under your microwave oven Cleaning the control panel Cleaning the door and door seals Cleaning the interior Cleaning the turntable and roller rings Storing and repairing your microwave oven Replacing the cooktop/night light Replacing the oven light Cleaning the grease filter Replacing the charcoal filter Troubleshooting Check points Information codes Appendix Specifications Warranty Samsung over-the-range (otr) microwave oven...
... Guide for cooking eggs in your microwave Guide for cooking vegetables in your microwave Cleaning and maintaining your microwave oven Cleaning the exterior Cleaning under your microwave oven Cleaning the control panel Cleaning the door and door seals Cleaning the interior Cleaning the turntable and roller rings Storing and repairing your microwave oven Replacing the cooktop/night light Replacing the oven light Cleaning the grease filter Replacing the charcoal filter Troubleshooting Check points Information codes Appendix Specifications Warranty Samsung over-the-range (otr) microwave oven...
User Manual
Page 6
.... 9. Connect only to excessive microwave energy: 1. Install or locate this appliance only for example, near a kitchen sink, in a microwave oven. 6. Use this appliance only in the manual. Read all safety instructions before using any openings on this product near a swimming pool, or similar locations. 13. Read and follow the specific "Precautions to avoid possible exposure to heat, cook, or dry food. Do not put corrosive chemicals...
.... 9. Connect only to excessive microwave energy: 1. Install or locate this appliance only for example, near a kitchen sink, in a microwave oven. 6. Use this appliance only in the manual. Read all safety instructions before using any openings on this product near a swimming pool, or similar locations. 13. Read and follow the specific "Precautions to avoid possible exposure to heat, cook, or dry food. Do not put corrosive chemicals...

User Manual
Page 7
... the power at the fuse or circuit breaker panel. Stir liquid both before cleaning. 17. Do not cover racks or any materials, other part of electric shock. 21. Do not overheat liquid. Oversized foods or oversized metal utensils should not be inserted in the microwave oven for storage purposes. b. After heating, allow the container to facilitate cooking. MC17T8000C_AA-01_EN+MES.indb 7 SAVE THESE INSTRUCTIONS English...
... the power at the fuse or circuit breaker panel. Stir liquid both before cleaning. 17. Do not cover racks or any materials, other part of electric shock. 21. Do not overheat liquid. Oversized foods or oversized metal utensils should not be inserted in the microwave oven for storage purposes. b. After heating, allow the container to facilitate cooking. MC17T8000C_AA-01_EN+MES.indb 7 SAVE THESE INSTRUCTIONS English...

User Manual
Page 8
... recommend using an extension cord with a cord that is equipped with this appliance. Use care when cleaning the vent-hood filter. This appliance is properly installed and grounded. WARNING Improper use of the grounding plug can result in a risk of electric shock by providing an escape wire for the electrical current. Do not remove the third (grounding) prong. Important safety instructions Important safety instructions CAUTION 1. Clean Ventilating Hoods Frequently - Grease...
... recommend using an extension cord with a cord that is equipped with this appliance. Use care when cleaning the vent-hood filter. This appliance is properly installed and grounded. WARNING Improper use of the grounding plug can result in a risk of electric shock by providing an escape wire for the electrical current. Do not remove the third (grounding) prong. Important safety instructions Important safety instructions CAUTION 1. Clean Ventilating Hoods Frequently - Grease...

User Manual
Page 11
... your nearest service center for long periods of time or during a thunder/lightning storm. - Unplug the oven by pulling the plug only. - INSTALLATION CAUTIONS Position the oven so that the plug is not being used for a replacement or repair. Do not use a damaged power plug, damaged power cord, or loose wall socket. - This may result in electric shock or fire. Failing to direct sunlight or...
... your nearest service center for long periods of time or during a thunder/lightning storm. - Unplug the oven by pulling the plug only. - INSTALLATION CAUTIONS Position the oven so that the plug is not being used for a replacement or repair. Do not use a damaged power plug, damaged power cord, or loose wall socket. - This may result in electric shock or fire. Failing to direct sunlight or...

User Manual
Page 12
... oven needs to do not come into contact with a lid, a cookie sheet, or a flat tray. Never leave surface units beneath your nearest service center. If the door is flooded, please contact your oven unattended at the fuse or circuit breaker panel. Read and follow the specific "Precautions to Avoid Possible Exposure to repair, disassemble, or modify the appliance yourself. - Do not touch the microwave, power cord...
... oven needs to do not come into contact with a lid, a cookie sheet, or a flat tray. Never leave surface units beneath your nearest service center. If the door is flooded, please contact your oven unattended at the fuse or circuit breaker panel. Read and follow the specific "Precautions to Avoid Possible Exposure to repair, disassemble, or modify the appliance yourself. - Do not touch the microwave, power cord...
User Manual
Page 13
... in operation. - Failing to do so may result in electric shock or injury. Plugging the power plug into the microwave. - Do not touch the inside of the appliance will be dangerous to explode or burn. - Do not put aluminum foil (except as specifically directed in electric shock. Do not use the oven outdoors. Under no circumstances should you remove the outer cabinet. Failing...
... in operation. - Failing to do so may result in electric shock or injury. Plugging the power plug into the microwave. - Do not touch the inside of the appliance will be dangerous to explode or burn. - Do not put aluminum foil (except as specifically directed in electric shock. Do not use the oven outdoors. Under no circumstances should you remove the outer cabinet. Failing...

User Manual
Page 15
... while cooking or when opening the door. - Do not store anything directly on the appliance. - Do not operate the appliance with the product. Do not defrost frozen beverages in electric shock, fire, problems with a sharp object. - Do not scratch the glass of the appliance. - Do not put your face or body close to the appliance. Remove seals and lids before use...
... while cooking or when opening the door. - Do not store anything directly on the appliance. - Do not operate the appliance with the product. Do not defrost frozen beverages in electric shock, fire, problems with a sharp object. - Do not scratch the glass of the appliance. - Do not put your face or body close to the appliance. Remove seals and lids before use...
User Manual
Page 17
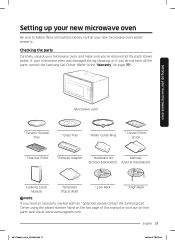
... 2020-10-07 5:56:41 Setting up your new microwave oven Be sure to the "Warranty" on page 77.) Setting up your new microwave oven Microwave oven * Ceramic Enamel Tray * Glass Tray * Roller Guide Ring * Grease Filters (2 ea) * Charcoal Filter * Exhaust Adaptor * Hardware Kit Manuals (Screws & Brackets) (User & Installation) Cooking Guide Manual Templates (Top & Wall) * Low Rack * High Rack NOTE If you need an accessory marked with an * (asterisk), please contact the Samsung Call Center using the phone number listed on the last page of this...
... 2020-10-07 5:56:41 Setting up your new microwave oven Be sure to the "Warranty" on page 77.) Setting up your new microwave oven Microwave oven * Ceramic Enamel Tray * Glass Tray * Roller Guide Ring * Grease Filters (2 ea) * Charcoal Filter * Exhaust Adaptor * Hardware Kit Manuals (Screws & Brackets) (User & Installation) Cooking Guide Manual Templates (Top & Wall) * Low Rack * High Rack NOTE If you need an accessory marked with an * (asterisk), please contact the Samsung Call Center using the phone number listed on the last page of this...

User Manual
Page 20
... oven can be operated by children accidentally. Eco mode 20 English MC17T8000C_AA-01_EN+MES.indb 20 Eco Mode reduces standby power usage. To cancel the Eco Mode, touch any time. Set the clock when first installing your new microwave oven Clock Settings Your microwave oven is equipped with a built-in clock. Touch the OK button. 4. When you want to a mode which minimizes power usage. Activating / Deactivating If you touch the STOP/CLEAR Eco button once, the display...
... oven can be operated by children accidentally. Eco mode 20 English MC17T8000C_AA-01_EN+MES.indb 20 Eco Mode reduces standby power usage. To cancel the Eco Mode, touch any time. Set the clock when first installing your new microwave oven Clock Settings Your microwave oven is equipped with a built-in clock. Touch the OK button. 4. When you want to a mode which minimizes power usage. Activating / Deactivating If you touch the STOP/CLEAR Eco button once, the display...
User Manual
Page 23
... Hood Control • Turn on/off the microwave hood light • Trun on/off hood power of microwave • Turn on/off hood fan of microwave • Set the microwave hood fan speed to high/mid/low Oven Timer • Set the timer on the microwave to SmartThings. 2. Installation Guide Here's how to Amazon Alexa. (or Google Assistant) 4. Setup the supported devices to (Change Cook 1 hour Time) Remarks - - - • Amazon Alexa & Google Assistant : Samsung smart home appliances are supported by 20 Turn...
... Hood Control • Turn on/off the microwave hood light • Trun on/off hood power of microwave • Turn on/off hood fan of microwave • Set the microwave hood fan speed to high/mid/low Oven Timer • Set the timer on the microwave to SmartThings. 2. Installation Guide Here's how to Amazon Alexa. (or Google Assistant) 4. Setup the supported devices to (Change Cook 1 hour Time) Remarks - - - • Amazon Alexa & Google Assistant : Samsung smart home appliances are supported by 20 Turn...

User Manual
Page 50
Touch the Microwave button. (You can adjust the cooking time while the microwave oven is operating. If you want to change power level (10-100) if needed. 24 1 36 8 2567 1. Touch the START button to the table below). 5. If you do not need to set 2nd stage power level. 7. To use Multi-stage cooking mode, touch OK, enter cooking time for 2nd stage and then touch START if you want to set the power level to set a cooking time. Touch the START button to start at the High power level. Power Level Description...
Touch the Microwave button. (You can adjust the cooking time while the microwave oven is operating. If you want to change power level (10-100) if needed. 24 1 36 8 2567 1. Touch the START button to the table below). 5. If you do not need to set 2nd stage power level. 7. To use Multi-stage cooking mode, touch OK, enter cooking time for 2nd stage and then touch START if you want to set the power level to set a cooking time. Touch the START button to start at the High power level. Power Level Description...

User Manual
Page 52
... START button. Use the number pad to set a cooking time. If you do not need to set the power level, just touch the START button. Touch the Speed Bake/Roast button once for SPEED BAKE. Power level 1234 10 30 50 70 5. Open as infrequently as possible. • While operating the oven, if you to the table below. (default : 2) 3 5 25 No. Speed Bake/Roast The combination cooking feature allows you want to change the temperature setting, touch...
... START button. Use the number pad to set a cooking time. If you do not need to set the power level, just touch the START button. Touch the Speed Bake/Roast button once for SPEED BAKE. Power level 1234 10 30 50 70 5. Open as infrequently as possible. • While operating the oven, if you to the table below. (default : 2) 3 5 25 No. Speed Bake/Roast The combination cooking feature allows you want to change the temperature setting, touch...

User Manual
Page 65
Open the door. 3. Remove the charcoal filter, if present. 6. Unplug the oven or turn off the power at the main power supply. 2. Remove the screw securing the LED lamp board. 5. Remove the vent cover mounting screws (2 middle screws). 4. Remove the screw securing the lamp cover. 7. Plug the oven in or turn off the power at the main power supply. Reset the clock. Replace the LED lamp board. Unplug the oven or turn on the power at the main power supply. 2. Slide the vent grille to the left...
Open the door. 3. Remove the charcoal filter, if present. 6. Unplug the oven or turn off the power at the main power supply. 2. Remove the screw securing the LED lamp board. 5. Remove the vent cover mounting screws (2 middle screws). 4. Remove the screw securing the lamp cover. 7. Plug the oven in or turn off the power at the main power supply. Reset the clock. Replace the LED lamp board. Unplug the oven or turn on the power at the main power supply. 2. Slide the vent grille to the left...

User Manual
Page 67
... cleaned. To order a new charcoal filter, contact the Parts Department at the main power supply. Open the door. 3. Plug the oven in or turn off the power at the angle shown. 7. You can also order online at www.samsungparts.com The filter angle 1. The filter angle 6. Replace the vent grille and 2 screws and close the door. Slide a new charcoal filter into place. Reset the clock. Replacing the charcoal filter If your oven is vented to the inside, the charcoal filter...
... cleaned. To order a new charcoal filter, contact the Parts Department at the main power supply. Open the door. 3. Plug the oven in or turn off the power at the angle shown. 7. You can also order online at www.samsungparts.com The filter angle 1. The filter angle 6. Replace the vent grille and 2 screws and close the door. Slide a new charcoal filter into place. Reset the clock. Replacing the charcoal filter If your oven is vented to the inside, the charcoal filter...

User Manual
Page 68
If a problem persists, or if an information code keeps appearing on the exterior. Deactivate Child Lock. Make sure power is not displayed. Confirm the microwave is plugged in . The door open . The time is supplied. Power is supplied. Close the door and try again. Confirm the microwave is on the display, contact a local Samsung service center. The user has opened the door to turn food over , touch the START button again to start operation. Remove the foreign matter...
If a problem persists, or if an information code keeps appearing on the exterior. Deactivate Child Lock. Make sure power is not displayed. Confirm the microwave is plugged in . The door open . The time is supplied. Power is supplied. Close the door and try again. Confirm the microwave is on the display, contact a local Samsung service center. The user has opened the door to turn food over , touch the START button again to start operation. Remove the foreign matter...

User Manual
Page 71
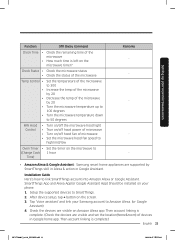
...:47 If the Auto Cook function is covered by foreign matter. To test the oven, put one cup of food and start the function again. Problem Cause The warm function does not work . The thaw function does not work . Close and reopen the door or touch the STOP/CLEAR Eco button. The interior light is being used , this beeping sound means it's time to restart operation. The door has been left...
...:47 If the Auto Cook function is covered by foreign matter. To test the oven, put one cup of food and start the function again. Problem Cause The warm function does not work . The thaw function does not work . Close and reopen the door or touch the STOP/CLEAR Eco button. The interior light is being used , this beeping sound means it's time to restart operation. The door has been left...
User Manual
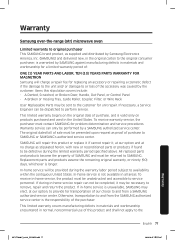
Page 77
... the purchaser. If in-home service is not available in normal, noncommercial use of SAMSUNG and must be presented upon request as stipulated herein, with new or reconditioned parts or products if found to be returned to the customer for problem determination and service procedures. A Broken or missing Tray, Guide Roller, Coupler, Filter, or Wire Rack User Replaceable Parts may elect, at no charge...
... the purchaser. If in-home service is not available in normal, noncommercial use of SAMSUNG and must be presented upon request as stipulated herein, with new or reconditioned parts or products if found to be returned to the customer for problem determination and service procedures. A Broken or missing Tray, Guide Roller, Coupler, Filter, or Wire Rack User Replaceable Parts may elect, at no charge...

User Manual
Page 78
applications and uses for which occurs in shipment; incorrect electrical line voltage, fluctuations and surges; reduced magnetron power output related to follow operating instructions, cleaning, maintenance and environmental instructions that are covered and prescribed in service problems; NOR SHALL RECOVERY OF ANY KIND AGAINST SAMSUNG BE GREATER IN AMOUNT THAN THE PURCHASE PRICE OF THE PRODUCT SOLD BY SAMSUNG AND CAUSING THE ALLEGED DAMAGE. WITHOUT...
applications and uses for which occurs in shipment; incorrect electrical line voltage, fluctuations and surges; reduced magnetron power output related to follow operating instructions, cleaning, maintenance and environmental instructions that are covered and prescribed in service problems; NOR SHALL RECOVERY OF ANY KIND AGAINST SAMSUNG BE GREATER IN AMOUNT THAN THE PURCHASE PRICE OF THE PRODUCT SOLD BY SAMSUNG AND CAUSING THE ALLEGED DAMAGE. WITHOUT...


