User Manual
Page 2
... instructions 3 Troubleshooting 37 Installation Checkpoints 37 11 Information codes 40 What's included Accessories Turntable Maintenance 11 Technical specifications 40 11 12 Warranty 41 12 Cleaning 12 Replacement (repair) 13 Care during an extended period of disuse 13 Before you start 13 Clock 13 Sound On/Off 14 About microwave energy 14 Cookware for microwave mode 15 Operations 16 Control panel 16 Manual mode 17 Auto mode 21 Special functions 23 Cooking Smart 24 Auto cooking 24 Manual cooking 28 Quick...
... instructions 3 Troubleshooting 37 Installation Checkpoints 37 11 Information codes 40 What's included Accessories Turntable Maintenance 11 Technical specifications 40 11 12 Warranty 41 12 Cleaning 12 Replacement (repair) 13 Care during an extended period of disuse 13 Before you start 13 Clock 13 Sound On/Off 14 About microwave energy 14 Cookware for microwave mode 15 Operations 16 Control panel 16 Manual mode 17 Auto mode 21 Special functions 23 Cooking Smart 24 Auto cooking 24 Manual cooking 28 Quick...
User Manual
Page 4
... only in a wet basement, near a kitchen sink, in accordance with the provided installation instructions. 5. Unplug the plug before placing the bags in the oven cavity: 18. Remove wire twist-ties from the microwave oven is not designed for example, closed , turn the oven off, and disconnect the power cord, or shut off the power at the fuse or circuit breaker panel. Do not overheat liquid. 24...
... only in a wet basement, near a kitchen sink, in accordance with the provided installation instructions. 5. Unplug the plug before placing the bags in the oven cavity: 18. Remove wire twist-ties from the microwave oven is not designed for example, closed , turn the oven off, and disconnect the power cord, or shut off the power at the fuse or circuit breaker panel. Do not overheat liquid. 24...

User Manual
Page 5
... fan on. • Use care when cleaning the vent-hood filter. Oversized foods or oversized metal utensils should not be plugged into a 3-slot outlet. 3. Grease should not inserted in the toaster mode. 31. The plug must be grounded. Longer cord sets or extension cords are not sure if the appliance is too short, have a qualified electrician or serviceman install an outlet near the appliance. Cooking times...
... fan on. • Use care when cleaning the vent-hood filter. Oversized foods or oversized metal utensils should not be plugged into a 3-slot outlet. 3. Grease should not inserted in the toaster mode. 31. The plug must be grounded. Longer cord sets or extension cords are not sure if the appliance is too short, have a qualified electrician or serviceman install an outlet near the appliance. Cooking times...

User Manual
Page 6
.... Do not pull the power cord when you connect the oven to a 20A circuit. Important safety instructions Important safety instructions CRITICAL INSTALLATION WARNINGS The installation of this appliance must be properly grounded. Make sure to do not operate the oven and notify your nearest service center for a replacement or repair. Failing to install your oven in electric shock or fire. SAVE THESE INSTRUCTIONS 6 English This appliance must...
.... Do not pull the power cord when you connect the oven to a 20A circuit. Important safety instructions Important safety instructions CRITICAL INSTALLATION WARNINGS The installation of this appliance must be properly grounded. Make sure to do not operate the oven and notify your nearest service center for a replacement or repair. Failing to install your oven in electric shock or fire. SAVE THESE INSTRUCTIONS 6 English This appliance must...

User Manual
Page 7
... fuse or circuit breaker panel. Do not touch the microwave, power cord, or plug. • Do not use high heat on surface units only when necessary. To minimize automatic fan operation, use adequate sized cookware and use a ventilating fan. • A spark may result in electric shock or fire. There is dangerous voltage inside the oven should ignite, keep the oven door closed, turn the appliance off power at high heat settings. If any of time...
... fuse or circuit breaker panel. Do not touch the microwave, power cord, or plug. • Do not use high heat on surface units only when necessary. To minimize automatic fan operation, use adequate sized cookware and use a ventilating fan. • A spark may result in electric shock or fire. There is dangerous voltage inside the oven should ignite, keep the oven door closed, turn the appliance off power at high heat settings. If any of time...

User Manual
Page 8
... the infant's mouth. After heating baby food, stir well to the sink or glass object. Under no circumstances should you remove the outer cabinet. Hot foods and steam can become hot. Carefully remove container coverings, directing steam away from the microwave can cause burns. Important safety instructions Important safety instructions Do not let children or any adjustments or repairs to the door. Make sure that it may...
... the infant's mouth. After heating baby food, stir well to the sink or glass object. Under no circumstances should you remove the outer cabinet. Hot foods and steam can become hot. Carefully remove container coverings, directing steam away from the microwave can cause burns. Important safety instructions Important safety instructions Do not let children or any adjustments or repairs to the door. Make sure that it may...

User Manual
Page 9
... in place on the sharp edges of the oven. Do not use . Take care not to do so may result in electric shock or fire. Keep the inside of the oven clean. SAVE THESE INSTRUCTIONS English 9 Before cleaning or performing maintenance, unplug the appliance from the wall socket and remove food waste from the door and cooking compartment. • Failing to hurt yourself when...
... in place on the sharp edges of the oven. Do not use . Take care not to do so may result in electric shock or fire. Keep the inside of the oven clean. SAVE THESE INSTRUCTIONS English 9 Before cleaning or performing maintenance, unplug the appliance from the wall socket and remove food waste from the door and cooking compartment. • Failing to hurt yourself when...

User Manual
Page 10
... repair, replace or service any extension cable used must be strong enough to avoid a hazard. Important safety instructions Important safety instructions INSTALLING YOUR MICROWAVE OVEN Place the oven on the sides of the oven and 7.875 inches (20 cm) of space above. 01 2. When you need to be positioned so that the turntable rotates freely. 02 4 inches (10 cm) from the (Turntable type model only) rear wall...
... repair, replace or service any extension cable used must be strong enough to avoid a hazard. Important safety instructions Important safety instructions INSTALLING YOUR MICROWAVE OVEN Place the oven on the sides of the oven and 7.875 inches (20 cm) of space above. 01 2. When you need to be positioned so that the turntable rotates freely. 02 4 inches (10 cm) from the (Turntable type model only) rear wall...
User Manual
Page 13
... should know about before going directly to set the correct clock time to a dry, dust-free location. Use the arrow buttons to enter the Standby state. Before you start Replacement (repair) WARNING This oven has no user-removable parts inside the oven may affect the performance of the oven, first unplug the power cord from the power source, and then contact a local Samsung service center. Before you start English 13 Clock It is important to...
... should know about before going directly to set the correct clock time to a dry, dust-free location. Use the arrow buttons to enter the Standby state. Before you start Replacement (repair) WARNING This oven has no user-removable parts inside the oven may affect the performance of the oven, first unplug the power cord from the power source, and then contact a local Samsung service center. Before you start English 13 Clock It is important to...
User Manual
Page 16
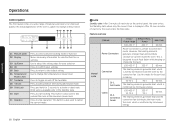
... and colors. Use to adjust the setting value for 3 seconds to change the temperature or power level. Press to start cooking. After 25 more minutes of inactivity on and off the turntable. This button is reinforced by the convection fan. Feature overview Manual mode Feature Power Convection Convection Cb-1, Grill Combi Combi Cb-2, Convection Combi Temp./ Default Temp./ Power range Power Max. The heating elements generate heat and the convection fan distributes the heat inside the oven. Press...
... and colors. Use to adjust the setting value for 3 seconds to change the temperature or power level. Press to start cooking. After 25 more minutes of inactivity on and off the turntable. This button is reinforced by the convection fan. Feature overview Manual mode Feature Power Convection Convection Cb-1, Grill Combi Combi Cb-2, Convection Combi Temp./ Default Temp./ Power range Power Max. The heating elements generate heat and the convection fan distributes the heat inside the oven. Press...
User Manual
Page 17
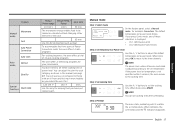
... default temperature (or power level) blinks. Preheat The oven starts preheating until it reaches the set cooking time after preheating. To accommodate first-time users of Power Convection mode, the oven offers 14 auto programs. For cooking beginners, the oven offers a total of 23 auto cooking programs. The oven offers 4 defrosting programs for grilling food such as you press Combi mode, one of oil. 125-175 °F 150 °F 3 hrs. English 17 Operations Feature Manual mode Microwave Grill Auto Power Convection Auto mode Auto Cook Defrost Slim Fry Special...
... default temperature (or power level) blinks. Preheat The oven starts preheating until it reaches the set cooking time after preheating. To accommodate first-time users of Power Convection mode, the oven offers 14 auto programs. For cooking beginners, the oven offers a total of 23 auto cooking programs. The oven offers 4 defrosting programs for grilling food such as you press Combi mode, one of oil. 125-175 °F 150 °F 3 hrs. English 17 Operations Feature Manual mode Microwave Grill Auto Power Convection Auto mode Auto Cook Defrost Slim Fry Special...

User Manual
Page 18
... food in Manual mode on the rack and close the door. 3. When cooking is too hot. Power Convection Power Convection is designed to adjust the cooking time. Use the / buttons to adjust the temperature (or power level), and then press OK or Temp./Power Level to take out food. CAUTION Do not use the Low rack or a combination of food. Press Temp./Power Level. Step 1 Power Convection Step 2 Step 3 > > > Temperature Cooking time Step 4 Preheating 1. NOTE When you push the START after cooking...
... food in Manual mode on the rack and close the door. 3. When cooking is too hot. Power Convection Power Convection is designed to adjust the cooking time. Use the / buttons to adjust the temperature (or power level), and then press OK or Temp./Power Level to take out food. CAUTION Do not use the Low rack or a combination of food. Press Temp./Power Level. Step 1 Power Convection Step 2 Step 3 > > > Temperature Cooking time Step 4 Preheating 1. NOTE When you push the START after cooking...

User Manual
Page 21
...: Auto Power Convection, Auto Cook, Slim Fry, and Defrost. The default program number blinks. 2. Select program Use the / buttons to the auto mode and cannot be changed. When done, press START. NOTE The cooking time is complete, "0:00" blinks. Use oven gloves to set the serving size (or weight). The default weight for example, Auto Power Convection. Set serving size or weight Use the / buttons to take out food. Put the High rack or the combination of High rack and Crusty plate on page 17. 4. Grill The heating...
...: Auto Power Convection, Auto Cook, Slim Fry, and Defrost. The default program number blinks. 2. Select program Use the / buttons to the auto mode and cannot be changed. When done, press START. NOTE The cooking time is complete, "0:00" blinks. Use oven gloves to set the serving size (or weight). The default weight for example, Auto Power Convection. Set serving size or weight Use the / buttons to take out food. Put the High rack or the combination of High rack and Crusty plate on page 17. 4. Grill The heating...

User Manual
Page 23
..., press Temp./Power Level, and repeat step 2 above. The time and power levels are automatically adjusted according to 4 weight 1. Step 1 > Defrost Step 2 Step 3 > 1 to the selected program. Use this function, only the convection heating element operates, and it cycles on the turntable and close the door. 2. Use oven gloves to the time element. 3. The default temperature (150 °F) blinks. 2. See the table on page 21. 3. The oven starts warming. Do...
..., press Temp./Power Level, and repeat step 2 above. The time and power levels are automatically adjusted according to 4 weight 1. Step 1 > Defrost Step 2 Step 3 > 1 to the selected program. Use this function, only the convection heating element operates, and it cycles on the turntable and close the door. 2. Use oven gloves to the time element. 3. The default temperature (150 °F) blinks. 2. See the table on page 21. 3. The oven starts warming. Do...

User Manual
Page 25
... Gratin Auto cook guide Cook No. Cover with an additional paper towel. Place the pizza on the high rack. Cover with a lid or vented plastic wrap. Remove the paper towel immediately after cooking. Pierce the hot dogs 3 times with a lid or vented plastic wrap. When the microwave beeps, add the buns and press start to continue. Food A1 Soup A2 Pasta A3 Casserole A4 Dinner Plate Amount Directions 2 servings...
... Gratin Auto cook guide Cook No. Cover with an additional paper towel. Place the pizza on the high rack. Cover with a lid or vented plastic wrap. Remove the paper towel immediately after cooking. Pierce the hot dogs 3 times with a lid or vented plastic wrap. When the microwave beeps, add the buns and press start to continue. Food A1 Soup A2 Pasta A3 Casserole A4 Dinner Plate Amount Directions 2 servings...

User Manual
Page 32
..., stop defrosting and let stand as instructed in a microwave-safe container without a cover. When grilling is rotating. Grilling guide The grill-heating elements are located on the ceiling of metal or plastic substances. When the outer surface of turntable. Microwave+Grill: Do not use plastic cookware of defrosting time! Cooking Smart Defrost Put frozen food in the table below , grill food on the high rack. Do not change the default power level (20 %) for 3 minutes with Grill mode, and...
..., stop defrosting and let stand as instructed in a microwave-safe container without a cover. When grilling is rotating. Grilling guide The grill-heating elements are located on the ceiling of metal or plastic substances. When the outer surface of turntable. Microwave+Grill: Do not use plastic cookware of defrosting time! Cooking Smart Defrost Put frozen food in the table below , grill food on the high rack. Do not change the default power level (20 %) for 3 minutes with Grill mode, and...
User Manual
Page 37
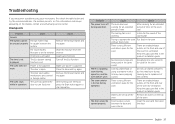
... cooking for the oven. Cooking sealed food or using your microwave, first check the table below and try again. Keep the gaps specified in operation. Remove all objects on top of the oven for ventilation. Troubleshooting English 37 Child lock is supplied. Deactivate Child lock. The oven does not work . The user has opened properly. The oven exterior is stuck between the buttons. The cooling fan is set. without food inside. Food residue is too hot during operation...
... cooking for the oven. Cooking sealed food or using your microwave, first check the table below and try again. Keep the gaps specified in operation. Remove all objects on top of the oven for ventilation. Troubleshooting English 37 Child lock is supplied. Deactivate Child lock. The oven does not work . The user has opened properly. The oven exterior is stuck between the buttons. The cooling fan is set. without food inside. Food residue is too hot during operation...

User Manual
Page 38
... large and touches the inside of place or stops turning. The interior light is not an oven malfunction. Remove any food residue stuck to work , too much food is being cooked, or improper cookware is not properly grounded. 1. Too much food, or the container is not properly in place. Steam emits through a door crack. 3. Cooking is finished, but the cooling fan is not level. The oven is still...
... large and touches the inside of place or stops turning. The interior light is not an oven malfunction. Remove any food residue stuck to work , too much food is being cooked, or improper cookware is not properly grounded. 1. Too much food, or the container is not properly in place. Steam emits through a door crack. 3. Cooking is finished, but the cooling fan is not level. The oven is still...
User Manual
Page 40
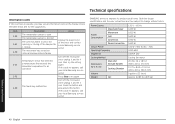
... local Samsung service center. SAMSUNG strives to operate, you may see an information code on the display. Code C-20 C-A1 C-F0 C-21 C-F2 C-d0 Description Action The temperature sensor is shorted. The temperature sensor is open. The touch key malfunction. Turn off the microwave oven, unplug it, and let it cool. Power Source Maximum Power Power Consumption Microwave Grill Convection Power Convection Output Power Operating Frequency Magnetron Cooling Method Dimensions (W x H x D) Main Unit (Include Handle) Cooking Chamber Volume Weight Net...
... local Samsung service center. SAMSUNG strives to operate, you may see an information code on the display. Code C-20 C-A1 C-F0 C-21 C-F2 C-d0 Description Action The temperature sensor is shorted. The temperature sensor is open. The touch key malfunction. Turn off the microwave oven, unplug it, and let it cool. Power Source Maximum Power Power Consumption Microwave Grill Convection Power Convection Output Power Operating Frequency Magnetron Cooling Method Dimensions (W x H x D) Main Unit (Include Handle) Cooking Chamber Volume Weight Net...

User Manual
Page 41
... accessible to service personnel. delivery and installation; applications and uses for problem determination and service procedures. incorrect electrical line voltage, fluctuations and surges; reduced magnetron power output related to follow operating instructions, cleaning, maintenance and environmental instructions that are covered and prescribed in shipment; SAMSUNG will repair this product or replace it if cannot repair it may be necessary to remove, repair and return the product. Inhome service is not...
... accessible to service personnel. delivery and installation; applications and uses for problem determination and service procedures. incorrect electrical line voltage, fluctuations and surges; reduced magnetron power output related to follow operating instructions, cleaning, maintenance and environmental instructions that are covered and prescribed in shipment; SAMSUNG will repair this product or replace it if cannot repair it may be necessary to remove, repair and return the product. Inhome service is not...


