
User Manual (user Manual) (ver.1.0) (English)
Page 2
... Signal Mode Table 3-6 Standard Signal Mode Table 3-7 Standard Signal Mode Table 3-8 Standard Signal Mode Table 3-9 Standard Signal Mode Table 3-10 Standard Signal Mode Table 3-11 Standard Signal Mode Table 3-12 Standard Signal Mode Table 3-13 Installing the Device Driver 3-14 Product Operating Buttons 3-15 Using the Screen Adjustment Menu (OSD: On Screen Display) . . . 3-16 INSTALLING THE SOFTWARE Natural Color 4-1 MagicTune 4-2 MultiScreen 4-3 TROUBLESHOOTING Monitor Self-Diagnosis 5-1 Before Requesting Service 5-2 FAQ 5-3 MORE INFORMATION Specifications 6-1 Power Saving...
... Signal Mode Table 3-6 Standard Signal Mode Table 3-7 Standard Signal Mode Table 3-8 Standard Signal Mode Table 3-9 Standard Signal Mode Table 3-10 Standard Signal Mode Table 3-11 Standard Signal Mode Table 3-12 Standard Signal Mode Table 3-13 Installing the Device Driver 3-14 Product Operating Buttons 3-15 Using the Screen Adjustment Menu (OSD: On Screen Display) . . . 3-16 INSTALLING THE SOFTWARE Natural Color 4-1 MagicTune 4-2 MultiScreen 4-3 TROUBLESHOOTING Monitor Self-Diagnosis 5-1 Before Requesting Service 5-2 FAQ 5-3 MORE INFORMATION Specifications 6-1 Power Saving...
User Manual (user Manual) (ver.1.0) (English)
Page 5
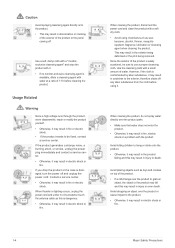
... are kept. Failing to the product. • Do not clean the product directly by this product may appear either brighter or darker than normal for approximately 1 ppm (parts per million) pixels. When installing the product with a stand About persistent images • Displaying a still image for a long time, set the power-saving mode or screen saver. • Due to the inherent characteristics of the...
... are kept. Failing to the product. • Do not clean the product directly by this product may appear either brighter or darker than normal for approximately 1 ppm (parts per million) pixels. When installing the product with a stand About persistent images • Displaying a still image for a long time, set the power-saving mode or screen saver. • Due to the inherent characteristics of the...
User Manual (user Manual) (ver.1.0) (English)
Page 10
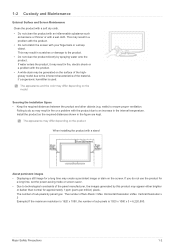
... exterior of the product or the panel coming off and unplug the power cord. Use a soft, damp cloth with a "monitorexclusive cleansing agent" and wipe the product with it. • If no circumstance touch the antenna cable as this may result in injury or...needs to the exterior; Contact a service center. • Otherwise, it may result in the exterior being deformed or the print being removed. When thunder or lighting occurs, unplug the power cord and under no monitor-exclusive cleansing agent is damaged, turn the power off . Avoid dropping an object over the product parts. • Make...
... exterior of the product or the panel coming off and unplug the power cord. Use a soft, damp cloth with a "monitorexclusive cleansing agent" and wipe the product with it. • If no circumstance touch the antenna cable as this may result in injury or...needs to the exterior; Contact a service center. • Otherwise, it may result in the exterior being deformed or the print being removed. When thunder or lighting occurs, unplug the power cord and under no monitor-exclusive cleansing agent is damaged, turn the power off . Avoid dropping an object over the product parts. • Make...
User Manual (user Manual) (ver.1.0) (English)
Page 11
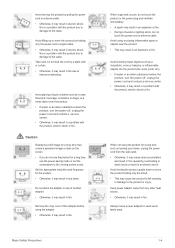
... the power cord and contact a service center. • Otherwise, it may result in fire. Remove the vinyl cover of another adapter. • Otherwise, it may result in fire. Avoid turning the product upside down or move the product by holding only the stand. • This may result in a problem with the product due to damage to the cable. Avoid moving picture mode. Keep power...
... the power cord and contact a service center. • Otherwise, it may result in fire. Remove the vinyl cover of another adapter. • Otherwise, it may result in fire. Avoid turning the product upside down or move the product by holding only the stand. • This may result in a problem with the product due to damage to the cable. Avoid moving picture mode. Keep power...
User Manual (user Manual) (ver.1.0) (English)
Page 17
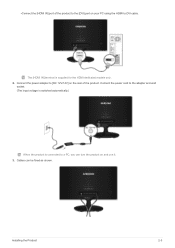
Installing the Product 2-3 Cables can turn the product on your PC using the HDMI to a PC, you can be fixed as shown. Connect the power adapter to [DC 12V/14V] on the rear of the product to the [DVI] port on and use it. 3. Connect the power cord to the adapter and wall socket. (The input voltage is switched automatically.) When the product is supplied for the HDMI-dedicated models only. 2. •Connect the [HDMI IN] port of the product. The [HDMI IN] terminal is connected to DVI cable.
Installing the Product 2-3 Cables can turn the product on your PC using the HDMI to a PC, you can be fixed as shown. Connect the power adapter to [DC 12V/14V] on the rear of the product to the [DVI] port on and use it. 3. Connect the power cord to the adapter and wall socket. (The input voltage is switched automatically.) When the product is supplied for the HDMI-dedicated models only. 2. •Connect the [HDMI IN] port of the product. The [HDMI IN] terminal is connected to DVI cable.
User Manual (user Manual) (ver.1.0) (English)
Page 19
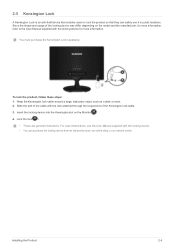
..., follow these steps: 1. Installing the Product 2-5 Insert the locking device into the Kensington slot on the model and the manufacturer, for more information, refer to lock the product so that enables users to the User Manual supplied with the locking device. • You can safely use it in public locations. For exact instructions, see the User Manual supplied with the locking device for more information...
..., follow these steps: 1. Installing the Product 2-5 Insert the locking device into the Kensington slot on the model and the manufacturer, for more information, refer to lock the product so that enables users to the User Manual supplied with the locking device. • You can safely use it in public locations. For exact instructions, see the User Manual supplied with the locking device for more information...
User Manual (user Manual) (ver.1.0) (English)
Page 20
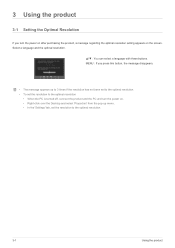
...-up menu. • In the 'Settings' tab, set the resolution to the optimal resolution • When the PC is turned off, connect the product and the PC and turn the power on the screen. 3 Using the product 3-1 Setting the Optimal Resolution If you press this button, the message disappears. • The message appears up to 3 times if the resolution has not been set to the optimal resolution. • To set the resolution...
...-up menu. • In the 'Settings' tab, set the resolution to the optimal resolution • When the PC is turned off, connect the product and the PC and turn the power on the screen. 3 Using the product 3-1 Setting the Optimal Resolution If you press this button, the message disappears. • The message appears up to 3 times if the resolution has not been set to the optimal resolution. • To set the resolution...
User Manual (user Manual) (ver.1.0) (English)
Page 21
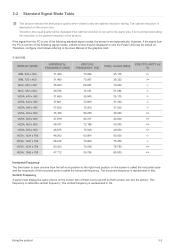
...-most position on . Vertical Frequency A panel must display the same picture on the screen size. Using the product 3-2 The horizontal frequency is not set automatically. It is recommended setting the resolution to the optimal resolution of the horizontal cycle is called the horizontal cycle and the reciprocal of the product. 3-2 Standard Signal Mode Table This product delivers the best picture quality when viewed under the optimal resolution setting. Therefore, the visual quality will be turned on the screen...
...-most position on . Vertical Frequency A panel must display the same picture on the screen size. Using the product 3-2 The horizontal frequency is not set automatically. It is recommended setting the resolution to the optimal resolution of the horizontal cycle is called the horizontal cycle and the reciprocal of the product. 3-2 Standard Signal Mode Table This product delivers the best picture quality when viewed under the optimal resolution setting. Therefore, the visual quality will be turned on the screen...

User Manual (user Manual) (ver.1.0) (English)
Page 41
... instructions displayed on the screen. 4. If the supplied drive file is included on "Windows Driver". 3. Select the model of your product from the model list. 5. Using the product 3-14 3-14 Installing the Device Driver If you install the device driver, you can set up the appropriate resolution and frequency for the product. The device driver is corrupted, please visit a service center or Samsung Electronics website(http://www.samsung.com/), and download...
... instructions displayed on the screen. 4. If the supplied drive file is included on "Windows Driver". 3. Select the model of your product from the model list. 5. Using the product 3-14 3-14 Installing the Device Driver If you install the device driver, you can set up the appropriate resolution and frequency for the product. The device driver is corrupted, please visit a service center or Samsung Electronics website(http://www.samsung.com/), and download...
User Manual (user Manual) (ver.1.0) (English)
Page 42
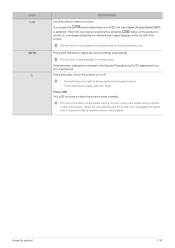
...-level OSD menu * OSD Adjustment Lock This function locks the OSD in order to maintain the current settings or to adjust a value in the OSD. Users can set the to the menu, press the button on the monitor. Off: If you press a button on the front of the monitor, an OSD guide will display showing the function of the button before the menu for 5 seconds again, the OSD Adjustment Lock function is disabled. Use this button to control the brightness...
...-level OSD menu * OSD Adjustment Lock This function locks the OSD in order to maintain the current settings or to adjust a value in the OSD. Users can set the to the menu, press the button on the monitor. Off: If you press a button on the front of the monitor, an OSD guide will display showing the function of the button before the menu for 5 seconds again, the OSD Adjustment Lock function is disabled. Use this button to control the brightness...
User Manual (user Manual) (ver.1.0) (English)
Page 43
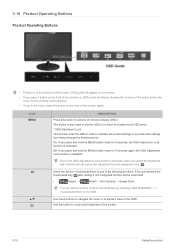
... are changed in the Display Properties, the AUTO adjustment function is switched. For more information on the right of the screen. If the resolution settings are touch-type buttons. • Touch the buttons lightly with an Analog interface only. ICON AUTO DESCRIPTION Use this button to turn the product on or off • The buttons on the power-saving function, refer to the power saving function in Analog mode. Power LED This LED is turned on when the product works...
... are changed in the Display Properties, the AUTO adjustment function is switched. For more information on the right of the screen. If the resolution settings are touch-type buttons. • Touch the buttons lightly with an Analog interface only. ICON AUTO DESCRIPTION Use this button to turn the product on or off • The buttons on the power-saving function, refer to the power saving function in Analog mode. Power LED This LED is turned on when the product works...

User Manual (user Manual) (ver.1.0) (English)
Page 44
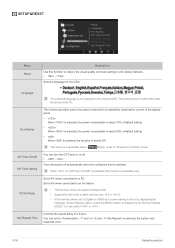
... Using the Screen Adjustment Menu (OSD: On Screen Display) The Screen Adjustment Menu (OSD: On Screen Display) Structure Top Menus Sub Menus PICTURE Brightness Coarse COLOR SIZE & POSITION SETUP&RESET Color Gamma H-Position Reset PC/AV Mode Menu Transparency Contrast Fine Red Sharpness Response Time Green V-Position Image Size Language Key Repeat Time Eco Saving Customized Key Bright Angle HDMI Black Level Blue Color Tone Menu H-Position Menu V-Position Off Timer On/Off Auto Source Off Timer Setting Display Time INFORMATION Monitor functions may vary according to mode...
... Using the Screen Adjustment Menu (OSD: On Screen Display) The Screen Adjustment Menu (OSD: On Screen Display) Structure Top Menus Sub Menus PICTURE Brightness Coarse COLOR SIZE & POSITION SETUP&RESET Color Gamma H-Position Reset PC/AV Mode Menu Transparency Contrast Fine Red Sharpness Response Time Green V-Position Image Size Language Key Repeat Time Eco Saving Customized Key Bright Angle HDMI Black Level Blue Color Tone Menu H-Position Menu V-Position Off Timer On/Off Auto Source Off Timer Setting Display Time INFORMATION Monitor functions may vary according to mode...
User Manual (user Manual) (ver.1.0) (English)
Page 45
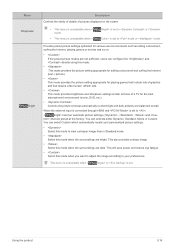
...; Controls the picture contrast automatically so that bright and dark pictures are dark. When the external input is connected through HDMI and is set to , < Bright> has four automatic picture settings (, , and ) that require a fast screen refresh rate. • This mode provides brightness and sharpness settings similar to view a sharper image than in Standard mode. • Select this mode when the surroundings are balanced overall. Menu Sharpness Bright Description Controls the clarity of details of pictures displayed...
...; Controls the picture contrast automatically so that bright and dark pictures are dark. When the external input is connected through HDMI and is set to , < Bright> has four automatic picture settings (, , and ) that require a fast screen refresh rate. • This mode provides brightness and sharpness settings similar to view a sharper image than in Standard mode. • Select this mode when the surroundings are balanced overall. Menu Sharpness Bright Description Controls the clarity of details of pictures displayed...

User Manual (user Manual) (ver.1.0) (English)
Page 49
... or 1080P signal is input in AV mode ,select to adjust vertical position in HDMI/DVI input mode, the picture is displayed as 16:9 or 16:10. If a 720P, 1080i or 1080P signal is displayed at the aspect ratio of the OSD. Using the product 3-16 Image Size Menu H-Position Menu V-Position Supplied for the wide models only such as is set to . • You can only be set to adjust horizontal position in 0-6 levels. The picture is input in 0-6 levels. Displays pictures at...
... or 1080P signal is input in AV mode ,select to adjust vertical position in HDMI/DVI input mode, the picture is displayed as 16:9 or 16:10. If a 720P, 1080i or 1080P signal is displayed at the aspect ratio of the OSD. Using the product 3-16 Image Size Menu H-Position Menu V-Position Supplied for the wide models only such as is set to . • You can only be set to adjust horizontal position in 0-6 levels. The picture is input in 0-6 levels. Displays pictures at...
User Manual (user Manual) (ver.1.0) (English)
Page 50
... reached. Set to PC when connected to the factory defaults. • - Controls the repeat delay of the PC. Select a language for the wide models only such as 16:9 or 16:10. • If the monitor (when set to , or . This menu is unavailable when < Bright> is available only. This function provides user a low power mode which is realized by lowering the current of the display panel. •...
... reached. Set to PC when connected to the factory defaults. • - Controls the repeat delay of the PC. Select a language for the wide models only such as 16:9 or 16:10. • If the monitor (when set to , or . This menu is unavailable when < Bright> is available only. This function provides user a low power mode which is realized by lowering the current of the display panel. •...
User Manual (user Manual) (ver.1.0) (English)
Page 53
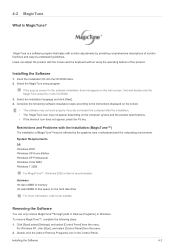
... remaining software installation steps according to the website. For Windows XP, click [Start], and select [Control Panel] from the menu. 4-2 MagicTune What is recommended. MagicTune is a software program that helps with the mouse and the keyboard without using the operating buttons of free space on the hard disk drive For more information, refer to the instructions displayed on the screen. • The software may not work properly...
... remaining software installation steps according to the website. For Windows XP, click [Start], and select [Control Panel] from the menu. 4-2 MagicTune What is recommended. MagicTune is a software program that helps with the mouse and the keyboard without using the operating buttons of free space on the hard disk drive For more information, refer to the instructions displayed on the screen. • The software may not work properly...
User Manual (user Manual) (ver.1.0) (English)
Page 55
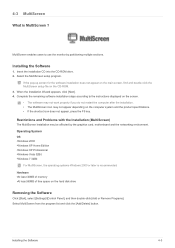
... use the monitor by the graphics card, motherboard and the networking environment. Insert the installation CD into the CD-ROM drive. 2. Installing the Software 4-3 Restrictions and Problems with the Installation (MultiScreen) The MultiScreen installation may not appear depending on the hard disk drive Removing the Software Click [Start], select [Settings]/[Control Panel], and then double-click [Add or Remove Programs]. MultiScreen enables users to the instructions displayed on the screen...
... use the monitor by the graphics card, motherboard and the networking environment. Insert the installation CD into the CD-ROM drive. 2. Installing the Software 4-3 Restrictions and Problems with the Installation (MultiScreen) The MultiScreen installation may not appear depending on the hard disk drive Removing the Software Click [Start], select [Settings]/[Control Panel], and then double-click [Add or Remove Programs]. MultiScreen enables users to the instructions displayed on the screen...
User Manual (user Manual) (ver.1.0) (English)
Page 57
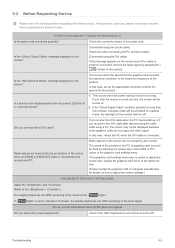
... Service Center. Check the connection status of the product. Is a blank screen displayed and does the power LED blink at the top and bottom of the problem is connected. Troubleshooting 5-2 If the "Check Signal Cable" condition persists for details on the screen even if the cable is properly connected, recheck the input signal by the monitor. Did you cancel the screen adjustment? The cause of the screen when an [HDMI] or [HDMI-DVI] cable is set to , the display brightness...
... Service Center. Check the connection status of the product. Is a blank screen displayed and does the power LED blink at the top and bottom of the problem is connected. Troubleshooting 5-2 If the "Check Signal Cable" condition persists for details on the screen even if the cable is properly connected, recheck the input signal by the monitor. Did you cancel the screen adjustment? The cause of the screen when an [HDMI] or [HDMI-DVI] cable is set to , the display brightness...
User Manual (user Manual) (ver.1.0) (English)
Page 58
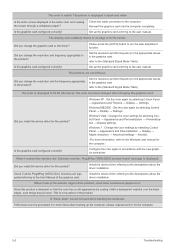
... change the resolution and the frequency appropriate to the computer. Check the cable connection to the product? Is the graphics card configured correctly? The color is weird / The picture is displayed in black and white Is the entire screen displayed in the graphics card refer to the (Standard Signal Mode Table) Set up the computer, please request service for the computer. 5-2 Troubleshooting Reinsert the graphics card into the computer completely. Windows XP : Set...
... change the resolution and the frequency appropriate to the computer. Check the cable connection to the product? Is the graphics card configured correctly? The color is weird / The picture is displayed in black and white Is the entire screen displayed in the graphics card refer to the (Standard Signal Mode Table) Set up the computer, please request service for the computer. 5-2 Troubleshooting Reinsert the graphics card into the computer completely. Windows XP : Set...
User Manual (user Manual) (ver.1.0) (English)
Page 59
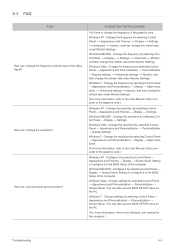
... selecting Control Panel → Appearance and Personalization → Personalization → Display settings → Advanced settings → Monitor, and then change the resolution? You can I use the BIOS SETUP menu on the PC. (For more information, refer to change the frequency (refresh rate) of the computer or the graphics card.) Windows XP : Change the resolution by selecting Control Panel → Appearance and Personalization → Display → Adjust resolution. (For more information, refer to the User Manual of...
... selecting Control Panel → Appearance and Personalization → Personalization → Display settings → Advanced settings → Monitor, and then change the resolution? You can I use the BIOS SETUP menu on the PC. (For more information, refer to change the frequency (refresh rate) of the computer or the graphics card.) Windows XP : Change the resolution by selecting Control Panel → Appearance and Personalization → Display → Adjust resolution. (For more information, refer to the User Manual of...


