User Manual (ENGLISH)
Page 3
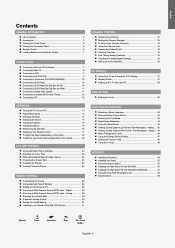
... the Channel Manager 32 To set-up Your Favorite Channels 33 Using the Channel Lists 34 Viewing the Channel Lists 34 Labeling Channels 35 Fine Tuning Analog Channels 35 Checking the Digital-Signal Strength 36 LNA (Low Noise Amplifier 36 PC DISPLAY Using Your TV as a Computer (PC) Display 37...Menus 15 Memorizing the Channels 16 Setting Up Your Remote Control 17 To Select the Source (depending on the model 22 To Edit the Input Source Name (depending on the model 22 PICTURE CONTROL Using Automatic Picture Settings 23 Adjusting the Color Tone 24 DNIe Demo(Digital Natural Image engine...
... the Channel Manager 32 To set-up Your Favorite Channels 33 Using the Channel Lists 34 Viewing the Channel Lists 34 Labeling Channels 35 Fine Tuning Analog Channels 35 Checking the Digital-Signal Strength 36 LNA (Low Noise Amplifier 36 PC DISPLAY Using Your TV as a Computer (PC) Display 37...Menus 15 Memorizing the Channels 16 Setting Up Your Remote Control 17 To Select the Source (depending on the model 22 To Edit the Input Source Name (depending on the model 22 PICTURE CONTROL Using Automatic Picture Settings 23 Adjusting the Color Tone 24 DNIe Demo(Digital Natural Image engine...
User Manual (ENGLISH)
Page 5
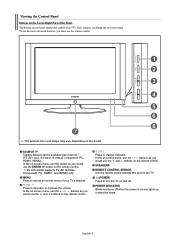
...S-Video1, S-Video2, Component, PC, HDMI1, HDMI2). To use the more advanced features, you would use the and buttons on the remote control. 26 inch model supports TV, AV, S-Video, Component, PC, HDMI1, and HDMI2 only. The product color and shape may vary depending on and lights up in stand-by mode....see an on-screen menu of the Panel The buttons on and off when the power is on the model. English-3 MENU Press to turn the TV on the lower-right panel control your TV's features. Press to change channels. Press to decrease or increase the volume. SPEAKERS REMOTE CONTROL SENSOR ...
...S-Video1, S-Video2, Component, PC, HDMI1, HDMI2). To use the more advanced features, you would use the and buttons on the remote control. 26 inch model supports TV, AV, S-Video, Component, PC, HDMI1, and HDMI2 only. The product color and shape may vary depending on and lights up in stand-by mode....see an on-screen menu of the Panel The buttons on and off when the power is on the model. English-3 MENU Press to turn the TV on the lower-right panel control your TV's features. Press to change channels. Press to decrease or increase the volume. SPEAKERS REMOTE CONTROL SENSOR ...
User Manual (ENGLISH)
Page 6
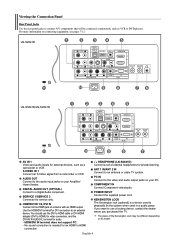
... be different depending on your Amplifier/ Home theater. DIGITAL AUDIO OUT (OPTICAL) Connect to an antenna or cable TV system. You should use a locking device, contact the dealer where you purchased the TV. COMPONENT IN Connect Component video/audio. Use the HDMI/DVI terminal for an HDMI to HDMI connection. The place... Connect the supplied power cord. KENSINGTON LOCK The Kensington lock (optional) is needed for DVI connection to the video and audio output jacks on its model.
... be different depending on your Amplifier/ Home theater. DIGITAL AUDIO OUT (OPTICAL) Connect to an antenna or cable TV system. You should use a locking device, contact the dealer where you purchased the TV. COMPONENT IN Connect Component video/audio. Use the HDMI/DVI terminal for an HDMI to HDMI connection. The place... Connect the supplied power cord. KENSINGTON LOCK The Kensington lock (optional) is needed for DVI connection to the video and audio output jacks on its model.
User Manual (ENGLISH)
Page 11
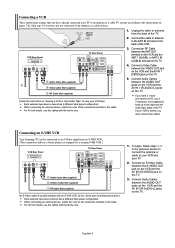
... a different back panel configuration. If your VCR is usually included with the ferrite core. 1. Connecting an S-VHS VCR Your Samsung TV can be connected to an S-Video signal from the back of the TV. 2. Connect an S-Video Cable between the VIDEO OUT jack on the VCR and the AV IN 1 [VIDEO] jack on... on the VCR and the AV IN 1 [R-AUDIO-L] jacks on the back of the TV. Connect Audio Cables between the AUDIO OUT jacks on the VCR and the AV IN1 [R-AUDIO-L] jacks on the TV. 5. For 40 inch model, use a Y-connector (not supplied) to hook up to the ANT IN terminal on the...
... a different back panel configuration. If your VCR is usually included with the ferrite core. 1. Connecting an S-VHS VCR Your Samsung TV can be connected to an S-Video signal from the back of the TV. 2. Connect an S-Video Cable between the VIDEO OUT jack on the VCR and the AV IN 1 [VIDEO] jack on... on the VCR and the AV IN 1 [R-AUDIO-L] jacks on the back of the TV. Connect Audio Cables between the AUDIO OUT jacks on the VCR and the AV IN1 [R-AUDIO-L] jacks on the TV. 5. For 40 inch model, use a Y-connector (not supplied) to hook up to the ANT IN terminal on the...
User Manual (ENGLISH)
Page 12
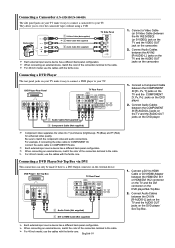
... camcorder. 2. Connect Audio Cables between the AV IN2 [VIDEO] (or S-VIDEO) jack on the TV and the VIDEO OUT jack on the DVD player/ Set-Top Box. English-10 For 40 inch model, use the cables with the ferrite core. Connect Audio Cables between the AV IN2 [R-AUDIO-L] jacks ...on the TV and the AUDIO OUT jacks on your TV make it easy to connect a camcorder to your TV. Each external input source device has a different back panel configuration. For 40 inch model, use the cables with the ferrite core. Connecting a DVD ...
... camcorder. 2. Connect Audio Cables between the AV IN2 [VIDEO] (or S-VIDEO) jack on the TV and the VIDEO OUT jack on the DVD player/ Set-Top Box. English-10 For 40 inch model, use the cables with the ferrite core. Connect Audio Cables between the AV IN2 [R-AUDIO-L] jacks ...on the TV and the AUDIO OUT jacks on your TV make it easy to connect a camcorder to your TV. Each external input source device has a different back panel configuration. For 40 inch model, use the cables with the ferrite core. Connecting a DVD ...

User Manual (ENGLISH)
Page 13
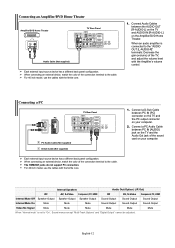
...to the "DIGITAL AUDIO OUT (OPTICAL)" terminal: Decrease the gain (volume) of the TV, and adjust the volume level with the ferrite core. 1. When a Digital Audio System is connected to your TV. For 40 inch model, use the cables with the ferrite core. Each external input source device has a ...jacks on the DVD player/Set-Top Box. Digital Audio System TV Rear Panel Optical Cable (Not supplied) 5.1CH audio is possible when the TV is connected to the cable. DVD Player Rear Panel TV Rear Panel 1. For 40 inch model, use the cables with the system's volume control. HDMI Cable...
...to the "DIGITAL AUDIO OUT (OPTICAL)" terminal: Decrease the gain (volume) of the TV, and adjust the volume level with the ferrite core. 1. When a Digital Audio System is connected to your TV. For 40 inch model, use the cables with the ferrite core. Each external input source device has a ...jacks on the DVD player/Set-Top Box. Digital Audio System TV Rear Panel Optical Cable (Not supplied) 5.1CH audio is possible when the TV is connected to the cable. DVD Player Rear Panel TV Rear Panel 1. For 40 inch model, use the cables with the system's volume control. HDMI Cable...
User Manual (ENGLISH)
Page 14
... supplied) Each external input source device has a different back panel configuration. For 40 inch model, use the cables with the ferrite core. 1. Connect Audio Cables between the AUDIO OUT [R-AUDIO-L] on the TV and AUDIO IN [R-AUDIO-L] on your computer. When connecting an external device, match the color... the PC output connector on the Amplifier/DVD Home Theater. The HDMI/DVI jacks do not support PC connection. For 40 inch model, use the cables with the ferrite core. 1. Internal Speakers Audio Out (Optical, L/R Out) RF AV, S-Video Component, PC, HDMI RF AV, S-...
... supplied) Each external input source device has a different back panel configuration. For 40 inch model, use the cables with the ferrite core. 1. Connect Audio Cables between the AUDIO OUT [R-AUDIO-L] on the TV and AUDIO IN [R-AUDIO-L] on your computer. When connecting an external device, match the color... the PC output connector on the Amplifier/DVD Home Theater. The HDMI/DVI jacks do not support PC connection. For 40 inch model, use the cables with the ferrite core. 1. Internal Speakers Audio Out (Optical, L/R Out) RF AV, S-Video Component, PC, HDMI RF AV, S-...
User Manual (ENGLISH)
Page 24
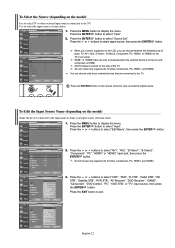
...select "Input". 2. Press the ENTER button to display the menu. Press the SOURCE button on the model) Name the device connected to the input jacks to the TV. When you connect equipment to the LCD, you can choose only those external devices that are connected to make your choice. 1. Press the ...or buttons to exit. HDMI1 or HDMI2 input can only be selected when the external device is placed on the model) Use to select TV or other external input ...
...select "Input". 2. Press the ENTER button to display the menu. Press the SOURCE button on the model) Name the device connected to the input jacks to the TV. When you connect equipment to the LCD, you can choose only those external devices that are connected to make your choice. 1. Press the ...or buttons to exit. HDMI1 or HDMI2 input can only be selected when the external device is placed on the model) Use to select TV or other external input ...
User Manual (ENGLISH)
Page 60
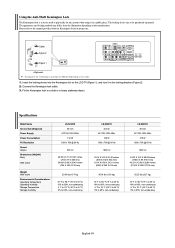
... 80%, non-condensing -4 °F to 113 °F (-20 °C to 45 °C) 5% to 95%, non-condensing LN-S3241D 32 inch AC110V-120V 60Hz 165 W 1360 x 768 @ 60 Hz 10W X 2 35.14 X 3.23 X 21.42 inches (892.5 ... the Kensington lock cable. 3. Insert the locking device into the Kensington slot on its model. 1. The appearance and locking method may be purchased separately. Please refer to 95%, ... when using it in a public place. The locking device has to be different depending on the LCD TV (Figure 1), and turn it in the locking direction (Figure 2). 2. Using the Anti-Theft Kensington...
... 80%, non-condensing -4 °F to 113 °F (-20 °C to 45 °C) 5% to 95%, non-condensing LN-S3241D 32 inch AC110V-120V 60Hz 165 W 1360 x 768 @ 60 Hz 10W X 2 35.14 X 3.23 X 21.42 inches (892.5 ... the Kensington lock cable. 3. Insert the locking device into the Kensington slot on its model. 1. The appearance and locking method may be purchased separately. Please refer to 95%, ... when using it in a public place. The locking device has to be different depending on the LCD TV (Figure 1), and turn it in the locking direction (Figure 2). 2. Using the Anti-Theft Kensington...


