User Manual (ENGLISH)
Page 3
... the Channel Manager 32 To set-up Your Favorite Channels 33 Using the Channel Lists 34 Viewing the Channel Lists 34 Labeling Channels 35 Fine Tuning Analog Channels 35 Checking the Digital-Signal Strength 36 LNA (Low Noise Amplifier 36 PC DISPLAY Using Your TV as a Computer (PC) Display...9 Connecting an S-VHS VCR 9 Connecting a Camcorder (LN-S3241D/LN-S4041D 10 Connecting a DVD Player 10 Connecting a DVD Player/Set-Top Box via DVI 10 Connecting a DVD Player/Set-Top Box via HDMI 11 Connecting a Digital Audio System 11 Connecting an Amplifier/DVD Home Theater 12 Connecting a PC 12...
... the Channel Manager 32 To set-up Your Favorite Channels 33 Using the Channel Lists 34 Viewing the Channel Lists 34 Labeling Channels 35 Fine Tuning Analog Channels 35 Checking the Digital-Signal Strength 36 LNA (Low Noise Amplifier 36 PC DISPLAY Using Your TV as a Computer (PC) Display...9 Connecting an S-VHS VCR 9 Connecting a Camcorder (LN-S3241D/LN-S4041D 10 Connecting a DVD Player 10 Connecting a DVD Player/Set-Top Box via DVI 10 Connecting a DVD Player/Set-Top Box via HDMI 11 Connecting a Digital Audio System 11 Connecting an Amplifier/DVD Home Theater 12 Connecting a PC 12...
User Manual (ENGLISH)
Page 6
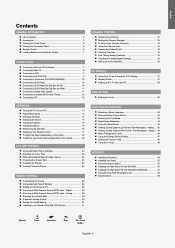
AUDIO OUT Connect to HDMI) for video connection, and the DVI-IN 'R-AUDIO-L' terminal for audio. - You should use a locking device, contact the dealer where you purchased the TV. PC IN Connect to a Digital Audio component. COMPONENT IN Connect Component video/audio. DIGITAL AUDIO OUT (OPTICAL.... SERVICE 1/SERVICE 2 Connector for private listening. No sound connection is a device used in a public place. Use the HDMI/DVI terminal for DVI connection to the HDMI jack of external headphones for service only. English-4 Viewing the Connection Panel Rear Panel Jacks Use the rear ...
AUDIO OUT Connect to HDMI) for video connection, and the DVI-IN 'R-AUDIO-L' terminal for audio. - You should use a locking device, contact the dealer where you purchased the TV. PC IN Connect to a Digital Audio component. COMPONENT IN Connect Component video/audio. DIGITAL AUDIO OUT (OPTICAL.... SERVICE 1/SERVICE 2 Connector for private listening. No sound connection is a device used in a public place. Use the HDMI/DVI terminal for DVI connection to the HDMI jack of external headphones for service only. English-4 Viewing the Connection Panel Rear Panel Jacks Use the rear ...
User Manual (ENGLISH)
Page 12
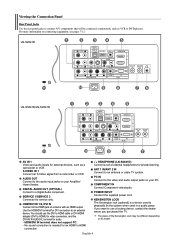
...player. 1. Connect Audio Cables between the HDMI/DVI IN 1 or HDMI/DVI IN 2 connector on the TV and the DVI connector on the DVD player/ Set-Top Box. Connect a DVI to HDMI Cable or DVI-HDMI Adapter between the DVI IN [R-AUDIO-L] jack on the TV and the AUDIO OUT jacks on the DVD ... terminal to HDMI Cable (Not supplied) 1. DVD Player / Set-Top Box TV Rear Panel 2 Audio Cable (Not supplied) 1 DVI to the cable. They allow you to your TV make it easy to connect a DVD player to your TV. Each external input source device has a different back panel configuration. Connect a ...
...player. 1. Connect Audio Cables between the HDMI/DVI IN 1 or HDMI/DVI IN 2 connector on the TV and the DVI connector on the DVD player/ Set-Top Box. Connect a DVI to HDMI Cable or DVI-HDMI Adapter between the DVI IN [R-AUDIO-L] jack on the TV and the AUDIO OUT jacks on the DVD ... terminal to HDMI Cable (Not supplied) 1. DVD Player / Set-Top Box TV Rear Panel 2 Audio Cable (Not supplied) 1 DVI to the cable. They allow you to your TV make it easy to connect a DVD player to your TV. Each external input source device has a different back panel configuration. Connect a ...

User Manual (ENGLISH)
Page 13
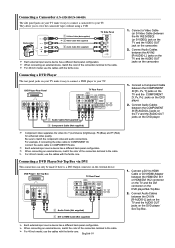
... an external device, match the color of the connection terminal to an external device supporting 5.1CH. The difference between the HDMI/DVI 1 or HDMI/DVI 2 connector on the TV and the HDMI connector on the Digital Audio System. For 40 inch model, use the cables with the ferrite core. Digital ...Audio System TV Rear Panel Optical Cable (Not supplied) 5.1CH audio is possible when the TV is connected to the cable. English-11 Connect an HDMI Cable between HDMI and DVI is that enables the transmission of digital audio and video signals ...
... an external device, match the color of the connection terminal to an external device supporting 5.1CH. The difference between the HDMI/DVI 1 or HDMI/DVI 2 connector on the TV and the HDMI connector on the Digital Audio System. For 40 inch model, use the cables with the ferrite core. Digital ...Audio System TV Rear Panel Optical Cable (Not supplied) 5.1CH audio is possible when the TV is connected to the cable. English-11 Connect an HDMI Cable between HDMI and DVI is that enables the transmission of digital audio and video signals ...
User Manual (ENGLISH)
Page 14
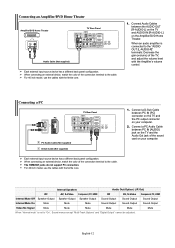
...Mute Mute Mute Mute Mute Mute When "Internal mute" is connected to the cable. The HDMI/DVI jacks do not support PC connection. English-12 Connect a D-Sub Cable between PC IN [PC] connector on the TV and the PC output connector on your computer. 2. Connect a PC Audio Cable between the ...Decrease the gain (volume) of the sound card on your computer. Connect Audio Cables between PC IN [AUDIO] jack on the TV and the Audio Out jack of the TV, and adjust the volume level with the ferrite core. 1. For 40 inch model, use the cables with the Amplifier's volume control...
...Mute Mute Mute Mute Mute Mute When "Internal mute" is connected to the cable. The HDMI/DVI jacks do not support PC connection. English-12 Connect a D-Sub Cable between PC IN [PC] connector on the TV and the PC output connector on your computer. 2. Connect a PC Audio Cable between the ...Decrease the gain (volume) of the sound card on your computer. Connect Audio Cables between PC IN [AUDIO] jack on the TV and the Audio Out jack of the TV, and adjust the volume level with the ferrite core. 1. For 40 inch model, use the cables with the Amplifier's volume control...
User Manual (ENGLISH)
Page 27
... S-VIDEO,and all COMPONENT (480i, 480p) modes, all screen modes can be selected. (16:9 • Zoom1 • Zoom2 • 4:3). • In TV(DTV), DVI, PC, HDMI, COMPONENT (720p, 1080i) modes, only 16:9 & 4:3 modes can press the P.SIZE button on the remote control repeatedly to change the picture size...• Zoom2 : Expands the Zoom1 format picture. • 4:3 : Sets the picture to 4:3 normal mode. Press the or buttons to display the menu. View the TV in the OSD menu) if you watch a still image or the 4:3 mode for a long time (over 2 hours), an image may be selected. • You ...
... S-VIDEO,and all COMPONENT (480i, 480p) modes, all screen modes can be selected. (16:9 • Zoom1 • Zoom2 • 4:3). • In TV(DTV), DVI, PC, HDMI, COMPONENT (720p, 1080i) modes, only 16:9 & 4:3 modes can press the P.SIZE button on the remote control repeatedly to change the picture size...• Zoom2 : Expands the Zoom1 format picture. • 4:3 : Sets the picture to 4:3 normal mode. Press the or buttons to display the menu. View the TV in the OSD menu) if you watch a still image or the 4:3 mode for a long time (over 2 hours), an image may be selected. • You ...

User Manual (ENGLISH)
Page 40
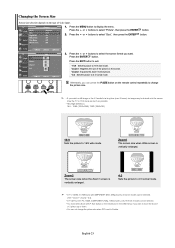
... noise. Press the EXIT button to display the menu. Vertical stripes may appear or the picture may be blurry. This function does not work in DVI-Digital mode. 1. Press the MENU button to exit. Press the or buttons to select "Auto Adjustment", then press the ENTER button. English-38 Press ...the PC mode first. 2. Change to the utmost and fine tune again. Press the ENTER button to have the TV set automatically adjust the video signals the monitor receives. Setting up the TV with your PC How to Auto Adjust Use the Auto Adjust function to select "Image Lock". 3. The function also...
... noise. Press the EXIT button to display the menu. Vertical stripes may appear or the picture may be blurry. This function does not work in DVI-Digital mode. 1. Press the MENU button to exit. Press the or buttons to select "Auto Adjustment", then press the ENTER button. English-38 Press ...the PC mode first. 2. Change to the utmost and fine tune again. Press the ENTER button to have the TV set automatically adjust the video signals the monitor receives. Setting up the TV with your PC How to Auto Adjust Use the Auto Adjust function to select "Image Lock". 3. The function also...
