
Open Source Guide (ENGLISH)
Page 1
... is restricted in certain countries either of that you also meet all . The precise terms and conditions for questions regarding open sources, contact Samsung via Email (vdswmanager@samsung. However, parties who have their rights. IN NO EVENT UNLESS REQUIRED BY APPLICABLE LAW OR AGREED TO IN WRITING WILL ANY COPYRIGHT HOLDER, OR...
... is restricted in certain countries either of that you also meet all . The precise terms and conditions for questions regarding open sources, contact Samsung via Email (vdswmanager@samsung. However, parties who have their rights. IN NO EVENT UNLESS REQUIRED BY APPLICABLE LAW OR AGREED TO IN WRITING WILL ANY COPYRIGHT HOLDER, OR...

Open Source Guide (ENGLISH)
Page 2
You can redistribute and change. To apply these terms (or, alternatively, under these terms, attach the following notices to where the full notice is safest to attach them to the start of each file should have at least the "copyright" line and a pointer to the library. and each source file to the public, we recommend making it to be of the greatest possible use to most effectively convey the exclusion of the ordinary General Public License). 16. IN NO EVENT UNLESS REQUIRED BY APPLICABLE LAW OR AGREED TO IN WRITING WILL ANY COPYRIGHT HOLDER, OR ANY OTHER PARTY WHO MAY MODIFY ...
You can redistribute and change. To apply these terms (or, alternatively, under these terms, attach the following notices to where the full notice is safest to attach them to the start of each file should have at least the "copyright" line and a pointer to the library. and each source file to the public, we recommend making it to be of the greatest possible use to most effectively convey the exclusion of the ordinary General Public License). 16. IN NO EVENT UNLESS REQUIRED BY APPLICABLE LAW OR AGREED TO IN WRITING WILL ANY COPYRIGHT HOLDER, OR ANY OTHER PARTY WHO MAY MODIFY ...

User Manual (ENGLISH)
Page 1
... Service 55 Standish Court Mississauga, Ontario L5R 4B2 Canada Samsung Electronique Canada Inc., Service á la Clientéle 55 Standish Court Mississauga, Ontario L5R 4B2 Canada Samsung Electronics America, Inc. 105 Challenger Road Ridgefield Park, NJ 07660-0511 LN-S2351W LN-S2352W TFT-LCD TELEVISION BN68-00998G-00 Owner's Instructions This device...
... Service 55 Standish Court Mississauga, Ontario L5R 4B2 Canada Samsung Electronique Canada Inc., Service á la Clientéle 55 Standish Court Mississauga, Ontario L5R 4B2 Canada Samsung Electronics America, Inc. 105 Challenger Road Ridgefield Park, NJ 07660-0511 LN-S2351W LN-S2352W TFT-LCD TELEVISION BN68-00998G-00 Owner's Instructions This device...

User Manual (ENGLISH)
Page 3
...Panel 3 Viewing the Connection Panel 4 Viewing the Remote Control 5 Installing Batteries in the Remote Control 6 CONNECTIONS Connecting VHF and UHF Antennas 6 Connecting Cable TV 7 Connecting a VCR 8 Connecting an S-VHS VCR 8 Connecting a DVD Player 9 Connecting a DVD Player/Set-Top Box via DVI 9 Connecting a ... Editing the Input Source Name 22 PC DISPLAY Setting Up Your PC Software (Based on Windows XP 23 Display Modes 23 Setting up the TV with your PC 24 TROUBLESHOOTING Identifying Problems 25 APPENDIX Specifications 25 Symbol Press Important Note One-Touch Button English...
...Panel 3 Viewing the Connection Panel 4 Viewing the Remote Control 5 Installing Batteries in the Remote Control 6 CONNECTIONS Connecting VHF and UHF Antennas 6 Connecting Cable TV 7 Connecting a VCR 8 Connecting an S-VHS VCR 8 Connecting a DVD Player 9 Connecting a DVD Player/Set-Top Box via DVI 9 Connecting a ... Editing the Input Source Name 22 PC DISPLAY Setting Up Your PC Software (Based on Windows XP 23 Display Modes 23 Setting up the TV with your PC 24 TROUBLESHOOTING Identifying Problems 25 APPENDIX Specifications 25 Symbol Press Important Note One-Touch Button English...

User Manual (ENGLISH)
Page 4
... can be stored in all locations) < 2 > 1. Remove the stand and cover the bottom hole with a cap and fasten with your LCD TV. English-2 V-Chip function. If any damage to the product or injury to yourself or others if you to create optimum contrast. Remote Control ... on your dealer. Installing the Stand Owner's Instructions Warranty Card / Registration Card /Safety Guide Manual (Not available in the TV's memory. Samsung Electronics is not responsible for assistance when installing the wall mounted bracket. Dynamic Contrast: Automatically detects the input visual signal and ...
... can be stored in all locations) < 2 > 1. Remove the stand and cover the bottom hole with a cap and fasten with your LCD TV. English-2 V-Chip function. If any damage to the product or injury to yourself or others if you to create optimum contrast. Remote Control ... on your dealer. Installing the Stand Owner's Instructions Warranty Card / Registration Card /Safety Guide Manual (Not available in the TV's memory. Samsung Electronics is not responsible for assistance when installing the wall mounted bracket. Dynamic Contrast: Automatically detects the input visual signal and ...

User Manual (ENGLISH)
Page 5
...more advanced features, you use the and buttons on the remote control. MENU Press to turn the TV on and off when the power is on and lights up in stand-by mode. Press to... increase or decrease the volume. SOURCE Toggles between all the available input sources (TV, AV1, AV2, S-Video, Component1, Component2, PC, HDMI). In the on-screen menu, use the buttons...ENTER button on the remote control. SPEAKERS (POWER) Press to see an on-screen menu of your TV's basic features, including the on-screen menu. The product color and shape may vary depending on the ...
...more advanced features, you use the and buttons on the remote control. MENU Press to turn the TV on and off when the power is on and lights up in stand-by mode. Press to... increase or decrease the volume. SOURCE Toggles between all the available input sources (TV, AV1, AV2, S-Video, Component1, Component2, PC, HDMI). In the on-screen menu, use the buttons...ENTER button on the remote control. SPEAKERS (POWER) Press to see an on-screen menu of your TV's basic features, including the on-screen menu. The product color and shape may vary depending on the ...

User Manual (ENGLISH)
Page 6
... HDMI cable or DVI-HDMI adapter (DVI to HDMI) for video connection, and the DVI-IN 'R-AUDIO-L' terminal for private listening. If you purchased the TV. Use the HDMI/DVI terminal for an HDMI to HDMI connection. No sound connection is a device used to physically fix the system when used in... or DVD players. COMPONENT IN 1, 2 Connect component video/audio. HDMI/DVI IN terminal does not support PC. HDMI/DVI IN, DVI IN Connect to a cable TV system. For more information on your PC. ANT IN Connect to an antenna or to the HDMI jack of external headphones for audio.
... HDMI cable or DVI-HDMI adapter (DVI to HDMI) for video connection, and the DVI-IN 'R-AUDIO-L' terminal for private listening. If you purchased the TV. Use the HDMI/DVI terminal for an HDMI to HDMI connection. No sound connection is a device used to physically fix the system when used in... or DVD players. COMPONENT IN 1, 2 Connect component video/audio. HDMI/DVI IN terminal does not support PC. HDMI/DVI IN, DVI IN Connect to a cable TV system. For more information on your PC. ANT IN Connect to an antenna or to the HDMI jack of external headphones for audio.

User Manual (ENGLISH)
Page 7
.../from memory. The performance of the preset factory settings. (or selects your personal, customized picture settings) Press to select a time for the TV to select channel "54-3", press "54", then press "-" and "3". Press to resume normal video. Press again to select channels directly on... /off automatically. Viewing the Remote Control Turns the TV on -screen menu. Press to choose stereo, mono or Separate Audio Program (SAPbroadcast). Press to select additional channels (digital and analog) ...
.../from memory. The performance of the preset factory settings. (or selects your personal, customized picture settings) Press to select a time for the TV to select channel "54-3", press "54", then press "-" and "3". Press to resume normal video. Press again to select channels directly on... /off automatically. Viewing the Remote Control Turns the TV on -screen menu. Press to choose stereo, mono or Separate Audio Program (SAPbroadcast). Press to select additional channels (digital and analog) ...

User Manual (ENGLISH)
Page 8
...8486; Round Leads ANT IN 1. ANT IN Antennas with the diagram inside the compartment. 3. UHF VHF 2. Connections Connecting VHF and UHF Antennas If your TV (one VHF and one year.) If the remote control doesn't work, check the following: 1. Separate VHF and UHF Antennas If you have two antennas... an off-air antenna (such as shown in the figure. 2. Are the batteries drained? 4. Place the wires from the TV. (Assuming typical TV usage, the batteries last for about 23 feet from the twin leads under the screws on a 300-75 Ω adapter (not supplied). Remove the batteries and store...
...8486; Round Leads ANT IN 1. ANT IN Antennas with the diagram inside the compartment. 3. UHF VHF 2. Connections Connecting VHF and UHF Antennas If your TV (one VHF and one year.) If the remote control doesn't work, check the following: 1. Separate VHF and UHF Antennas If you have two antennas... an off-air antenna (such as shown in the figure. 2. Are the batteries drained? 4. Place the wires from the TV. (Assuming typical TV usage, the batteries last for about 23 feet from the twin leads under the screws on a 300-75 Ω adapter (not supplied). Remove the batteries and store...

User Manual (ENGLISH)
Page 9
... OUT terminal on the splitter and the A-IN terminal on the cable box. Connect an RF cable between the other end of this TV is connected to the ANT IN terminal on your cable box descrambles only some channels (such as premium channels), follow the instructions below ... is usually channel 3 or 4.) English-7 You will need to tune your cable box. RF (A/B) Switch Incoming cable Splitter Cable Box RF (A/B) Switch ANT IN TV Rear 6. This terminal might be labeled "ANT IN", "VHF IN" or simply, "IN". 2. Incoming cable Splitter Incoming cable Splitter Cable Box 3. Set the...
... OUT terminal on the splitter and the A-IN terminal on the cable box. Connect an RF cable between the other end of this TV is connected to the ANT IN terminal on your cable box descrambles only some channels (such as premium channels), follow the instructions below ... is usually channel 3 or 4.) English-7 You will need to tune your cable box. RF (A/B) Switch Incoming cable Splitter Cable Box RF (A/B) Switch ANT IN TV Rear 6. This terminal might be labeled "ANT IN", "VHF IN" or simply, "IN". 2. Incoming cable Splitter Incoming cable Splitter Cable Box 3. Set the...

User Manual (ENGLISH)
Page 10
...the ANT IN terminal on the TV. If you have not yet connected to an antenna or a cable system. Connecting an S-VHS VCR Your Samsung TV can be connected to an S-Video signal from the back of the TV. 2. Skip step 1 if you have already connected your TV. 2. When connecting an external ...device, match the color of the TV. Connect a Video Cable between the AUDIO OUT jacks on...
...the ANT IN terminal on the TV. If you have not yet connected to an antenna or a cable system. Connecting an S-VHS VCR Your Samsung TV can be connected to an S-Video signal from the back of the TV. 2. Skip step 1 if you have already connected your TV. 2. When connecting an external ...device, match the color of the TV. Connect a Video Cable between the AUDIO OUT jacks on...

User Manual (ENGLISH)
Page 11
...brightness)), Pb (Blue) and Pr (Red) for enhanced video quality. Connect a Component Cable between the COMPONENT IN 1 or COMPONENT IN 2 [R-AUDIO-L] jacks on the TV and the AUDIO OUT jacks on the DVD player. For example, if connecting the video cable to COMPONENT IN, connect the audio cable to match...input source device has a different back panel configuration. Connect Audio Cables between the COMPONENT IN 1 or COMPONENT IN 2 [PR, PB, Y] jacks on the TV and the COMPONENT [Y, PB, PR] jacks on the DVD player. 2. Connecting a DVD Player/Set-Top Box via DVI This connection can only be made ...
...brightness)), Pb (Blue) and Pr (Red) for enhanced video quality. Connect a Component Cable between the COMPONENT IN 1 or COMPONENT IN 2 [R-AUDIO-L] jacks on the TV and the AUDIO OUT jacks on the DVD player. For example, if connecting the video cable to COMPONENT IN, connect the audio cable to match...input source device has a different back panel configuration. Connect Audio Cables between the COMPONENT IN 1 or COMPONENT IN 2 [PR, PB, Y] jacks on the TV and the COMPONENT [Y, PB, PR] jacks on the DVD player. 2. Connecting a DVD Player/Set-Top Box via DVI This connection can only be made ...
User Manual (ENGLISH)
Page 12
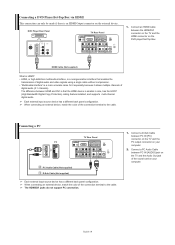
...High Bandwidth Digital Copy Protection) coding feature installed, and supports multi-channel digital audio. The difference between PC IN [PC] connector on the TV and the PC output connector on your computer. 2. English-10 HDMI Cable (Not supplied) What is HDMI? • HDMI, or high...allows multiple channels of the connection terminal to the cable. Each external input source device has a different back panel configuration. Connecting a PC PC TV Rear Panel 2 PC Audio Cable (Not supplied) 1 D-Sub Cable (Not supplied) Each external input source device has a different back panel ...
...High Bandwidth Digital Copy Protection) coding feature installed, and supports multi-channel digital audio. The difference between PC IN [PC] connector on the TV and the PC output connector on your computer. 2. English-10 HDMI Cable (Not supplied) What is HDMI? • HDMI, or high...allows multiple channels of the connection terminal to the cable. Each external input source device has a different back panel configuration. Connecting a PC PC TV Rear Panel 2 PC Audio Cable (Not supplied) 1 D-Sub Cable (Not supplied) Each external input source device has a different back panel ...

User Manual (ENGLISH)
Page 13
... press the ENTER 2. is displayed. • Language: Select your language. • Air/Cable: Select your local cable company TV system. • Auto Program: Selects between terrestrial antenna connection or your watching." This will start and end automatically. The message ..."Enjoy your local cable company TV system. The TV automatically cycles through all the available channels are available. 1. Press the or button to the "Hour", "Minute" or ...
... press the ENTER 2. is displayed. • Language: Select your language. • Air/Cable: Select your local cable company TV system. • Auto Program: Selects between terrestrial antenna connection or your watching." This will start and end automatically. The message ..."Enjoy your local cable company TV system. The TV automatically cycles through all the available channels are available. 1. Press the or button to the "Hour", "Minute" or ...

User Manual (ENGLISH)
Page 14
... 10 seconds and it disappears automatically. You will appear in sequence. Using MUTE button: At any time, you press the CH or CH button, the TV changes channels in the lower-left corner of certain audio-video settings. Viewing the Display Press the INFO button on the remote control to select... the VOL or VOL button. English-12 Press the CH or CH button to the last channel viewed. You will switch to change channels. The TV will see channels that the TV has memorized. (The TV must have memorized at least three channels).
... 10 seconds and it disappears automatically. You will appear in sequence. Using MUTE button: At any time, you press the CH or CH button, the TV changes channels in the lower-left corner of certain audio-video settings. Viewing the Display Press the INFO button on the remote control to select... the VOL or VOL button. English-12 Press the CH or CH button to the last channel viewed. You will switch to change channels. The TV will see channels that the TV has memorized. (The TV must have memorized at least three channels).

User Manual (ENGLISH)
Page 15
... Press the EXIT button to the "Channel" menu. 4. English-13 Press the or button to display the menu. Storing Channels Automatically The TV automatically cycles through all the available channels are stored, the "Channel" menu reappears. 5. The channel search will alternate between add channel and ...then press the ENTER button. 2. To select the signal source, follow the "Selecting the Video Signal-source" instructions number 1 to the TV (i.e. You can view any time to interrupt the memorization process and return to exit. Selecting the Video Signal-source Before your television can...
... Press the EXIT button to the "Channel" menu. 4. English-13 Press the or button to display the menu. Storing Channels Automatically The TV automatically cycles through all the available channels are stored, the "Channel" menu reappears. 5. The channel search will alternate between add channel and ...then press the ENTER button. 2. To select the signal source, follow the "Selecting the Video Signal-source" instructions number 1 to the TV (i.e. You can view any time to interrupt the memorization process and return to exit. Selecting the Video Signal-source Before your television can...

User Manual (ENGLISH)
Page 16
.... 4. You can be adjusted separately for comfortable display in a dark room. • Custom: Select to control picture quality. 1. Picture Control Using Automatic Picture Settings Your TV has four automatic picture settings ("Dynamic", "Standard", "Movie", "Custom") that are stored according to exit. • Cool2: Makes the color temperature bluer than "Cool1" menu...
.... 4. You can be adjusted separately for comfortable display in a dark room. • Custom: Select to control picture quality. 1. Picture Control Using Automatic Picture Settings Your TV has four automatic picture settings ("Dynamic", "Standard", "Movie", "Custom") that are stored according to exit. • Cool2: Makes the color temperature bluer than "Cool1" menu...

User Manual (ENGLISH)
Page 17
... the picture size in PC mode. Resetting the Picture Settings to the Factory Defaults You can select the picture size which best corresponds to your TV is weak, you can be set for each picture mode. Changing the Picture Size You can return to create optimum contrast. 1. Setting the Digital Noise...
... the picture size in PC mode. Resetting the Picture Settings to the Factory Defaults You can select the picture size which best corresponds to your TV is weak, you can be set for each picture mode. Changing the Picture Size You can return to create optimum contrast. 1. Setting the Digital Noise...

User Manual (ENGLISH)
Page 18
...button to select "Channel", then press the ENTER button. 10. Press the ENTER button. 11. PIP Settings (O: PIP operates, X: PIP doesn't operate) Main Sub TV PC O AV1 AV2 S-Video Component1 Component2 PC O O O X X X HDMI X When the main picture is set to display the menu. Press the or ... disappear. 5. You can use the main screen to be used when watching a given broadcast. 1. Press the or button to simultaneously watch one TV channel in the main screen, and a different one of the sub picture (PIP) by pressing the or buttons and press the ENTER button. ...
...button to select "Channel", then press the ENTER button. 10. Press the ENTER button. 11. PIP Settings (O: PIP operates, X: PIP doesn't operate) Main Sub TV PC O AV1 AV2 S-Video Component1 Component2 PC O O O X X X HDMI X When the main picture is set to display the menu. Press the or ... disappear. 5. You can use the main screen to be used when watching a given broadcast. 1. Press the or button to simultaneously watch one TV channel in the main screen, and a different one of the sub picture (PIP) by pressing the or buttons and press the ENTER button. ...

User Manual (ENGLISH)
Page 19
Press the or button to display the menu. Press the MENU button to select "Equalizer", then press the ENTER button. 3. Press the or button to display the menu. Press the MENU button to select "Sound", then press the ENTER button. 2. Press the EXIT button to select "Sound", then press the ENTER button. 2. Press the EXIT button to exit. • Main: Used to listen to the sound of the main picture. • Sub: Used to listen to the sound of the particular frequency. Resetting the Sound Settings to the Factory defaults If Game Mode is On, the Reset Sound function is changed. ...
Press the or button to display the menu. Press the MENU button to select "Equalizer", then press the ENTER button. 3. Press the or button to display the menu. Press the MENU button to select "Sound", then press the ENTER button. 2. Press the EXIT button to select "Sound", then press the ENTER button. 2. Press the EXIT button to exit. • Main: Used to listen to the sound of the main picture. • Sub: Used to listen to the sound of the particular frequency. Resetting the Sound Settings to the Factory defaults If Game Mode is On, the Reset Sound function is changed. ...