User Manual
Page 3
... 4 yy Network Connection 23 yy Accessories 4 Connecting to a Wired Network 23 yy Installing the LCD TV Stand 4 yy Viewing the Control Panel 5 yy Viewing the Remote Control 6 yy Connecting to an Antenna 7 yy Plug & Play (Initial Setup 7 Connecting Wireless Network 25 yy Media Play 28 Connecting a USB Device 28 Connecting to...
... 4 yy Network Connection 23 yy Accessories 4 Connecting to a Wired Network 23 yy Installing the LCD TV Stand 4 yy Viewing the Control Panel 5 yy Viewing the Remote Control 6 yy Connecting to an Antenna 7 yy Plug & Play (Initial Setup 7 Connecting Wireless Network 25 yy Media Play 28 Connecting a USB Device 28 Connecting to...
User Manual
Page 4
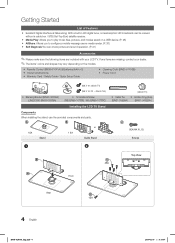
... to configure a mobile message server media render. (P. 38) yy Self Diagnosis:You can be viewed without a cable box / STB (Set-Top-Box) satellite receiver. yy Remote Control (BN59-01041A) & Batteries (AAA x 2) yy Owner's Instructions yy Warranty Card / Safety Guide / Quick Setup Guide yy Cleaning Cloth (BN63-01798B) yy Power Cord (M8...
... to configure a mobile message server media render. (P. 38) yy Self Diagnosis:You can be viewed without a cable box / STB (Set-Top-Box) satellite receiver. yy Remote Control (BN59-01041A) & Batteries (AAA x 2) yy Owner's Instructions yy Warranty Card / Safety Guide / Quick Setup Guide yy Cleaning Cloth (BN63-01798B) yy Power Cord (M8...
User Manual
Page 5
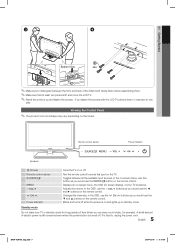
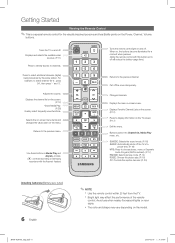
..., for long periods of time (when you would use the ▼ and ▲ buttons on the remote control. Changes the channels. In the OSD, use the y buttons as you would use the ENTERE button...TV in standby mode. In the on-screen menu, use the ◄ and ► buttons on the remote control. Displays an on-screen menu, the OSD (on or off . A small amount of electric power... is still consumed even when the power button is on the remote control. Toggles between the front and back of the Stand and Guide Stand when assembling them. ✎...
..., for long periods of time (when you would use the ▼ and ▲ buttons on the remote control. Changes the channels. In the OSD, use the y buttons as you would use the ENTERE button...TV in standby mode. In the on-screen menu, use the ◄ and ► buttons on the remote control. Displays an on-screen menu, the OSD (on or off . A small amount of electric power... is still consumed even when the power button is on the remote control. Toggles between the front and back of the Stand and Guide Stand when assembling them. ✎...
User Manual
Page 6
...the picture size. (P. 15) CC: Controls the caption decoder. (P. 20) Installing batteries (Battery size: AAA) 6 English ✎✎NOTE xx Use the remote control within 23 feet from the TV. Returns to the previous channel. Displays the channel list on the screen. (P. 12) Views Media Play. (P. 28) ...Quickly select frequently used in Media Play and Anynet+ modes. (�: controls recording on Samsung recorders with this button set to off . Turns the TV on and off the sound temporarily. When on, the buttons become illuminated for the...
...the picture size. (P. 15) CC: Controls the caption decoder. (P. 20) Installing batteries (Battery size: AAA) 6 English ✎✎NOTE xx Use the remote control within 23 feet from the TV. Returns to the previous channel. Displays the channel list on the screen. (P. 12) Views Media Play. (P. 28) ...Quickly select frequently used in Media Play and Anynet+ modes. (�: controls recording on Samsung recorders with this button set to off . Turns the TV on and off the sound temporarily. When on, the buttons become illuminated for the...
User Manual
Page 13
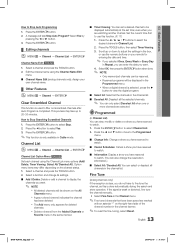
... → ENTERE Channel List Option Menu t Set each channel using the Channel Name Edit menu. ■■ Channel Name Edit (analog channels only): Assign your remote for deleted channels. Select a function and change the reservation Information.) ■■ Select All / Deselect All: You can select or deselect all the selected channels...
... → ENTERE Channel List Option Menu t Set each channel using the Channel Name Edit menu. ■■ Channel Name Edit (analog channels only): Assign your remote for deleted channels. Select a function and change the reservation Information.) ■■ Select All / Deselect All: You can select or deselect all the selected channels...
User Manual
Page 18
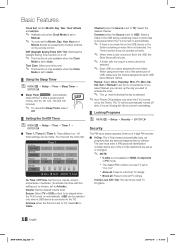
...: Select TV or USB content to be played when the TV is turned on automatically. ✎✎ If there is no music file on the remote control. Auto The cP.mMaOrDkEindicates the day Power Off (available only when is sPe.SleIcZtEed. xx The default PIN number of a new TV set at...
...: Select TV or USB content to be played when the TV is turned on automatically. ✎✎ If there is no music file on the remote control. Auto The cP.mMaOrDkEindicates the day Power Off (available only when is sPe.SleIcZtEed. xx The default PIN number of a new TV set at...

User Manual
Page 20
... TV menu in digital caption mode depending on set to a game console such as PlayStation™ or Xbox™, you forget the PIN, press the remote-control buttons in Caption Mode. xx Selecting Reset after adjusting the equalizer returns the equalizer to 7. If captions are available only when Default and Service1...
... TV menu in digital caption mode depending on set to a game console such as PlayStation™ or Xbox™, you forget the PIN, press the remote-control buttons in Caption Mode. xx Selecting Reset after adjusting the equalizer returns the equalizer to 7. If captions are available only when Default and Service1...

User Manual
Page 24
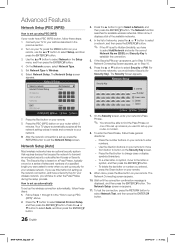
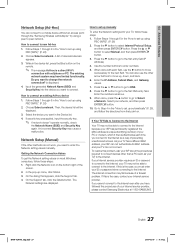
... computers, follow these steps: How to set up menu that appears, click the Support tab. 4. Right click the Network icon on your remote. 6. The Network connection values are displayed. Set Internet Protocol Setup to Wired. 6. Select Network Test to another. 5. Enter the IP Address...Type : Wired ► Network Setup Network test U Move E Enter R Return 4. In the pop-up your remote to go to Auto. 8. Press the ▼ button on your remote. 10. When done, press the Return button on your TV's cable network connection automatically, follow these steps: 1. ...
... computers, follow these steps: How to set up menu that appears, click the Support tab. 4. Right click the Network icon on your remote. 6. The Network connection values are displayed. Set Internet Protocol Setup to Wired. 6. Select Network Test to another. 5. Enter the IP Address...Type : Wired ► Network Setup Network test U Move E Enter R Return 4. In the pop-up your remote to go to Auto. 8. Press the ▼ button on your remote. 10. When done, press the Return button on your TV's cable network connection automatically, follow these steps: 1. ...
User Manual
Page 26
...press the ENTERE button. 26 English BN68-02604A_Eng.indb 26 2010-02-10 �� 8:19:22 When done, it needs and connects to your remote. 8. If the Network Connecting Screen appears, go to your router or modem. 8. Connect your TV to Select a Network, and then press the ...the available networks. 4. Press the ▲ or ▼ button to enter numbers. -- The Network Setup screen appears. Use the direction buttons on your remote to move to select Auto, and then press the ENTERE button. 3. If the Security/PIN pop-up PBC (WPS)" above. 2. Press the number buttons...
...press the ENTERE button. 26 English BN68-02604A_Eng.indb 26 2010-02-10 �� 8:19:22 When done, it needs and connects to your remote. 8. If the Network Connecting Screen appears, go to your router or modem. 8. Connect your TV to Select a Network, and then press the ...the available networks. 4. Press the ▲ or ▼ button to enter numbers. -- The Network Setup screen appears. Use the direction buttons on your remote to move to select Auto, and then press the ENTERE button. 3. If the Security/PIN pop-up PBC (WPS)" above. 2. Press the number buttons...
User Manual
Page 27
...key. ✎✎ If network doesn't operate normally, check the Network Name (SSID) and Security Key again. Right click the Network icon on the remote. ✎✎ The message Ad-hoc is displayed. 4. Press the ▲ or ▼ button to select Internet Protocol Setup, and then press...required to connect devices other methods do not work, you connect to the Internet as a way of your Internet service provider, please contact Samsung Electronics at 1-800-SAMSUNG. Select the device you want to connect. Network Setup (Manual) If the other than a PC (such as above. 9. Getting ...
...key. ✎✎ If network doesn't operate normally, check the Network Name (SSID) and Security Key again. Right click the Network icon on the remote. ✎✎ The message Ad-hoc is displayed. 4. Press the ▲ or ▼ button to select Internet Protocol Setup, and then press...required to connect devices other methods do not work, you connect to the Internet as a way of your Internet service provider, please contact Samsung Electronics at 1-800-SAMSUNG. Select the device you want to connect. Network Setup (Manual) If the other than a PC (such as above. 9. Getting ...

User Manual
Page 32
... menu, a pop-up message will be automatically played during play continuously by pressing the Blue button. During the slide show, files are saved on the remote control to select the desired photo in the Media Play menu. 2. Press the button to play . ✎✎Only displays the files with MP3 and...
... menu, a pop-up message will be automatically played during play continuously by pressing the Blue button. During the slide show, files are saved on the remote control to select the desired photo in the Media Play menu. 2. Press the button to play . ✎✎Only displays the files with MP3 and...
User Manual
Page 35
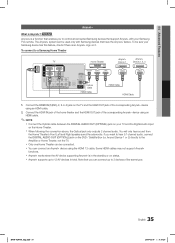
... be sure your Samsung TV's remote. To connect to the Amplifier or Home Theater, not the TV. Some HDMI cables may not support Anynet+ functions. xx Anynet+ supports up to 3 devices of the corresponding Anynet+ device using the HDMI 1.3 cable. Anynet Device 1 or 2) directly to a Samsung Home Theater Anynet+...on it. xx When following the connection above, the Optical jack only outputs 2 channel audio. If you can be used only with your Samsung device has this feature, check if there is in total. xx You can be connected. Note that have the Anynet+ feature. Connect the...
... be sure your Samsung TV's remote. To connect to the Amplifier or Home Theater, not the TV. Some HDMI cables may not support Anynet+ functions. xx Anynet+ supports up to 3 devices of the corresponding Anynet+ device using the HDMI 1.3 cable. Anynet Device 1 or 2) directly to a Samsung Home Theater Anynet+...on it. xx When following the connection above, the Optical jack only outputs 2 channel audio. If you can be used only with your Samsung device has this feature, check if there is in total. xx You can be connected. Note that have the Anynet+ feature. Connect the...
User Manual
Page 37
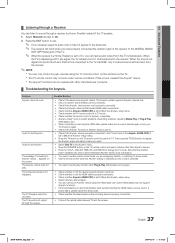
... Anynet+ menu and select a menu you want. • Select View TV in the Anynet+ menu. • Press the SOURCE button on the TV remote control and select a device other manufacturers' products. ¦¦ Troubleshooting for Anynet+ Problem Anynet+ does not work when you can hear sound output from... the screen. The Anynet+ system supports Anynet+ devices only. • Only one receiver (home theater) can only control Anynet+ devices using the TV remote control, not the buttons on . • Check if the Anynet+ device is properly connected to the TV and check if the Anynet+ (HDMI-CEC...
... Anynet+ menu and select a menu you want. • Select View TV in the Anynet+ menu. • Press the SOURCE button on the TV remote control and select a device other manufacturers' products. ¦¦ Troubleshooting for Anynet+ Problem Anynet+ does not work when you can hear sound output from... the screen. The Anynet+ system supports Anynet+ devices only. • Only one receiver (home theater) can only control Anynet+ devices using the TV remote control, not the buttons on . • Check if the Anynet+ device is properly connected to the TV and check if the Anynet+ (HDMI-CEC...
User Manual
Page 44
...wall outlet and the TV. • Make sure the wall outlet is working. • Try pressing the POWER button on , refer to 'Remote control does not work' below. Try changing Caption Mode Service 1 to CC1. (P. 20) • Some channels may cause picture distortion. ...Network Connection The wireless network connection failed. • Samsung Wireless USB dongle is required to use a wireless network. • Make sure the Network Connection is set to Wireless. (P. 25) • Make...
...wall outlet and the TV. • Make sure the wall outlet is working. • Try pressing the POWER button on , refer to 'Remote control does not work' below. Try changing Caption Mode Service 1 to CC1. (P. 20) • Some channels may cause picture distortion. ...Network Connection The wireless network connection failed. • Samsung Wireless USB dongle is required to use a wireless network. • Make sure the Network Connection is set to Wireless. (P. 25) • Make...
User Manual
Page 45
The remote control does not work. There is a plastic smell from the set-top-box. TV Signal Information is unavailable in the Plug & Play procedure. Your settings are flexible enough for SAMSUNG TV code. • Check the supported resolution of the TV and adjust the external device's output resolution accordingly. For ... every time the TV is turned off , or adjust the volume. However, there may be activated on the top of the remote. • Try pointing the remote directly at the edge of the frame of the TV. Channel menu is tilted to the Cable/Sat user manual for long term...
The remote control does not work. There is a plastic smell from the set-top-box. TV Signal Information is unavailable in the Plug & Play procedure. Your settings are flexible enough for SAMSUNG TV code. • Check the supported resolution of the TV and adjust the external device's output resolution accordingly. For ... every time the TV is turned off , or adjust the volume. However, there may be activated on the top of the remote. • Try pointing the remote directly at the edge of the frame of the TV. Channel menu is tilted to the Cable/Sat user manual for long term...

User Manual
Page 48
... 8O 10 ON/OFF button Optimal resolution 36 9, 35 18 9, 10 15 14 16 17 P Photo view Picture Reset PIN number PIP Position Power Indicator R Remote Control RGB 6, 12 12 H HD HDMI Home theater 16 8 9, 35 S 24 Screen Fit 15 Sleep Timer 18 Slide Show 32 Software Upgrade 22 46 Source...
... 8O 10 ON/OFF button Optimal resolution 36 9, 35 18 9, 10 15 14 16 17 P Photo view Picture Reset PIN number PIP Position Power Indicator R Remote Control RGB 6, 12 12 H HD HDMI Home theater 16 8 9, 35 S 24 Screen Fit 15 Sleep Timer 18 Slide Show 32 Software Upgrade 22 46 Source...

