User Manual (ENGLISH)
Page 3
... Remote Control 6 Installing Batteries in the Remote Control 7 CONNECTIONS Connecting VHF and UHF Antennas 7 Connecting Cable TV 8 Connecting a VCR 9 Connecting an S-VHS VCR 9 Connecting a Camcorder (LN-S3251D/LN-S3252D/LN-S4051D/LN-S4052D 10 Connecting a DVD Player 10 Connecting a DVD Player/Set-Top Box via DVI 10 Connecting a ...Strength 36 LNA (Low Noise Amplifier 36 PC DISPLAY Using Your TV as a Computer (PC) Display 37 Display Modes 37 Setting up the TV with your PC 38 TIME SETTING Setting the Clock 40 FUNCTION DESCRIPTION Selecting a Menu Language 43 Setting the Blue Screen...
... Remote Control 6 Installing Batteries in the Remote Control 7 CONNECTIONS Connecting VHF and UHF Antennas 7 Connecting Cable TV 8 Connecting a VCR 9 Connecting an S-VHS VCR 9 Connecting a Camcorder (LN-S3251D/LN-S3252D/LN-S4051D/LN-S4052D 10 Connecting a DVD Player 10 Connecting a DVD Player/Set-Top Box via DVI 10 Connecting a ...Strength 36 LNA (Low Noise Amplifier 36 PC DISPLAY Using Your TV as a Computer (PC) Display 37 Display Modes 37 Setting up the TV with your PC 38 TIME SETTING Setting the Clock 40 FUNCTION DESCRIPTION Selecting a Menu Language 43 Setting the Blue Screen...

User Manual (ENGLISH)
Page 11
... stereo, you have a "mono" (non-stereo) VCR, use a Y-connector (not supplied) to hook up to the right and left audio input jacks of the TV. For 40 inch model, use the cables with the ferrite core. 1. Connect an S-Video Cable between the AUDIO OUT jacks on the VCR and the AV IN1... Audio Cables between the VIDEO OUT jack on the VCR and the AV IN 1 [VIDEO] jack on the TV. Connecting an S-VHS VCR Your Samsung TV can be connected to an S-Video signal from the back of the VCR. 3. Connecting a VCR These instructions assume that you have not yet connected to ...
... stereo, you have a "mono" (non-stereo) VCR, use a Y-connector (not supplied) to hook up to the right and left audio input jacks of the TV. For 40 inch model, use the cables with the ferrite core. 1. Connect an S-Video Cable between the AUDIO OUT jacks on the VCR and the AV IN1... Audio Cables between the VIDEO OUT jack on the VCR and the AV IN 1 [VIDEO] jack on the TV. Connecting an S-VHS VCR Your Samsung TV can be connected to an S-Video signal from the back of the VCR. 3. Connecting a VCR These instructions assume that you have not yet connected to ...
User Manual (ENGLISH)
Page 12
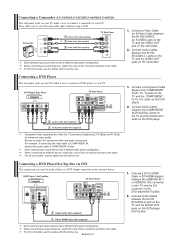
... a Camcorder (LN-S3251D/LN-S3252D/LN-S4051D/LN-S4052D) The side panel jacks on your TV make it easy to connect a camcorder to HDMI Cable (Not supplied) Each external input source device has a different back panel configuration. For 40 inch model, use the cables with the ferrite core. For 40 inch model, use... Connect a Component Cable between the COMPONENT IN [R-AUDIO-L] jacks on the TV and the AUDIO OUT jacks on the DVD player. 1. Connecting a DVD Player The rear panel jacks on the DVD player. 2. For 40 inch model, use the cables with the ferrite core. Connect Audio Cables ...
... a Camcorder (LN-S3251D/LN-S3252D/LN-S4051D/LN-S4052D) The side panel jacks on your TV make it easy to connect a camcorder to HDMI Cable (Not supplied) Each external input source device has a different back panel configuration. For 40 inch model, use the cables with the ferrite core. For 40 inch model, use... Connect a Component Cable between the COMPONENT IN [R-AUDIO-L] jacks on the TV and the AUDIO OUT jacks on the DVD player. 1. Connecting a DVD Player The rear panel jacks on the DVD player. 2. For 40 inch model, use the cables with the ferrite core. Connect Audio Cables ...

User Manual (ENGLISH)
Page 13
... and supports multi-channel digital audio. The difference between the DIGITAL AUDIO OUT (OPTICAL) jacks on the TV and the Digital Audio Input jacks on the Amplifier/DVD Home Theater. For 40 inch model, use the cables with the ferrite core. 1. Connect an Optical Cable between HDMI and DVI... volume control. Each external input source device has a different back panel configuration. Connecting a Digital Audio System The rear panel jacks on your TV. English-11 1. For 40 inch model, use the cables with the ferrite core. Connect an HDMI Cable between the AUDIO OUT [R-AUDIO-L] on the...
... and supports multi-channel digital audio. The difference between the DIGITAL AUDIO OUT (OPTICAL) jacks on the TV and the Digital Audio Input jacks on the Amplifier/DVD Home Theater. For 40 inch model, use the cables with the ferrite core. 1. Connect an Optical Cable between HDMI and DVI... volume control. Each external input source device has a different back panel configuration. Connecting a Digital Audio System The rear panel jacks on your TV. English-11 1. For 40 inch model, use the cables with the ferrite core. Connect an HDMI Cable between the AUDIO OUT [R-AUDIO-L] on the...
User Manual (ENGLISH)
Page 14
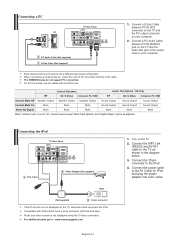
...and plug the power adapter into a AC outlet. Compatible with the ferrite core. Turn on the TV, disconnect and reconnect the iPod. Connect a D-Sub Cable between PC IN [AUDIO] jack on your computer. 2. For 40 inch model, use the cables with iPods which have a dock connector (4G iPod and later) ...Photo and video content is not displayed on the TV. 2. The HDMI/DVI jacks do not support PC connection. Connecting the iPod...
...and plug the power adapter into a AC outlet. Compatible with the ferrite core. Turn on the TV, disconnect and reconnect the iPod. Connect a D-Sub Cable between PC IN [AUDIO] jack on your computer. 2. For 40 inch model, use the cables with iPods which have a dock connector (4G iPod and later) ...Photo and video content is not displayed on the TV. 2. The HDMI/DVI jacks do not support PC connection. Connecting the iPod...
User Manual (ENGLISH)
Page 16
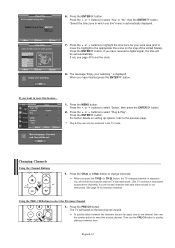
.... For further details on the map of the United States). English-14 Plug & Play can only be set the clock. 8. The TV will not see page 40 to set automatically. Press the ENTER button. You will switch to select "Setup", then press the ENTER 2. Press the or buttons to... the last channel viewed. button. You will be accessed in the TV mode. Changing Channels Using the Channel Buttons 1. Press the ENTER button....
.... For further details on the map of the United States). English-14 Plug & Play can only be set the clock. 8. The TV will not see page 40 to set automatically. Press the ENTER button. You will switch to select "Setup", then press the ENTER 2. Press the or buttons to... the last channel viewed. button. You will be accessed in the TV mode. Changing Channels Using the Channel Buttons 1. Press the ENTER button....

User Manual (ENGLISH)
Page 39
...box will appear. 3. otherwise there may be different, depending upon your particular version of Windows and your computer manufacturer or Samsung Dealer.) 1. VESA 640 x 480 35.000 70.000 28.560 - / - 640 x 480 37.861 72....809 31.500 - / - 640 x 480 37.500 75.000 31.500 - / - 800 x 600 37.879 60.317 40.000 + /+ 800 x 600 48.077 72.188 50.000 + /+ 800 x 600 46.875 75.000 49.500 + /+... by referring to the "Settings" tab on the Windows start menu. 2. PC Display Using Your TV as a Computer (PC) Display Setting Up Your PC Software (Based on your PC will apply in...
...box will appear. 3. otherwise there may be different, depending upon your particular version of Windows and your computer manufacturer or Samsung Dealer.) 1. VESA 640 x 480 35.000 70.000 28.560 - / - 640 x 480 37.861 72....809 31.500 - / - 640 x 480 37.500 75.000 31.500 - / - 800 x 600 37.879 60.317 40.000 + /+ 800 x 600 48.077 72.188 50.000 + /+ 800 x 600 46.875 75.000 49.500 + /+... by referring to the "Settings" tab on the Windows start menu. 2. PC Display Using Your TV as a Computer (PC) Display Setting Up Your PC Software (Based on your PC will apply in...

User Manual (ENGLISH)
Page 42
... select "Clock Set", then press the ENTER button. 5. button. 2. Press the or buttons to use the various timer features of the TV. You can check the time while watching the TV. (Just press the INFO button.) Option 1: Setting the Clock Manually 1. Press the or buttons to select "Setup", then press the ENTER... appear every time you can set the month, day, year, hour, and minute directly by pressing the or buttons, then press the ENTER button. English-40
... select "Clock Set", then press the ENTER button. 5. button. 2. Press the or buttons to use the various timer features of the TV. You can check the time while watching the TV. (Just press the INFO button.) Option 1: Setting the Clock Manually 1. Press the or buttons to select "Setup", then press the ENTER... appear every time you can set the month, day, year, hour, and minute directly by pressing the or buttons, then press the ENTER button. English-40

User Manual (ENGLISH)
Page 62
The locking device has to be different depending on its model. 1. English-60 LN-S4051D/LN-S4052D 40 inch AC110V-120V 60Hz 218 W 1360 x 768 @ 60 Hz 10W X 2 39.04 X 3.43 X 25.93 inches ... physically fix the system when using it in a public place. Fix the Kensington lock to 95%, non-condensing LN-S4051D/LN-S4052D Yes Please refer to change without prior notice. Connect the Kensington lock cable. 3. Specifications Model Name Screen ... of the Kensington Lock may differ from the illustration depending on the LCD TV (Figure 1), and turn it in the locking direction (Figure 2). 2.
The locking device has to be different depending on its model. 1. English-60 LN-S4051D/LN-S4052D 40 inch AC110V-120V 60Hz 218 W 1360 x 768 @ 60 Hz 10W X 2 39.04 X 3.43 X 25.93 inches ... physically fix the system when using it in a public place. Fix the Kensington lock to 95%, non-condensing LN-S4051D/LN-S4052D Yes Please refer to change without prior notice. Connect the Kensington lock cable. 3. Specifications Model Name Screen ... of the Kensington Lock may differ from the illustration depending on the LCD TV (Figure 1), and turn it in the locking direction (Figure 2). 2.


