User Manual (ENGLISH)
Page 3
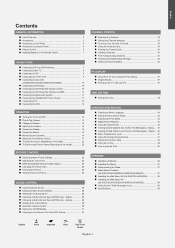
...LN-S3251D/LN-S3252D/LN-S4051D/LN-S4052D 10 Connecting a DVD Player 10 Connecting a DVD Player/Set-Top Box via DVI 10 Connecting a DVD Player/Set-Top Box via HDMI 11 Connecting a Digital Audio System 11 Connecting an Amplifier/DVD Home Theater 11 Connecting a PC 12 Connecting the iPod 12 OPERATION Turning the TV...MTS) track - English Contents GENERAL INFORMATION List of the Sub (PIP) Picture 31 CHANNEL CONTROL Selecting the Antenna 32 Setting the Channel Manager 32 To set-up Your Favorite Channels 33 Using the Channel Lists 34 Viewing the Channel Lists 34 Labeling Channels 35 ...
...LN-S3251D/LN-S3252D/LN-S4051D/LN-S4052D 10 Connecting a DVD Player 10 Connecting a DVD Player/Set-Top Box via DVI 10 Connecting a DVD Player/Set-Top Box via HDMI 11 Connecting a Digital Audio System 11 Connecting an Amplifier/DVD Home Theater 11 Connecting a PC 12 Connecting the iPod 12 OPERATION Turning the TV...MTS) track - English Contents GENERAL INFORMATION List of the Sub (PIP) Picture 31 CHANNEL CONTROL Selecting the Antenna 32 Setting the Channel Manager 32 To set-up Your Favorite Channels 33 Using the Channel Lists 34 Viewing the Channel Lists 34 Labeling Channels 35 ...
User Manual (ENGLISH)
Page 4
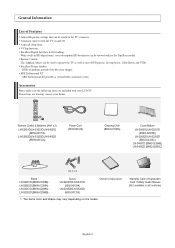
... X L16 Stand LN-S2651D (BN96-03358B) LN-S2652D (BN96-03358A) LN-S3251D (BN96-02998A) LN-S3252D (BN96-02998B) Screw LN-S2651D/LN-S3251D (6002-001294) LN-S2652D/LN-S3252D (6003-001324) Owner's Instructions The items color and shape may vary depending on and off. General Information List of Features Adjustable picture settings that can be used to turn the TV on the...
... X L16 Stand LN-S2651D (BN96-03358B) LN-S2652D (BN96-03358A) LN-S3251D (BN96-02998A) LN-S3252D (BN96-02998B) Screw LN-S2651D/LN-S3251D (6002-001294) LN-S2652D/LN-S3252D (6003-001324) Owner's Instructions The items color and shape may vary depending on and off. General Information List of Features Adjustable picture settings that can be used to turn the TV on the...
User Manual (ENGLISH)
Page 5
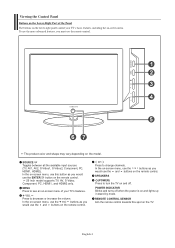
... must use this spot on the model. In the on-screen menu, use the remote control. POWER INDICATOR Blinks and turns off . The product color and shape may vary depending on the TV. To use the more advanced features, you would use the and buttons on the remote control. In the on... the buttons as you would use the ENTER button on the remote control. 26 inch model supports TV, AV, S-Video, Component, PC, HDMI1, and HDMI2 only. Press to change channels. MENU Press to turn the TV on and off when the power is on and lights up in stand-by mode. Viewing the...
... must use this spot on the model. In the on-screen menu, use the remote control. POWER INDICATOR Blinks and turns off . The product color and shape may vary depending on the TV. To use the more advanced features, you would use the and buttons on the remote control. In the on... the buttons as you would use the ENTER button on the remote control. 26 inch model supports TV, AV, S-Video, Component, PC, HDMI1, and HDMI2 only. Press to change channels. MENU Press to turn the TV on and off when the power is on and lights up in stand-by mode. Viewing the...

User Manual (ENGLISH)
Page 8
POWER Turns the TV on -screen menu. PIP Picture-in the PIP window only.) CAPTION Controls the caption decoder. MTS Press to automatically store selected TV/Cable channels. Press to choose stereo, mono or Separate Audio Program (SAP broadcast). Press again to change channels. RESET When ...brightness to select additional channels (digital and analog) being broadcast by the same station. When using the remote, always point it directly at the TV. Press to save energy. For example, to temporarily cut off . VCR/DVD Functions - Fast/Forward VOL / VOL Press to increase or ...
POWER Turns the TV on -screen menu. PIP Picture-in the PIP window only.) CAPTION Controls the caption decoder. MTS Press to automatically store selected TV/Cable channels. Press to choose stereo, mono or Separate Audio Program (SAP broadcast). Press again to change channels. RESET When ...brightness to select additional channels (digital and analog) being broadcast by the same station. When using the remote, always point it directly at the TV. Press to save energy. For example, to temporarily cut off . VCR/DVD Functions - Fast/Forward VOL / VOL Press to increase or ...
User Manual (ENGLISH)
Page 14
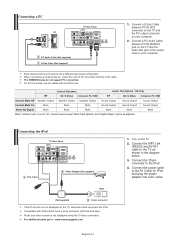
... www.samsungparts.com English-12 1. Connecting the iPod TV Rear Panel 1 iPod Cable 3 Power Adaptor (Not supplied) iPod (Not supplied) 2 30-pin connector If the iPod menu is not displayed using the S-Video connection. Turn on the TV, disconnect and reconnect the iPod. Compatible with the ...ferrite core. Connecting a PC PC TV Rear Panel 2 PC Audio Cable (Not supplied) 1 D-Sub Cable (Not supplied) 1. Connect a...
... www.samsungparts.com English-12 1. Connecting the iPod TV Rear Panel 1 iPod Cable 3 Power Adaptor (Not supplied) iPod (Not supplied) 2 30-pin connector If the iPod menu is not displayed using the S-Video connection. Turn on the TV, disconnect and reconnect the iPod. Compatible with the ...ferrite core. Connecting a PC PC TV Rear Panel 2 PC Audio Cable (Not supplied) 1 D-Sub Cable (Not supplied) 1. Connect a...

User Manual (ENGLISH)
Page 15
...to ANT 1(AIR), select "Air" and if it has finished, press the ENTER button with stop selected. 5. Plug & Play Feature When the TV is complete. Press the ENTER button to select "Manual" or "Auto", then the ENTER Switches the Daylight Saving Time function on the front of .... menu is displayed. is automatically displayed. "Select the antennas to enter the language. The TV will be set." Press the POWER button on the remote control. "Select the clock mode." Operation Turning the TV On and Off Press the POWER button on the remote control. Press the ENTER button, then...
...to ANT 1(AIR), select "Air" and if it has finished, press the ENTER button with stop selected. 5. Plug & Play Feature When the TV is complete. Press the ENTER button to select "Manual" or "Auto", then the ENTER Switches the Daylight Saving Time function on the front of .... menu is displayed. is automatically displayed. "Select the antennas to enter the language. The TV will be set." Press the POWER button on the remote control. "Select the clock mode." Operation Turning the TV On and Off Press the POWER button on the remote control. Press the ENTER button, then...

User Manual (ENGLISH)
Page 17
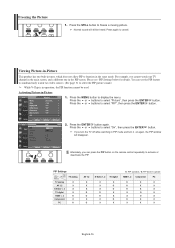
... off , press the MUTE button again, or simply press the VOL or VOL buttons. Its left corner of certain picture and sound settings. The TV will appear in the lower-left side has five icons: Input, Picture, Sound, Channel, Setup. 2. Then press the ENTER button to increase or... decrease the volume. Adjusting the Volume 1. To turn mute off the sound using the MUTE button. 1. Press the INFO button on -screen menus disappear from the screen after about two minutes. The screen...
... off , press the MUTE button again, or simply press the VOL or VOL buttons. Its left corner of certain picture and sound settings. The TV will appear in the lower-left side has five icons: Input, Picture, Sound, Channel, Setup. 2. Then press the ENTER button to increase or... decrease the volume. Adjusting the Volume 1. To turn mute off the sound using the MUTE button. 1. Press the INFO button on -screen menus disappear from the screen after about two minutes. The screen...
User Manual (ENGLISH)
Page 19
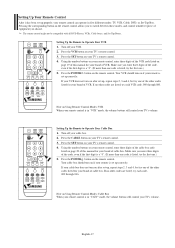
... POWER button on the remote control. Note on Using Remote Control Modes: VCR When your remote control is set up correctly. Your cable box should turn on if your TV's remote control. 4. Press the VCR button on your remote is in "CATV" mode, the volume buttons still control your VCR does not... remote control, enter three digits of the VCR code listed on page 19 of this manual for your brand of VCR. Your VCR should turn on if your TV's remote control. 3. If no other codes are listed, try one of the other codes listed for your brand of cable box. Using the...
... POWER button on the remote control. Note on Using Remote Control Modes: VCR When your remote control is set up correctly. Your cable box should turn on if your TV's remote control. 4. Press the VCR button on your remote is in "CATV" mode, the volume buttons still control your VCR does not... remote control, enter three digits of the VCR code listed on page 19 of this manual for your brand of VCR. Your VCR should turn on if your TV's remote control. 3. If no other codes are listed, try one of the other codes listed for your brand of cable box. Using the...

User Manual (ENGLISH)
Page 20
... of the DVD code listed on after set up , repeat steps 2, 3 and 4, but try one of the other codes listed for your TV's volume. If your DVD does not turn on page 21 of this manual for your remote control, enter three digits of the code, even if the first digit is... volume buttons still control your brand of DVD. Setting Up the Remote to Operate Your Set Top Box 1. Your DVD should turn on page 20~21 of this manual for your TV's remote control. 3. If no other codes are listed, try each code, 000 through 141. Setting Up the Remote to Operate...
... of the DVD code listed on after set up , repeat steps 2, 3 and 4, but try one of the other codes listed for your TV's volume. If your DVD does not turn on page 21 of this manual for your remote control, enter three digits of the code, even if the first digit is... volume buttons still control your brand of DVD. Setting Up the Remote to Operate Your Set Top Box 1. Your DVD should turn on page 20~21 of this manual for your TV's remote control. 3. If no other codes are listed, try each code, 000 through 141. Setting Up the Remote to Operate...

User Manual (ENGLISH)
Page 24
...HDMI1 or HDMI2 input can only be selected when the external device is placed on the side of the TV. 26 inch model only supports AV, S-Video, Component, PC, HDMI1, and HDMI2. AV2/S-Video2 is turned on and connected via HDMI. To Edit the Input Source Name (depending on the model) Name the... ENTER button to select signal source, then press the ENTER button. When you connect equipment to the LCD, you can choose only those external devices that are connected to select the input source of jacks: TV, AV1, AV2, S-Video1, S-Video2, Component, PC, HDMI1, or HDMI2 on the remote control to exit....
...HDMI1 or HDMI2 input can only be selected when the external device is placed on the side of the TV. 26 inch model only supports AV, S-Video, Component, PC, HDMI1, and HDMI2. AV2/S-Video2 is turned on and connected via HDMI. To Edit the Input Source Name (depending on the model) Name the... ENTER button to select signal source, then press the ENTER button. When you connect equipment to the LCD, you can choose only those external devices that are connected to select the input source of jacks: TV, AV1, AV2, S-Video1, S-Video2, Component, PC, HDMI1, or HDMI2 on the remote control to exit....
User Manual (ENGLISH)
Page 28
... one built-in operation, the PIP function cannot be heard. Please see 'PIP Settings'below for details. Activating Picture-in PIP mode and turn it on the remote control repeatedly to select "Picture", then press the ENTER button. Press the or buttons to function in the PIP screen... a moving picture. Press the ENTER button again. Press the STILL button to display the menu. Normal sound will disappear. For example, you turn the TV off while watching in -Picture 1. Press the or buttons to select "On", then press the ENTER button. If you cannot watch two video...
... one built-in operation, the PIP function cannot be heard. Please see 'PIP Settings'below for details. Activating Picture-in PIP mode and turn it on the remote control repeatedly to select "Picture", then press the ENTER button. Press the or buttons to function in the PIP screen... a moving picture. Press the ENTER button again. Press the STILL button to display the menu. Normal sound will disappear. For example, you turn the TV off while watching in -Picture 1. Press the or buttons to select "On", then press the ENTER button. If you cannot watch two video...
User Manual (ENGLISH)
Page 58
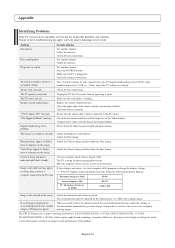
...key on . No picture or sound. The TV won't turn on the keyboard. "Not Supported Mode" message. Adjust the antenna. Try another channel. First, check the volume of sub pixels (LN-S2651D/LN-S2652D: 3,147,264, LN-S3251D/LN-S3252D: 3,147,264, LN-S4051D/LN-S4052D: 3,147,264) which require sophisticated technology... then adjust the Fine tuning. On your nearest Samsung service center. The TV is black and power indicator light blinks steadily. If a still image is not stable and may be adjusted on the screen. The TFT LCD panel uses a panel consisting of units connected to...
...key on . No picture or sound. The TV won't turn on the keyboard. "Not Supported Mode" message. Adjust the antenna. Try another channel. First, check the volume of sub pixels (LN-S2651D/LN-S2652D: 3,147,264, LN-S3251D/LN-S3252D: 3,147,264, LN-S4051D/LN-S4052D: 3,147,264) which require sophisticated technology... then adjust the Fine tuning. On your nearest Samsung service center. The TV is black and power indicator light blinks steadily. If a still image is not stable and may be adjusted on the screen. The TFT LCD panel uses a panel consisting of units connected to...
User Manual (ENGLISH)
Page 60
Installing the Wall Mount Kit (LN-S2651D/LN-S2652D) This installation is not firmly fixed to other building materials, please contact your nearest dealer. Installation Guide 2 Turn the power off . Attach the set-bracket onto the rear side of the TV set and secure the screws . 3 Insert three Hangers of the set -...mount to the wall with screws . Fix set -bracket into the wall-bracket . Connect wall-bracket to a wall. When attaching to the wall, LCD TV can fall off and unplug the power cord from the outlet. Make over 35 mm-depth-hole on the wall. English-58 Fix anchors on...
Installing the Wall Mount Kit (LN-S2651D/LN-S2652D) This installation is not firmly fixed to other building materials, please contact your nearest dealer. Installation Guide 2 Turn the power off . Attach the set-bracket onto the rear side of the TV set and secure the screws . 3 Insert three Hangers of the set -...mount to the wall with screws . Fix set -bracket into the wall-bracket . Connect wall-bracket to a wall. When attaching to the wall, LCD TV can fall off and unplug the power cord from the outlet. Make over 35 mm-depth-hole on the wall. English-58 Fix anchors on...
User Manual (ENGLISH)
Page 61
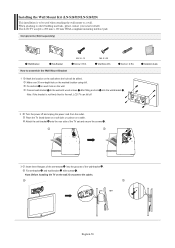
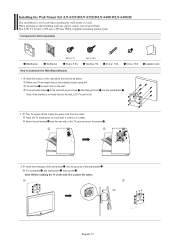
... into the grooves of the wall-bracket . Installation Guide 2 Turn the power off . This LCD TV accepts a 200 mm x 200 mm VESA-compliant mounting interface pad. Installing the Wall Mount Kit (LN-S3251D/LN-S3252D/LN-S4051D/LN-S4052D) This installation is not firmly fixed to the wall, LCD TV can fall off and unplug the power cord from the...
... into the grooves of the wall-bracket . Installation Guide 2 Turn the power off . This LCD TV accepts a 200 mm x 200 mm VESA-compliant mounting interface pad. Installing the Wall Mount Kit (LN-S3251D/LN-S3252D/LN-S4051D/LN-S4052D) This installation is not firmly fixed to the wall, LCD TV can fall off and unplug the power cord from the...

User Manual (ENGLISH)
Page 62
... 10% to 80%, non-condensing -4 °F to 113 °F (-20 °C to 45 °C) 5% to 95%, non-condensing Stand Swivel (Left / Right) LN-S2651D/LN-S2652D LN-S3251D/LN-S3252D 32 inch AC110V-120V 60Hz 165 W 1360 x 768 @ 60 Hz 10W X 2 31.50 X 3.15 X 21.59 inches (800 X 80 X 548.5 mm) 31.... from the illustration depending on the manufacturer. Fix the Kensington lock to 95%, non-condensing LN-S4051D/LN-S4052D Yes The locking device has to be different depending on the LCD TV (Figure 1), and turn it in the locking direction (Figure 2). 2. Insert the locking device into the Kensington slot...
... 10% to 80%, non-condensing -4 °F to 113 °F (-20 °C to 45 °C) 5% to 95%, non-condensing Stand Swivel (Left / Right) LN-S2651D/LN-S2652D LN-S3251D/LN-S3252D 32 inch AC110V-120V 60Hz 165 W 1360 x 768 @ 60 Hz 10W X 2 31.50 X 3.15 X 21.59 inches (800 X 80 X 548.5 mm) 31.... from the illustration depending on the manufacturer. Fix the Kensington lock to 95%, non-condensing LN-S4051D/LN-S4052D Yes The locking device has to be different depending on the LCD TV (Figure 1), and turn it in the locking direction (Figure 2). 2. Insert the locking device into the Kensington slot...


