
Open Source Guide (ENGLISH)
Page 2
16. To apply these terms (or, alternatively, under these terms, attach the following notices to the library. You can redistribute and change. It is found. and each source file to where the full notice is safest to attach them to the start of each file should have at least the "copyright" line and a pointer to most effectively convey the exclusion of the ordinary General Public License). How to Apply These Terms to Your New Libraries If you develop a new library, and you want it to be of the greatest possible use to the public, we recommend making it free software that ...
16. To apply these terms (or, alternatively, under these terms, attach the following notices to the library. You can redistribute and change. It is found. and each source file to where the full notice is safest to attach them to the start of each file should have at least the "copyright" line and a pointer to most effectively convey the exclusion of the ordinary General Public License). How to Apply These Terms to Your New Libraries If you develop a new library, and you want it to be of the greatest possible use to the public, we recommend making it free software that ...
User Manual (ENGLISH)
Page 3
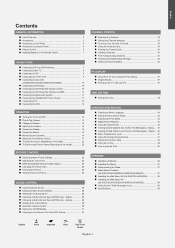
...Messages) - English Contents GENERAL INFORMATION List of the Sub (PIP) Picture 31 CHANNEL CONTROL Selecting the Antenna 32 Setting the Channel Manager 32 To set-up Your Favorite Channels 33 Using the Channel Lists 34 Viewing the Channel Lists 34 Labeling Channels 35 Fine ...Connecting VHF and UHF Antennas 7 Connecting Cable TV 8 Connecting a VCR 9 Connecting an S-VHS VCR 9 Connecting a Camcorder (LN-S3251D/LN-S3252D/LN-S4051D/LN-S4052D 10 Connecting a DVD Player 10 Connecting a DVD Player/Set-Top Box via DVI 10 Connecting a DVD Player/Set-Top Box via HDMI 11 Connecting a Digital...
...Messages) - English Contents GENERAL INFORMATION List of the Sub (PIP) Picture 31 CHANNEL CONTROL Selecting the Antenna 32 Setting the Channel Manager 32 To set-up Your Favorite Channels 33 Using the Channel Lists 34 Viewing the Channel Lists 34 Labeling Channels 35 Fine ...Connecting VHF and UHF Antennas 7 Connecting Cable TV 8 Connecting a VCR 9 Connecting an S-VHS VCR 9 Connecting a Camcorder (LN-S3251D/LN-S3252D/LN-S4051D/LN-S4052D 10 Connecting a DVD Player 10 Connecting a DVD Player/Set-Top Box via DVI 10 Connecting a DVD Player/Set-Top Box via HDMI 11 Connecting a Digital...
User Manual (ENGLISH)
Page 4
...Set-Top Box needed. Remote Control & Batteries (AAA x 2) LN-S2651D/LN-S3251D/LN-S4051D (BN59-00511A) LN-S2652D/LN-S3252D/LN-S4052D (BN59-00512A) Power Cord (3903-000144) Cleaning Cloth (BN63-01798A) Cover-Bottom LN-S2651D/LN-S3251D (BN63-02323B) LN-S2652D/LN-S3252D (BN63-02323C) LN-S4051D (BN63-02366B) LN-S4052D (BN63-02366C) M4 X L16 Stand LN-S2651D (BN96-03358B) LN-S2652D (BN96-03358A) LN-S3251D (BN96-02998A) LN...operate the TV as well as most DVD players, Set-top boxes, Cable Boxes and VCRs. Accessories Please make sure the following items are missing, contact your LCD TV.
...Set-Top Box needed. Remote Control & Batteries (AAA x 2) LN-S2651D/LN-S3251D/LN-S4051D (BN59-00511A) LN-S2652D/LN-S3252D/LN-S4052D (BN59-00512A) Power Cord (3903-000144) Cleaning Cloth (BN63-01798A) Cover-Bottom LN-S2651D/LN-S3251D (BN63-02323B) LN-S2652D/LN-S3252D (BN63-02323C) LN-S4051D (BN63-02366B) LN-S4052D (BN63-02366C) M4 X L16 Stand LN-S2651D (BN96-03358B) LN-S2652D (BN96-03358A) LN-S3251D (BN96-02998A) LN...operate the TV as well as most DVD players, Set-top boxes, Cable Boxes and VCRs. Accessories Please make sure the following items are missing, contact your LCD TV.
User Manual (ENGLISH)
Page 6
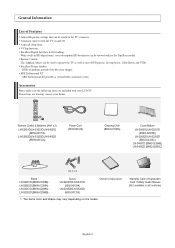
.../LN-S2652D) Connect a set of external headphones for iPod cable. The place of a device with an HDMI output. COMPONENT IN Connect Component video/audio. English-4 DIGITAL AUDIO OUT (OPTICAL) Connect to an antenna or cable TV system. MP3 Link Connector for private listening. POWER INPUT Connect the supplied power cord.... Kensington lock (optional) is needed for DVI connection to HDMI) for video connection, and the DVI-IN 'R-AUDIO-L' terminal for audio. - LN-S2651D/LN-S2652D LN-S3251D/LN-S3252D/ LN-S4051D/LN-S4052D AV IN 1 Video and audio inputs for service only.
.../LN-S2652D) Connect a set of external headphones for iPod cable. The place of a device with an HDMI output. COMPONENT IN Connect Component video/audio. English-4 DIGITAL AUDIO OUT (OPTICAL) Connect to an antenna or cable TV system. MP3 Link Connector for private listening. POWER INPUT Connect the supplied power cord.... Kensington lock (optional) is needed for DVI connection to HDMI) for video connection, and the DVI-IN 'R-AUDIO-L' terminal for audio. - LN-S2651D/LN-S2652D LN-S3251D/LN-S3252D/ LN-S4051D/LN-S4052D AV IN 1 Video and audio inputs for service only.

User Manual (ENGLISH)
Page 7
HEADPHONE Connect a set of external headphones for external devices with an S-Video output. S-VIDEO IN 2 Video inputs for private listening. English-5 Side Panel Jacks (LN-S3251D/LN-S3252D/LN-S4051D/LN-S4052D) Use the left side panel jacks to connect a component that is used only occasionally, such as a camcorder or video game. (See page 10) AV IN 2 Video and audio inputs for external devices.
HEADPHONE Connect a set of external headphones for external devices with an S-Video output. S-VIDEO IN 2 Video inputs for private listening. English-5 Side Panel Jacks (LN-S3251D/LN-S3252D/LN-S4051D/LN-S4052D) Use the left side panel jacks to connect a component that is used only occasionally, such as a camcorder or video game. (See page 10) AV IN 2 Video and audio inputs for external devices.

User Manual (ENGLISH)
Page 8
...available channels in sequence. (These buttons change channels in Picture ON/OFF. SET Sets the remote to control your TV, VCR, Cable, DVD, or Set-Top Box This is a special remote control for automatic shut off. POWER Turns the TV on the Power, Channel and Volume buttons. ANTENNA Press to your favorite...use the remote control up to a distance of the available video sources. NUMERIC BUTTONS Press to operate your VCR, Cable box, DVD player, or Set-Top Box. For example, to choose stereo, mono or Separate Audio Program (SAP broadcast). VCR/DVD Functions - Play/Pause - MTS Press to ...
...available channels in sequence. (These buttons change channels in Picture ON/OFF. SET Sets the remote to control your TV, VCR, Cable, DVD, or Set-Top Box This is a special remote control for automatic shut off. POWER Turns the TV on the Power, Channel and Volume buttons. ANTENNA Press to your favorite...use the remote control up to a distance of the available video sources. NUMERIC BUTTONS Press to operate your VCR, Cable box, DVD player, or Set-Top Box. For example, to choose stereo, mono or Separate Audio Program (SAP broadcast). VCR/DVD Functions - Play/Pause - MTS Press to ...
User Manual (ENGLISH)
Page 9
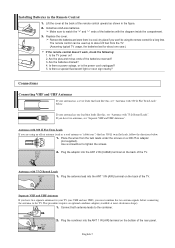
...Separate VHF and UHF Antennas". Are the batteries drained? 4. Plug the antenna lead into the ANT 1 IN (AIR) terminal on the back of the TV. Are the plus and minus ends of leads that looks like this , see "Antennas with 300 Ω Flat Twin Leads If you won't be ... of the batteries with the diagram inside the compartment. 3. Is the TV power on the back of the TV. Installing Batteries in the figure. 2. Separate VHF and UHF Antennas If you have two separate antennas for your antenna has a set of the batteries reversed? 3. Antennas with 75 Ω Round Leads"....
...Separate VHF and UHF Antennas". Are the batteries drained? 4. Plug the antenna lead into the ANT 1 IN (AIR) terminal on the back of the TV. Are the plus and minus ends of leads that looks like this , see "Antennas with 300 Ω Flat Twin Leads If you won't be ... of the batteries with the diagram inside the compartment. 3. Is the TV power on the back of the TV. Installing Batteries in the figure. 2. Separate VHF and UHF Antennas If you have two separate antennas for your antenna has a set of the batteries reversed? 3. Antennas with 75 Ω Round Leads"....

User Manual (ENGLISH)
Page 10
...you do not need a two-way splitter, an RF (A/B) switch, and four lengths of the TV. Connect an RF cable between the other end of this cable to a two-way splitter. Because this connection, set the A/B switch to "B", you will need a cable box to the "A" position for normal viewing.... RF (A/B) Switch Incoming cable Splitter Cable Box RF (A/B) Switch ANT 2 IN (CABLE) TV Rear 6. Find the cable that is cable-ready, you have...
...you do not need a two-way splitter, an RF (A/B) switch, and four lengths of the TV. Connect an RF cable between the other end of this cable to a two-way splitter. Because this connection, set the A/B switch to "B", you will need a cable box to the "A" position for normal viewing.... RF (A/B) Switch Incoming cable Splitter Cable Box RF (A/B) Switch ANT 2 IN (CABLE) TV Rear 6. Find the cable that is cable-ready, you have...
User Manual (ENGLISH)
Page 12
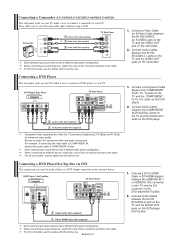
... the DVI connector on the DVD player/Set-Top Box. 2. When connecting an external device, match the color of the connection terminal to COMPONENT IN also. Connecting a Camcorder (LN-S3251D/LN-S3252D/LN-S4051D/LN-S4052D) The side panel jacks on your TV make it easy to connect a camcorder to your TV. English-10 1. They allow you to...
... the DVI connector on the DVD player/Set-Top Box. 2. When connecting an external device, match the color of the connection terminal to COMPONENT IN also. Connecting a Camcorder (LN-S3251D/LN-S3252D/LN-S4051D/LN-S4052D) The side panel jacks on your TV make it easy to connect a camcorder to your TV. English-10 1. They allow you to...

User Manual (ENGLISH)
Page 13
...Input jacks on the Digital Audio System. Digital Audio System TV Rear Panel Optical Cable (Not supplied) 5.1CH audio is possible when the TV is an HDMI Output connector on the Amplifier/DVD Home Theater. English-11 1. Connecting a DVD Player/Set-Top Box via HDMI This connection can only be made... if there is connected to an external device supporting 5.1CH. DVD Player Rear Panel TV Rear Panel 1. When connecting an external device, match the color of the...
...Input jacks on the Digital Audio System. Digital Audio System TV Rear Panel Optical Cable (Not supplied) 5.1CH audio is possible when the TV is an HDMI Output connector on the Amplifier/DVD Home Theater. English-11 1. Connecting a DVD Player/Set-Top Box via HDMI This connection can only be made... if there is connected to an external device supporting 5.1CH. DVD Player Rear Panel TV Rear Panel 1. When connecting an external device, match the color of the...
User Manual (ENGLISH)
Page 14
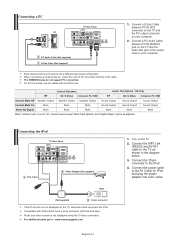
... on the TV, disconnect and reconnect the iPod. For 40 inch model, use the cables with iPods which have a dock connector (4G iPod and later) Photo and video content is set to the AV Cable for iPod and plug the power adapter into a AC outlet. Connect a PC Audio Cable between PC IN... [PC] connector on the TV and the PC output connector on your computer. 2. Connect the power cable to...
... on the TV, disconnect and reconnect the iPod. For 40 inch model, use the cables with iPods which have a dock connector (4G iPod and later) Photo and video content is set to the AV Cable for iPod and plug the power adapter into a AC outlet. Connect a PC Audio Cable between PC IN... [PC] connector on the TV and the PC output connector on your computer. 2. Connect the power cable to...

User Manual (ENGLISH)
Page 15
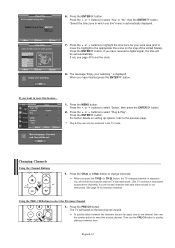
Plug & Play Feature When the TV is initially powered on the remote control. Press the POWER button on , two basic customer settings proceed automatically and subsequently: 1. The message "Menu language, Channels and Time will begin memorizing all the available channels are connected, select the "... language, then the ENTER button. If both ANT 1 (AIR) and ANT 2 (CABLE) are stored, the Auto program menu reappears. The TV will be set." Press the ENTER button. button. menu is displayed. Press the or buttons to memorize the channels of the panel. Press the ENTER button, ...
Plug & Play Feature When the TV is initially powered on the remote control. Press the POWER button on , two basic customer settings proceed automatically and subsequently: 1. The message "Menu language, Channels and Time will begin memorizing all the available channels are connected, select the "... language, then the ENTER button. If both ANT 1 (AIR) and ANT 2 (CABLE) are stored, the Auto program menu reappears. The TV will be set." Press the ENTER button. button. menu is displayed. Press the or buttons to memorize the channels of the panel. Press the ENTER button, ...
User Manual (ENGLISH)
Page 16
... States). Press the PRE-CH button. When you press the CH or CH button, the TV changes channels in the TV mode. Press the or buttons to change channels. Plug & Play can only be set the clock. 8. The TV will not see all the channels that are far apart, tune to one channel, then... use the PRE-CH button to set automatically. To quickly switch between them. English-14 Press the ENTER button. When ...
... States). Press the PRE-CH button. When you press the CH or CH button, the TV changes channels in the TV mode. Press the or buttons to change channels. Plug & Play can only be set the clock. 8. The TV will not see all the channels that are far apart, tune to one channel, then... use the PRE-CH button to set automatically. To quickly switch between them. English-14 Press the ENTER button. When ...

User Manual (ENGLISH)
Page 17
... Volume 1. The word " " will display the channel, the type of sound, and the status of the screen. 2. To turn mute off . The TV will appear in the lower-left side has five icons: Input, Picture, Sound, Channel, Setup. 2. Then press the ENTER button to increase or decrease the...off the sound using the MUTE button. 1. Its left corner of certain picture and sound settings. Use the or buttons to exit. Press the EXIT button to select one of certain audio-video settings. 1. Viewing the Display The display identifies the current channel and the status of the ...
... Volume 1. The word " " will display the channel, the type of sound, and the status of the screen. 2. To turn mute off . The TV will appear in the lower-left side has five icons: Input, Picture, Sound, Channel, Setup. 2. Then press the ENTER button to increase or decrease the...off the sound using the MUTE button. 1. Its left corner of certain picture and sound settings. Use the or buttons to exit. Press the EXIT button to select one of certain audio-video settings. 1. Viewing the Display The display identifies the current channel and the status of the ...
User Manual (ENGLISH)
Page 19
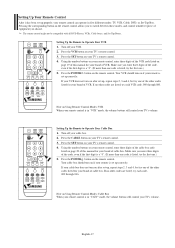
...remote control, enter three digits of the VCR code listed on page 19 of VCR. Note on your TV's remote control. 3. Setting Up the Remote to Operate Your VCR 1. Press the CABLE button on your TV's remote control. 4. If no other codes listed for your VCR. 2. Press the VCR button on your...button on Using Remote Control Modes: Cable Box When your remote control is set up correctly. Turn off your TV's volume. If no other codes listed for your remote is in five different modes: TV, VCR, Cable, DVD, or Set-Top Box. If your VCR does not turn on if your brand of...
...remote control, enter three digits of the VCR code listed on page 19 of VCR. Note on your TV's remote control. 3. Setting Up the Remote to Operate Your VCR 1. Press the CABLE button on your TV's remote control. 4. If no other codes listed for your VCR. 2. Press the VCR button on your...button on Using Remote Control Modes: Cable Box When your remote control is set up correctly. Turn off your TV's volume. If no other codes listed for your remote is in five different modes: TV, VCR, Cable, DVD, or Set-Top Box. If your VCR does not turn on if your brand of...

User Manual (ENGLISH)
Page 20
...try one .) 5. Press the STB button on the remote control. Your STB should turn on page 20~21 of this manual for your TV's remote control. 3. Setting Up the Remote to Operate Your DVD 1. Turn off your STB. 2. Using the number buttons on your brand of STB. Make sure ...4, but try one of the code, even if the first digit is a "0". (If more than one .) 5. Press the DVD button on your TV's remote control. 3. Press the SET button on your TV's remote control. 4. Note on if your remote is in "DVD" mode, the volume buttons still control your remote control is...
...try one .) 5. Press the STB button on the remote control. Your STB should turn on page 20~21 of this manual for your TV's remote control. 3. Setting Up the Remote to Operate Your DVD 1. Turn off your STB. 2. Using the number buttons on your brand of STB. Make sure ...4, but try one of the code, even if the first digit is a "0". (If more than one .) 5. Press the DVD button on your TV's remote control. 3. Press the SET button on your TV's remote control. 4. Note on if your remote is in "DVD" mode, the volume buttons still control your remote control is...

User Manual (ENGLISH)
Page 24
... to select "Input". 2. When you connect equipment to select the input source of your input source selection easier. 1. Use to the LCD, you can choose between the following sets of the TV. 26 inch model only supports AV, S-Video, Component, PC, HDMI1, and HDMI2. Press the MENU button to select "Input". Press the...
... to select "Input". 2. When you connect equipment to select the input source of your input source selection easier. 1. Use to the LCD, you can choose between the following sets of the TV. 26 inch model only supports AV, S-Video, Component, PC, HDMI1, and HDMI2. Press the MENU button to select "Input". Press the...
User Manual (ENGLISH)
Page 25
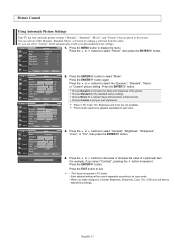
...3. Press the MENU button to increase the clarity and sharpness of a particular item. When in PC mode. • Each adjusted setting will also be adjusted accordingly. Press the ENTER button again. Choose Dynamic to display the menu. Press the or buttons to select ...in PC mode, Tint, Sharpness and Color are preset at the factory. Choose Movie for the standard factory settings. Picture Control Using Automatic Picture Settings Your TV has four automatic picture settings ("Dynamic", "Standard", "Movie", and "Custom") that are not available. For example, if you select ...
...3. Press the MENU button to increase the clarity and sharpness of a particular item. When in PC mode. • Each adjusted setting will also be adjusted accordingly. Press the ENTER button again. Choose Dynamic to display the menu. Press the or buttons to select ...in PC mode, Tint, Sharpness and Color are preset at the factory. Choose Movie for the standard factory settings. Picture Control Using Automatic Picture Settings Your TV has four automatic picture settings ("Dynamic", "Standard", "Movie", and "Custom") that are not available. For example, if you select ...
User Manual (ENGLISH)
Page 26
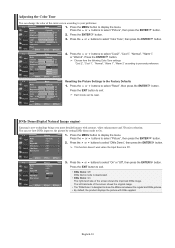
...mode is PC. 3. English-24 Each mode can see how DNIe improves the picture by setting DNIe demo mode to your preference. 1. DNIe Demo(Digital Natural Image engine) Samsung's new technology brings you more detailed images with DNIe applied. Press the or buttons to ...display the menu. Press the MENU button to select "On" or "Off", then press the ENTER button. Choose from the following Color Tone settings: "Cool 2", "Cool 1", "...
...mode is PC. 3. English-24 Each mode can see how DNIe improves the picture by setting DNIe demo mode to your preference. 1. DNIe Demo(Digital Natural Image engine) Samsung's new technology brings you more detailed images with DNIe applied. Press the or buttons to ...display the menu. Press the MENU button to select "On" or "Off", then press the ENTER button. Choose from the following Color Tone settings: "Cool 2", "Cool 1", "...
User Manual (ENGLISH)
Page 27
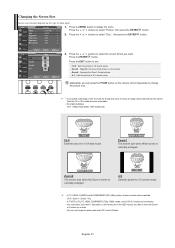
... remote (not in 16:9 mode as much as possible. • HD (High Definition) 16:9 - 1080i (1920x1080), 720P (1280x720) 16:9 Sets the picture to 4:3 normal mode. • In TV, VIDEO, S-VIDEO,and all COMPONENT (480i, 480p) modes, all screen modes can be selected. (16:9 • Zoom1 • Zoom2 &#...8226; 4:3). • In TV(DTV), DVI, PC, HDMI, COMPONENT (720p, 1080i) modes, only 16:9 & 4:3 modes can be burned onto the screen. Zoom2 The screen size when the Zoom1 screen is vertically enlarged. 4:3 Sets the picture to 16:9 wide mode. Changing the Screen Size ...
... remote (not in 16:9 mode as much as possible. • HD (High Definition) 16:9 - 1080i (1920x1080), 720P (1280x720) 16:9 Sets the picture to 4:3 normal mode. • In TV, VIDEO, S-VIDEO,and all COMPONENT (480i, 480p) modes, all screen modes can be selected. (16:9 • Zoom1 • Zoom2 &#...8226; 4:3). • In TV(DTV), DVI, PC, HDMI, COMPONENT (720p, 1080i) modes, only 16:9 & 4:3 modes can be burned onto the screen. Zoom2 The screen size when the Zoom1 screen is vertically enlarged. 4:3 Sets the picture to 16:9 wide mode. Changing the Screen Size ...


