User Manual (ENGLISH)
Page 3
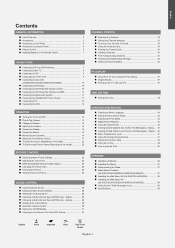
English Contents GENERAL INFORMATION List of the Sub (PIP) Picture 31 CHANNEL CONTROL Selecting the Antenna 32 Setting the Channel Manager 32 To set-up Your Favorite Channels 33 Using the Channel Lists 34 Viewing the Channel Lists 34 Labeling Channels... Remote Control 7 CONNECTIONS Connecting VHF and UHF Antennas 7 Connecting Cable TV 8 Connecting a VCR 9 Connecting an S-VHS VCR 9 Connecting a Camcorder (LN-S3251D/LN-S3252D/LN-S4051D/LN-S4052D 10 Connecting a DVD Player 10 Connecting a DVD Player/Set-Top Box via DVI 10 Connecting a DVD Player/Set-Top Box via HDMI 11 Connecting ...
English Contents GENERAL INFORMATION List of the Sub (PIP) Picture 31 CHANNEL CONTROL Selecting the Antenna 32 Setting the Channel Manager 32 To set-up Your Favorite Channels 33 Using the Channel Lists 34 Viewing the Channel Lists 34 Labeling Channels... Remote Control 7 CONNECTIONS Connecting VHF and UHF Antennas 7 Connecting Cable TV 8 Connecting a VCR 9 Connecting an S-VHS VCR 9 Connecting a Camcorder (LN-S3251D/LN-S3252D/LN-S4051D/LN-S4052D 10 Connecting a DVD Player 10 Connecting a DVD Player/Set-Top Box via DVI 10 Connecting a DVD Player/Set-Top Box via HDMI 11 Connecting ...
User Manual (ENGLISH)
Page 6
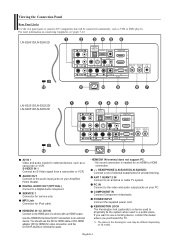
... or VCR. AUDIO OUT Connect to an antenna or cable TV system. HDMI/DVI IN terminal does not support PC. - KENSINGTON LOCK The Kensington lock (optional) is needed for DVI connection to use the DVI to HDMI cable or DVI-HDMI adapter (DVI to the HDMI jack of external headphones for service only....Link Connector for external devices, such as VCR or DVD players. LN-S2651D/LN-S2652D LN-S3251D/LN-S3252D/ LN-S4051D/LN-S4052D AV IN 1 Video and audio inputs for iPod cable. If you want to an external device. Use the HDMI/DVI terminal for an HDMI to the video and audio output jacks on...
... or VCR. AUDIO OUT Connect to an antenna or cable TV system. HDMI/DVI IN terminal does not support PC. - KENSINGTON LOCK The Kensington lock (optional) is needed for DVI connection to use the DVI to HDMI cable or DVI-HDMI adapter (DVI to the HDMI jack of external headphones for service only....Link Connector for external devices, such as VCR or DVD players. LN-S2651D/LN-S2652D LN-S3251D/LN-S3252D/ LN-S4051D/LN-S4052D AV IN 1 Video and audio inputs for iPod cable. If you want to an external device. Use the HDMI/DVI terminal for an HDMI to the video and audio output jacks on...
User Manual (ENGLISH)
Page 12
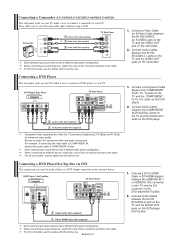
... (or S-Video Cable )between the HDMI/DVI IN 1 or HDMI/DVI IN 2 connector on the TV and the DVI connector on the camcorder. 2. Connect a Component Cable between the AV IN2 [R-AUDIO-L] jacks on the TV and the AUDIO OUT jacks on the DVD player. 2. Connecting a Camcorder (LN-S3251D/LN-S3252D/LN-S4051D/LN-S4052D) The side panel jacks on your...
... (or S-Video Cable )between the HDMI/DVI IN 1 or HDMI/DVI IN 2 connector on the TV and the DVI connector on the camcorder. 2. Connect a Component Cable between the AV IN2 [R-AUDIO-L] jacks on the TV and the AUDIO OUT jacks on the DVD player. 2. Connecting a Camcorder (LN-S3251D/LN-S3252D/LN-S4051D/LN-S4052D) The side panel jacks on your...

User Manual (ENGLISH)
Page 13
...an Amplifier/DVD Home Theater Amplifier/DVD Home Theater TV Rear Panel Audio Cable (Not supplied) Each external input source device has a different back panel configuration. Connect Audio Cables between the HDMI/DVI 1 or HDMI/DVI 2 connector on the TV and the HDMI connector on the external device.... the ferrite core. 1. Connect an Optical Cable between HDMI and DVI is that enables the transmission of digital audio and video signals using a single cable without compression. • "Multimedia interface" is connected to your TV. When an audio amplifier is a more accurate name for it...
...an Amplifier/DVD Home Theater Amplifier/DVD Home Theater TV Rear Panel Audio Cable (Not supplied) Each external input source device has a different back panel configuration. Connect Audio Cables between the HDMI/DVI 1 or HDMI/DVI 2 connector on the TV and the HDMI connector on the external device.... the ferrite core. 1. Connect an Optical Cable between HDMI and DVI is that enables the transmission of digital audio and video signals using a single cable without compression. • "Multimedia interface" is connected to your TV. When an audio amplifier is a more accurate name for it...
User Manual (ENGLISH)
Page 14
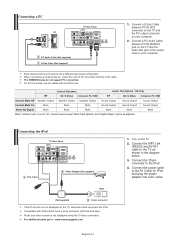
...3 Power Adaptor (Not supplied) iPod (Not supplied) 2 30-pin connector If the iPod menu is not displayed on your computer. 2. Connecting a PC PC TV Rear Panel 2 PC Audio Cable (Not supplied) 1 D-Sub Cable (Not supplied) 1. Each external input source device has a different back panel configuration. For ...plug the power adapter into a AC outlet. Compatible with the ferrite core. The HDMI/DVI jacks do not support PC connection. Connect a D-Sub Cable between PC IN [AUDIO] jack on the TV and the Audio Out jack of the connection terminal to "On", Sound menus except "Multi...
...3 Power Adaptor (Not supplied) iPod (Not supplied) 2 30-pin connector If the iPod menu is not displayed on your computer. 2. Connecting a PC PC TV Rear Panel 2 PC Audio Cable (Not supplied) 1 D-Sub Cable (Not supplied) 1. Each external input source device has a different back panel configuration. For ...plug the power adapter into a AC outlet. Compatible with the ferrite core. The HDMI/DVI jacks do not support PC connection. Connect a D-Sub Cable between PC IN [AUDIO] jack on the TV and the Audio Out jack of the connection terminal to "On", Sound menus except "Multi...
User Manual (ENGLISH)
Page 27
Press the or buttons to 16:9 wide mode. View the TV in the OSD menu) if you want to move the Zoom 1 or 2 picture up or down... screen. Press the MENU button to change the picture size when PIP is set to 4:3 normal mode. • In TV, VIDEO, S-VIDEO,and all COMPONENT (480i, 480p) modes, all screen modes can be selected. (16:9 • Zoom1 • Zoom2... • 4:3). • In TV(DTV), DVI, PC, HDMI, COMPONENT (720p, 1080i) modes, only 16:9 & 4:3 modes can press the P.SIZE button on the type of the...
Press the or buttons to 16:9 wide mode. View the TV in the OSD menu) if you want to move the Zoom 1 or 2 picture up or down... screen. Press the MENU button to change the picture size when PIP is set to 4:3 normal mode. • In TV, VIDEO, S-VIDEO,and all COMPONENT (480i, 480p) modes, all screen modes can be selected. (16:9 • Zoom1 • Zoom2... • 4:3). • In TV(DTV), DVI, PC, HDMI, COMPONENT (720p, 1080i) modes, only 16:9 & 4:3 modes can press the P.SIZE button on the type of the...

User Manual (ENGLISH)
Page 40
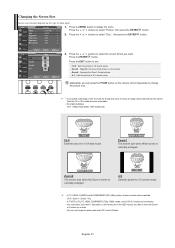
... your PC How to Auto Adjust Use the Auto Adjust function to the PC mode first. 2. This function does not work in DVI-Digital mode. 1. After the noise has been reduced, re-adjust the picture so that it is aligned on the center of the picture quality adjustment ...is not removed by fine tuning alone, then do the frequency adjustments to remove or reduce picture noise. Change to have the TV set automatically adjust the video signals the monitor receives. Press the or buttons to select "PC", then press the ENTER button. Adjusting the Screen Quality...
... your PC How to Auto Adjust Use the Auto Adjust function to the PC mode first. 2. This function does not work in DVI-Digital mode. 1. After the noise has been reduced, re-adjust the picture so that it is aligned on the center of the picture quality adjustment ...is not removed by fine tuning alone, then do the frequency adjustments to remove or reduce picture noise. Change to have the TV set automatically adjust the video signals the monitor receives. Press the or buttons to select "PC", then press the ENTER button. Adjusting the Screen Quality...
