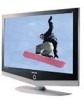

User Manual (ENGLISH)
Page 4
...300-ohm Flat Twin Leads 7 Antennas with 75-ohm Round Leads 8 Separate VHF and UHF Antennas 8 Connecting Cable TV 9 Cable without a Cable Box 9 Connecting to a Cable Box that Descrambles All Channels . . . . . 9 Connecting to a Cable Box that Descrambles Some Channels . . . 9 Connecting a VCR 11 Connecting an S-VHS VCR 13 Connecting...Picture Control Using Automatic Picture Settings 29 Customizing the Picture 30 Adjusting the Color Tone 31 Changing the Screen Size 32 Zoom 33 Freezing the Picture 34 Digital Noise Reduction 34 DNIe (Digital Natural Image engine 35 My Color Control 36...
...300-ohm Flat Twin Leads 7 Antennas with 75-ohm Round Leads 8 Separate VHF and UHF Antennas 8 Connecting Cable TV 9 Cable without a Cable Box 9 Connecting to a Cable Box that Descrambles All Channels . . . . . 9 Connecting to a Cable Box that Descrambles Some Channels . . . 9 Connecting a VCR 11 Connecting an S-VHS VCR 13 Connecting...Picture Control Using Automatic Picture Settings 29 Customizing the Picture 30 Adjusting the Color Tone 31 Changing the Screen Size 32 Zoom 33 Freezing the Picture 34 Digital Noise Reduction 34 DNIe (Digital Natural Image engine 35 My Color Control 36...
User Manual (ENGLISH)
Page 6
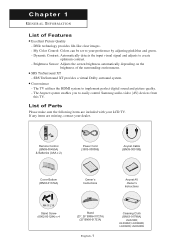
... (23", 26" BN96-01727A) (32" BN96-01733A) English-1 Cleaning Cloth (BN63-01798A) LN-R238W, LN-R268W, LN-R2668W, LN-R328W, LN-R3228W SRS TruSurround XT provides a virtual Dolby surround system. The Anynet system enables you to your LCD TV. My Color Control: Colors can be set to easily control Samsung audio-video (AV) devices from this TV. List of Parts Please...
... (23", 26" BN96-01727A) (32" BN96-01733A) English-1 Cleaning Cloth (BN63-01798A) LN-R238W, LN-R268W, LN-R2668W, LN-R328W, LN-R3228W SRS TruSurround XT provides a virtual Dolby surround system. The Anynet system enables you to your LCD TV. My Color Control: Colors can be set to easily control Samsung audio-video (AV) devices from this TV. List of Parts Please...
User Manual (ENGLISH)
Page 8
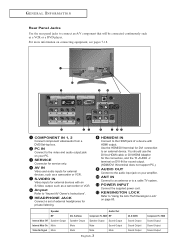
... Sound Output Mute Mute English-3 AV, S-VIDEO Sound Output Sound Output Sound Output Component, PC, HDMI Sound Output Sound Output Sound Output Anynet Refer to a cable TV system. PC IN Connect to the audio input jack on connecting equipment, see pages 7-18. You should use the DVI-to-HDMI... cable or DVI-HDMI Adapter for the connection, and the 'R -AUDIO -L' terminal on DVI-IN for service only. POWER INPUT Connect the supplied power cord. For ...
... Sound Output Mute Mute English-3 AV, S-VIDEO Sound Output Sound Output Sound Output Component, PC, HDMI Sound Output Sound Output Sound Output Anynet Refer to a cable TV system. PC IN Connect to the audio input jack on connecting equipment, see pages 7-18. You should use the DVI-to-HDMI... cable or DVI-HDMI Adapter for the connection, and the 'R -AUDIO -L' terminal on DVI-IN for service only. POWER INPUT Connect the supplied power cord. For ...
User Manual (ENGLISH)
Page 10
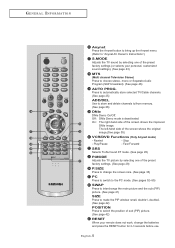
Press to automatically store selected TV/Cable channels. (See page 25) ADD/DEL Use to...mode is deactivated. Stop - Fast Forward SRS Selects TruSurround XT mode. (See page 45) P.MODE Adjusts the TV picture by selecting one of the preset factory settings. (See page 29) P.SIZE Press to change the batteries ...AT I O N Anynet Press the Anynet button to bring up the Anynet menu. (Refer to "Anynet AV Owner's Instructions".) S.MODE Adjusts the TV sound by selecting one of the screen shows the original image.(See page 35) VCR/DVD Functions (Only Anynet mode) - The left-hand side of...
Press to automatically store selected TV/Cable channels. (See page 25) ADD/DEL Use to...mode is deactivated. Stop - Fast Forward SRS Selects TruSurround XT mode. (See page 45) P.MODE Adjusts the TV picture by selecting one of the preset factory settings. (See page 29) P.SIZE Press to change the batteries ...AT I O N Anynet Press the Anynet button to bring up the Anynet menu. (Refer to "Anynet AV Owner's Instructions".) S.MODE Adjusts the TV sound by selecting one of the screen shows the original image.(See page 35) VCR/DVD Functions (Only Anynet mode) - The left-hand side of...
User Manual (ENGLISH)
Page 14
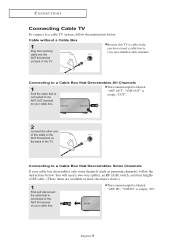
...". 2 Connect the other end of this TV is connected to view unscrambled cable channels. Connecting to a cable TV system, follow the instructions below . Cable without a Cable Box 1 Plug the incoming cable into the ANT IN terminal on your cable box. Because this cable to the ANT IN terminal on your cable box. Connecting to a Cable Box that Descrambles All Channels 1 Find...
...". 2 Connect the other end of this TV is connected to view unscrambled cable channels. Connecting to a cable TV system, follow the instructions below . Cable without a Cable Box 1 Plug the incoming cable into the ANT IN terminal on your cable box. Because this cable to the ANT IN terminal on your cable box. Connecting to a Cable Box that Descrambles All Channels 1 Find...
User Manual (ENGLISH)
Page 15
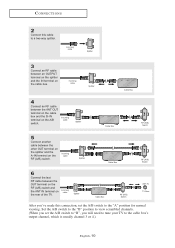
... on the splitter and the A-IN terminal on the rear of the TV. Incoming cable Splitter 3 Connect an RF cable between the ANT OUT terminal on the cable box and the B-IN terminal on the cable box. Incoming cable Splitter Cable Box 4 Connect an RF cable between an OUTPUT terminal on the splitter and the IN terminal on...
... on the splitter and the A-IN terminal on the rear of the TV. Incoming cable Splitter 3 Connect an RF cable between the ANT OUT terminal on the cable box and the B-IN terminal on the cable box. Incoming cable Splitter Cable Box 4 Connect an RF cable between an OUTPUT terminal on the splitter and the IN terminal on...

User Manual (ENGLISH)
Page 16
Skip step 1 if you have not yet connected to an antenna or a cable system. 1 Unplug the cable or antenna from the back of the TV. 2 Connect the cable or antenna to the instructions on pages 7-10). Incoming Cable or Antenna VCR Rear Panel 3 Connect an RF cable between the ANT OUT terminal on the VCR and the ANT IN terminal on the TV. CONNECTIONS Connecting a VCR These instructions assume that you have already connected your TV to an antenna or a cable TV system (according to the ANT IN terminal on the back of the VCR. VCR Rear Panel TV Rear Panel RF Cable (Option) English-11
Skip step 1 if you have not yet connected to an antenna or a cable system. 1 Unplug the cable or antenna from the back of the TV. 2 Connect the cable or antenna to the instructions on pages 7-10). Incoming Cable or Antenna VCR Rear Panel 3 Connect an RF cable between the ANT OUT terminal on the VCR and the ANT IN terminal on the TV. CONNECTIONS Connecting a VCR These instructions assume that you have already connected your TV to an antenna or a cable TV system (according to the ANT IN terminal on the back of the VCR. VCR Rear Panel TV Rear Panel RF Cable (Option) English-11

User Manual (ENGLISH)
Page 17
...) to hook up to view your VCR tape. * Each external input source device has a different back panel configuration. VCR Rear Panel TV Rear Panel Audio Cable (Option) Video Cable (Option) RF Cable (Option) Follow the instructions in "Viewing a VCR or Camcorder Tape" to the left and right audio input jacks of the... TV. 5 Connect a video cable between the AUDIO OUT jacks on the VCR and the AV IN [R-AUDIO-L] jacks on the TV. CONNECTIONS 4 Connect an audio cable between the VIDEO OUT jack on the VCR and the AV IN [VIDEO]...
...) to hook up to view your VCR tape. * Each external input source device has a different back panel configuration. VCR Rear Panel TV Rear Panel Audio Cable (Option) Video Cable (Option) RF Cable (Option) Follow the instructions in "Viewing a VCR or Camcorder Tape" to the left and right audio input jacks of the... TV. 5 Connect a video cable between the AUDIO OUT jacks on the VCR and the AV IN [R-AUDIO-L] jacks on the TV. CONNECTIONS 4 Connect an audio cable between the VIDEO OUT jack on the VCR and the AV IN [VIDEO]...

User Manual (ENGLISH)
Page 18
...and the AV IN [R-AUDIO-L] jacks on the TV. VCR Rear Panel TV Rear Panel RF Cable (Option) 2 Connect an audio cable between the S-VIDEO OUT jack on the VCR and the S-VIDEO IN jack on the TV. CONNECTIONS Connecting an S-VHS VCR Your Samsung TV can be connected to an S-Video signal from... an S-VHS VCR. (This connection delivers a better picture as compared to a standard VHS VCR.) 1 To begin, follow steps 1-3 in the previous section to connect the antenna or cable to your ...
...and the AV IN [R-AUDIO-L] jacks on the TV. VCR Rear Panel TV Rear Panel RF Cable (Option) 2 Connect an audio cable between the S-VIDEO OUT jack on the VCR and the S-VIDEO IN jack on the TV. CONNECTIONS Connecting an S-VHS VCR Your Samsung TV can be connected to an S-Video signal from... an S-VHS VCR. (This connection delivers a better picture as compared to a standard VHS VCR.) 1 To begin, follow steps 1-3 in the previous section to connect the antenna or cable to your ...

User Manual (ENGLISH)
Page 19
...'s manual. DVD Player Rear Panel Audio Cable (Option) Component Cable (Option) TV Rear Panel Note: For an explanation of Component video, see your TV. 1 Connect an audio cable between the COMPONENT IN 1 or COMPONENT IN 2 [PR, PB, Y] jacks on the TV and the COMPONENT [Y, PB, PR]... panel configuration. For example, if connecting the video cable to Component In 1, connect the audio cable to match the component video and audio connections. English-14 DVD Player Rear Panel TV Rear Panel Audio Cable (Option) 2 Connect a component cable between the COMPONENT IN 1 or COMPONENT IN 2 ...
...'s manual. DVD Player Rear Panel Audio Cable (Option) Component Cable (Option) TV Rear Panel Note: For an explanation of Component video, see your TV. 1 Connect an audio cable between the COMPONENT IN 1 or COMPONENT IN 2 [PR, PB, Y] jacks on the TV and the COMPONENT [Y, PB, PR]... panel configuration. For example, if connecting the video cable to Component In 1, connect the audio cable to match the component video and audio connections. English-14 DVD Player Rear Panel TV Rear Panel Audio Cable (Option) 2 Connect a component cable between the COMPONENT IN 1 or COMPONENT IN 2 ...

User Manual (ENGLISH)
Page 20
... back panel configuration. Amplifier/DVD Home Theater TV Rear Panel Audio Cable (Option) English-15 Set-Top Box Rear Panel TV Rear Panel Audio Cable (Option) 2 Connect a component cable between the COMPONENT IN 1 or COMPONENT IN 2 [R-AUDIO-L] jacks on the TV and the AUDIO OUT jacks on the Set...-top box. CONNECTIONS Connecting a Digital TV Set-top box The connections for ...
... back panel configuration. Amplifier/DVD Home Theater TV Rear Panel Audio Cable (Option) English-15 Set-Top Box Rear Panel TV Rear Panel Audio Cable (Option) 2 Connect a component cable between the COMPONENT IN 1 or COMPONENT IN 2 [R-AUDIO-L] jacks on the TV and the AUDIO OUT jacks on the Set...-top box. CONNECTIONS Connecting a Digital TV Set-top box The connections for ...

User Manual (ENGLISH)
Page 21
DVD Player Rear Panel TV Rear Panel DVI-to -HDMI Cable (Option) English-16 DVD Player Rear Panel TV Rear Panel Audio Cable (Option) DVI-to -HDMI Cable (Option) 2 Connect an audio cable between the HDMI/DVI connector on the TV and the DVI connector on the DVD player/Set-top box. CONNECTIONS Connecting a DVD/Set-top box via DVI This can be applied only if there is the DVI Output connector on the external device. 1 Connect a DVI-to-HDMI cable or DVI-HDMI adapter between the DVI IN [R-AUDIO-L] jack on the TV and the AUDIO OUT jacks on the DVD player/Set-top box.
DVD Player Rear Panel TV Rear Panel DVI-to -HDMI Cable (Option) English-16 DVD Player Rear Panel TV Rear Panel Audio Cable (Option) DVI-to -HDMI Cable (Option) 2 Connect an audio cable between the HDMI/DVI connector on the TV and the DVI connector on the DVD player/Set-top box. CONNECTIONS Connecting a DVD/Set-top box via DVI This can be applied only if there is the DVI Output connector on the external device. 1 Connect a DVI-to-HDMI cable or DVI-HDMI adapter between the DVI IN [R-AUDIO-L] jack on the TV and the AUDIO OUT jacks on the DVD player/Set-top box.

User Manual (ENGLISH)
Page 22
... is the HDMI Output connector on the external device. 1 Connect an HDMI cable between HDMI and DVI is that enables the transmission of digital audio (5.1 channels).The difference between the HDMI/DVI connector on the TV and the HDMI connector on the DVD player/Set-top box. English-17... is a next-generation interface that the HDMI device is a more accurate name for an HDMI to HDMI connection. DVD Player Rear Panel TV Rear Panel HDMI Cable (Option) Note: No sound connection is needed for it especially because it allows multiple channels of digital audio and video signals using a single...
... is the HDMI Output connector on the external device. 1 Connect an HDMI cable between HDMI and DVI is that enables the transmission of digital audio (5.1 channels).The difference between the HDMI/DVI connector on the TV and the HDMI connector on the DVD player/Set-top box. English-17... is a next-generation interface that the HDMI device is a more accurate name for an HDMI to HDMI connection. DVD Player Rear Panel TV Rear Panel HDMI Cable (Option) Note: No sound connection is needed for it especially because it allows multiple channels of digital audio and video signals using a single...

User Manual (ENGLISH)
Page 23
TV Rear Panel 2 Connect a PC audio cable between PC IN [PC] connector on the TV and the PC output connector on your computer. CONNECTIONS Connecting a PC 1 Connect a PC video cable(D-Sub) between PC IN [AUDIO] on the TV and the Audio Out of the sound card on your computer. PC Video Cable (Option) TV Rear Panel PC Audio Cable (Option) PC Video Cable (Option) English-18
TV Rear Panel 2 Connect a PC audio cable between PC IN [PC] connector on the TV and the PC output connector on your computer. CONNECTIONS Connecting a PC 1 Connect a PC video cable(D-Sub) between PC IN [AUDIO] on the TV and the Audio Out of the sound card on your computer. PC Video Cable (Option) TV Rear Panel PC Audio Cable (Option) PC Video Cable (Option) English-18
User Manual (ENGLISH)
Page 29
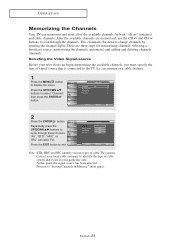
... button to change channels by entering the channel digits. Note: STD, HRC and IRC identify various types of cable TV systems. Contact your local cable company to identify the type of cable system that is connected to scan through these choices: "Air", "STD", "HRC", or "IRC" (all...the ENTER button. 2 Press the ENTER button. Selecting the Video Signal-source Before your television can memorize and store all cable TV). O P E R AT I O N Memorizing the Channels Your TV can begin memorizing the available channels, you must specify the type of signal source that exists in Memory" (next page...
... button to change channels by entering the channel digits. Note: STD, HRC and IRC identify various types of cable TV systems. Contact your local cable company to identify the type of cable system that is connected to scan through these choices: "Air", "STD", "HRC", or "IRC" (all...the ENTER button. 2 Press the ENTER button. Selecting the Video Signal-source Before your television can memorize and store all cable TV). O P E R AT I O N Memorizing the Channels Your TV can begin memorizing the available channels, you must specify the type of signal source that exists in Memory" (next page...
User Manual (ENGLISH)
Page 33
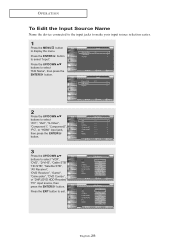
..." input jack, then press the ENTER button. 3 Press the UP/DOWN buttons to exit. English-28 Press the EXIT button to select "VCR", "DVD", "D-VHS", "Cable STB", "HD STB", "Satellite STB", "AV Receiver", "DVD Receiver", "Game", "Camcorder", "DVD Combo", or "DHR (DVD HDD Recoder)", "PC" input source, then press the ENTER...
..." input jack, then press the ENTER button. 3 Press the UP/DOWN buttons to exit. English-28 Press the EXIT button to select "VCR", "DVD", "D-VHS", "Cable STB", "HD STB", "Satellite STB", "AV Receiver", "DVD Receiver", "Game", "Camcorder", "DVD Combo", or "DHR (DVD HDD Recoder)", "PC" input source, then press the ENTER...
User Manual (ENGLISH)
Page 80
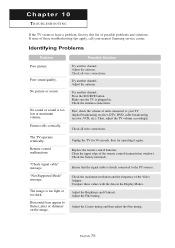
.... Press the SOURCE button. Compare these troubleshooting tips apply, call your TV (digital broadcasting receiver, DTV, DVD, cable broadcasting receiver, VCR, etc.). The TV operates erratically. Remote control malfunctions "Check signal cable" message. Possible Solution Try another channel. First, check the volume of...Fine tuning. No picture or sound. Horizontal bars appear to your nearest Samsung service center. Clean the upper edge of the Video Adapter. Chapter 10 TROUBLESHOOTING If the TV seems to the PC sources. Replace the remote control batteries. "Not ...
.... Press the SOURCE button. Compare these troubleshooting tips apply, call your TV (digital broadcasting receiver, DTV, DVD, cable broadcasting receiver, VCR, etc.). The TV operates erratically. Remote control malfunctions "Check signal cable" message. Possible Solution Try another channel. First, check the volume of...Fine tuning. No picture or sound. Horizontal bars appear to your nearest Samsung service center. Clean the upper edge of the Video Adapter. Chapter 10 TROUBLESHOOTING If the TV seems to the PC sources. Replace the remote control batteries. "Not ...

User Manual (ENGLISH)
Page 81
...When you have no impact on the image. The TFT LCD panel uses a panel consisting of sub pixels [3,147,264 (LN-R237W - 2,764,800)] which require sophisticated technology to...is not centered on the screen. The TV is black and power indicator light blinks steadily. However, there may appear. NOTE: Your TV supports multiscan display functions within the following ...frequency domain: Horizontal frequency (kHz) Vertical frequency (Hz) 30~61 60~75 Maximum refresh rate (at 60Hz) 1360 x 768 (*LN-R237W: ...
...When you have no impact on the image. The TFT LCD panel uses a panel consisting of sub pixels [3,147,264 (LN-R237W - 2,764,800)] which require sophisticated technology to...is not centered on the screen. The TV is black and power indicator light blinks steadily. However, there may appear. NOTE: Your TV supports multiscan display functions within the following ...frequency domain: Horizontal frequency (kHz) Vertical frequency (Hz) 30~61 60~75 Maximum refresh rate (at 60Hz) 1360 x 768 (*LN-R237W: ...

User Manual (ENGLISH)
Page 83
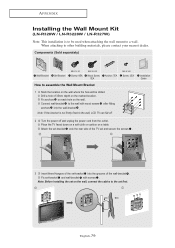
...the wall, connect the cables to the set -bracket into the wall-bracket . Note: If the bracket is to be drilled. APPENDIX Installing the Wall Mount Kit (LN-R238W / LN-R237W / LN-R268W / LN-R2668W / LN-R267W) Note: This installation is not firmly fixed to the wall, LCD TV can fall off and ...unplug the power cord from the outlet. Attach the set-bracket onto the rear side of the TV set and secure the screws ....
...the wall, connect the cables to the set -bracket into the wall-bracket . Note: If the bracket is to be drilled. APPENDIX Installing the Wall Mount Kit (LN-R238W / LN-R237W / LN-R268W / LN-R2668W / LN-R267W) Note: This installation is not firmly fixed to the wall, LCD TV can fall off and ...unplug the power cord from the outlet. Attach the set-bracket onto the rear side of the TV set and secure the screws ....
User Manual (ENGLISH)
Page 84
... English-79 Components (Sold separately) Wall-Bracket Set-Bracket M6 X L14 Screw: 8EA M4 X L25 Wood Screw: 7EA How to the wall, LCD TV can fall off and unplug the power cord from the outlet. Note: If the bracket is to be drilled. Fix set first. Note: Before ...rear side of the TV set and secure the screws . 3 Insert three Hangers of the set on the marked location. Installation Guide 2 Turn the power off . Drill a hole of 35mm depth on the wall, connect the cables to a wall. APPENDIX Installing the Wall Mount Kit (LN-R328W / LN-R3228W / LN-R327W) Note: This...
... English-79 Components (Sold separately) Wall-Bracket Set-Bracket M6 X L14 Screw: 8EA M4 X L25 Wood Screw: 7EA How to the wall, LCD TV can fall off and unplug the power cord from the outlet. Note: If the bracket is to be drilled. Fix set first. Note: Before ...rear side of the TV set and secure the screws . 3 Insert three Hangers of the set on the marked location. Installation Guide 2 Turn the power off . Drill a hole of 35mm depth on the wall, connect the cables to a wall. APPENDIX Installing the Wall Mount Kit (LN-R328W / LN-R3228W / LN-R327W) Note: This...

