

Open Source Guide (ENGLISH)
Page 2
To apply these terms (or, alternatively, under the terms of the greatest possible use to the library. How to Apply These Terms to Your New Libraries If you develop a new library, and you want it free software that everyone can do so by permitting redistribution under these terms, attach the following notices to the public, we recommend making it to be of the ordinary General Public License). It is safest to attach them to where the full notice is found. and each source file to most effectively convey the exclusion of each file should have at least the "copyright" line and ...
To apply these terms (or, alternatively, under the terms of the greatest possible use to the library. How to Apply These Terms to Your New Libraries If you develop a new library, and you want it free software that everyone can do so by permitting redistribution under these terms, attach the following notices to the public, we recommend making it to be of the ordinary General Public License). It is safest to attach them to where the full notice is found. and each source file to most effectively convey the exclusion of each file should have at least the "copyright" line and ...

User Manual (ENGLISH)
Page 2
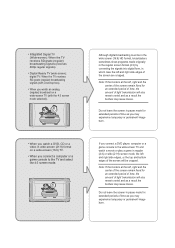
... Displaying a Still Image A still image may cause permanent damage to the TV screen. • Digital Ready TV: When you select the regular screen (4:3) mode to watch an SD-grade digital broadcast (and the set-top box output is 480p). • Digital Ready TV: When you select the wide screen (16:9) mode to watch the... the top and bottom edges of light transmission will also remain varied and as you may experience temporary or permanent image burn. • Digital Ready TV: When the TV receives HD-grade signals (and the set -top box output is 1080i).
... Displaying a Still Image A still image may cause permanent damage to the TV screen. • Digital Ready TV: When you select the regular screen (4:3) mode to watch an SD-grade digital broadcast (and the set-top box output is 480p). • Digital Ready TV: When you select the wide screen (16:9) mode to watch the... the top and bottom edges of light transmission will also remain varied and as you may experience temporary or permanent image burn. • Digital Ready TV: When the TV receives HD-grade signals (and the set -top box output is 1080i).
User Manual (ENGLISH)
Page 3
...image burn. • Integrated Digital TV (Wide-screen): When the TV receives SD-grade (regular) broadcasting signals (receives 480p regular signals). • Digital Ready TV (wide-screen): digital TV: When the TV receives SD-grade (regular) broadcasting signals (with a set-top box). • When ...you watch an analog (regular) broadcast on a wide-screen TV (with the 4:3 screen mode selected). • When ...
...image burn. • Integrated Digital TV (Wide-screen): When the TV receives SD-grade (regular) broadcasting signals (receives 480p regular signals). • Digital Ready TV (wide-screen): digital TV: When the TV receives SD-grade (regular) broadcasting signals (with a set-top box). • When ...you watch an analog (regular) broadcast on a wide-screen TV (with the 4:3 screen mode selected). • When ...

User Manual (ENGLISH)
Page 4
... Connecting VHF and UHF Antennas 7 Antennas with 300-ohm Flat Twin Leads 7 Antennas with 75-ohm Round Leads 8 Separate VHF and UHF Antennas 8 Connecting Cable TV 9 Cable without a Cable Box 9 Connecting to a Cable Box that Descrambles All Channels . . . . . 9 Connecting to a Cable Box that Descrambles Some Channels ....27 To Edit the Input Source Name 28 Chapter 4: Picture Control Using Automatic Picture Settings 29 Customizing the Picture 30 Adjusting the Color Tone 31 Changing the Screen Size 32 Zoom 33 Freezing the Picture 34 Digital Noise Reduction 34 DNIe (Digital Natural Image...
... Connecting VHF and UHF Antennas 7 Antennas with 300-ohm Flat Twin Leads 7 Antennas with 75-ohm Round Leads 8 Separate VHF and UHF Antennas 8 Connecting Cable TV 9 Cable without a Cable Box 9 Connecting to a Cable Box that Descrambles All Channels . . . . . 9 Connecting to a Cable Box that Descrambles Some Channels ....27 To Edit the Input Source Name 28 Chapter 4: Picture Control Using Automatic Picture Settings 29 Customizing the Picture 30 Adjusting the Color Tone 31 Changing the Screen Size 32 Zoom 33 Freezing the Picture 34 Digital Noise Reduction 34 DNIe (Digital Natural Image...
User Manual (ENGLISH)
Page 5
...Setting the Blue Screen Mode 73 Selecting the Melody 74 Chapter 10: Troubleshooting Identifying Problems 75 Appendix Installing the stand 77 Disconnecting the stand 77 Installing the Wall Mount Kit (LN-R238W / LN-R237W / LN-R268W / LN-R2668W / LN-R267W) . . . 78 Installing the Wall Mount Kit (LN-R328W / LN-R3228W / LN...-R327W 79 Using the Anti-Theft Kensington Lock 80 Using Your TV in Another Country 80 Specifications 81 Display...
...Setting the Blue Screen Mode 73 Selecting the Melody 74 Chapter 10: Troubleshooting Identifying Problems 75 Appendix Installing the stand 77 Disconnecting the stand 77 Installing the Wall Mount Kit (LN-R238W / LN-R237W / LN-R268W / LN-R2668W / LN-R267W) . . . 78 Installing the Wall Mount Kit (LN-R328W / LN-R3228W / LN...-R327W 79 Using the Anti-Theft Kensington Lock 80 Using Your TV in Another Country 80 Specifications 81 Display...
User Manual (ENGLISH)
Page 6
... signal and adjusts to implement perfect digital sound and picture quality. - The TV utilizes the HDMI system to create optimum contrast. - If any items are included with your LCD TV. DNIe technology provides life-like clear images. - The Anynet system enables you...001294) x 4 Stand (23", 26" BN96-01727A) (32" BN96-01733A) English-1 Cleaning Cloth (BN63-01798A) LN-R238W, LN-R268W, LN-R2668W, LN-R328W, LN-R3228W My Color Control: Colors can be set to easily control Samsung audio-video (AV) devices from this TV. SRS TruSurround XT - Brightness Sensor: Adjusts the screen ...
... signal and adjusts to implement perfect digital sound and picture quality. - The TV utilizes the HDMI system to create optimum contrast. - If any items are included with your LCD TV. DNIe technology provides life-like clear images. - The Anynet system enables you...001294) x 4 Stand (23", 26" BN96-01727A) (32" BN96-01733A) English-1 Cleaning Cloth (BN63-01798A) LN-R238W, LN-R268W, LN-R2668W, LN-R328W, LN-R3228W My Color Control: Colors can be set to easily control Samsung audio-video (AV) devices from this TV. SRS TruSurround XT - Brightness Sensor: Adjusts the screen ...
User Manual (ENGLISH)
Page 8
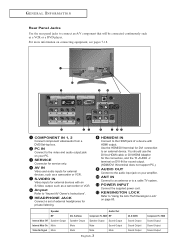
... external headphones for external devices, such as a camcorder or VCR. AV IN Video and audio inputs for private listening. HEADPHONE JACK Connect a set of a device with an S-Video output, such as a camcorder or VCR. SERVICE Connector for external devices with HDMI output. POWER INPUT Connect... the supplied power cord. COMPONENT IN 1, 2 Connect component video/audio from a DVD/Set-top box. HDMI/DVI IN Connect to a cable TV system. Speaker RF Internal Mute Off Speaker Output Internal Mute On Mute Video No Signal Mute AV, S-Video Speaker ...
... external headphones for external devices, such as a camcorder or VCR. AV IN Video and audio inputs for private listening. HEADPHONE JACK Connect a set of a device with an S-Video output, such as a camcorder or VCR. SERVICE Connector for external devices with HDMI output. POWER INPUT Connect... the supplied power cord. COMPONENT IN 1, 2 Connect component video/audio from a DVD/Set-top box. HDMI/DVI IN Connect to a cable TV system. Speaker RF Internal Mute Off Speaker Output Internal Mute On Mute Video No Signal Mute AV, S-Video Speaker ...
User Manual (ENGLISH)
Page 10
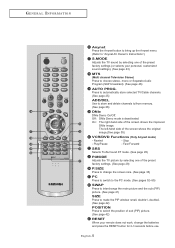
... to bring up the Anynet menu. (Refer to "Anynet AV Owner's Instructions".) S.MODE Adjusts the TV sound by selecting one of the preset factory settings (or selects your personal, customized sound settings). (See page 43) MTS (Multi channel Television Stereo) Press to select the position of sub (PIP... AUTO PROG. Rewind - Play/Pause - Fast Forward SRS Selects TruSurround XT mode. (See page 45) P.MODE Adjusts the TV picture by selecting one of the preset factory settings. (See page 29) P.SIZE Press to change the batteries and press the RESET button for 2-3 seconds before use. The ...
... to bring up the Anynet menu. (Refer to "Anynet AV Owner's Instructions".) S.MODE Adjusts the TV sound by selecting one of the preset factory settings (or selects your personal, customized sound settings). (See page 43) MTS (Multi channel Television Stereo) Press to select the position of sub (PIP... AUTO PROG. Rewind - Play/Pause - Fast Forward SRS Selects TruSurround XT mode. (See page 45) P.MODE Adjusts the TV picture by selecting one of the preset factory settings. (See page 29) P.SIZE Press to change the batteries and press the RESET button for 2-3 seconds before use. The ...
User Manual (ENGLISH)
Page 12
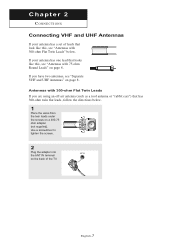
If your antenna has a set of the TV. Antennas with 75-ohm Round Leads" on page 8. Use a screwdriver to tighten the screws. 2 Plug the adapter into the ANT IN terminal on the back ...
If your antenna has a set of the TV. Antennas with 75-ohm Round Leads" on page 8. Use a screwdriver to tighten the screws. 2 Plug the adapter into the ANT IN terminal on the back ...
User Manual (ENGLISH)
Page 15
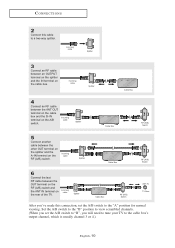
... Connect an RF cable between an OUTPUT terminal on the splitter and the IN terminal on the A/B switch. Set the A/B switch to the "B" position to view scrambled channels. (When you set the A/B switch to "B", you 've made this cable to the cable box's output channel, which is ...usually channel 3 or 4.) English-10 CONNECTIONS 2 Connect this connection, set the A/B switch to the "A" position for normal viewing. Incoming cable Splitter Cable Box RF (A/B) Switch ANT IN TV Rear After you will need to tune your TV to a two-way splitter.
... Connect an RF cable between an OUTPUT terminal on the splitter and the IN terminal on the A/B switch. Set the A/B switch to the "B" position to view scrambled channels. (When you set the A/B switch to "B", you 've made this cable to the cable box's output channel, which is ...usually channel 3 or 4.) English-10 CONNECTIONS 2 Connect this connection, set the A/B switch to the "A" position for normal viewing. Incoming cable Splitter Cable Box RF (A/B) Switch ANT IN TV Rear After you will need to tune your TV to a two-way splitter.

User Manual (ENGLISH)
Page 20
...Option) Component Cable (Option) TV Rear Panel Note: For an explanation of Component video, see your Set-top box owner's manual. * Each external input source device has a different back panel configuration. CONNECTIONS Connecting a Digital TV Set-top box The connections for a typical Set-top box are shown below....COMPONENT IN 1 or COMPONENT IN 2 [R-AUDIO-L] jacks on the TV and the AUDIO OUT jacks on the Set-top box. Amplifier/DVD Home Theater TV Rear Panel Audio Cable (Option) English-15 Set-Top Box Rear Panel TV Rear Panel Audio Cable (Option) 2 Connect a component cable between...
...Option) Component Cable (Option) TV Rear Panel Note: For an explanation of Component video, see your Set-top box owner's manual. * Each external input source device has a different back panel configuration. CONNECTIONS Connecting a Digital TV Set-top box The connections for a typical Set-top box are shown below....COMPONENT IN 1 or COMPONENT IN 2 [R-AUDIO-L] jacks on the TV and the AUDIO OUT jacks on the Set-top box. Amplifier/DVD Home Theater TV Rear Panel Audio Cable (Option) English-15 Set-Top Box Rear Panel TV Rear Panel Audio Cable (Option) 2 Connect a component cable between...

User Manual (ENGLISH)
Page 21
CONNECTIONS Connecting a DVD/Set-top box via DVI This can be applied only if there is the DVI Output connector on the external device. 1 Connect a DVI-to-HDMI cable or DVI-HDMI adapter between the DVI IN [R-AUDIO-L] jack on the TV and the AUDIO OUT jacks on the DVD player/Set-top box. DVD Player Rear Panel TV Rear Panel DVI-to -HDMI Cable (Option) English-16 DVD Player Rear Panel TV Rear Panel Audio Cable (Option) DVI-to -HDMI Cable (Option) 2 Connect an audio cable between the HDMI/DVI connector on the TV and the DVI connector on the DVD player/Set-top box.
CONNECTIONS Connecting a DVD/Set-top box via DVI This can be applied only if there is the DVI Output connector on the external device. 1 Connect a DVI-to-HDMI cable or DVI-HDMI adapter between the DVI IN [R-AUDIO-L] jack on the TV and the AUDIO OUT jacks on the DVD player/Set-top box. DVD Player Rear Panel TV Rear Panel DVI-to -HDMI Cable (Option) English-16 DVD Player Rear Panel TV Rear Panel Audio Cable (Option) DVI-to -HDMI Cable (Option) 2 Connect an audio cable between the HDMI/DVI connector on the TV and the DVI connector on the DVD player/Set-top box.

User Manual (ENGLISH)
Page 22
CONNECTIONS Connecting a DVD/Set-top box via HDMI This can be applied only if there is a more accurate name for an HDMI to HDMI connection. DVD Player Rear Panel TV Rear Panel HDMI Cable (Option) Note: No sound connection is needed for it especially because it allows multiple channels of... digital audio (5.1 channels).The difference between the HDMI/DVI connector on the TV and the HDMI connector on the DVD player/Set-top box. English-17 What is HDMI? • HDMI, or high-definition multimedia interface, is a next-generation ...
CONNECTIONS Connecting a DVD/Set-top box via HDMI This can be applied only if there is a more accurate name for an HDMI to HDMI connection. DVD Player Rear Panel TV Rear Panel HDMI Cable (Option) Note: No sound connection is needed for it especially because it allows multiple channels of... digital audio (5.1 channels).The difference between the HDMI/DVI connector on the TV and the HDMI connector on the DVD player/Set-top box. English-17 What is HDMI? • HDMI, or high-definition multimedia interface, is a next-generation ...
User Manual (ENGLISH)
Page 26
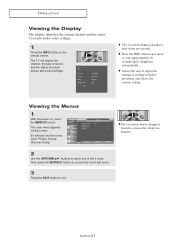
The TV will display the channel, the type of sound, and the status of certain audio-video settings. 1 Press the INFO button on the remote control. The main menu appears on , press the MENU button. English-21 Allows the user to adjust the settings according to select one of the 5 icons. O P E R ...has five icons: Input, Picture, Sound, Channel, Setup. 2 Use the UP/DOWN buttons to his/her preference and shows the current settings. Press the INFO button once more or wait approximately 10 seconds and it disappears automatically. The on -screen displays disappear after about ten ...
The TV will display the channel, the type of sound, and the status of certain audio-video settings. 1 Press the INFO button on the remote control. The main menu appears on , press the MENU button. English-21 Allows the user to adjust the settings according to select one of the 5 icons. O P E R ...has five icons: Input, Picture, Sound, Channel, Setup. 2 Use the UP/DOWN buttons to his/her preference and shows the current settings. Press the INFO button once more or wait approximately 10 seconds and it disappears automatically. The on -screen displays disappear after about ten ...

User Manual (ENGLISH)
Page 27
O P E R AT I O N Plug & Play Feature When the TV is displayed with "OK" selected. 2 Select the appropriate language by pressing the UP/DOWN buttons. Press the ENTER button. 4 Press the UP/DOWN buttons to confirm your choice. 3 The message "Check antenna input." Press the ENTER button to select "Air", "STD", "HRC", or "IRC", then press the ENTER button. is initially powered on, several basic customer settings proceed automatically and subsequently. 1 Press the POWER button on the remote control. English-22 The message "Start Plug & Play" is displayed with "OK" selected.
O P E R AT I O N Plug & Play Feature When the TV is displayed with "OK" selected. 2 Select the appropriate language by pressing the UP/DOWN buttons. Press the ENTER button. 4 Press the UP/DOWN buttons to confirm your choice. 3 The message "Check antenna input." Press the ENTER button to select "Air", "STD", "HRC", or "IRC", then press the ENTER button. is initially powered on, several basic customer settings proceed automatically and subsequently. 1 Press the POWER button on the remote control. English-22 The message "Start Plug & Play" is displayed with "OK" selected.
User Manual (ENGLISH)
Page 28
Set the "Hour", "Minute" or "am /pm". To stop the search before it has finished, press the ENTER button with "Stop" selected. English-23 is displayed. O P E R AT I O N 5 Press the ENTER to the "Hour", "Minute" or "am /pm" by pressing the UP/DOWN buttons. (Refer to "Setting the Clock" on page 56.) 7 Press the MENU button to confirm your watching." The message "Enjoy your setting. Press the LEFT/RIGHT buttons to move to select "Start". button The TV will begin memorizing all of the available channels. 6 Press the ENTER button.
Set the "Hour", "Minute" or "am /pm". To stop the search before it has finished, press the ENTER button with "Stop" selected. English-23 is displayed. O P E R AT I O N 5 Press the ENTER to the "Hour", "Minute" or "am /pm" by pressing the UP/DOWN buttons. (Refer to "Setting the Clock" on page 56.) 7 Press the MENU button to confirm your watching." The message "Enjoy your setting. Press the LEFT/RIGHT buttons to move to select "Start". button The TV will begin memorizing all of the available channels. 6 Press the ENTER button.

User Manual (ENGLISH)
Page 34
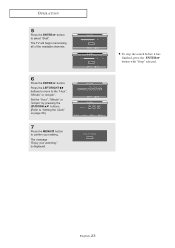
Chapter 4 PICTURE CONTROL Using Automatic Picture Settings Your TV has four automatic picture settings ("Dynamic", "Standard", "Movie", and "Custom") that are preset at the factory. Press the ENTER button. Press the EXIT button to personal preference (see "Customizing the ...
Chapter 4 PICTURE CONTROL Using Automatic Picture Settings Your TV has four automatic picture settings ("Dynamic", "Standard", "Movie", and "Custom") that are preset at the factory. Press the ENTER button. Press the EXIT button to personal preference (see "Customizing the ...
User Manual (ENGLISH)
Page 35
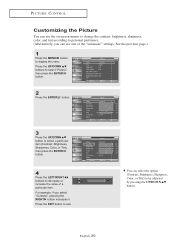
..., brightness, sharpness, color, and tint according to exit. See the previous page.) 1 Press the MENU button to decrease or increase the value of the "automatic" settings. Press the EXIT button to personal preference. (Alternatively, you select "Contrast", pressing the RIGHT button increases it. PICTURE CONTROL Customizing the Picture You can use...
..., brightness, sharpness, color, and tint according to exit. See the previous page.) 1 Press the MENU button to decrease or increase the value of the "automatic" settings. Press the EXIT button to personal preference. (Alternatively, you select "Contrast", pressing the RIGHT button increases it. PICTURE CONTROL Customizing the Picture You can use...
User Manual (ENGLISH)
Page 36
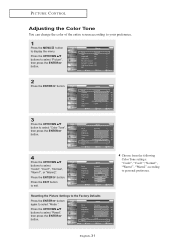
... the UP/DOWN buttons to select "Cool2", "Cool1", "Normal", "Warm1", or "Warm2". Press the ENTER button. English-31 Choose from the following Color Tone settings: "Cool2", "Cool1","Normal", "Warm1", "Warm2" according to display the menu. PICTURE CONTROL Adjusting the Color Tone You can change the color of the entire screen... according to your preference. 1 Press the MENU button to personal preference. Resetting the Picture Settings to the Factory Defaults Press the ENTER button again to exit. Press the EXIT button to select "Mode ".
... the UP/DOWN buttons to select "Cool2", "Cool1", "Normal", "Warm1", or "Warm2". Press the ENTER button. English-31 Choose from the following Color Tone settings: "Cool2", "Cool1","Normal", "Warm1", "Warm2" according to display the menu. PICTURE CONTROL Adjusting the Color Tone You can change the color of the entire screen... according to your preference. 1 Press the MENU button to personal preference. Resetting the Picture Settings to the Factory Defaults Press the ENTER button again to exit. Press the EXIT button to select "Mode ".
User Manual (ENGLISH)
Page 37
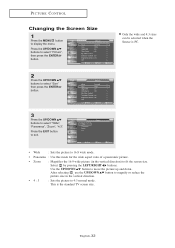
... 16:9 wide picture (in the vertical direction. Press the EXIT button to exit. • Wide : Sets the picture to select "Wide", "Panorama", "Zoom", "4:3". button to magnify or reduce the • 4:3 : Sets the picture to select "Size" then press the ENTER button. Select by pressing the LEFT/RIGHT buttons. ... 4:3 normal mode. Only the wide and 4:3 sizes can be selected when the Source is the standard TV screen size. Use the UP/DOWN button to display the menu. English-32 PICTURE CONTROL Changing the Screen Size 1 Press the MENU button to move the picture up and down.
... 16:9 wide picture (in the vertical direction. Press the EXIT button to exit. • Wide : Sets the picture to select "Wide", "Panorama", "Zoom", "4:3". button to magnify or reduce the • 4:3 : Sets the picture to select "Size" then press the ENTER button. Select by pressing the LEFT/RIGHT buttons. ... 4:3 normal mode. Only the wide and 4:3 sizes can be selected when the Source is the standard TV screen size. Use the UP/DOWN button to display the menu. English-32 PICTURE CONTROL Changing the Screen Size 1 Press the MENU button to move the picture up and down.


