User Manual
Page 4
...Method 2. Connecting via Bluetooth 23 Method 2. CONTENTS 01 Checking the Components 6 02 Product Overview 7 Top Panel of the Soundbar ...7 Bottom Panel of the Soundbar 7 03 Using the Soundbar Remote Control 9 Inserting Batteries before using the Remote Control (AA batteries X 2 9 How to Use the Remote Control ...Using the Hidden Buttons (Buttons with more than one function 10 Output specifications for the different sound effect modes 11 Adjusting the Soundbar volume with an Apple product 28 ENG - 4 Connecting via Wi-Fi 20 07 Connecting an External Device 21 Method 1....
...Method 2. Connecting via Bluetooth 23 Method 2. CONTENTS 01 Checking the Components 6 02 Product Overview 7 Top Panel of the Soundbar ...7 Bottom Panel of the Soundbar 7 03 Using the Soundbar Remote Control 9 Inserting Batteries before using the Remote Control (AA batteries X 2 9 How to Use the Remote Control ...Using the Hidden Buttons (Buttons with more than one function 10 Output specifications for the different sound effect modes 11 Adjusting the Soundbar volume with an Apple product 28 ENG - 4 Connecting via Wi-Fi 20 07 Connecting an External Device 21 Method 1....
User Manual
Page 5
10 Installing the Wall Mount 29 Installation Precautions ...29 Wallmount Components ...29 Installing the Surround Speakers on a Wall 30 11 Installing the Soundbar above a TV Stand 30 Component ...30 12 Software Update 31 Auto Update ...31 USB Update...31 Initialization ...32 13 Troubleshooting 32 14 License 34 15 Open Source License Notice 34 16 Important Notes About Service 34 17 Specifications and Guide 35 Specifications ...35 ENG - 5
10 Installing the Wall Mount 29 Installation Precautions ...29 Wallmount Components ...29 Installing the Surround Speakers on a Wall 30 11 Installing the Soundbar above a TV Stand 30 Component ...30 12 Software Update 31 Auto Update ...31 USB Update...31 Initialization ...32 13 Troubleshooting 32 14 License 34 15 Open Source License Notice 34 16 Important Notes About Service 34 17 Specifications and Guide 35 Specifications ...35 ENG - 5

User Manual
Page 6
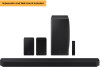
... Control (AH59-02767A) / Batteries Subwoofer x 2 POWER x 4 Surround Speaker (Left / Right) Wall Mount Guide (AH63-04369C) Power Cord (Subwoofer, Surround Speaker, Soundbar) (3903-001117) x 2 Holder-Screw (AH61-04110A) HDMI Cable (BN39-01997A) x 2 (M4 x L10) Screw (6001-001202) x 2 x 4 Bracket-Wall ... consumption, refer to the label attached to the product. (Label: Rear of the Soundbar Main Unit) • To purchase additional components or optional cables, contact a Samsung Service Center or Samsung Customer Care. • For more information about the wallmount or rubber-foot, see ...
... Control (AH59-02767A) / Batteries Subwoofer x 2 POWER x 4 Surround Speaker (Left / Right) Wall Mount Guide (AH63-04369C) Power Cord (Subwoofer, Surround Speaker, Soundbar) (3903-001117) x 2 Holder-Screw (AH61-04110A) HDMI Cable (BN39-01997A) x 2 (M4 x L10) Screw (6001-001202) x 2 x 4 Bracket-Wall ... consumption, refer to the label attached to the product. (Label: Rear of the Soundbar Main Unit) • To purchase additional components or optional cables, contact a Samsung Service Center or Samsung Customer Care. • For more information about the wallmount or rubber-foot, see ...

User Manual
Page 7
02 PRODUCT OVERVIEW Top Panel of the Soundbar Position the 1 2 3 product so that the SAMSUNG logo is located on the top. 4 1 (Multi Function) Button • In standby mode, press the (Multi Function) button to turn on the Soundbar. • Press the (Multi Function) button to change the TV ...HDMI 2 HDMI TO TV HDMI IN 2 HDMI 1(eARC/ARC) NETWORK HDMI IN 2 HDMI 1 HDMI TO TV (eARC/ARC) Bottom Panel of the Soundbar HDMI TO TV (eARC/ARC) DIGITAL AUDIO IN DIGITAL A(UODPITOICIANL) 5 POWER POWER POWER ID SET ID SET IDIDSESTET ID(WSEOTOFER/REAR) SERVICE SERVICE SERVICE...
02 PRODUCT OVERVIEW Top Panel of the Soundbar Position the 1 2 3 product so that the SAMSUNG logo is located on the top. 4 1 (Multi Function) Button • In standby mode, press the (Multi Function) button to turn on the Soundbar. • Press the (Multi Function) button to change the TV ...HDMI 2 HDMI TO TV HDMI IN 2 HDMI 1(eARC/ARC) NETWORK HDMI IN 2 HDMI 1 HDMI TO TV (eARC/ARC) Bottom Panel of the Soundbar HDMI TO TV (eARC/ARC) DIGITAL AUDIO IN DIGITAL A(UODPITOICIANL) 5 POWER POWER POWER ID SET ID SET IDIDSESTET ID(WSEOTOFER/REAR) SERVICE SERVICE SERVICE...

User Manual
Page 9
... off (Standby mode). Insert 2 AA batteries (1.5V) oriented so that their polarity is completely removed. How to Use the Remote Control 1 Turns the Soundbar on and off. • Auto Power Down Function 1 Power The unit turns off automatically in the following situations: • In D.IN / HDMI ... or "AUI ON". 3 8 3 Press the (Mute) button to unmute the sound. Press the button and wait for 6 5 seconds while the Soundbar is off the Voice Feedback. Press it is correct. Bluetooth PAIR 6 You can select the desired sound mode by pressing the button. Play / Pause...
... off (Standby mode). Insert 2 AA batteries (1.5V) oriented so that their polarity is completely removed. How to Use the Remote Control 1 Turns the Soundbar on and off. • Auto Power Down Function 1 Power The unit turns off automatically in the following situations: • In D.IN / HDMI ... or "AUI ON". 3 8 3 Press the (Mute) button to unmute the sound. Press the button and wait for 6 5 seconds while the Soundbar is off the Voice Feedback. Press it is correct. Bluetooth PAIR 6 You can select the desired sound mode by pressing the button. Play / Pause...

User Manual
Page 10
.... 7 Press the indicated areas to mute the sound. Up/Down/Left/ Right Press Up/Down/Left/Right on the TV and audio from the Soundbar are not synchronized, select SYNC in Sound Settings, and then adjust the volume between 0~300 milliseconds by using the Up/Down buttons. • SYNC... is only supported for some functions. • If Surround Speakers are displayed in real time while soundbar is playing, so that voice audio can always be heard clearly. • No data is set functions. • Music Skip Press the Right button...
.... 7 Press the indicated areas to mute the sound. Up/Down/Left/ Right Press Up/Down/Left/Right on the TV and audio from the Soundbar are not synchronized, select SYNC in Sound Settings, and then adjust the volume between 0~300 milliseconds by using the Up/Down buttons. • SYNC... is only supported for some functions. • If Surround Speakers are displayed in real time while soundbar is playing, so that voice audio can always be heard clearly. • No data is set functions. • Music Skip Press the Right button...

User Manual
Page 12
...-TV REMOTE Status Disable the TV remote control. ENG - 12 SOUMNODDE WOOFER VOL SOUNDBAR SOUMNODDE WOOFER VOL SOUNDBAR SAMSUNG-TV REMOTE ALL-TV REMOTE Enable a Samsung TV's IR remote control. Turn Off the Soundbar. 2. Bluetooth remote controls (remote controls that require pairing) are not supported. &#...seconds, the mode switches in the following order: "OFF-TV REMOTE" (Default mode), "SAMSUNG-TV REMOTE", "ALL-TV REMOTE". Adjusting the Soundbar volume with a TV remote control Adjust the Soundbar volume using the TV's remote control. • This function can be used with IR ...
...-TV REMOTE Status Disable the TV remote control. ENG - 12 SOUMNODDE WOOFER VOL SOUNDBAR SOUMNODDE WOOFER VOL SOUNDBAR SAMSUNG-TV REMOTE ALL-TV REMOTE Enable a Samsung TV's IR remote control. Turn Off the Soundbar. 2. Bluetooth remote controls (remote controls that require pairing) are not supported. &#...seconds, the mode switches in the following order: "OFF-TV REMOTE" (Default mode), "SAMSUNG-TV REMOTE", "ALL-TV REMOTE". Adjusting the Soundbar volume with a TV remote control Adjust the Soundbar volume using the TV's remote control. • This function can be used with IR ...

User Manual
Page 13
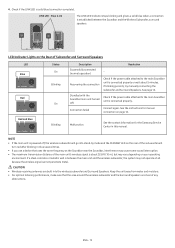
...on automatically. The Subwoofer and Surround Speakers are automatically connected when the Soundbar is turned on, the Soundbar turns on . LINK LED - Connect the Power cord to the Soundbar. ENG - 13 Power Cord POWER POWER Bottoms of the Soundbar Main Unit) 1. Connect the Power cord to the Subwoofer. Connect ...) SERVICE HDMI IN 1 HDMI 1 NETWORK HDMI IN 2 HDMI 2 HDMI TO TV (eARC/ARC) Bottom of Subwoofer 2. Connect the power cord to the Soundbar, Subwoofer and Surround Speakers. Blue is On NOTE • Connect the Subwoofer and Surround Speakers power before connecting to the...
...on automatically. The Subwoofer and Surround Speakers are automatically connected when the Soundbar is turned on, the Soundbar turns on . LINK LED - Connect the Power cord to the Soundbar. ENG - 13 Power Cord POWER POWER Bottoms of the Soundbar Main Unit) 1. Connect the Power cord to the Subwoofer. Connect ...) SERVICE HDMI IN 1 HDMI 1 NETWORK HDMI IN 2 HDMI 2 HDMI TO TV (eARC/ARC) Bottom of Subwoofer 2. Connect the power cord to the Soundbar, Subwoofer and Surround Speakers. Blue is On NOTE • Connect the Subwoofer and Surround Speakers power before connecting to the...

User Manual
Page 14
... button on the remote control for 5 seconds. • The ID SET message appears on the display of the Soundbar for a moment, and then it disappears. • The Soundbar will automatically power on the rear of the subwoofer and surround speakers for at least 5 seconds. • The red... R Manually connecting the Subwoofer or Surround Speakers Before performing the manual connection procedure below: • Check whether the power cables for the Soundbar and subwoofer or Surround Speakers are built into the wireless subwoofer and surround speakers. Press and hold ID SET on when ID SET is...
... button on the remote control for 5 seconds. • The ID SET message appears on the display of the Soundbar for a moment, and then it disappears. • The Soundbar will automatically power on the rear of the subwoofer and surround speakers for at least 5 seconds. • The red... R Manually connecting the Subwoofer or Surround Speakers Before performing the manual connection procedure below: • Check whether the power cables for the Soundbar and subwoofer or Surround Speakers are built into the wireless subwoofer and surround speakers. Press and hold ID SET on when ID SET is...
User Manual
Page 15
... the main unit is connected properly. ENG - 15 Check if the power cable attached to the main Soundbar unit is powered off ) Connection failed Resolution - See the instructions for the Samsung Service Center in blue several times. • If you use a device that the area around the ... Keep the unit away from water and moisture. • For optimal listening performance, make sure that uses the same frequency as the Soundbar near the Soundbar, interference may vary depending on the Rear of the main unit's wireless signal is solid blue (connection complete). See page 14. LINK...
... the main unit is connected properly. ENG - 15 Check if the power cable attached to the main Soundbar unit is powered off ) Connection failed Resolution - See the instructions for the Samsung Service Center in blue several times. • If you use a device that the area around the ... Keep the unit away from water and moisture. • For optimal listening performance, make sure that uses the same frequency as the Soundbar near the Soundbar, interference may vary depending on the Rear of the main unit's wireless signal is solid blue (connection complete). See page 14. LINK...

User Manual
Page 16
If you are using the function for the first time 1. Press the (Sound Control) button until Auto EQ is no sound from the Soundbar's main unit and rear speakers. Press the Up/Down buttons to select one of 3" (8 cm) clearance from each side to the nearest boundary. &#... the Auto EQ tuning is complete. • Auto EQ tuning takes about 2 minutes. • During Auto EQ tuning, there is selected. 2. Auto EQ Samsung's Auto EQ Technology uses a microphone mounted in blue. The result will start, and the progress appears in percentage. ‒ To cancel tuning, press the Up...
If you are using the function for the first time 1. Press the (Sound Control) button until Auto EQ is no sound from the Soundbar's main unit and rear speakers. Press the Up/Down buttons to select one of 3" (8 cm) clearance from each side to the nearest boundary. &#... the Auto EQ tuning is complete. • Auto EQ tuning takes about 2 minutes. • During Auto EQ tuning, there is selected. 2. Auto EQ Samsung's Auto EQ Technology uses a microphone mounted in blue. The result will start, and the progress appears in percentage. ‒ To cancel tuning, press the Up...
User Manual
Page 17
..., you change the volume on the remote control to connect the terminals marked ARC. If you use a coreless HDMI cable if possible. Turn on setting. (e.g. Samsung TV : Home ( ) → Settings ( ) → Sound → Expert Settings → HDMI-eARC Mode (Auto)) • If "TV ARC" does not ...the HDMI signal is connected to the correct port. • Use the volume buttons on the TV's remote control to change the setting to the Soundbar with eARC, the eARC function in sequence, and TV sound is played. • When connecting a TV that supports HDMI ARC (Audio Return ...
..., you change the volume on the remote control to connect the terminals marked ARC. If you use a coreless HDMI cable if possible. Turn on setting. (e.g. Samsung TV : Home ( ) → Settings ( ) → Sound → Expert Settings → HDMI-eARC Mode (Auto)) • If "TV ARC" does not ...the HDMI signal is connected to the correct port. • Use the volume buttons on the TV's remote control to change the setting to the Soundbar with eARC, the eARC function in sequence, and TV sound is played. • When connecting a TV that supports HDMI ARC (Audio Return ...
User Manual
Page 18
...surround effect. The TV sound is connected, the menu, "TV+Soundbar" appears under the Sound Output menu of the Samsung TVs. TV menu HDMI Cable OR D.IN Optical Cable (not supplied) • TV menu example: TV + [AV] Soundbar series name (HDMI) NOTE • It can operate according ...To enable this function, turn on the Adaptive Sound+ mode on your Samsung TV menu. (Home ( ) → Settings ( ) → General → Intelligent Mode Settings → Adaptive Sound+) NOTE • The sound mode on your Soundbar will automatically change to Adaptive Sound+ if you use an optical cable ...
...surround effect. The TV sound is connected, the menu, "TV+Soundbar" appears under the Sound Output menu of the Samsung TVs. TV menu HDMI Cable OR D.IN Optical Cable (not supplied) • TV menu example: TV + [AV] Soundbar series name (HDMI) NOTE • It can operate according ...To enable this function, turn on the Adaptive Sound+ mode on your Samsung TV menu. (Home ( ) → Settings ( ) → General → Intelligent Mode Settings → Adaptive Sound+) NOTE • The sound mode on your Soundbar will automatically change to Adaptive Sound+ if you use an optical cable ...
User Manual
Page 19
... → Sound → Sound Output → Bluetooth Speaker List → [AV] Samsung Soundbar Q950A (Bluetooth)) 3. To connect the Samsung TV to the Soundbar, select the message, and then establish a connection. • When the Samsung TV is a connect record. Devices that was connected before. • BT PAIRING : ...READY : In this mode, you have an existing Soundbar (e.g., [AV] Samsung Soundbar Q950A) on the list of speakers on the top of the Soundbar for a PIN code when connecting a Bluetooth device, enter . • The Soundbar automatically turns off , not in place, or ...
... → Sound → Sound Output → Bluetooth Speaker List → [AV] Samsung Soundbar Q950A (Bluetooth)) 3. To connect the Samsung TV to the Soundbar, select the message, and then establish a connection. • When the Samsung TV is a connect record. Devices that was connected before. • BT PAIRING : ...READY : In this mode, you have an existing Soundbar (e.g., [AV] Samsung Soundbar Q950A) on the list of speakers on the top of the Soundbar for a PIN code when connecting a Bluetooth device, enter . • The Soundbar automatically turns off , not in place, or ...
User Manual
Page 20
... released in 2017 or later Home ( ) → Settings ( ) → Sound → Sound Output → [AV] Samsung Soundbar Q950A (Wi-Fi) ENG - 20 Connecting via Wi-Fi Pre-connection Checklist • Wi-Fi connection is available only on Samsung TV. • Check whether the wireless router (Wi-Fi) is turned on the year of the...
... released in 2017 or later Home ( ) → Settings ( ) → Sound → Sound Output → [AV] Samsung Soundbar Q950A (Wi-Fi) ENG - 20 Connecting via Wi-Fi Pre-connection Checklist • Wi-Fi connection is available only on Samsung TV. • Check whether the wireless router (Wi-Fi) is turned on the year of the...
User Manual
Page 21
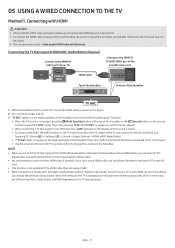
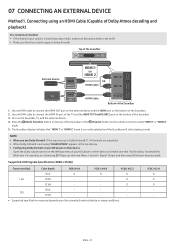
...- 120 10 bit - - - • Supported specification may vary depending on a Samsung BD Player, go to select "HDMI 1" or "HDMI 2" mode. 5. ENG - 21 07 CONNECTING AN EXTERNAL DEVICE Method 1. Top of the Soundbar External Device HDMI OUT HDMI 1 OR HDMI 2 DIGITAL AUDIO IN (OPTICAL) HDMI 2...HDMI 1 HDMI IN (ARC) HDMI Cable HDMI TO TV (eARC/ARC) Bottom of the Soundbar. 2. O 12 bit - - The Soundbar display indicates that "No Encoding" is currently selected and the Soundbar will start playing sounds. Supported UHD Signals Specification (3840 x 2160p) Frame rate (fps) Color...
...- 120 10 bit - - - • Supported specification may vary depending on a Samsung BD Player, go to select "HDMI 1" or "HDMI 2" mode. 5. ENG - 21 07 CONNECTING AN EXTERNAL DEVICE Method 1. Top of the Soundbar External Device HDMI OUT HDMI 1 OR HDMI 2 DIGITAL AUDIO IN (OPTICAL) HDMI 2...HDMI 1 HDMI IN (ARC) HDMI Cable HDMI TO TV (eARC/ARC) Bottom of the Soundbar. 2. O 12 bit - - The Soundbar display indicates that "No Encoding" is currently selected and the Soundbar will start playing sounds. Supported UHD Signals Specification (3840 x 2160p) Frame rate (fps) Color...

User Manual
Page 22
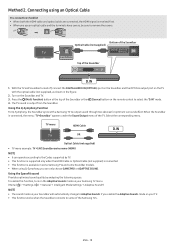
Use an optical cable (not supplied) to connect the DIGITAL AUDIO IN (OPTICAL) on the Soundbar main and the OPTICAL OUT port on the remote control. 4. Connecting using an Optical Cable Top of the Soundbar BD / DVD player / Settop box / Game console D.IN OPTICAL OUT Optical Cable (not supplied)... DIGITAL AUDIO IN (OPTICAL) Bottom of the Soundbar or the (Source) button on the external device. 2. To select "D.IN" ...
Use an optical cable (not supplied) to connect the DIGITAL AUDIO IN (OPTICAL) on the Soundbar main and the OPTICAL OUT port on the remote control. 4. Connecting using an Optical Cable Top of the Soundbar BD / DVD player / Settop box / Game console D.IN OPTICAL OUT Optical Cable (not supplied)... DIGITAL AUDIO IN (OPTICAL) Bottom of the Soundbar or the (Source) button on the external device. 2. To select "D.IN" ...

User Manual
Page 23
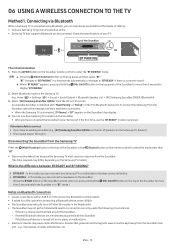
...The initial connection • When connecting to your device, select "[AV] Samsung Soundbar Q950A" from the list that appears. • When the Soundbar is a strong electrical field around the Soundbar. ‒ If several Bluetooth devices are from each other , the lower...Bluetooth connection may break when the devices are out of cabling. • When you have an existing Soundbar (e.g., "[AV] Samsung Soundbar Q950A") in the top display. 3. Connecting via Bluetooth through the Soundbar. • After you connect a paired Bluetooth device with poor reception. ENG - 23 08 CONNECTING...
...The initial connection • When connecting to your device, select "[AV] Samsung Soundbar Q950A" from the list that appears. • When the Soundbar is a strong electrical field around the Soundbar. ‒ If several Bluetooth devices are from each other , the lower...Bluetooth connection may break when the devices are out of cabling. • When you have an existing Soundbar (e.g., "[AV] Samsung Soundbar Q950A") in the top display. 3. Connecting via Bluetooth through the Soundbar. • After you connect a paired Bluetooth device with poor reception. ENG - 23 08 CONNECTING...

User Manual
Page 24
...second screenshot below) may not show on the top display. Disconnecting the Bluetooth device from a Soundbar You can disconnect a Bluetooth device from the Bluetooth device, the Soundbar will display "BT DISCONNECTED" on the Home screen. Connecting via Wi-Fi (Wireless Network) To...". • Disconnecting takes time because the Bluetooth device must receive a response from your Soundbar cannot be disconnected. • When the Soundbar is disconnected from the Bluetooth device, the Soundbar will display "BT DISCONNECTED" on some devices. • A Bluetooth device may experience noise...
...second screenshot below) may not show on the top display. Disconnecting the Bluetooth device from a Soundbar You can disconnect a Bluetooth device from the Bluetooth device, the Soundbar will display "BT DISCONNECTED" on the Home screen. Connecting via Wi-Fi (Wireless Network) To...". • Disconnecting takes time because the Bluetooth device must receive a response from your Soundbar cannot be disconnected. • When the Soundbar is disconnected from the Bluetooth device, the Soundbar will display "BT DISCONNECTED" on some devices. • A Bluetooth device may experience noise...
User Manual
Page 25
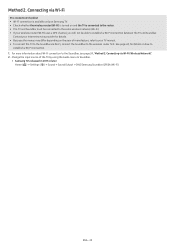
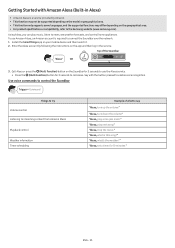
...listen to enable voice recognition. Install the SmartThings app on the geographical area. • For product specification or compatibility, refer to connect the Soundbar over the network. 1. "Alexa, what is a service provided by following the instructions on the app and then log in Alexa) •... 25 Enter the Alexa account by Amazon. • This function may not be supported depending on the Soundbar for 3 seconds to use Amazon Alexa, an Amazon account is required to the Samsung website (www.samsung.com). "Alexa, set a timer for 3 seconds to say "Alexa, turn down the volume" ...
...listen to enable voice recognition. Install the SmartThings app on the geographical area. • For product specification or compatibility, refer to connect the Soundbar over the network. 1. "Alexa, what is a service provided by following the instructions on the app and then log in Alexa) •... 25 Enter the Alexa account by Amazon. • This function may not be supported depending on the Soundbar for 3 seconds to use Amazon Alexa, an Amazon account is required to the Samsung website (www.samsung.com). "Alexa, set a timer for 3 seconds to say "Alexa, turn down the volume" ...


