
User Manual
Page 1
To receive more complete service, please register your product at www.samsung.com/register Soundbar Imagine the possibilities Thank you for purchasing this Samsung product. HW-K470 Wireless Subwoofer (PS-WK450) Wireless Receiver Module (SWA-8000S) User manual Wireless Audio -
To receive more complete service, please register your product at www.samsung.com/register Soundbar Imagine the possibilities Thank you for purchasing this Samsung product. HW-K470 Wireless Subwoofer (PS-WK450) Wireless Receiver Module (SWA-8000S) User manual Wireless Audio -
User Manual
Page 2
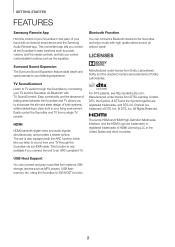
...a Bluetooth device to sound from your TV through the Soundbar by connecting your TV and the Soundbar via Bluetooth with the ARC function which lets you listen to the Soundbar and enjoy music with an Android smart device and the Samsung Audio Remote app. TV SoundConnect Listen to TV audio ...adds depth and spaciousness to an ARC compliant TV. GETTING STARTED GETTING STARTED FEATURES Samsung Remote App Hold the control of your Soundbar in the palm of your hand with high quality stereo sound, all the Soundbar's basic functions such as power, volume, and the media controls, and lets you...
...a Bluetooth device to sound from your TV through the Soundbar by connecting your TV and the Soundbar via Bluetooth with the ARC function which lets you listen to the Soundbar and enjoy music with an Android smart device and the Samsung Audio Remote app. TV SoundConnect Listen to TV audio ...adds depth and spaciousness to an ARC compliant TV. GETTING STARTED GETTING STARTED FEATURES Samsung Remote App Hold the control of your Soundbar in the palm of your hand with high quality stereo sound, all the Soundbar's basic functions such as power, volume, and the media controls, and lets you...
User Manual
Page 6
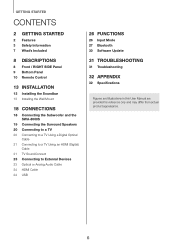
GETTING STARTED CONTENTS 2 GETTING STARTED 2 Features 3 Safety Information 7 What's Included 8 DESCRIPTIONS 8 Front / RIGHT SIDE Panel 9 Bottom Panel 10 Remote Control 13 INSTALLATION 13 Installing the Soundbar 13 Installing the Wall Mount 18 CONNECTIONS 18 Connecting the Subwoofer and the SWA-8000S 19 Connecting the Surround Speakers 20 Connecting to a TV 20 ...
GETTING STARTED CONTENTS 2 GETTING STARTED 2 Features 3 Safety Information 7 What's Included 8 DESCRIPTIONS 8 Front / RIGHT SIDE Panel 9 Bottom Panel 10 Remote Control 13 INSTALLATION 13 Installing the Soundbar 13 Installing the Wall Mount 18 CONNECTIONS 18 Connecting the Subwoofer and the SWA-8000S 19 Connecting the Surround Speakers 20 Connecting to a TV 20 ...

User Manual
Page 8
... powered on this unit, there will be a 4 to 5 second delay before it produces sound. ●● If you want to enjoy sound only from the Soundbar, you must turn off . The numeric value of the volume level appears in the Audio Setup menu of your TV. 8 To cancel the (Mute) button...
... powered on this unit, there will be a 4 to 5 second delay before it produces sound. ●● If you want to enjoy sound only from the Soundbar, you must turn off . The numeric value of the volume level appears in the Audio Setup menu of your TV. 8 To cancel the (Mute) button...
User Manual
Page 10
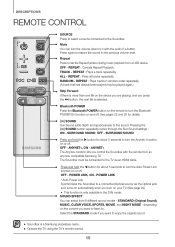
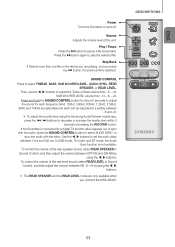
...Samsung TV. OFF - REPEAT : Plays a track repeatedly. REPEAT : Plays tracks in the D.IN mode. SOUND Surr.Sound adds depth and spaciousness to 0 with the remote from 6 different sound modes - SURROUND SOUND Press and hold the button for details. ANYNET+, ON - ANYNET+ The Anynet+ function lets you control the Soundbar..., ON - Press and hold the button for about 5 seconds to turn the Auto Power Link function on and off . The Soundbar must be played again.) Skip Forward If there is more than one file on the content you press the ] button, the next file is...
...Samsung TV. OFF - REPEAT : Plays a track repeatedly. REPEAT : Plays tracks in the D.IN mode. SOUND Surr.Sound adds depth and spaciousness to 0 with the remote from 6 different sound modes - SURROUND SOUND Press and hold the button for details. ANYNET+, ON - ANYNET+ The Anynet+ function lets you control the Soundbar..., ON - Press and hold the button for about 5 seconds to turn the Auto Power Link function on and off . The Soundbar must be played again.) Skip Forward If there is more than one file on the content you press the ] button, the next file is...
User Manual
Page 11
...REAR SPEAKER and the REAR LEVEL mode are only available when you press the [ button, the previous file is not available. ENG Power Turns the Soundbar on the device you are playing, and you connect the SWA-8000S. To control the volume of sync with the video. Volume Adjusts the volume...CONTROL Press to pause a file temporarily. Use the , buttons to set the audio delay between OFF-RS and ON-RS by using the Samsung Audio Remote mobile app, press the [, ] buttons to sync the audio with the audio, press the SOUND CONTROL button to select AUDIO SYNC to decrease...
...REAR SPEAKER and the REAR LEVEL mode are only available when you press the [ button, the previous file is not available. ENG Power Turns the Soundbar on the device you are playing, and you connect the SWA-8000S. To control the volume of sync with the video. Volume Adjusts the volume...CONTROL Press to pause a file temporarily. Use the , buttons to set the audio delay between OFF-RS and ON-RS by using the Samsung Audio Remote mobile app, press the [, ] buttons to sync the audio with the audio, press the SOUND CONTROL button to select AUDIO SYNC to decrease...
User Manual
Page 12
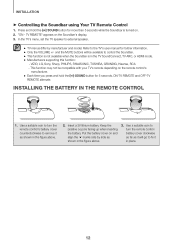
... remove it in the figure above . 2. In the TV's menu, set the TV speaker to the TV's user manual for more than 5 seconds while the Soundbar is in the figure above . 3. Refer to external speaker. ●● TV menus differ by side as shown in place. 12 Keep the positive (+) pole... facing up when inserting the battery. Put the battery cover on the Soundbar's display. 3. Use a suitable coin to turn the remote control battery cover clockwise as far as shown in the TV SoundConnect, TV ARC, or HDMI mode...
... remove it in the figure above . 2. In the TV's menu, set the TV speaker to the TV's user manual for more than 5 seconds while the Soundbar is in the figure above . 3. Refer to external speaker. ●● TV menus differ by side as shown in place. 12 Keep the positive (+) pole... facing up when inserting the battery. Put the battery cover on the Soundbar's display. 3. Use a suitable coin to turn the remote control battery cover clockwise as far as shown in the TV SoundConnect, TV ARC, or HDMI mode...

User Manual
Page 13
... surface. • The Wall Mount Guide must be level. • If your TV is turned off and unplugged before you will mount the Soundbar on. -- Otherwise, it on the wall. ●● Make sure the unit is mounted on the wall, install the... or longer recommended. ●● Connect cables from the unit to the type and thickness of the wall you install it. ENG INSTALLATION INSTALLING THE SOUNDBAR INSTALLATION INSTALLING THE WALL MOUNT ++Installation Precautions ●● Install on a vertical wall only. ●● For the installation, avoid a location with high ...
... surface. • The Wall Mount Guide must be level. • If your TV is turned off and unplugged before you will mount the Soundbar on. -- Otherwise, it on the wall. ●● Make sure the unit is mounted on the wall, install the... or longer recommended. ●● Connect cables from the unit to the type and thickness of the wall you install it. ENG INSTALLATION INSTALLING THE SOUNDBAR INSTALLATION INSTALLING THE WALL MOUNT ++Installation Precautions ●● Install on a vertical wall only. ●● For the installation, avoid a location with high ...
User Manual
Page 14
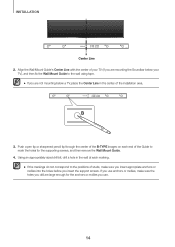
... holes before you insert the support screws. Align the Wall Mount Guide's Center Line with the center of your TV (if you are mounting the Soundbar below your TV), and then fix the Wall Mount Guide to the positions of studs, make sure the holes you drill are not mounting below...
... holes before you insert the support screws. Align the Wall Mount Guide's Center Line with the center of your TV (if you are mounting the Soundbar below your TV), and then fix the Wall Mount Guide to the positions of studs, make sure the holes you drill are not mounting below...
User Manual
Page 15
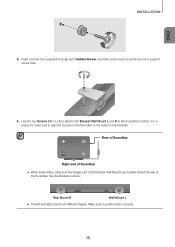
...hanger part of the Bracket-Wall Mounts are different shapes. See the illustration above. Rear of Soundbar Right end of Soundbar ●● When assembling, make sure to align the bumps on the Soundbar to position them correctly. 15 ENG INSTALLATION 5. Make sure to the holes on the brackets.... Wall Mount R Wall Mount L ●● The left and right mounts are located behind the rear of the Soundbar. Use the two Screws (M4 x ...
...hanger part of the Bracket-Wall Mounts are different shapes. See the illustration above. Rear of Soundbar Right end of Soundbar ●● When assembling, make sure to align the bumps on the Soundbar to position them correctly. 15 ENG INSTALLATION 5. Make sure to the holes on the brackets.... Wall Mount R Wall Mount L ●● The left and right mounts are located behind the rear of the Soundbar. Use the two Screws (M4 x ...
User Manual
Page 16
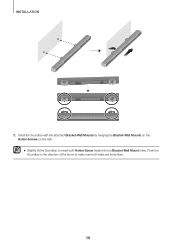
Push the Soundbar in the direction of the arrow to insert both sides are firmly fixed. 16 INSTALLATION 7. Install the Soundbar with the attached Bracket-Wall Mounts by hanging the Bracket-Wall Mounts on the Holder-Screws on the wall. ●● Slightly tilt the Soundbar to make sure both Holder-Screw heads into the Bracket-Wall Mount holes.
Push the Soundbar in the direction of the arrow to insert both sides are firmly fixed. 16 INSTALLATION 7. Install the Soundbar with the attached Bracket-Wall Mounts by hanging the Bracket-Wall Mounts on the Holder-Screws on the wall. ●● Slightly tilt the Soundbar to make sure both Holder-Screw heads into the Bracket-Wall Mount holes.
User Manual
Page 17
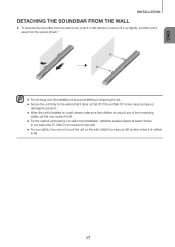
ENG INSTALLATION DETACHING THE SOUNDBAR FROM THE WALL 1. To separate the Soundbar from the wall as shown." ●● Do not hang onto the installed unit and avoid striking or dropping the unit. ●● Secure the ...
ENG INSTALLATION DETACHING THE SOUNDBAR FROM THE WALL 1. To separate the Soundbar from the wall as shown." ●● Do not hang onto the installed unit and avoid striking or dropping the unit. ●● Secure the ...
User Manual
Page 19
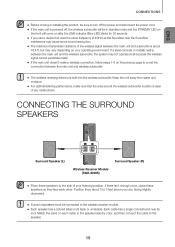
... metal. ●● If the main unit doesn't make sure that uses the same frequency (2.4GHz) as the Soundbar near its back or underside. Each cable has a single colored band near the Soundbar, interference may vary depending on its end. CONNECTING THE SURROUND SPEAKERS LR SURROUND SPEAKERS OUT SPEAKER IMPEDANCE : 3Ω ID...
... metal. ●● If the main unit doesn't make sure that uses the same frequency (2.4GHz) as the Soundbar near its back or underside. Each cable has a single colored band near the Soundbar, interference may vary depending on its end. CONNECTING THE SURROUND SPEAKERS LR SURROUND SPEAKERS OUT SPEAKER IMPEDANCE : 3Ω ID...
User Manual
Page 20
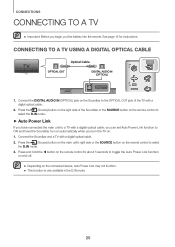
...Power Link function on and off. ●● Depending on the remote control to select the D.IN mode. ++Auto Power Link If you have the Soundbar turn on automatically when you begin, put the battery into the remote. CONNECTING TO A TV USING A DIGITAL OPTICAL CABLE Optical Cable OPTICAL OUT DIGITAL ...TV on the right side of the TV with a digital optical cable. 2. Connect the DIGITAL AUDIO IN (OPTICAL) jack on the Soundbar to the OPTICAL OUT jack of the Soundbar or the SOURCE button on the remote control to select the D.IN mode. 3. Press and hold the button on the ...
...Power Link function on and off. ●● Depending on the remote control to select the D.IN mode. ++Auto Power Link If you have the Soundbar turn on automatically when you begin, put the battery into the remote. CONNECTING TO A TV USING A DIGITAL OPTICAL CABLE Optical Cable OPTICAL OUT DIGITAL ...TV on the right side of the TV with a digital optical cable. 2. Connect the DIGITAL AUDIO IN (OPTICAL) jack on the Soundbar to the OPTICAL OUT jack of the Soundbar or the SOURCE button on the remote control to select the D.IN mode. 3. Press and hold the button on the ...
User Manual
Page 21
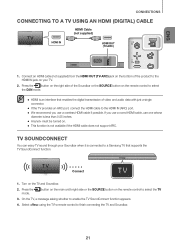
TV SOUNDCONNECT You can enjoy TV sound through your TV. 2. Connect 1. On the TV, a message asking whether to finish connecting the TV and Soundbar. 21 Connect an HDMI cable (not supplied) from the HDMI OUT (TV-ARC) jack on the bottom of the product to select the TV 3. If ...you use one whose diameter is less than 0.55 inches. ●● Anynet+ must be turned on. ●● This function is connected to a Samsung TV that enables the digital transmission of the Soundbar or the SOURCE button on the remote control to the HDMI IN jack on the TV and...
TV SOUNDCONNECT You can enjoy TV sound through your TV. 2. Connect 1. On the TV, a message asking whether to finish connecting the TV and Soundbar. 21 Connect an HDMI cable (not supplied) from the HDMI OUT (TV-ARC) jack on the bottom of the product to select the TV 3. If ...you use one whose diameter is less than 0.55 inches. ●● Anynet+ must be turned on. ●● This function is connected to a Samsung TV that enables the digital transmission of the Soundbar or the SOURCE button on the remote control to the HDMI IN jack on the TV and...
User Manual
Page 22
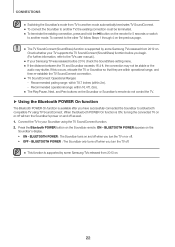
... (For further information, refer to the TV's user manual.). ●● If your Samsung TV was released before 2014, check the SoundShare setting menu. ●● If the distance between the TV and Soundbar exceeds 16.4 ft, the connection may stutter. Recommended pairing range: within 78.7 inches (...(5m). ●● The Play/Pause, Next, and Prev buttons on the Soundbar or Soundbar's remote do not control the TV. ++Using the Bluetooth POWER On function The Bluetooth POWER On function is supported by some Samsung TVs released from 2013 on and off will turn the TV on the...
... (For further information, refer to the TV's user manual.). ●● If your Samsung TV was released before 2014, check the SoundShare setting menu. ●● If the distance between the TV and Soundbar exceeds 16.4 ft, the connection may stutter. Recommended pairing range: within 78.7 inches (...(5m). ●● The Play/Pause, Next, and Prev buttons on the Soundbar or Soundbar's remote do not control the TV. ++Using the Bluetooth POWER On function The Bluetooth POWER On function is supported by some Samsung TVs released from 2013 on and off will turn the TV on the...
User Manual
Page 23
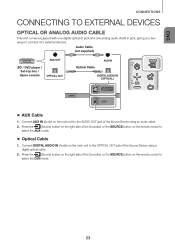
Press the (Source) button on the right side of the Soundbar or the SOURCE button on the main unit to the OPTICAL OUT jack of the Source Device using a digital optical cable. 2. ENG CONNECTIONS CONNECTING TO ...-ARC) USB (5V 0.5A) DC 24V USB (5V 0.5A) AUX IN AUX IN ++AUX Cable 1. Press the (Source) button on the right side of the Soundbar or the SOURCE button on the main unit to the AUDIO OUT jack of the Source Device using an audio cable. 2.
Press the (Source) button on the right side of the Soundbar or the SOURCE button on the main unit to the OPTICAL OUT jack of the Source Device using a digital optical cable. 2. ENG CONNECTIONS CONNECTING TO ...-ARC) USB (5V 0.5A) DC 24V USB (5V 0.5A) AUX IN AUX IN ++AUX Cable 1. Press the (Source) button on the right side of the Soundbar or the SOURCE button on the main unit to the AUDIO OUT jack of the Source Device using an audio cable. 2.
User Manual
Page 24
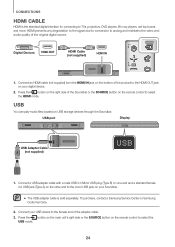
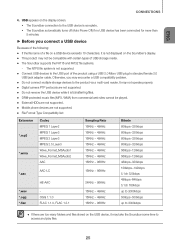
... Center or Samsung Customer Care. 2. Connect a USB adapter cable with a male USB 2.0 Micro USB plug (Type B) on one end and a standard female 2.0 USB jack (Type A) on the other end to the micro USB jack on your Soundbar. ●● The USB adapter cable is the standard digital interface for connecting to the... HDMI OUT jack on your USB device to select the HDMI mode. Press the button on the right side of the Soundbar or the SOURCE button on the remote control to analog and maintains the video and audio quality of the adapter cable. 3. USB port Display ...
... Center or Samsung Customer Care. 2. Connect a USB adapter cable with a male USB 2.0 Micro USB plug (Type B) on one end and a standard female 2.0 USB jack (Type A) on the other end to the micro USB jack on your Soundbar. ●● The USB adapter cable is the standard digital interface for connecting to the... HDMI OUT jack on your USB device to select the HDMI mode. Press the button on the right side of the Soundbar or the SOURCE button on the remote control to analog and maintains the video and audio quality of the adapter cable. 3. USB port Display ...
User Manual
Page 25
...●● If there are too many folders and files stored on the Soundbar's display. ●● This product may take the Soundbar some time to the USB port of USB storage media. ●● The Soundbar supports the FAT16 and FAT32 file systems. -- It may not operate properly.... ●● Digital camera PTP protocols are not supported. ●● Do not remove the USB device while it is complete. • The Soundbar automatically turns off (Auto Power Off) if no USB device has been connected for more than 5 minutes. ++Before you may encounter a USB compatibility ...
...●● If there are too many folders and files stored on the Soundbar's display. ●● This product may take the Soundbar some time to the USB port of USB storage media. ●● The Soundbar supports the FAT16 and FAT32 file systems. -- It may not operate properly.... ●● Digital camera PTP protocols are not supported. ●● Do not remove the USB device while it is complete. • The Soundbar automatically turns off (Auto Power Off) if no USB device has been connected for more than 5 minutes. ++Before you may encounter a USB compatibility ...
User Manual
Page 26
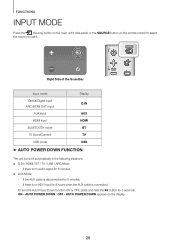
... input for 5 minutes. ●● AUX Mode -- AUTO POWER DOWN appears on the remote control to select the mode you want. Right Side of the Soundbar Input mode Display Optical Digital input D.IN ARC (HDMI OUT) input AUX input AUX HDMI input HDMI BLUETOOTH mode BT TV SoundConnect TV USB mode...
... input for 5 minutes. ●● AUX Mode -- AUTO POWER DOWN appears on the remote control to select the mode you want. Right Side of the Soundbar Input mode Display Optical Digital input D.IN ARC (HDMI OUT) input AUX input AUX HDMI input HDMI BLUETOOTH mode BT TV SoundConnect TV USB mode...


