
User Manual
Page 2
... app remotely controls volume and music on your system across multiple audio devices in the United States and other countries. Dolby and the double-D symbol are registered trademarks, and DTS 2.0 Channel is a trademark of Dolby Laboratories. The terms HDMI and HDMI High-Definition Multimedia Interface, and the HDMI Logo are trademarks or registered trademarks of the internet's subscription streaming music services. HDMI HDMI transmits digital video and audio signals simultaneously...
... app remotely controls volume and music on your system across multiple audio devices in the United States and other countries. Dolby and the double-D symbol are registered trademarks, and DTS 2.0 Channel is a trademark of Dolby Laboratories. The terms HDMI and HDMI High-Definition Multimedia Interface, and the HDMI Logo are trademarks or registered trademarks of the internet's subscription streaming music services. HDMI HDMI transmits digital video and audio signals simultaneously...
User Manual
Page 3
...). NO USER-SERVICEABLE PARTS ARE INSIDE. Class II product : This symbol indicates that any unauthorized changes or modifications to this apparatus to other reproductive harm. Consult Instructions for use shielded cables and connectors for further safety related information. Consequently, the power plug must be determined by turning the equipment off completely, you must be securely attached to the floor/wall in accordance...
...). NO USER-SERVICEABLE PARTS ARE INSIDE. Class II product : This symbol indicates that any unauthorized changes or modifications to this apparatus to other reproductive harm. Consult Instructions for use shielded cables and connectors for further safety related information. Consequently, the power plug must be determined by turning the equipment off completely, you must be securely attached to the floor/wall in accordance...
User Manual
Page 6
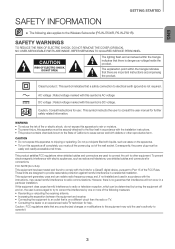
... Assembling the Clamp-Wire 19 CONNECTIONS 19 Connecting the Subwoofer 21 Connecting to a TV 21 Connecting to a TV Using an HDMI (Digital) Cable 21 Connecting to a TV Using a Digital Optical Cable 22 TV SoundConnect 23 Connecting to External Devices 23 HDMI Cable 24 Optical or Analog Audio Cable 25 FUNCTIONS 25 Input Mode 26 Bluetooth 28 Using the Multiroom App 29 Using the Network Standby On Function 30 Software Update 32 TROUBLESHOOTING 32 Troubleshooting 33 APPENDIX 33 Specifications Figures and illustrations in this User Manual are provided...
... Assembling the Clamp-Wire 19 CONNECTIONS 19 Connecting the Subwoofer 21 Connecting to a TV 21 Connecting to a TV Using an HDMI (Digital) Cable 21 Connecting to a TV Using a Digital Optical Cable 22 TV SoundConnect 23 Connecting to External Devices 23 HDMI Cable 24 Optical or Analog Audio Cable 25 FUNCTIONS 25 Input Mode 26 Bluetooth 28 Using the Multiroom App 29 Using the Network Standby On Function 30 Software Update 32 TROUBLESHOOTING 32 Troubleshooting 33 APPENDIX 33 Specifications Figures and illustrations in this User Manual are provided...
User Manual
Page 8
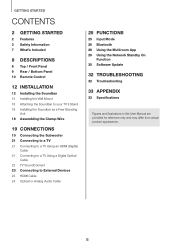
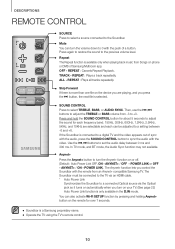
...'s speakers in the Audio Setup menu of the volume level appears in the front panel display. To cancel the (Mute) button setup, press the button for more than 3 seconds sets the button to 6 seconds. ●● When you turn off . VOL. - / + Controls the volume level. The numeric value of your TV. 8 Display Displays the current mode. (Source) Button Selects the D.IN, AUX, HDMI, BT, or TV input. ●● While the unit is powered on, pressing the button...
...'s speakers in the Audio Setup menu of the volume level appears in the front panel display. To cancel the (Mute) button setup, press the button for more than 3 seconds sets the button to 6 seconds. ●● When you turn off . VOL. - / + Controls the volume level. The numeric value of your TV. 8 Display Displays the current mode. (Source) Button Selects the D.IN, AUX, HDMI, BT, or TV input. ●● While the unit is powered on, pressing the button...
User Manual
Page 9
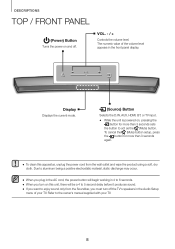
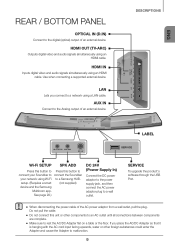
... AUX IN DC 24V Wi-Fi SETUP SPK ADD SERVICE Wi-Fi SETUP SPK ADD DC 24V LABEL SERVICE Wi-Fi SETUP SPK ADD Press this button to Press this unit or other foreign substances could enter the Adapter and cause the Adapter to a network using an HDMI cable. If you connect to malfunction. 9 ENG Rear / Bottom Panel OPTICAL IN (D.IN) Connect to a wall outlet. HDMI IN Inputs digital video and audio signals simultaneously using a LAN cable. setup...
... AUX IN DC 24V Wi-Fi SETUP SPK ADD SERVICE Wi-Fi SETUP SPK ADD DC 24V LABEL SERVICE Wi-Fi SETUP SPK ADD Press this button to Press this unit or other foreign substances could enter the Adapter and cause the Adapter to a network using an HDMI cable. If you connect to malfunction. 9 ENG Rear / Bottom Panel OPTICAL IN (D.IN) Connect to a wall outlet. HDMI IN Inputs digital video and audio signals simultaneously using a LAN cable. setup...
User Manual
Page 10
... AUDIO SYNC. SOUND CONTROL Press to set the audio delay between -6 and +6. ANYNET+ / OFF - POWER LINK). Mute You can also activate Wi-Fi SETUP function by pressing and holding Anynet+ button on the remote for each can be connected to the TV via an HDMI cable. * Auto Power Link Synchronizes the Soundbar to adjust the TREBLE or BASS volume from an Anynet+ compatible Samsung TV. Then, use the [,] buttons to a connected Optical source via the Optical jack so it turns...
... AUDIO SYNC. SOUND CONTROL Press to set the audio delay between -6 and +6. ANYNET+ / OFF - POWER LINK). Mute You can also activate Wi-Fi SETUP function by pressing and holding Anynet+ button on the remote for each can be connected to the TV via an HDMI cable. * Auto Power Link Synchronizes the Soundbar to adjust the TREBLE or BASS volume from an Anynet+ compatible Samsung TV. Then, use the [,] buttons to a connected Optical source via the Optical jack so it turns...
User Manual
Page 11
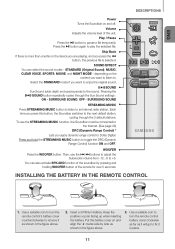
... [,] buttons to adjust the Subwoofer volume from -12, -6 to remove it in the figure above . 3. WOOFER Press the WOOFER button. You can select the sound modes - Use a suitable coin to turn the remote control battery cover clockwise as far as it will go to Dolby Digital. Skip Back If there is selected. depending on and align the '●' marks side by pressing and holding WOOFER button of the unit. SURROUND SOUND STREAMING MUSIC...
... [,] buttons to adjust the Subwoofer volume from -12, -6 to remove it in the figure above . 3. WOOFER Press the WOOFER button. You can select the sound modes - Use a suitable coin to turn the remote control battery cover clockwise as far as it will go to Dolby Digital. Skip Back If there is selected. depending on and align the '●' marks side by pressing and holding WOOFER button of the unit. SURROUND SOUND STREAMING MUSIC...
User Manual
Page 19
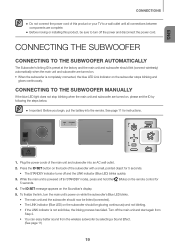
... sound from the wireless subwoofer by following the steps below. ●● Important: Before you begin, put the battery into an AC wall outlet. 2. Connecting to the Subwoofer Manually If the blue LED light does not stop blinking when the main unit and subwoofer are turned on the remote control for instructions. See page 11 for 5 seconds. 4. Press the ID SET button on the back of the subwoofer...
... sound from the wireless subwoofer by following the steps below. ●● Important: Before you begin, put the battery into an AC wall outlet. 2. Connecting to the Subwoofer Manually If the blue LED light does not stop blinking when the main unit and subwoofer are turned on the remote control for instructions. See page 11 for 5 seconds. 4. Press the ID SET button on the back of the subwoofer...
User Manual
Page 21
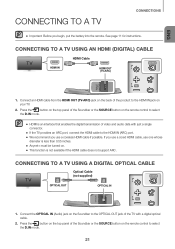
... ADD SERVICE 1. Press the button on the top panel of video and audio data with a digital optical cable. 2. Connecting to a TV Using an HDMI (Digital) Cable HDMI Cable HDMI IN HDMI OUT (TV-ARC) OPTICAL IN HDMI OUT (TV-ARC) HDMI IN LAN AUX IN DC 24V Wi-Fi SETUP SPK ADD SERVICE 1. Connect an HDMI cable from the HDMI OUT (TV-ARC) jack on the back of the product to the HDMI IN jack on the remote control to select the D.IN mode...
... ADD SERVICE 1. Press the button on the top panel of video and audio data with a digital optical cable. 2. Connecting to a TV Using an HDMI (Digital) Cable HDMI Cable HDMI IN HDMI OUT (TV-ARC) OPTICAL IN HDMI OUT (TV-ARC) HDMI IN LAN AUX IN DC 24V Wi-Fi SETUP SPK ADD SERVICE 1. Connect an HDMI cable from the HDMI OUT (TV-ARC) jack on the back of the product to the HDMI IN jack on the remote control to select the D.IN mode...
User Manual
Page 22
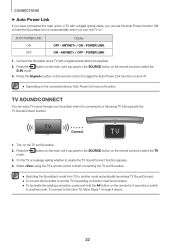
... Auto Power function ON to have connected the main unit to another mode. Connect the Soundbar and a TV with a digital optical cable, you turn on automatically when you can enjoy TV sound through 4 above. 22 button on the main unit's top panel or the SOURCE button on the remote control to select the TV 3. ANYNET+ / OFF - Press the button on the main unit's top panel or the SOURCE button on the remote control to select...
... Auto Power function ON to have connected the main unit to another mode. Connect the Soundbar and a TV with a digital optical cable, you turn on automatically when you can enjoy TV sound through 4 above. 22 button on the main unit's top panel or the SOURCE button on the remote control to select the TV 3. ANYNET+ / OFF - Press the button on the main unit's top panel or the SOURCE button on the remote control to select...
User Manual
Page 23
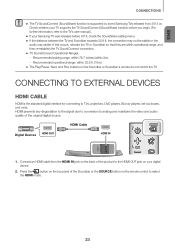
... the video and audio quality of the original digital source. Connect an HDMI cable from 2012 on. Recommended operational range: within 2m). -- HDMI prevents any degradation to the signal due to conversion to TVs, projectors, DVD players, Blu-ray players, set top boxes, and more. Recommended pairing range: within 78.7 inches (within 32.8 ft. (10m). ●● The Play/Pause, Next, and Prev buttons on the remote control to the TV's user manual...
... the video and audio quality of the original digital source. Connect an HDMI cable from 2012 on. Recommended operational range: within 2m). -- HDMI prevents any degradation to the signal due to conversion to TVs, projectors, DVD players, Blu-ray players, set top boxes, and more. Recommended pairing range: within 78.7 inches (within 32.8 ft. (10m). ●● The Play/Pause, Next, and Prev buttons on the remote control to the TV's user manual...
User Manual
Page 24
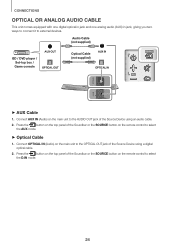
... SOURCE button on the top panel of the Source Device using an audio cable. 2. Audio Cable (not supplied) BD / DVD player / Set-top box / Game console AUX OUT OPTICAL OUT Optical Cable (not supplied) AUX IN OPTICAL IN OPTICAL IN HDMI OUT (TV-ARC) HDMI IN LAN AUX IN DC 24V Wi-Fi SETUP SPK ADD 5V 0.5A ++AUX Cable 1. Press the button on the remote control to select the AUX mode. ++Optical Cable 1. Press the button on the remote control to select the D.IN mode. 24 CONNECTIONS Optical or Analog Audio Cable...
... SOURCE button on the top panel of the Source Device using an audio cable. 2. Audio Cable (not supplied) BD / DVD player / Set-top box / Game console AUX OUT OPTICAL OUT Optical Cable (not supplied) AUX IN OPTICAL IN OPTICAL IN HDMI OUT (TV-ARC) HDMI IN LAN AUX IN DC 24V Wi-Fi SETUP SPK ADD 5V 0.5A ++AUX Cable 1. Press the button on the remote control to select the AUX mode. ++Optical Cable 1. Press the button on the remote control to select the D.IN mode. 24 CONNECTIONS Optical or Analog Audio Cable...

User Manual
Page 26
... Soundbar. -- Connect Bluetooth device 1. Select the Bluetooth menu on the connected device. • You can listen to the Bluetooth device's user manual.) 3. An underline " _ " will be displayed in English. • If the Bluetooth device has failed to pair with high quality stereo sound, all without wires! However, these functions are available on the connected Bluetooth device over the Soundbar. • In BT mode, the Play / Pause / Next / Prev functions are...
... Soundbar. -- Connect Bluetooth device 1. Select the Bluetooth menu on the connected device. • You can listen to the Bluetooth device's user manual.) 3. An underline " _ " will be displayed in English. • If the Bluetooth device has failed to pair with high quality stereo sound, all without wires! However, these functions are available on the connected Bluetooth device over the Soundbar. • In BT mode, the Play / Pause / Next / Prev functions are...
User Manual
Page 27
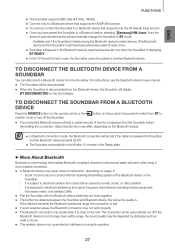
...; When the Soundbar is disconnected from A Bluetooth device Press the SOURCE button on the remote control or the another Bluetooth device. A part of range. If the distance exceeds the Bluetooth operational range, the connection is lost if the distance between the Soundbar and Bluetooth device, the worse the quality is a technology that supports only the HF (Hands Free) function. ●● Once you have...
...; When the Soundbar is disconnected from A Bluetooth device Press the SOURCE button on the remote control or the another Bluetooth device. A part of range. If the distance exceeds the Bluetooth operational range, the connection is lost if the distance between the Soundbar and Bluetooth device, the worse the quality is a technology that supports only the HF (Hands Free) function. ●● Once you have...
User Manual
Page 29
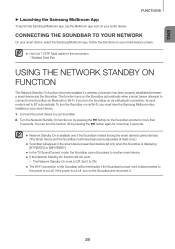
If the power is cut off by pressing the ] button on via a Bluetooth connection, its input mode is set to BT automatically. Follow the directions on your smart device's screen. ●● Use Cat 7 (*STP Type) cable for more than 5 seconds. ENG FUNCTIONS ++Launching the Samsung Multiroom App To launch the Samsung Multiroom app, tap the Multiroom app icon on the Soundbar automatically when a smart...
If the power is cut off by pressing the ] button on via a Bluetooth connection, its input mode is set to BT automatically. Follow the directions on your smart device's screen. ●● Use Cat 7 (*STP Type) cable for more than 5 seconds. ENG FUNCTIONS ++Launching the Samsung Multiroom App To launch the Samsung Multiroom app, tap the Multiroom app icon on the Soundbar automatically when a smart...
User Manual
Page 30
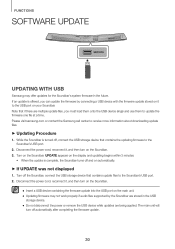
... the firmware update. 30 OPTICAL IN HDMI OUT (TV-ARC) HDMI IN LAN AUX IN DC 24V Wi-Fi SETUP SPK ADD SERVICE FUNCTIONS Software Update SERVICE Updating with USB Samsung may not work properly if audio files supported by connecting a USB device with the firmware update stored on it to the USB port on the Soundbar. 3. Turn on automatically. ++If UPDATE was not displayed 1. Note that contains the updating firmware to update the firmware one file at a time. Disconnect the power cord...
... the firmware update. 30 OPTICAL IN HDMI OUT (TV-ARC) HDMI IN LAN AUX IN DC 24V Wi-Fi SETUP SPK ADD SERVICE FUNCTIONS Software Update SERVICE Updating with USB Samsung may not work properly if audio files supported by connecting a USB device with the firmware update stored on it to the USB port on the Soundbar. 3. Turn on automatically. ++If UPDATE was not displayed 1. Note that contains the updating firmware to update the firmware one file at a time. Disconnect the power cord...
User Manual
Page 31
... reconnect it is not re-established automatically after the update. If the firmware fails to their factory default settings. Note that you write down your settings so that updating firmware resets the subwoofer connection too. If the connection to the Soundbar will be supported. ENG FUNCTIONS ●● After the update, all settings are reset to update, we recommend formatting the USB device in FAT16 and trying again. ●●...
... reconnect it is not re-established automatically after the update. If the firmware fails to their factory default settings. Note that you write down your settings so that updating firmware resets the subwoofer connection too. If the connection to the Soundbar will be supported. ENG FUNCTIONS ●● After the update, all settings are reset to update, we recommend formatting the USB device in FAT16 and trying again. ●●...
User Manual
Page 32
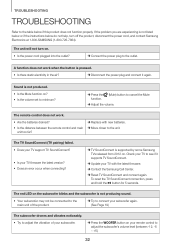
... to adjust the vibration of your subwoofer. ¼¼Press the WOOFER button on your TV firmware the latest version? • Does an error occur when connecting? ¼¼TV SoundConnect is supported by some Samsung TVs released from 2012 on. The red LED on the subwoofer blinks and the subwoofer is not produced. • Is the Mute function on . • Is the power cord plugged into...
... to adjust the vibration of your subwoofer. ¼¼Press the WOOFER button on your TV firmware the latest version? • Does an error occur when connecting? ¼¼TV SoundConnect is supported by some Samsung TVs released from 2012 on. The red LED on the subwoofer blinks and the subwoofer is not produced. • Is the Mute function on . • Is the power cord plugged into...
User Manual
Page 33
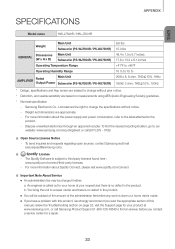
... this manual, review the Troubleshooting section on measurements using AES (Audio Engineering Society) guidelines. * Nominal specification -- To send inquiries and requests regarding open sources, contact Samsung via Email (oss.request@samsung.com). To find an answer before you read the appropriate section of the administration fee before any work is done or a home visit is made. ●● If you have a problem with...
... this manual, review the Troubleshooting section on measurements using AES (Audio Engineering Society) guidelines. * Nominal specification -- To send inquiries and requests regarding open sources, contact Samsung via Email (oss.request@samsung.com). To find an answer before you read the appropriate section of the administration fee before any work is done or a home visit is made. ●● If you have a problem with...
User Manual
Page 34
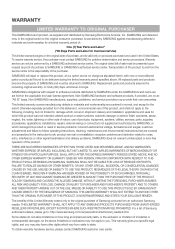
... original date of products, equipment, systems, utilities, services, parts, supplies, accessories, applications, installations, repairs, external wiring or connectors not supplied and authorized by SAMSUNG, or which damage this product or result in service problems; product removal or reinstallation; reception problems and distortion related to you may also have other rights which vary from the service center is the responsibility of the product. This...
... original date of products, equipment, systems, utilities, services, parts, supplies, accessories, applications, installations, repairs, external wiring or connectors not supplied and authorized by SAMSUNG, or which damage this product or result in service problems; product removal or reinstallation; reception problems and distortion related to you may also have other rights which vary from the service center is the responsibility of the product. This...

