
User Manual (user Manual) (ver.1.0) (English)
Page 5
... SETUP 29 2 Safety Warnings 3 Important Safety Instructions 4 Precautions 7 Key features of your new AV Receiver 8 Accessories 9 Description 9 Front Panel 10 Display 11 Rear Panel 12 Remote Control 15 Speaker Positioning 17 Connecting the Speakers 19 Connecting External Devices/your TV via HDMI 20 HDMI Function 21 Connecting to your TV 22... Sync 42 Tone Control 43 MP3 Enhancer 43 Smart Volume 44 Auto Calibration Setup 45 DRC Setup 45 Dual Mono Setup 46 HDMI Setup ENGLISH HW-D600_D650S_XAA_0616.indd 5 5 English 2011-06-16 10:27:06
... SETUP 29 2 Safety Warnings 3 Important Safety Instructions 4 Precautions 7 Key features of your new AV Receiver 8 Accessories 9 Description 9 Front Panel 10 Display 11 Rear Panel 12 Remote Control 15 Speaker Positioning 17 Connecting the Speakers 19 Connecting External Devices/your TV via HDMI 20 HDMI Function 21 Connecting to your TV 22... Sync 42 Tone Control 43 MP3 Enhancer 43 Smart Volume 44 Auto Calibration Setup 45 DRC Setup 45 Dual Mono Setup 46 HDMI Setup ENGLISH HW-D600_D650S_XAA_0616.indd 5 5 English 2011-06-16 10:27:06

User Manual (user Manual) (ver.1.0) (English)
Page 6
...the Display 53 Reset Function 54 Using Headphones 54 Software Upgrade 55 Operating your TV with the Remote Control 56 Operating your DVD or BD Player with the Remote Control 57 Troubleshooting 58 Product Protection Function 58 Auto Calibration Error List 59 Specifications ...• Figures and illustrations in this User Manual are provided for reference only and may differ from actual product appearance. 6 English HW-D600_D650S_XAA_0616.indd 6...
...the Display 53 Reset Function 54 Using Headphones 54 Software Upgrade 55 Operating your TV with the Remote Control 56 Operating your DVD or BD Player with the Remote Control 57 Troubleshooting 58 Product Protection Function 58 Auto Calibration Error List 59 Specifications ...• Figures and illustrations in this User Manual are provided for reference only and may differ from actual product appearance. 6 English HW-D600_D650S_XAA_0616.indd 6...

User Manual (user Manual) (ver.1.0) (English)
Page 8
...'s manual (AH68-02354X) (For Speaker cable) iPod Dock (AH96-00051A) ASC microphone (AH30-00099A) Toroidal Ferrite Core (3301-000144) 8 English HW-D600_D650S_XAA_0616.indd 8 2011-06-16 10:27:07 Getting Started DTS-ES (Extended Surround) The DTS-ES (Extended Surround) system is available only in...Supporting full compatibility with the supplied iPod dock. iPod You can be used to operate this AV Receiver with a Samsung TV remote control, by connecting the receiver to a SAMSUNG TV using an HDMI Cable. (This function is a new multi digital signal format that was developed by connecting...
...'s manual (AH68-02354X) (For Speaker cable) iPod Dock (AH96-00051A) ASC microphone (AH30-00099A) Toroidal Ferrite Core (3301-000144) 8 English HW-D600_D650S_XAA_0616.indd 8 2011-06-16 10:27:07 Getting Started DTS-ES (Extended Surround) The DTS-ES (Extended Surround) system is available only in...Supporting full compatibility with the supplied iPod dock. iPod You can be used to operate this AV Receiver with a Samsung TV remote control, by connecting the receiver to a SAMSUNG TV using an HDMI Cable. (This function is a new multi digital signal format that was developed by connecting...

User Manual (user Manual) (ver.1.0) (English)
Page 12
Getting Started Remote Control Tour of the Remote Control INPUT SELECT POWER TV SOURCE 1 20 2 21 3 AMP TV BD DVD 22 123 4 456 23 NEO:6 SLEEP DIMMER 5 78 9 24 PROLOGIC AUDIO ASSIGN DSP 25 6 0 26 7 27 8 28 9 MUTE 10 VOL S.DIRECT TUNING /CH 29 11 30 TONE MO/ST TUNER MEMORY 12 SETUP/MENU 13 31 INFO 32 14 33 15 RETURN EXIT 34 16 BD/DVD SAT GAME/TV CD AV SYNC AUX iPod TUNER 17 ASC SUB WOOFER CROSS OVER 3D SOUND 18 35 19 36 12 English HW-D600_D650S_XAA_0616.indd 12 2011-06-16 10:27:10
Getting Started Remote Control Tour of the Remote Control INPUT SELECT POWER TV SOURCE 1 20 2 21 3 AMP TV BD DVD 22 123 4 456 23 NEO:6 SLEEP DIMMER 5 78 9 24 PROLOGIC AUDIO ASSIGN DSP 25 6 0 26 7 27 8 28 9 MUTE 10 VOL S.DIRECT TUNING /CH 29 11 30 TONE MO/ST TUNER MEMORY 12 SETUP/MENU 13 31 INFO 32 14 33 15 RETURN EXIT 34 16 BD/DVD SAT GAME/TV CD AV SYNC AUX iPod TUNER 17 ASC SUB WOOFER CROSS OVER 3D SOUND 18 35 19 36 12 English HW-D600_D650S_XAA_0616.indd 12 2011-06-16 10:27:10

User Manual (user Manual) (ver.1.0) (English)
Page 14
...may differ in voltage. Always replace both batteries at a horizontal angle of up to 30° from the remote control sensor. 14 English HW-D600_D650S_XAA_0616.indd 14 2011-06-16 10:27:11 Getting Started 27 SEARCH BUTTON 28 PAUSE BUTTON 29 TUNING/CHANNEL BUTTONS ...radio frequency. Press to adjust the crossover frequency. Press to select S.DIRECT mode. Display information on a connected device. Installing batteries in the Remote Control ✎ NOTE Follow these precautions to avoid leaking or cracking cells: Place batteries in the SETUP menu. It can also ...
...may differ in voltage. Always replace both batteries at a horizontal angle of up to 30° from the remote control sensor. 14 English HW-D600_D650S_XAA_0616.indd 14 2011-06-16 10:27:11 Getting Started 27 SEARCH BUTTON 28 PAUSE BUTTON 29 TUNING/CHANNEL BUTTONS ...radio frequency. Press to adjust the crossover frequency. Press to select S.DIRECT mode. Display information on a connected device. Installing batteries in the Remote Control ✎ NOTE Follow these precautions to avoid leaking or cracking cells: Place batteries in the SETUP menu. It can also ...
User Manual (user Manual) (ver.1.0) (English)
Page 20
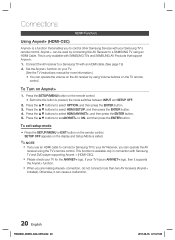
... 19) 2. Connect the AV receiver to select OPTION, and then press the ENTER button. 3. Press the ▲▼ buttons to a Samsung TV with your Samsung TV's remote control. Press the ▲▼ buttons to set ANYNET+ to select HDMI SETUP, and then press the ENTER button. 4. Press the ..., it supports the Anynet+ function. When you can operate the volume on the TV remote control. To exit setup mode • Press the SETUP/MENU or EXIT button on Anynet+ 1. Anynet + can cause a malfunction. 20 English HW-D600_D650S_XAA_0616.indd 20 2011-06-16 10:27:26
... 19) 2. Connect the AV receiver to select OPTION, and then press the ENTER button. 3. Press the ▲▼ buttons to a Samsung TV with your Samsung TV's remote control. Press the ▲▼ buttons to set ANYNET+ to select HDMI SETUP, and then press the ENTER button. 4. Press the ..., it supports the Anynet+ function. When you can operate the volume on the TV remote control. To exit setup mode • Press the SETUP/MENU or EXIT button on Anynet+ 1. Anynet + can cause a malfunction. 20 English HW-D600_D650S_XAA_0616.indd 20 2011-06-16 10:27:26

User Manual (user Manual) (ver.1.0) (English)
Page 26
... VIDEO ✎ NOTE You must have the VIDEO (Monitor or TV) output connected to connect the dock connector so that the label "SAMSUNG" faces upward. 26 English HW-D600_D650S_XAA_0616.indd 26 2011-06-16 10:27:44 For iPod operation with your TV to a moderate level before inserting it into the... on and you should set the player's TV Out option to audio from an iPod through the main unit. Press the iPod button on the remote control. • You can listen to On before you connect your reciever. 2. Connections Connecting an iPod You can also use the INPUT SELECT on the...
... VIDEO ✎ NOTE You must have the VIDEO (Monitor or TV) output connected to connect the dock connector so that the label "SAMSUNG" faces upward. 26 English HW-D600_D650S_XAA_0616.indd 26 2011-06-16 10:27:44 For iPod operation with your TV to a moderate level before inserting it into the... on and you should set the player's TV Out option to audio from an iPod through the main unit. Press the iPod button on the remote control. • You can listen to On before you connect your reciever. 2. Connections Connecting an iPod You can also use the INPUT SELECT on the...

User Manual (user Manual) (ver.1.0) (English)
Page 29
...on the display screen. Before Using the AV Receiver Turning On/Off Connect the power plug to display the "INPUT" message on the remote control. Remote Control Functions You can directly select the desired function. Press SETUP/MENU to the outlet. To Select a Function Method 1 Press the ...to Standby mode. 03 Setup Setup For your AMP (this AV receiver)/ TV and BD(Samsung only)/DVD player with this remote control. INPUT INPUT SELECTION SPEAKER Q SURROUND OPTION > MOVE SELECT ' RETURN EXIT HW-D600_D650S_XAA_0616.indd 29 29 English 2011-06-16 10:27:51 See pages 55 ~ 56...
...on the display screen. Before Using the AV Receiver Turning On/Off Connect the power plug to display the "INPUT" message on the remote control. Remote Control Functions You can directly select the desired function. Press SETUP/MENU to the outlet. To Select a Function Method 1 Press the ...to Standby mode. 03 Setup Setup For your AMP (this AV receiver)/ TV and BD(Samsung only)/DVD player with this remote control. INPUT INPUT SELECTION SPEAKER Q SURROUND OPTION > MOVE SELECT ' RETURN EXIT HW-D600_D650S_XAA_0616.indd 29 29 English 2011-06-16 10:27:51 See pages 55 ~ 56...

User Manual (user Manual) (ver.1.0) (English)
Page 30
..., the TV ARC menu will be displayed only if an ARC-compliant TV is connected. 30 English HW-D600_D650S_XAA_0616.indd 30 2011-06-16 10:27:51 Press the INPUT SELECT button on the remote control to select the audio input source of the external device you have connected. • Each time... your AV Receiver. You can listen to sound of an external audio component to the optical or coaxial digital audio input jack on the remote control to select a desired function (BD/DVD, SAT, TV, CD, AUX).
..., the TV ARC menu will be displayed only if an ARC-compliant TV is connected. 30 English HW-D600_D650S_XAA_0616.indd 30 2011-06-16 10:27:51 Press the INPUT SELECT button on the remote control to select the audio input source of the external device you have connected. • Each time... your AV Receiver. You can listen to sound of an external audio component to the optical or coaxial digital audio input jack on the remote control to select a desired function (BD/DVD, SAT, TV, CD, AUX).
User Manual (user Manual) (ver.1.0) (English)
Page 34
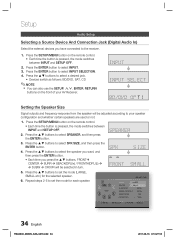
... ENTER button. 3. BD/DVD, SAT, CD ✎ NOTE You can also use the SETUP, ,,., ENTER, RETURN buttons on the remote control. • Each time the button is pressed, the mode switches between INPUT and SETUP OFF. 2. Press the ▲▼ buttons to select INPUT...LARGE, SMALL etc.) for each speaker. Press the ▲▼ buttons to select INPUT SELECTION. 4. Press the SETUP/MENU button on the remote control. • Each time the button is pressed, the mode switches between INPUT and SETUP OFF. 2. USER SPEAKER SIZE FRONT LA:RGESMALL CENTER...
... ENTER button. 3. BD/DVD, SAT, CD ✎ NOTE You can also use the SETUP, ,,., ENTER, RETURN buttons on the remote control. • Each time the button is pressed, the mode switches between INPUT and SETUP OFF. 2. Press the ▲▼ buttons to select INPUT...LARGE, SMALL etc.) for each speaker. Press the ▲▼ buttons to select INPUT SELECTION. 4. Press the SETUP/MENU button on the remote control. • Each time the button is pressed, the mode switches between INPUT and SETUP OFF. 2. USER SPEAKER SIZE FRONT LA:RGESMALL CENTER...

User Manual (user Manual) (ver.1.0) (English)
Page 35
HW-D600_D650S_XAA_0616.indd 35 35 English 2011-06-16 10:27:56 SETUP OFF appears on the front of your AV Receiver. ..., you can also change the crossover frequency by using large speakers. To exit setup mode - • Press the SETUP/MENU or EXIT button on the remote control. Setting the Speaker SPEAKER FRONT (Front) CENTER (Center) SURR (Surround) SBACK (Surround Back) FRONTH (Front Height) SUBW (Subwoofer) CROVR (Crossover Frequency)..., NO YES 60, 80, 100,120, 150, 180, 200(Hz) 100Hz • LARGE : Select when using the CROSS OVER, buttons on the remote control.
HW-D600_D650S_XAA_0616.indd 35 35 English 2011-06-16 10:27:56 SETUP OFF appears on the front of your AV Receiver. ..., you can also change the crossover frequency by using large speakers. To exit setup mode - • Press the SETUP/MENU or EXIT button on the remote control. Setting the Speaker SPEAKER FRONT (Front) CENTER (Center) SURR (Surround) SBACK (Surround Back) FRONTH (Front Height) SUBW (Subwoofer) CROVR (Crossover Frequency)..., NO YES 60, 80, 100,120, 150, 180, 200(Hz) 100Hz • LARGE : Select when using the CROSS OVER, buttons on the remote control.

User Manual (user Manual) (ver.1.0) (English)
Page 36
...method and installation site of the speaker to music properly. 1. With this if you may not use the following feature: PLIIz. 36 English HW-D600_D650S_XAA_0616.indd 36 2011-06-16 10:27:56 Press the ▲▼ to select a proper setting for the surround back speaker. &#...7.1 CHANNEL settings according to install the surround back speaker in the speaker menu: SPEAKER SIZE, SPEAKER LEVEL, SPEAKER DISTANCE. Depending on the remote control. • Each time the button is pressed, the mode switches between INPUT and SETUP OFF. 2. Press the SETUP/MENU button on your...
...method and installation site of the speaker to music properly. 1. With this if you may not use the following feature: PLIIz. 36 English HW-D600_D650S_XAA_0616.indd 36 2011-06-16 10:27:56 Press the ▲▼ to select a proper setting for the surround back speaker. &#...7.1 CHANNEL settings according to install the surround back speaker in the speaker menu: SPEAKER SIZE, SPEAKER LEVEL, SPEAKER DISTANCE. Depending on the remote control. • Each time the button is pressed, the mode switches between INPUT and SETUP OFF. 2. Press the SETUP/MENU button on your...

User Manual (user Manual) (ver.1.0) (English)
Page 37
HW-D600_D650S_XAA_0616.indd 37 37 English 2011-06-16 10:27:57 Press the SETUP/MENU button on the remote control. • Each time the button is pressed, the mode switches between 1ft ~ 30ft (0.3~9.0m) in intervals of 1ft (0.3m). FRONT LEFT FRONT RIGHT CENTER ...
HW-D600_D650S_XAA_0616.indd 37 37 English 2011-06-16 10:27:57 Press the SETUP/MENU button on the remote control. • Each time the button is pressed, the mode switches between 1ft ~ 30ft (0.3~9.0m) in intervals of 1ft (0.3m). FRONT LEFT FRONT RIGHT CENTER ...

User Manual (user Manual) (ver.1.0) (English)
Page 38
... OFF. 2. Press the ▲▼ buttons to select SPK LEVEL, and then press the ENTER button. 4. Press the SETUP/MENU button on the remote control. 38 English HW-D600_D650S_XAA_0616.indd 38 2011-06-16 10:27:57 Press the ▲▼ buttons to select SPEAKER, and then press the ENTER button. 3. Setup...
... OFF. 2. Press the ▲▼ buttons to select SPK LEVEL, and then press the ENTER button. 4. Press the SETUP/MENU button on the remote control. 38 English HW-D600_D650S_XAA_0616.indd 38 2011-06-16 10:27:57 Press the ▲▼ buttons to select SPEAKER, and then press the ENTER button. 3. Setup...

User Manual (user Manual) (ver.1.0) (English)
Page 39
... automatically output as follows : F.L FHL CEN S.W FHR F.R S.R S.L. 39 English HW-D600_D650S_XAA_0616.indd 39 2011-06-16 10:27:58 Each time you press the ENTER button, F.L CEN S.W F.R S.R... -10 ~ +10dB • SBL (surround back left) : -10 ~ +10dB • SBR (surround back right) : -10 ~ +10dB - SETUP OFF appears on the remote control. • Each time the button is pressed, the mode switches between INPUT and SETUP OFF. 2. F.L CEN S.W F.R S.R ...
... automatically output as follows : F.L FHL CEN S.W FHR F.R S.R S.L. 39 English HW-D600_D650S_XAA_0616.indd 39 2011-06-16 10:27:58 Each time you press the ENTER button, F.L CEN S.W F.R S.R... -10 ~ +10dB • SBL (surround back left) : -10 ~ +10dB • SBR (surround back right) : -10 ~ +10dB - SETUP OFF appears on the remote control. • Each time the button is pressed, the mode switches between INPUT and SETUP OFF. 2. F.L CEN S.W F.R S.R ...

User Manual (user Manual) (ver.1.0) (English)
Page 40
Press the SETUP/MENU button on the remote control. • MOVIE : Adds realism to the movie soundtrack. • MUSIC : Provides up to 7.1 channel surround sound for an exciting "wraparound" effect with 5.1 channel surround ... less sound comes from the front or surround.) • C- Press the PROLOGIC button on the remote control. • Each time the button is set ON, Dolby Pro Logic IIx can not be used. 40 English HW-D600_D650S_XAA_0616.indd 40 2011-06-16 10:27:58 Press the ▲▼ buttons to 7.1 channel...
Press the SETUP/MENU button on the remote control. • MOVIE : Adds realism to the movie soundtrack. • MUSIC : Provides up to 7.1 channel surround sound for an exciting "wraparound" effect with 5.1 channel surround ... less sound comes from the front or surround.) • C- Press the PROLOGIC button on the remote control. • Each time the button is set ON, Dolby Pro Logic IIx can not be used. 40 English HW-D600_D650S_XAA_0616.indd 40 2011-06-16 10:27:58 Press the ▲▼ buttons to 7.1 channel...
User Manual (user Manual) (ver.1.0) (English)
Page 41
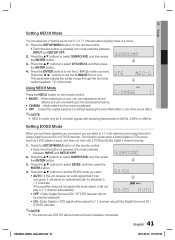
... the C-IMAGE from 0 to the movie soundtrack. • OFF : Output the original signal as it is without surround back speakers connected. 41 English HW-D600_D650S_XAA_0616.indd 41 2011-06-16 10:27:59 Setting EX/ES Mode When surround back speakers are connected, you can experience sound effects as... a DVD player) is the wider. Using NEO:6 Mode Press the NEO:6 button on the remote control. • Each time the button is pressed, the mode switches between INPUT and SETUP OFF. 2. Press the SETUP/MENU button on the...
... the C-IMAGE from 0 to the movie soundtrack. • OFF : Output the original signal as it is without surround back speakers connected. 41 English HW-D600_D650S_XAA_0616.indd 41 2011-06-16 10:27:59 Setting EX/ES Mode When surround back speakers are connected, you can experience sound effects as... a DVD player) is the wider. Using NEO:6 Mode Press the NEO:6 button on the remote control. • Each time the button is pressed, the mode switches between INPUT and SETUP OFF. 2. Press the SETUP/MENU button on the...

User Manual (user Manual) (ver.1.0) (English)
Page 42
... ► buttons to set the Tone Control mode you press this occurs, adjust the audio delay time to the front channels only. 42 English HW-D600_D650S_XAA_0616.indd 42 2011-06-16 10:27:59 Tone Control This will be applied to match the video. 1. Press the ▲▼ buttons... and louder at +6dB. ✎ NOTE The Tone Control function can be selected in 10MS steps. Press the SETUP/MENU button on the remote control. • Each time the button is pressed, the mode switches between INPUT and SETUP OFF. 2. Press the ▲▼ buttons to select ON...
... ► buttons to set the Tone Control mode you press this occurs, adjust the audio delay time to the front channels only. 42 English HW-D600_D650S_XAA_0616.indd 42 2011-06-16 10:27:59 Tone Control This will be applied to match the video. 1. Press the ▲▼ buttons... and louder at +6dB. ✎ NOTE The Tone Control function can be selected in 10MS steps. Press the SETUP/MENU button on the remote control. • Each time the button is pressed, the mode switches between INPUT and SETUP OFF. 2. Press the ▲▼ buttons to select ON...
User Manual (user Manual) (ver.1.0) (English)
Page 43
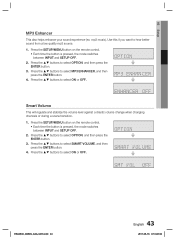
Press the SETUP/MENU button on the remote control. • Each time the button is pressed, the mode switches between INPUT and SETUP OFF. 2. Press the ▲▼ buttons to select ON or ... press the ENTER button. 3. Press the ▲▼ buttons to select ON or OFF. HW-D600_D650S_XAA_0616.indd 43 43 English 2011-06-16 10:28:00 Press the SETUP/MENU button on the remote control. • Each time the button is pressed, the mode switches between INPUT and SETUP OFF...
Press the SETUP/MENU button on the remote control. • Each time the button is pressed, the mode switches between INPUT and SETUP OFF. 2. Press the ▲▼ buttons to select ON or ... press the ENTER button. 3. Press the ▲▼ buttons to select ON or OFF. HW-D600_D650S_XAA_0616.indd 43 43 English 2011-06-16 10:28:00 Press the SETUP/MENU button on the remote control. • Each time the button is pressed, the mode switches between INPUT and SETUP OFF...

User Manual (user Manual) (ver.1.0) (English)
Page 44
Before Setting - 1. Press the SETUP/MENU button on the remote control. • Each time the button is pressed, the mode switches between channels, and frequency characteristics to create a 5.1-channel sound field optimized for your ... SW 0dB 0.3m FR 0dB 0.3m SR 0dB 0.3m SBR 0dB 0.0m SELECT ' RETURN EXIT To cancel the Auto Calibration setup. ASC Microphone 44 English HW-D600_D650S_XAA_0616.indd 44 2011-06-16 10:28:00 Press the ASC button on the front panel, and then press the ENTER button. 1. Press the...
Before Setting - 1. Press the SETUP/MENU button on the remote control. • Each time the button is pressed, the mode switches between channels, and frequency characteristics to create a 5.1-channel sound field optimized for your ... SW 0dB 0.3m FR 0dB 0.3m SR 0dB 0.3m SBR 0dB 0.0m SELECT ' RETURN EXIT To cancel the Auto Calibration setup. ASC Microphone 44 English HW-D600_D650S_XAA_0616.indd 44 2011-06-16 10:28:00 Press the ASC button on the front panel, and then press the ENTER button. 1. Press the...


