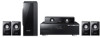

User Manual (user Manual) (ver.1.0) (English)
Page 3
...of Communications Radio Interference Regulations This digital apparatus (Wireless Internet Radio) does not exceed the Class B limits for your body. HW-C500-C560S-XAA_0609.indd 3 3 2010-06-09 5:10:56 Keep these operating instructions carefully before using the unit. Operation is required when... with the manufacturer's instructions. 8) Do not install near water. 6) Clean only with FCC radiation exposure limits set out in conjunction with any heat sources such as set forth an uncontrolled environment. A grounding type plug has two blades and a third grounding prong.
...of Communications Radio Interference Regulations This digital apparatus (Wireless Internet Radio) does not exceed the Class B limits for your body. HW-C500-C560S-XAA_0609.indd 3 3 2010-06-09 5:10:56 Keep these operating instructions carefully before using the unit. Operation is required when... with the manufacturer's instructions. 8) Do not install near water. 6) Clean only with FCC radiation exposure limits set out in conjunction with any heat sources such as set forth an uncontrolled environment. A grounding type plug has two blades and a third grounding prong.
User Manual (user Manual) (ver.1.0) (English)
Page 6
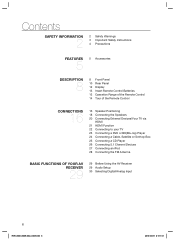
.../Your TV via HDMI 21 HDMI Function 22 Connecting to your TV 23 Connecting a DVD or BD(Blu-ray) Player 24 Connecting a Cable, Satellite or Set-top Box 25 Connecting a CD Player 26 Connecting 5.1 Channel Devices 27 Connecting an iPod 28 Connecting the FM Antenna BASIC FUNCTIONS OF YOUR AV RECEIVER...
.../Your TV via HDMI 21 HDMI Function 22 Connecting to your TV 23 Connecting a DVD or BD(Blu-ray) Player 24 Connecting a Cable, Satellite or Set-top Box 25 Connecting a CD Player 26 Connecting 5.1 Channel Devices 27 Connecting an iPod 28 Connecting the FM Antenna BASIC FUNCTIONS OF YOUR AV RECEIVER...

User Manual (user Manual) (ver.1.0) (English)
Page 7
... Control 41 AV SYNC 41 MP3 Enhancer 41 Smart Volume 42 ASC (Auto Sound Calibration) Setup 43 DRC Setup 43 HDMI Setup 43 Variable Set OPERATION 44 44 Using the Surround Modes 45 Using the Subwoofer Selection Button 46 Listening to the Radio 47 Using an iPod 49 Convenient Functions ... With the Remote Control 53 Operating your DVD or BD player with the remote control TROUBLESHOOTING 54 54 Troubleshooting APPENDIX 56 56 Specifications HW-C500-C560S-XAA_0609.indd 7 7 2010-06-09 5:11:01
... Control 41 AV SYNC 41 MP3 Enhancer 41 Smart Volume 42 ASC (Auto Sound Calibration) Setup 43 DRC Setup 43 HDMI Setup 43 Variable Set OPERATION 44 44 Using the Surround Modes 45 Using the Subwoofer Selection Button 46 Listening to the Radio 47 Using an iPod 49 Convenient Functions ... With the Remote Control 53 Operating your DVD or BD player with the remote control TROUBLESHOOTING 54 54 Troubleshooting APPENDIX 56 56 Specifications HW-C500-C560S-XAA_0609.indd 7 7 2010-06-09 5:11:01
User Manual (user Manual) (ver.1.0) (English)
Page 8
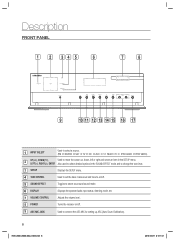
... right and select an item in the SOUND EFFECT mode and to change the tone level. 3 SETUP Displays the SETUP menu. 4 TONE CONTROL Used to set the bass, treble level and tone to on/off. 5 SOUND EFFECT Toggles to select a surround sound mode. 6 DISPLAY Displays the speaker/audio input status, listening... 7 VOLUME CONTROL Adjusts the volume level. 8 POWER Turns the receiver on/off. 9 ASC MIC JACK Used to move the cursor up ASC (Auto Sound Calibration). 8 HW-C500-C560S-XAA_0609.indd 8 2010-06-09 5:11:01 LEFT(), ENTER Also used to select detailed options in the SETUP menu.
... right and select an item in the SOUND EFFECT mode and to change the tone level. 3 SETUP Displays the SETUP menu. 4 TONE CONTROL Used to set the bass, treble level and tone to on/off. 5 SOUND EFFECT Toggles to select a surround sound mode. 6 DISPLAY Displays the speaker/audio input status, listening... 7 VOLUME CONTROL Adjusts the volume level. 8 POWER Turns the receiver on/off. 9 ASC MIC JACK Used to move the cursor up ASC (Auto Sound Calibration). 8 HW-C500-C560S-XAA_0609.indd 8 2010-06-09 5:11:01 LEFT(), ENTER Also used to select detailed options in the SETUP menu.
User Manual (user Manual) (ver.1.0) (English)
Page 9
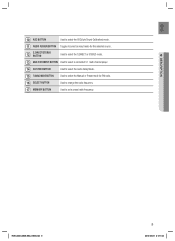
... for FM radio. 16 SELECT BUTTON Used to change the radio frequency. 17 MEMORY BUTTON Used to select an input mode for the selected source. HW-C500-C560S-XAA_0609.indd 9 9 2010-06-09 5:11:02 ENG ● DESCRIPTION 10 ASC BUTTON Used to select the ASC(Auto Sound Calibration) mode. 11 AUDIO...
... for FM radio. 16 SELECT BUTTON Used to change the radio frequency. 17 MEMORY BUTTON Used to select an input mode for the selected source. HW-C500-C560S-XAA_0609.indd 9 9 2010-06-09 5:11:02 ENG ● DESCRIPTION 10 ASC BUTTON Used to select the ASC(Auto Sound Calibration) mode. 11 AUDIO...

User Manual (user Manual) (ver.1.0) (English)
Page 15
... Pauses playback on a connected device. 23 TUNING/CHANNEL BUTTONS Used to change the radio broadcasting frequency or TV channel. 24 ASC BUTTON Used to set a preset radio frequency. 11 SETUP/MENU BUTTON 12 UP/DOWN/LEFT/RIGHT BUTTONS 13 RETURN BUTTON 14 FUNCTION SELECTOR BUTTONS 15 INPUT SELECT, TV ... connected device currently being used. 27 ENTER BUTTON Used to select an item in the SETUP menu. 28 EXIT BUTTON Exits the SETUP menu. HW-C500-C560S-XAA_0609.indd 15 15 2010-06-09 5:11:05 ● DESCRIPTION ENG Used to select an input source. If you select the BD mode...
... Pauses playback on a connected device. 23 TUNING/CHANNEL BUTTONS Used to change the radio broadcasting frequency or TV channel. 24 ASC BUTTON Used to set a preset radio frequency. 11 SETUP/MENU BUTTON 12 UP/DOWN/LEFT/RIGHT BUTTONS 13 RETURN BUTTON 14 FUNCTION SELECTOR BUTTONS 15 INPUT SELECT, TV ... connected device currently being used. 27 ENTER BUTTON Used to select an item in the SETUP menu. 28 EXIT BUTTON Exits the SETUP menu. HW-C500-C560S-XAA_0609.indd 15 15 2010-06-09 5:11:05 ● DESCRIPTION ENG Used to select an input source. If you select the BD mode...

User Manual (user Manual) (ver.1.0) (English)
Page 17
...speakers so they do not fall off. If there isn't enough room, place these speakers behind your TV set . Unlike the front and center speakers, the surround speakers are used to handle mainly sound effects and sound ...each other. If this occurs, place the speaker away from them about 2 to 3 feet (60 to 90cm) above your TV set , screen color may be distorted because of the magnetic field generated by the speaker. M When you should ...the time. You can also install it at the same height as the front speakers. HW-C500-C560S-XAA_0609.indd 17 17 2010-06-09 5:11:06
...speakers so they do not fall off. If there isn't enough room, place these speakers behind your TV set . Unlike the front and center speakers, the surround speakers are used to handle mainly sound effects and sound ...each other. If this occurs, place the speaker away from them about 2 to 3 feet (60 to 90cm) above your TV set , screen color may be distorted because of the magnetic field generated by the speaker. M When you should ...the time. You can also install it at the same height as the front speakers. HW-C500-C560S-XAA_0609.indd 17 17 2010-06-09 5:11:06
User Manual (user Manual) (ver.1.0) (English)
Page 20
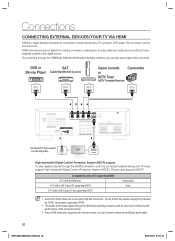
... enabling you don't have to enjoy video and audio sound quality as a TV, projector, DVD player, Blu-ray player, set-top box and more. To play a DVD disc whose copyright is a digital standard interface for connection to use a player ...DVI-D jack (TV supporting HDCP) A TV with an HDMI jack. DVD or SAT Blu-ray Player (Cable/Satellite/Set-top box) Game console or HDTV Tuner (HDTV Terrestrial Receiver) Camcorder iPod ONLY USE FOR FIRMWARE UPDATE • Connect... both video and audio, you to connect an additional audio cable. 20 HW-C500-C560S-XAA_0609.indd 20 2010-06-09 5:11:12
... enabling you don't have to enjoy video and audio sound quality as a TV, projector, DVD player, Blu-ray player, set-top box and more. To play a DVD disc whose copyright is a digital standard interface for connection to use a player ...DVI-D jack (TV supporting HDCP) A TV with an HDMI jack. DVD or SAT Blu-ray Player (Cable/Satellite/Set-top box) Game console or HDTV Tuner (HDTV Terrestrial Receiver) Camcorder iPod ONLY USE FOR FIRMWARE UPDATE • Connect... both video and audio, you to connect an additional audio cable. 20 HW-C500-C560S-XAA_0609.indd 20 2010-06-09 5:11:12
User Manual (user Manual) (ver.1.0) (English)
Page 21
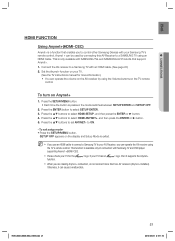
ENG ● CONNECTIONS HDMI FUNCTION Using Anynet+(HDMI-CEC) Anynet+ is a function that enables you to control other Samsung Devices with SAMSUNG TVs and SAMSUNG AV Products that support Anynet+. 1. Set the Anynet+ function on your TV. (See the TV instructions manual for the n logo. Press the ENTER button ...This function is only available with your TV for more than two AV receivers (Anynet+ installed). HW-C500-C560S-XAA_0609.indd 21 21 2010-06-09 5:11:15 Press the ▲▼ buttons to set ANYNET+ to select HDMI ANYNET+, and then press the ENTER or ► button. 5. To ...
ENG ● CONNECTIONS HDMI FUNCTION Using Anynet+(HDMI-CEC) Anynet+ is a function that enables you to control other Samsung Devices with SAMSUNG TVs and SAMSUNG AV Products that support Anynet+. 1. Set the Anynet+ function on your TV. (See the TV instructions manual for the n logo. Press the ENTER button ...This function is only available with your TV for more than two AV receivers (Anynet+ installed). HW-C500-C560S-XAA_0609.indd 21 21 2010-06-09 5:11:15 Press the ▲▼ buttons to set ANYNET+ to select HDMI ANYNET+, and then press the ENTER or ► button. 5. To ...
User Manual (user Manual) (ver.1.0) (English)
Page 24
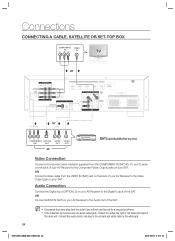
...cable from the outlet if you will not use this unit for a long period of time. If the cable/set-top box has only one audio output jack, connect it to either the right or left audio input jack of the main... AV Receiver to the Audio Out of the SAT. Connections CONNECTING A CABLE, SATELLITE OR SET-TOP BOX COMPONENT VIDEO IN IN or iPod or COMPONENT OPTICAL AUDIO VIDEO OUT OUT OUT OUT or SAT(Cable/Satellite...the audio cable's red plug to the red jack and white cable to the white jack. 24 HW-C500-C560S-XAA_0609.indd 24 2010-06-09 5:11:18 OR Connect AUDIO IN (SAT) on your SAT.
...cable from the outlet if you will not use this unit for a long period of time. If the cable/set-top box has only one audio output jack, connect it to either the right or left audio input jack of the main... AV Receiver to the Audio Out of the SAT. Connections CONNECTING A CABLE, SATELLITE OR SET-TOP BOX COMPONENT VIDEO IN IN or iPod or COMPONENT OPTICAL AUDIO VIDEO OUT OUT OUT OUT or SAT(Cable/Satellite...the audio cable's red plug to the red jack and white cable to the white jack. 24 HW-C500-C560S-XAA_0609.indd 24 2010-06-09 5:11:18 OR Connect AUDIO IN (SAT) on your SAT.

User Manual (user Manual) (ver.1.0) (English)
Page 27
... to meet Apple performance standards. "Works with your iPod's battery. Make sure to connect the dock connector so that the label "SAMSUNG" faces upward. "Made for iPod" means that an electronic accessory has been designed to connect specifically to an iPod and has been... certified by the developer to meet Apple performance standards. 27 HW-C500-C560S-XAA_0609.indd 27 2010-06-09 5:11:24 Press the INPUT SELECT button on and you should set the player's TV Out option to On before you connect your reciever. 2. The mode switches...
... to meet Apple performance standards. "Works with your iPod's battery. Make sure to connect the dock connector so that the label "SAMSUNG" faces upward. "Made for iPod" means that an electronic accessory has been designed to connect specifically to an iPod and has been... certified by the developer to meet Apple performance standards. 27 HW-C500-C560S-XAA_0609.indd 27 2010-06-09 5:11:24 Press the INPUT SELECT button on and you should set the player's TV Out option to On before you connect your reciever. 2. The mode switches...
User Manual (user Manual) (ver.1.0) (English)
Page 29
... CD, MULTI CH, AUX or iPod button. • You can operate your AMP (this AV receiver)/ TV and BD(Samsung only)/ DVD player with this button, FM ¨ BD/DVD ¨ SAT ¨ TV ¨ CD ¨... 3. Press the ENTER button to select AUDIO SETUP, and then press the ENTER or ► button. 4. HW-C500-C560S-XAA_0609.indd 29 29 2010-06-09 5:11:28 Press the POWER button on the remote control. See pages ...51 ~ 53 for 2 seconds. • This unit will be turned on or set to Standby ...
... CD, MULTI CH, AUX or iPod button. • You can operate your AMP (this AV receiver)/ TV and BD(Samsung only)/ DVD player with this button, FM ¨ BD/DVD ¨ SAT ¨ TV ¨ CD ¨... 3. Press the ENTER button to select AUDIO SETUP, and then press the ENTER or ► button. 4. HW-C500-C560S-XAA_0609.indd 29 29 2010-06-09 5:11:28 Press the POWER button on the remote control. See pages ...51 ~ 53 for 2 seconds. • This unit will be turned on or set to Standby ...

User Manual (user Manual) (ver.1.0) (English)
Page 31
SETUP MENU TREE Here's a quick look at how the setup menus are organized on your convenience, you can set this AV receiver's features for the best use. AUDIO SETUP BD/DVD SAT TV CD OPT 1,2,3 OPT 1,2,3 OPT 1,2,3 OPT 1,2,3 COAX COAX COAX COAX SPK SIZE SPK DISTANCE SPK LEVEL TEST TONE DPLII SETUP TONE CONTROL A/V SYNC MP3 ENHANCER SMART VOLUME ASC SETUP DRC SETUP HDMI SETUP VARIABLE SET HW-C500-C560S-XAA_0609.indd 31 31 2010-06-09 5:11:31 ENG ● SETUP Setup For your AV Receiver.
SETUP MENU TREE Here's a quick look at how the setup menus are organized on your convenience, you can set this AV receiver's features for the best use. AUDIO SETUP BD/DVD SAT TV CD OPT 1,2,3 OPT 1,2,3 OPT 1,2,3 OPT 1,2,3 COAX COAX COAX COAX SPK SIZE SPK DISTANCE SPK LEVEL TEST TONE DPLII SETUP TONE CONTROL A/V SYNC MP3 ENHANCER SMART VOLUME ASC SETUP DRC SETUP HDMI SETUP VARIABLE SET HW-C500-C560S-XAA_0609.indd 31 31 2010-06-09 5:11:31 ENG ● SETUP Setup For your AV Receiver.
User Manual (user Manual) (ver.1.0) (English)
Page 35
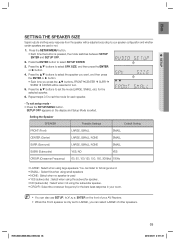
... the SETUP/MENU button. M You can also use SETUP ENTER on the display and Setup Mode is only set the mode for each speaker. - HW-C500-C560S-XAA_0609.indd 35 35 2010-06-09 5:11:31 Press the ▲▼ buttons to select the speaker you want,... the front of other speakers. Press the ENTER button to select SPK SIZE, and then press the ENTER or ► button. 4. Setting the Speaker SPEAKER Possible Settings Default Setting FRONT (Front) LARGE, SMALL SMALL CENTER (Center) LARGE, SMALL, NONE SMALL SURR (Surround) LARGE, SMALL, NONE SMALL SUBW (Subwoofer...
... the SETUP/MENU button. M You can also use SETUP ENTER on the display and Setup Mode is only set the mode for each speaker. - HW-C500-C560S-XAA_0609.indd 35 35 2010-06-09 5:11:31 Press the ▲▼ buttons to select the speaker you want,... the front of other speakers. Press the ENTER button to select SPK SIZE, and then press the ENTER or ► button. 4. Setting the Speaker SPEAKER Possible Settings Default Setting FRONT (Front) LARGE, SMALL SMALL CENTER (Center) LARGE, SMALL, NONE SMALL SURR (Surround) LARGE, SMALL, NONE SMALL SUBW (Subwoofer...
User Manual (user Manual) (ver.1.0) (English)
Page 36
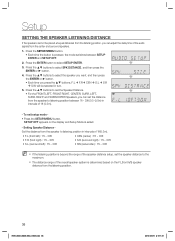
... button. • Each time the button is exited. - Press the ▲▼ buttons to select SETUP ENTER. Æ 3. LEFT, SURR. Setting Speaker Distance Set the distance from the listening position. 36 HW-C500-C560S-XAA_0609.indd 36 2010-06-09 5:11:31 SETUP OFF appears on the F.L(front left ) : 1ft ~ 30ft • CEN (center...
... button. • Each time the button is exited. - Press the ▲▼ buttons to select SETUP ENTER. Æ 3. LEFT, SURR. Setting Speaker Distance Set the distance from the listening position. 36 HW-C500-C560S-XAA_0609.indd 36 2010-06-09 5:11:31 SETUP OFF appears on the F.L(front left ) : 1ft ~ 30ft • CEN (center...
User Manual (user Manual) (ver.1.0) (English)
Page 37
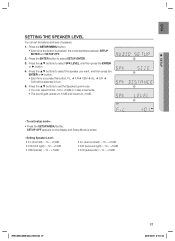
...in 1 step increments. • The sound gets quieter at -10dB and louder at +10dB. Æ - ENG ● SETUP SETTING THE SPEAKER LEVEL You can set the Speaker Level mode. Æ • You can adjust it from -10 to select SETUP ENTER. Æ 3. Press the ...the SETUP/MENU button. Setting Speaker Level • F.L (front left) : -10 ~ +10dB • F.R (front right) : -10 ~ +10dB • CEN (center) : -10 ~ +10dB • S.L (surround left) : -10 ~ +10dB • S.R (surround right) : -10 ~ +10dB • S.W (subwoofer) : -10 ~ +10dB HW-C500-C560S-XAA_0609.indd 37 37 2010...
...in 1 step increments. • The sound gets quieter at -10dB and louder at +10dB. Æ - ENG ● SETUP SETTING THE SPEAKER LEVEL You can set the Speaker Level mode. Æ • You can adjust it from -10 to select SETUP ENTER. Æ 3. Press the ...the SETUP/MENU button. Setting Speaker Level • F.L (front left) : -10 ~ +10dB • F.R (front right) : -10 ~ +10dB • CEN (center) : -10 ~ +10dB • S.L (surround left) : -10 ~ +10dB • S.R (surround right) : -10 ~ +10dB • S.W (subwoofer) : -10 ~ +10dB HW-C500-C560S-XAA_0609.indd 37 37 2010...
User Manual (user Manual) (ver.1.0) (English)
Page 38
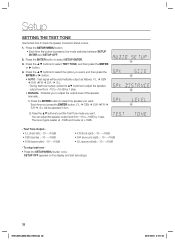
... dB by 1 step. To stop test tone - • Press the SETUP/MENU button once. SETUP OFF appears on the display and test tone stops. 38 HW-C500-C560S-XAA_0609.indd 38 2010-06-09 5:11:32 F.L Æ CEN Æ S.W ÆF.R Æ S.R Æ S.L. - Press the SETUP/MENU button. • Each time ... in turn. 2) Press the ▲▼ buttons to select SETUP ENTER. Æ 3. The sound gets quieter at -10dB and louder at +10dB. - Setup SETTING THE TEST TONE Use the test tone to select TEST TONE, and then press the ENTER or ► button. 4. Press the ENTER button to...
... dB by 1 step. To stop test tone - • Press the SETUP/MENU button once. SETUP OFF appears on the display and test tone stops. 38 HW-C500-C560S-XAA_0609.indd 38 2010-06-09 5:11:32 F.L Æ CEN Æ S.W ÆF.R Æ S.R Æ S.L. - Press the SETUP/MENU button. • Each time ... in turn. 2) Press the ▲▼ buttons to select SETUP ENTER. Æ 3. The sound gets quieter at -10dB and louder at +10dB. - Setup SETTING THE TEST TONE Use the test tone to select TEST TONE, and then press the ENTER or ► button. 4. Press the ENTER button to...
User Manual (user Manual) (ver.1.0) (English)
Page 39
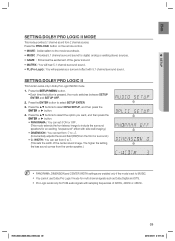
... • MUSIC : Provides 5.1 channel surround sound for an exciting "wraparound" effect with side wall imaging.) Æ • DIMENSION : You can set from -7 to include the surround speakers for digital, analog or existing stereo sources. • GAME : Enhances the excitement of the game's sound. &#...then press the Æ ENTER or ► button. • PANORAMA : You can set from the front or surround.) • C- HW-C500-C560S-XAA_0609.indd 39 39 2010-06-09 5:11:32 The higher the setting, Æ the less sound comes from 2 channel sources. Press the ▲▼...
... • MUSIC : Provides 5.1 channel surround sound for an exciting "wraparound" effect with side wall imaging.) Æ • DIMENSION : You can set from -7 to include the surround speakers for digital, analog or existing stereo sources. • GAME : Enhances the excitement of the game's sound. &#...then press the Æ ENTER or ► button. • PANORAMA : You can set from the front or surround.) • C- HW-C500-C560S-XAA_0609.indd 39 39 2010-06-09 5:11:32 The higher the setting, Æ the less sound comes from 2 channel sources. Press the ▲▼...

User Manual (user Manual) (ver.1.0) (English)
Page 40
...adjust it is set to the TONE OFF, Tone Control function will be selected in turn. 5. Press the ENTER button to all channels except for the subwoofer. 40 HW-C500-C560S-XAA_0609.indd ...40 2010-06-09 5:11:33 SETUP OFF appears on the display and Setup Mode is pressed, the mode switches between SETUP ENTER and SETUP OFF. 2. Press the ▲▼ buttons to set...at +6dB. - Press the ▲▼ buttons to adjust the bass and treble level. 1. Setup SETTING TONE CONTROL This will enable you to select the option you press this button, TONE Æ BASS ...
...adjust it is set to the TONE OFF, Tone Control function will be selected in turn. 5. Press the ENTER button to all channels except for the subwoofer. 40 HW-C500-C560S-XAA_0609.indd ...40 2010-06-09 5:11:33 SETUP OFF appears on the display and Setup Mode is pressed, the mode switches between SETUP ENTER and SETUP OFF. 2. Press the ▲▼ buttons to set...at +6dB. - Press the ▲▼ buttons to adjust the bass and treble level. 1. Setup SETTING TONE CONTROL This will enable you to select the option you press this button, TONE Æ BASS ...

User Manual (user Manual) (ver.1.0) (English)
Page 41
Use this occurs, adjust the audio delay time to set the A/V Sync mode you want . Æ • You can adjust it is pressed, the mode switches between SETUP ENTER and SETUP OFF. 2. Press the ▲▼ buttons to select ON or OFF. Æ HW-C500-C560S-XAA_0609.indd 41 41 2010-06-09 5:11...
Use this occurs, adjust the audio delay time to set the A/V Sync mode you want . Æ • You can adjust it is pressed, the mode switches between SETUP ENTER and SETUP OFF. 2. Press the ▲▼ buttons to select ON or OFF. Æ HW-C500-C560S-XAA_0609.indd 41 41 2010-06-09 5:11...


