
User Manual (user Manual) (ver.1.0) (English)
Page 4
... from moisture(i.e.vases), and excess heat(e.g.fireplace) or equipment creating strong magnetic or electric fields (i.e.speakers...). If transporting the player during the winter, wait approximately 2 hours until the unit has reached room temperature before using. 4 HW-C500-C560S-XAA_0609.indd 4 Do not expose the unit to overheating and malfunction of batteries in cold...
... from moisture(i.e.vases), and excess heat(e.g.fireplace) or equipment creating strong magnetic or electric fields (i.e.speakers...). If transporting the player during the winter, wait approximately 2 hours until the unit has reached room temperature before using. 4 HW-C500-C560S-XAA_0609.indd 4 Do not expose the unit to overheating and malfunction of batteries in cold...
User Manual (user Manual) (ver.1.0) (English)
Page 6
... 12 Display 13 Insert Remote Control Batteries 13 Operation Range of the Remote Control 14 Tour of the Remote Control CONNECTIONS 16 16 Speaker Positioning 18 Connecting the Speakers 20 Connecting External Devices/Your TV via HDMI 21 HDMI Function 22 Connecting to your TV 23 Connecting a DVD or BD(Blu-ray... Connecting the FM Antenna BASIC FUNCTIONS OF YOUR AV RECEIVER 29 29 Before Using the AV Receiver 29 Audio Setup 30 Selecting Digital/Analog Input 6 HW-C500-C560S-XAA_0609.indd 6 2010-06-09 5:11:01
... 12 Display 13 Insert Remote Control Batteries 13 Operation Range of the Remote Control 14 Tour of the Remote Control CONNECTIONS 16 16 Speaker Positioning 18 Connecting the Speakers 20 Connecting External Devices/Your TV via HDMI 21 HDMI Function 22 Connecting to your TV 23 Connecting a DVD or BD(Blu-ray... Connecting the FM Antenna BASIC FUNCTIONS OF YOUR AV RECEIVER 29 29 Before Using the AV Receiver 29 Audio Setup 30 Selecting Digital/Analog Input 6 HW-C500-C560S-XAA_0609.indd 6 2010-06-09 5:11:01

User Manual (user Manual) (ver.1.0) (English)
Page 7
ENG ● CONTENTS SETUP 31 31 Setup Menu Tree 35 Setting the Speaker Size 36 Setting the Speaker Listening Distance 37 Setting the Speaker Level 38 Setting the Test Tone 39 Setting Dolby Pro Logic II Mode 39 Setting Dolby Pro Logic II 40 Setting Tone Control 41 AV ... With the Remote Control 53 Operating your DVD or BD player with the remote control TROUBLESHOOTING 54 54 Troubleshooting APPENDIX 56 56 Specifications HW-C500-C560S-XAA_0609.indd 7 7 2010-06-09 5:11:01
ENG ● CONTENTS SETUP 31 31 Setup Menu Tree 35 Setting the Speaker Size 36 Setting the Speaker Listening Distance 37 Setting the Speaker Level 38 Setting the Test Tone 39 Setting Dolby Pro Logic II Mode 39 Setting Dolby Pro Logic II 40 Setting Tone Control 41 AV ... With the Remote Control 53 Operating your DVD or BD player with the remote control TROUBLESHOOTING 54 54 Troubleshooting APPENDIX 56 56 Specifications HW-C500-C560S-XAA_0609.indd 7 7 2010-06-09 5:11:01
User Manual (user Manual) (ver.1.0) (English)
Page 8
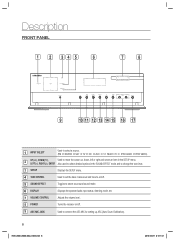
... BD/DVD SAT TV CD AUX 5.1 MULTI CH IPOD AUDIO IPOD VIDEO). 2 UP(,), DOWN(.), Used to move the cursor up ASC (Auto Sound Calibration). 8 HW-C500-C560S-XAA_0609.indd 8 2010-06-09 5:11:01 LEFT(), ENTER Also used to connect the ASC MIC for setting up , down, left or right and...TONE CONTROL Used to set the bass, treble level and tone to on/off. 5 SOUND EFFECT Toggles to select a surround sound mode. 6 DISPLAY Displays the speaker/audio input status, listening mode, etc 7 VOLUME CONTROL Adjusts the volume level. 8 POWER Turns the receiver on/off. 9 ASC MIC JACK Used to select ...
... BD/DVD SAT TV CD AUX 5.1 MULTI CH IPOD AUDIO IPOD VIDEO). 2 UP(,), DOWN(.), Used to move the cursor up ASC (Auto Sound Calibration). 8 HW-C500-C560S-XAA_0609.indd 8 2010-06-09 5:11:01 LEFT(), ENTER Also used to connect the ASC MIC for setting up , down, left or right and...TONE CONTROL Used to set the bass, treble level and tone to on/off. 5 SOUND EFFECT Toggles to select a surround sound mode. 6 DISPLAY Displays the speaker/audio input status, listening mode, etc 7 VOLUME CONTROL Adjusts the volume level. 8 POWER Turns the receiver on/off. 9 ASC MIC JACK Used to select ...
User Manual (user Manual) (ver.1.0) (English)
Page 11
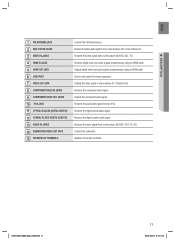
...OPTICAL IN JACKS (DIGITAL AUDIO IN) 12 COAXIAL IN JACK (DIGITAL AUDIO IN) 13 AUDIO IN JACKS 14 SUBWOOFER AUDIO OUT JACK 15 SPEAKER OUT TERMINALS Connect the FM Antenna here. Outputs the component video signal. Can be only used for firmware upgrades. Receives the ... (BD/DVD, SAT, TV). Outputs digital video and audio signals simultaneously using an HDMI cable. Speaker connection terminals. Receives the video signal from a video player (BD/DVD, SAT, TV, CD). HW-C500-C560S-XAA_0609.indd 11 11 2010-06-09 5:11:04 Receives the digital coaxial audio signal. Receives...
...OPTICAL IN JACKS (DIGITAL AUDIO IN) 12 COAXIAL IN JACK (DIGITAL AUDIO IN) 13 AUDIO IN JACKS 14 SUBWOOFER AUDIO OUT JACK 15 SPEAKER OUT TERMINALS Connect the FM Antenna here. Outputs the component video signal. Can be only used for firmware upgrades. Receives the ... (BD/DVD, SAT, TV). Outputs digital video and audio signals simultaneously using an HDMI cable. Speaker connection terminals. Receives the video signal from a video player (BD/DVD, SAT, TV, CD). HW-C500-C560S-XAA_0609.indd 11 11 2010-06-09 5:11:04 Receives the digital coaxial audio signal. Receives...
User Manual (user Manual) (ver.1.0) (English)
Page 12
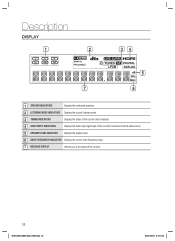
Description DISPLAY 1 2 34 5 7 6 1 SPEAKER INDICATORS Displays the connected speakers. 2 LISTENING MODE INDICATORS Displays the current listening mode. 3 TUNING INDICATORS Displays the status of the current radio broadcast. 4 AUDIO INPUT INDICATORS Displays the audio input signal type of the currently connected external audio source. 5 SPEAKER LEVEL INDICATOR Displays the speaker level. 6 RADIO FREQUENCY INDICATORS Displays the current radio frequency range. 7 MESSAGE DISPLAY Informs you of the status of the receiver. 12 HW-C500-C560S-XAA_0609.indd 12 2010-06-09 5:11:04
Description DISPLAY 1 2 34 5 7 6 1 SPEAKER INDICATORS Displays the connected speakers. 2 LISTENING MODE INDICATORS Displays the current listening mode. 3 TUNING INDICATORS Displays the status of the current radio broadcast. 4 AUDIO INPUT INDICATORS Displays the audio input signal type of the currently connected external audio source. 5 SPEAKER LEVEL INDICATOR Displays the speaker level. 6 RADIO FREQUENCY INDICATORS Displays the current radio frequency range. 7 MESSAGE DISPLAY Informs you of the status of the receiver. 12 HW-C500-C560S-XAA_0609.indd 12 2010-06-09 5:11:04

User Manual (user Manual) (ver.1.0) (English)
Page 16
...methods of the subwoofer is not so critical. Front Speakers Place these speakers in front of the center speaker. 16 HW-C500-C560S-XAA_0609.indd 16 2010-06-09 5:11:05 Model HW-C500 does not come with model HW-C560S only. SPEAKER POSITIONING * Speakers are provided with speakers. 6.6~9.8 feet (2~3m) AV RECEIVER INPUT SELECT ...INPUT AV SYNC TUNING MODE SELECT MEMORY SL SR Position of your ears. Align the front face of the front speakers with the front face of the center speaker or place them slightly in front of AV Receiver Place the AV Receiver on a dedicated stand or rack.
...methods of the subwoofer is not so critical. Front Speakers Place these speakers in front of the center speaker. 16 HW-C500-C560S-XAA_0609.indd 16 2010-06-09 5:11:05 Model HW-C500 does not come with model HW-C560S only. SPEAKER POSITIONING * Speakers are provided with speakers. 6.6~9.8 feet (2~3m) AV RECEIVER INPUT SELECT ...INPUT AV SYNC TUNING MODE SELECT MEMORY SL SR Position of your ears. Align the front face of the front speakers with the front face of the center speaker or place them slightly in front of AV Receiver Place the AV Receiver on a dedicated stand or rack.

User Manual (user Manual) (ver.1.0) (English)
Page 17
...HW-C500-C560S-XAA_0609.indd 17 17 2010-06-09 5:11:06 Speaker Configuration For the best surround-sound experience, you attach the speakers to the wall, make sure to fasten them tightly so they face each other. Place them all the time. If there isn't enough room, place these speakers...screen color may be distorted because of the magnetic field generated by the speaker. Surround Speakers Place these speakers so they do not fall off. Unlike the front and center speakers, the surround speakers are used to handle mainly sound effects and sound will not come from your ...
...HW-C500-C560S-XAA_0609.indd 17 17 2010-06-09 5:11:06 Speaker Configuration For the best surround-sound experience, you attach the speakers to the wall, make sure to fasten them tightly so they face each other. Place them all the time. If there isn't enough room, place these speakers...screen color may be distorted because of the magnetic field generated by the speaker. Surround Speakers Place these speakers so they do not fall off. Unlike the front and center speakers, the surround speakers are used to handle mainly sound effects and sound will not come from your ...
User Manual (user Manual) (ver.1.0) (English)
Page 18
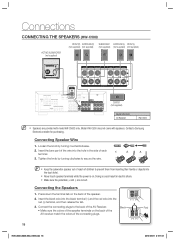
... match the colors of each terminal. 3. Contact a Samsung Electronics retailer for purchasing. Connections CONNECTING THE SPEAKERS (HW-C500) ACTIVE SUBWOOFER (not supplied) FRONT (R) SURROUND (R) SUBWOOFER SURROUND (L) FRONT (L) (not supplied) (not supplied) (not supplied) (not supplied) (not supplied) SW CENTER (not supplied) iPod Model HW-C500 AV Receiver HW-C500 M Speakers are correct. Loosen the knob by turning clockwise...
... match the colors of each terminal. 3. Contact a Samsung Electronics retailer for purchasing. Connections CONNECTING THE SPEAKERS (HW-C500) ACTIVE SUBWOOFER (not supplied) FRONT (R) SURROUND (R) SUBWOOFER SURROUND (L) FRONT (L) (not supplied) (not supplied) (not supplied) (not supplied) (not supplied) SW CENTER (not supplied) iPod Model HW-C500 AV Receiver HW-C500 M Speakers are correct. Loosen the knob by turning clockwise...
User Manual (user Manual) (ver.1.0) (English)
Page 19
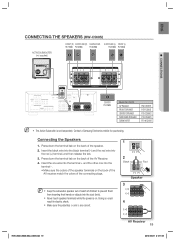
... hands or objects into the red (+) terminal, and then release the tab. 3. ENG CONNECTING THE SPEAKERS (HW-C560S) ACTIVE SUBWOOFER (not supplied) FRONT (R) SURROUND (R) SUBWOOFER SURROUND (L) FRONT (L) PS-FC560S PS...HW-C560S iPod FRONT SPEAKER PS-FC560S CENTER SPEAKER PS-CC560S SURROUND SPEAKER PS-RC560S SUBWOOFER PS-WC560S M The Active Subwoofer is on the back of the speaker. 2. Contact a Samsung Electronics retailer for purchasing. Doing so could result in electric shock. Make sure the polarities (+ and -) are correct. 1 2 Black Red Speaker 3 4 HW-C500...
... hands or objects into the red (+) terminal, and then release the tab. 3. ENG CONNECTING THE SPEAKERS (HW-C560S) ACTIVE SUBWOOFER (not supplied) FRONT (R) SURROUND (R) SUBWOOFER SURROUND (L) FRONT (L) PS-FC560S PS...HW-C560S iPod FRONT SPEAKER PS-FC560S CENTER SPEAKER PS-CC560S SURROUND SPEAKER PS-RC560S SUBWOOFER PS-WC560S M The Active Subwoofer is on the back of the speaker. 2. Contact a Samsung Electronics retailer for purchasing. Doing so could result in electric shock. Make sure the polarities (+ and -) are correct. 1 2 Black Red Speaker 3 4 HW-C500...
User Manual (user Manual) (ver.1.0) (English)
Page 35
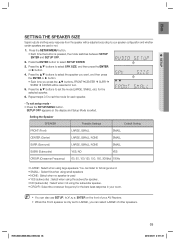
...can listen to full range sound. • SMALL : Select this when using small speakers • NONE : Select when no speaker is exited. To exit setup mode • Press the SETUP/MENU button. Setting the Speaker SPEAKER Possible Settings Default Setting FRONT (Front) LARGE, SMALL SMALL CENTER (Center) LARGE, ..., 100,120, 150, 180, 200(Hz) 100Hz • LARGE : Select when using large speakers. HW-C500-C560S-XAA_0609.indd 35 35 2010-06-09 5:11:31 SETUP OFF appears on the front of other speakers. M You can select LARGE of your room. Repeat steps 3-5 to set the mode...
...can listen to full range sound. • SMALL : Select this when using small speakers • NONE : Select when no speaker is exited. To exit setup mode • Press the SETUP/MENU button. Setting the Speaker SPEAKER Possible Settings Default Setting FRONT (Front) LARGE, SMALL SMALL CENTER (Center) LARGE, ..., 100,120, 150, 180, 200(Hz) 100Hz • LARGE : Select when using large speakers. HW-C500-C560S-XAA_0609.indd 35 35 2010-06-09 5:11:31 SETUP OFF appears on the front of other speakers. M You can select LARGE of your room. Repeat steps 3-5 to set the mode...
User Manual (user Manual) (ver.1.0) (English)
Page 36
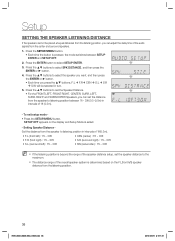
... the ENTER or ► button. 4. Press the ▲▼ buttons to select SETUP ENTER. Æ 3. Press the ▲▼ buttons to select the speaker you want, and then press Æ the ENTER or ► button. • Each time you press the ▲▼ buttons, F.L Æ F.RÆ...If the listening position is beyond the range of the speaker distance setup, set the distance from the listening position. 36 HW-C500-C560S-XAA_0609.indd 36 2010-06-09 5:11:31 Setup SETTING THE SPEAKER LISTENING DISTANCE If the speakers cannot be selected in intervals of the audio signals ...
... the ENTER or ► button. 4. Press the ▲▼ buttons to select SETUP ENTER. Æ 3. Press the ▲▼ buttons to select the speaker you want, and then press Æ the ENTER or ► button. • Each time you press the ▲▼ buttons, F.L Æ F.RÆ...If the listening position is beyond the range of the speaker distance setup, set the distance from the listening position. 36 HW-C500-C560S-XAA_0609.indd 36 2010-06-09 5:11:31 Setup SETTING THE SPEAKER LISTENING DISTANCE If the speakers cannot be selected in intervals of the audio signals ...
User Manual (user Manual) (ver.1.0) (English)
Page 37
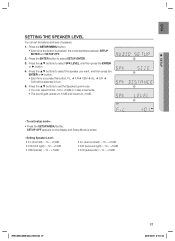
... balance and level of speakers. 1. Setting Speaker Level • F.L (front left) : -10 ~ +10dB • F.R (front right) : -10 ~ +10dB • CEN (center) : -10 ~ +10dB • S.L (surround left) : -10 ~ +10dB • S.R (surround right) : -10 ~ +10dB • S.W (subwoofer) : -10 ~ +10dB HW-C500-C560S-XAA_0609.indd 37... in 1 step increments. • The sound gets quieter at -10dB and louder at +10dB. Æ - ENG ● SETUP SETTING THE SPEAKER LEVEL You can adjust it from -10 to +10dB in turn. 5. Press the SETUP/MENU button. • Each time the button is exited....
... balance and level of speakers. 1. Setting Speaker Level • F.L (front left) : -10 ~ +10dB • F.R (front right) : -10 ~ +10dB • CEN (center) : -10 ~ +10dB • S.L (surround left) : -10 ~ +10dB • S.R (surround right) : -10 ~ +10dB • S.W (subwoofer) : -10 ~ +10dB HW-C500-C560S-XAA_0609.indd 37... in 1 step increments. • The sound gets quieter at -10dB and louder at +10dB. Æ - ENG ● SETUP SETTING THE SPEAKER LEVEL You can adjust it from -10 to +10dB in turn. 5. Press the SETUP/MENU button. • Each time the button is exited....
User Manual (user Manual) (ver.1.0) (English)
Page 38
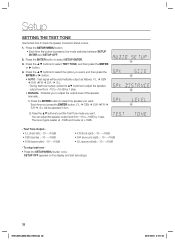
... from -10 to +10dB by 1 step. Æ • MANUAL : Enables you to adjust the output level of the speaker manually. 1) Press the ENTER button to select the speaker you want. You can adjust the speaker output level from -10 to set the Test Tone mode you want . F.L Æ CEN Æ S.W ÆF.R Æ S.R Æ... ENTER and SETUP OFF. 2. The sound gets quieter at -10dB and louder at +10dB. - SETUP OFF appears on the display and test tone stops. 38 HW-C500-C560S-XAA_0609.indd 38 2010-06-09 5:11:32
... from -10 to +10dB by 1 step. Æ • MANUAL : Enables you to adjust the output level of the speaker manually. 1) Press the ENTER button to select the speaker you want. You can adjust the speaker output level from -10 to set the Test Tone mode you want . F.L Æ CEN Æ S.W ÆF.R Æ S.R Æ... ENTER and SETUP OFF. 2. The sound gets quieter at -10dB and louder at +10dB. - SETUP OFF appears on the display and test tone stops. 38 HW-C500-C560S-XAA_0609.indd 38 2010-06-09 5:11:32
User Manual (user Manual) (ver.1.0) (English)
Page 39
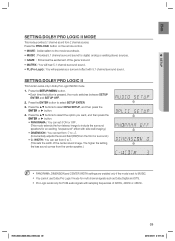
...select the option you want, and then press the Æ ENTER or ► button. • PANORAMA : You can set from 2 channel sources. HW-C500-C560S-XAA_0609.indd 39 39 2010-06-09 5:11:32 Press the ENTER button to select DPLII SETUP, and then press the ENTER or ►..."wraparound" effect with 5.1 channel surround sound. WIDTH : You can set from -7 to +7. (Incrementally adjusts the sound field (DSP)from the center speaker.) M PANORAMA, DIMENSION and CENTER WIDTH settings are enabled only if the mode is pressed, the mode switches between SETUP ENTER and SETUP OFF. 2....
...select the option you want, and then press the Æ ENTER or ► button. • PANORAMA : You can set from 2 channel sources. HW-C500-C560S-XAA_0609.indd 39 39 2010-06-09 5:11:32 Press the ENTER button to select DPLII SETUP, and then press the ENTER or ►..."wraparound" effect with 5.1 channel surround sound. WIDTH : You can set from -7 to +7. (Incrementally adjusts the sound field (DSP)from the center speaker.) M PANORAMA, DIMENSION and CENTER WIDTH settings are enabled only if the mode is pressed, the mode switches between SETUP ENTER and SETUP OFF. 2....
User Manual (user Manual) (ver.1.0) (English)
Page 42
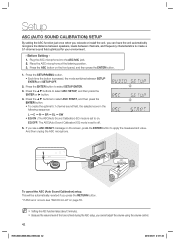
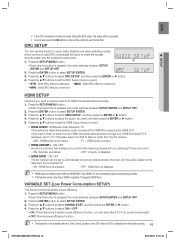
... By setting the ASC function just once when you relocate or install the unit, you cannot adjust the volume using the volume control. 42 HW-C500-C560S-XAA_0609.indd 42 2010-06-09 5:11:33 This will be automatically reverted if you see "ASC Error List" on the screen, press...SETUP/MENU button. • Each time the button is fixed during the ASC setup, you can have the unit automatically recognize the distance between speakers, levels between SETUP ENTER and SETUP OFF. 2. Plug the ASC microphone into the ASC MIC jack. 2. Place the ASC microphone at the listening position....
... By setting the ASC function just once when you relocate or install the unit, you cannot adjust the volume using the volume control. 42 HW-C500-C560S-XAA_0609.indd 42 2010-06-09 5:11:33 This will be automatically reverted if you see "ASC Error List" on the screen, press...SETUP/MENU button. • Each time the button is fixed during the ASC setup, you can have the unit automatically recognize the distance between speakers, levels between SETUP ENTER and SETUP OFF. 2. Plug the ASC microphone into the ASC MIC jack. 2. Place the ASC microphone at the listening position....
User Manual (user Manual) (ver.1.0) (English)
Page 43
... This function is not available after the Tone Control, Speaker Level, SFE mode or ASC is changed from an HDMI connected external device through your HDMI connected TV's speakers, set the DRC Setup mode you to select SETUP ENTER. 3.... the HDMI INPUT and HDMI OUT are connected properly and working normally. This function works only if your Samsung TV's remote control. - Press the SETUP/MENU button. • Each time the button is pressed, the mode...TV. - If you want to listen to audio from the factory setting. 43 HW-C500-C560S-XAA_0609.indd 43 2010-06-09 5:11:35
... This function is not available after the Tone Control, Speaker Level, SFE mode or ASC is changed from an HDMI connected external device through your HDMI connected TV's speakers, set the DRC Setup mode you to select SETUP ENTER. 3.... the HDMI INPUT and HDMI OUT are connected properly and working normally. This function works only if your Samsung TV's remote control. - Press the SETUP/MENU button. • Each time the button is pressed, the mode...TV. - If you want to listen to audio from the factory setting. 43 HW-C500-C560S-XAA_0609.indd 43 2010-06-09 5:11:35

User Manual (user Manual) (ver.1.0) (English)
Page 45
... Pro Logic II Pro Logic II Pro Logic II DD+SFE DD+SFE SFE SFE Stereo Stereo Stereo Stereo Stereo • L/R : Front Speaker (Left/Right) C : Center Speaker SL/SR : Surround Speaker (Left/Right) SW : Subwoofer Output Channel L/R C SL SR SUBW O OO O O OO O O OO O O OO O O OO O O OO O O OO O O OO O O OO O O -- O O -- O...L, C, R, SL, SR, SW L, C, R, SL, SR, SW L, R, SW L, R, SW L, R, SW L, R, SW L, R, SW M Channel status displays are dependent on /off. O O -- O O -- Press the SUBWOOFER button. HW-C500-C560S-XAA_0609.indd 45 45 2010-06-09 5:11:35 O O --
... Pro Logic II Pro Logic II Pro Logic II DD+SFE DD+SFE SFE SFE Stereo Stereo Stereo Stereo Stereo • L/R : Front Speaker (Left/Right) C : Center Speaker SL/SR : Surround Speaker (Left/Right) SW : Subwoofer Output Channel L/R C SL SR SUBW O OO O O OO O O OO O O OO O O OO O O OO O O OO O O OO O O OO O O -- O O -- O...L, C, R, SL, SR, SW L, C, R, SL, SR, SW L, R, SW L, R, SW L, R, SW L, R, SW L, R, SW M Channel status displays are dependent on /off. O O -- O O -- Press the SUBWOOFER button. HW-C500-C560S-XAA_0609.indd 45 45 2010-06-09 5:11:35 O O --
User Manual (user Manual) (ver.1.0) (English)
Page 54
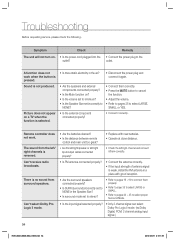
...connected properly? • Check the left / right channels is weak, install the FM antenna in a place with good reception. • Are the surround speakers connected properly? • Is SURR (surround) incorrectly set incorrectly to NONE? • Connect them properly. • Refer to page 35 to select ...? • Only 2 channel signal can select Dolby Pro Logic II mode. (ex:Dolby Digital, PCM, 2 channel analog input signal.) 54 HW-C500-C560S-XAA_0609.indd 54 2010-06-09 5:11:39 Troubleshooting Before requesting service, please check the following. The sound from surround...
...connected properly? • Check the left / right channels is weak, install the FM antenna in a place with good reception. • Are the surround speakers connected properly? • Is SURR (surround) incorrectly set incorrectly to NONE? • Connect them properly. • Refer to page 35 to select ...? • Only 2 channel signal can select Dolby Pro Logic II mode. (ex:Dolby Digital, PCM, 2 channel analog input signal.) 54 HW-C500-C560S-XAA_0609.indd 54 2010-06-09 5:11:39 Troubleshooting Before requesting service, please check the following. The sound from surround...

User Manual (user Manual) (ver.1.0) (English)
Page 55
... is no sound when • Is Digital input selected? Connect the microphone. Check the distance between speaker and microphone exceeds the acceptable value. HW-C500-C560S-XAA_0610.indd 55 55 2010-06-16 4:05:59 ASC Error List Error No. Unplug the power cable and plug it back. Unplug ... MIC LEVL NO FRONT LEVL OVR DIST OVR TIME OVR CODE ERR Action Disconnect the headphones. Check the position of each of microphone and each speaker. ENG ● TROUBLESHOOTING Symptom Check There is properly connected and refer to page 30 to the microphone. Remedy • Check whether the DVD ...
... is no sound when • Is Digital input selected? Connect the microphone. Check the distance between speaker and microphone exceeds the acceptable value. HW-C500-C560S-XAA_0610.indd 55 55 2010-06-16 4:05:59 ASC Error List Error No. Unplug the power cable and plug it back. Unplug ... MIC LEVL NO FRONT LEVL OVR DIST OVR TIME OVR CODE ERR Action Disconnect the headphones. Check the position of each of microphone and each speaker. ENG ● TROUBLESHOOTING Symptom Check There is properly connected and refer to page 30 to the microphone. Remedy • Check whether the DVD ...


