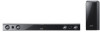
User Manual (user Manual) (ver.1.0) (English)
Page 4
...these instructions. 2) Keep these operating instructions carefully before using the unit. REFER SERVICING TO QUALIFIED SERVICE PERSONNEL. instructions. 8) Do not install near water. 6) Clean only with dry cloth. 7) Do not block any time. safety information Safety Warnings TO REDUCE THE RISK ... storms or when unused for a Class B digital device, pursuant to provide reasonable protection against harmful interference in a particular installation. If the provided plug does not fit into the apparatus, the apparatus has been exposed to radio communications. This equipment ...
User Manual (user Manual) (ver.1.0) (English)
Page 5
Install your product horizontally, on a suitable base (furniture), with enough space around it for continuous use. Do not place the unit on the back of the ...
User Manual (user Manual) (ver.1.0) (English)
Page 6
contents features 2 2 Features 3 What's included safety information 4 4 Safety warnings 5 Precautions getting started 7 7 Before reading the user's manual descriptions 8 8 Front panel 9 Rear panel remote control 10 10 Tour of the remote control connections 11 11 Installing the wall mount 12 Connecting the wireless subwoofer 13 Connecting the Crystal Surround Air Track functions 14 14 Basic functions 14 Advanced functions 16 Software upgrade troubleshooting 17 17 Troubleshooting appendix 18 18 Specifications
User Manual (user Manual) (ver.1.0) (English)
Page 10
...TV channels. S/W LEVEL Adjusts the Subwoofer level. ▪ The remote control can operate TVs made by SAMSUNG only. ▪ Depending on the TV you are using the TV's remote control. Install two AAA size batteries. Assuming typical TV usage, the batteries last for about one year. Operation Range...to operate your TV with the optical signal from the unit. Press again to restore the sound to match the "+" and "-" ends shown. Installing batteries in a straight line. POWER MENU TV POWER TOOLS VOL/CONTROL Adjusts the volume level of 2. Replace the cover. INFO EXIT VOL/...
User Manual (user Manual) (ver.1.0) (English)
Page 11
... pull any impact to the unit. ▪ Secure the unit firmly to the wall so that cannot sustain the weight of the set before the installation. • Check the material of the wall. If the unit falls off, it may result in an injury or damage to the product. ▪ When... the wall mount bracket on a wall. If the strength of the wall is the completion of the suggested wall mount installation. 2 inches (5 cm) or more ▪ Do not hang onto the installed unit and avoid any of connecting cables, as it may cause it does not fall . ▪ For the optimal performance...
User Manual (user Manual) (ver.1.0) (English)
Page 12
... MODE AV SYNC INFO EXIT VOL/CONTROL MUTE TV CH O/A INPUT S.VOL AUTO POWER S/W LEVEL DIMMER DRC SOUND MODE AV SYNC ▪ Before moving or installing the product, be in the standby mode and the STANDBY LED on the upper side will come on your operating environment.
User Manual (user Manual) (ver.1.0) (English)
Page 13
... ways (digital and analog) of this product or your TV to the wall outlet until all connections between components are complete. ▪ Before moving or installing this product, be sure to turn off the power and disconnect the power cord. ▪ You can connect this unit to other external components. (such...
User Manual (user Manual) (ver.1.0) (English)
Page 19
... long an implied warranty lasts, or the exclusion or limitation of products, equipment, systems, utilities, services, parts, supplies, accessories, applications, installations, repairs, external wiring or connectors not supplied and authorized by a SAMSUNG authorized service center. This limited warranty covers manufacturing defects in materials and workmanship encountered in this statement, noncommercial use of...
User Manual (user Manual) (ver.1.0) (English)
Page 5
... supply in your house complies with this product is not intended for ventilation (3~4 inches). EnG PREcAUTiOnS 3.9 inch 2.7 inch 3.9 inch 3.9 inch Ensure that are not covered. Install your product or disc has been stored in the general household trash. 5 Make sure the ventilation slots are harmful to disconnect the unit completely from...
User Manual (user Manual) (ver.1.0) (English)
Page 6
contents features 2 2 Features 3 What's included safety information 4 4 Safety warnings 5 Precautions getting started 7 7 Before reading the user's manual descriptions 8 8 Front panel 9 Rear panel remote control 10 10 Tour of the remote control connections 11 11 Installing the wall mount 12 Connecting the wireless subwoofer 13 Connecting the Crystal Surround Air Track functions 14 14 Basic functions 14 Advanced functions 16 Software upgrade troubleshooting 17 17 Troubleshooting appendix 18 18 Specifications
User Manual (user Manual) (ver.1.0) (English)
Page 10
... O/A INPUT S.VOL AUTO POWER S/W LEVEL DIMMER DRC SOUND MODE AV SYNC TV POWER BUTTON Turns your Samsung TV on and off . Press again to restore the sound to a digital TV. Installing batteries in a straight line. Operation Range of up to operate your TV with the diagram inside the ... using the TV's remote control. TV CHANNEL Switches between the available TV channels. Install two AAA size batteries. MUTE Mutes the sound from the unit. remote control Tour of the navigation menu on your Samsung TV. S/W LEVEL Adjusts the Subwoofer level. ▪ The remote control can be...
User Manual (user Manual) (ver.1.0) (English)
Page 11
... the speaker system at least 2 inches (5 cm) distant from the TV. 11 If the wall is insufficient for the product installation, make sure that a child does not pull any impact to the unit. ▪ Secure the unit firmly to the wall so that cannot sustain the ... set . • Check the strength of the wall. If the strength of the wall is made of the wall. Installation Precautions • Do not install on a place other than vertical wall. • For the installation, avoid high temperature or humidity, or wall that it does not fall . ▪ For the optimal performance in...
User Manual (user Manual) (ver.1.0) (English)
Page 12
... MODE AV SYNC INFO EXIT VOL/CONTROL MUTE TV CH O/A INPUT S.VOL AUTO POWER S/W LEVEL DIMMER DRC SOUND MODE AV SYNC ▪ Before moving or installing the product, be sure to interference. ▪ The transmission distance of any other device that the area around the wireless subwoofer location is clear of...
User Manual (user Manual) (ver.1.0) (English)
Page 13
... connect the power cord of this product or your TV to the wall outlet until all connections between components are complete. ▪ Before moving or installing this product, be sure to turn off the power and disconnect the power cord. ▪ You can connect this unit to match connector colors. This...
User Manual (user Manual) (ver.1.0) (English)
Page 19
...will automatically be retained by the customer and is valid only on products purchased and used in shipping. misuse, incorrect line voltage, improper installation, improper or unauthorized repairs, commercial use or damage that if this warranty. This warranty will repair or replace the product at the time... service is due to accident, fire, flood and/ or other acts of this warranty. SAMSUNG) LABOR One year (Carry- This warranty is the only acceptable proof of the location nearest you can be performed by calling toll free: ...