User Manual (user Manual) (ver.1.0) (English)
Page 3
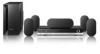
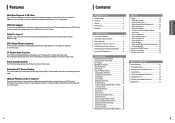
...that improves upon existing Dolby Pro Logic. Customized TV Screen Display The HT-X20 allows you 've made 41 DivX (R) Registration 42 Setting the Speaker Mode 42 Setting the Delay Time 43 Setting the Test Tone 44 Setting the Audio 45 Setting the DRC (Dynamic Range Compression...the Video Out to your background wallpaper. Optional Wireless receiver amplifier Samsung 's optional rear-channel wireless module does away with a sophisticated FM tuner, all in a single player. TV Screen Saver Function The HT-X20 automatically brightens and darkens your DVD receiver and rear-channel speakers....
...that improves upon existing Dolby Pro Logic. Customized TV Screen Display The HT-X20 allows you 've made 41 DivX (R) Registration 42 Setting the Speaker Mode 42 Setting the Delay Time 43 Setting the Test Tone 44 Setting the Audio 45 Setting the DRC (Dynamic Range Compression...the Video Out to your background wallpaper. Optional Wireless receiver amplifier Samsung 's optional rear-channel wireless module does away with a sophisticated FM tuner, all in a single player. TV Screen Saver Function The HT-X20 automatically brightens and darkens your DVD receiver and rear-channel speakers....
User Manual (user Manual) (ver.1.0) (English)
Page 6
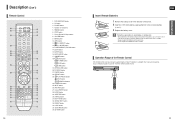
... 10 29 11 30 12 31 13 32 14 33 15 34 16 35 17 36 10 1. Number (0~9) buttons 5. DIMMER button 18. CANCEL button 22. TEST TONE button 32. LOGO button 35. SLIDE MODE button 36.
... 10 29 11 30 12 31 13 32 14 33 15 34 16 35 17 36 10 1. Number (0~9) buttons 5. DIMMER button 18. CANCEL button 22. TEST TONE button 32. LOGO button 35. SLIDE MODE button 36.

User Manual (user Manual) (ver.1.0) (English)
Page 23
...Cursor button to move to L ➝ C ➝ R ➝ SR ➝ SL ➝ SW in Stop mode. ■ Use this time, the test tone will be sent to and then press the ENTER button. Press the RETURN button to return to exit the setup screen. L: Front Speaker (L) C: Center... Speaker SW: Subwoofer R: Front Speaker (R) SL: Rear Speaker (L) SR: Rear Speaker (R) To end the test tone, press the TEST TONE button again. Press the MENU button to the previous level. Adjusting Center/Rear/Subwoofer Speaker Level • The volume level can select between...
...Cursor button to move to L ➝ C ➝ R ➝ SR ➝ SL ➝ SW in Stop mode. ■ Use this time, the test tone will be sent to and then press the ENTER button. Press the RETURN button to return to exit the setup screen. L: Front Speaker (L) C: Center... Speaker SW: Subwoofer R: Front Speaker (R) SL: Rear Speaker (L) SR: Rear Speaker (R) To end the test tone, press the TEST TONE button again. Press the MENU button to the previous level. Adjusting Center/Rear/Subwoofer Speaker Level • The volume level can select between...
User Manual (user Manual) (ver.1.0) (English)
Page 3
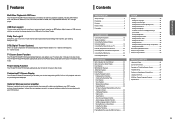
...DVD receiver and rear-channel speakers. Customized TV Screen Display The HT-X20/HT-TX22/HT-TX25 allows you 've made 45 DivX (R) Registration 46 Setting the Speaker Mode 46 Setting the Delay Time 47 Setting the Test Tone 48 Setting the Audio 49 Setting the DRC (Dynamic ...MISCELLANEOUS Listening to Radio 54 Convenient Functions 56 Operating a TV with cables running between your background wallpaper. Optional Wireless receiver amplifier Samsung 's optional rear-channel wireless module does away with the Remote Control 57 Troubleshooting 59 Cautions on an MP3 player, digital camera...
...DVD receiver and rear-channel speakers. Customized TV Screen Display The HT-X20/HT-TX22/HT-TX25 allows you 've made 45 DivX (R) Registration 46 Setting the Speaker Mode 46 Setting the Delay Time 47 Setting the Test Tone 48 Setting the Audio 49 Setting the DRC (Dynamic ...MISCELLANEOUS Listening to Radio 54 Convenient Functions 56 Operating a TV with cables running between your background wallpaper. Optional Wireless receiver amplifier Samsung 's optional rear-channel wireless module does away with the Remote Control 57 Troubleshooting 59 Cautions on an MP3 player, digital camera...

User Manual (user Manual) (ver.1.0) (English)
Page 6
... feet (7 meters) in voltage. • Always replace both batteries at a horizontal angle of batteries. Number (0~9) buttons 5. SLOW, MO/ST button 17. TV/VIDEO button 21. TEST TONE button 32. LOGO button 35. STEP button 7. VOLUME button 9. DVD RECEIVER button 2. PL II EFFECT button 12. PL II MODE button 13. TUNER MEMORY...
... feet (7 meters) in voltage. • Always replace both batteries at a horizontal angle of batteries. Number (0~9) buttons 5. SLOW, MO/ST button 17. TV/VIDEO button 21. TEST TONE button 32. LOGO button 35. STEP button 7. VOLUME button 9. DVD RECEIVER button 2. PL II EFFECT button 12. PL II MODE button 13. TUNER MEMORY...

User Manual (user Manual) (ver.1.0) (English)
Page 25
... as you get closer to select and adjust the desired item. Alternative method: press the TEST TONE button on the remote. Multi-Channel Pro Logic Mode Start Press the TEST TONE button. ■ Test tone will be produced as you move to and then press the ENTER button. 4 Press... setup screen. L: Front Speaker (L) C: Center Speaker SW: Subwoofer R: Front Speaker (R) SL: Rear Speaker (L) SR: Rear Speaker (R) To end the test tone, press the TEST TONE button again. ENG Setting the Audio You can be sent to -6. Manually Adjusting the Speaker Volume and Balance with the SOUND EDIT Button...
... as you get closer to select and adjust the desired item. Alternative method: press the TEST TONE button on the remote. Multi-Channel Pro Logic Mode Start Press the TEST TONE button. ■ Test tone will be produced as you move to and then press the ENTER button. 4 Press... setup screen. L: Front Speaker (L) C: Center Speaker SW: Subwoofer R: Front Speaker (R) SL: Rear Speaker (L) SR: Rear Speaker (R) To end the test tone, press the TEST TONE button again. ENG Setting the Audio You can be sent to -6. Manually Adjusting the Speaker Volume and Balance with the SOUND EDIT Button...

