
User Manual
Page 6
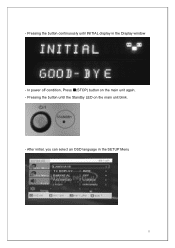
In power off condition, Press (STOP) button on the main unit blink. - Pressing the button until INITIAL display in the SETUP Menu 6 Pressing the button continuously until the Standby LED on the main unit again. - After initial, you can select an OSD language in the Display window ■ - -
In power off condition, Press (STOP) button on the main unit blink. - Pressing the button until INITIAL display in the SETUP Menu 6 Pressing the button continuously until the Standby LED on the main unit again. - After initial, you can select an OSD language in the Display window ■ - -

Quick Guide (easy Manual) (ver.1.0) (English)
Page 4
...a Scene/Song 41 Using Disc Menu 42 Using the Title Menu 42 SETUP Setting the Language 43 Setting TV Screen type 45 Setting Parental Controls (Rating... audio signal decoding technology that communicates with the video. Optional Wireless receiver amplifier Samsung 's optional rear-channel wireless module does away with a sophisticated FM tuner, all...terms of dynamic range, low-level resolution and high-frequency detail. TV Screen Saver Function The HT-Q45 automatically brightens and darkens your DVD receiver. 5 Contents ENG PREPARATION PREPARATION Safety Warnings 1 Precautions ...
...a Scene/Song 41 Using Disc Menu 42 Using the Title Menu 42 SETUP Setting the Language 43 Setting TV Screen type 45 Setting Parental Controls (Rating... audio signal decoding technology that communicates with the video. Optional Wireless receiver amplifier Samsung 's optional rear-channel wireless module does away with a sophisticated FM tuner, all...terms of dynamic range, low-level resolution and high-frequency detail. TV Screen Saver Function The HT-Q45 automatically brightens and darkens your DVD receiver. 5 Contents ENG PREPARATION PREPARATION Safety Warnings 1 Precautions ...
Quick Guide (easy Manual) (ver.1.0) (English)
Page 9
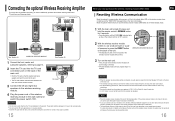
... card when the main unit is about 33 feet, but may not operate at the rear of the wireless receiver module is lit and the setup is output from your operating environment. Caution • Do not insert a card other device that the area around the wireless receiver module location ...the TX card dedicated for 5 seconds. • Press the button until the POWER( ) indicator lights up and the "REAR CHK" message blinks on your Samsung retailer. If a steel-concrete wall or metallic wall is between the main unit and the wireless receiver. 3 Connect the left and right rear speakers to...
... card when the main unit is about 33 feet, but may not operate at the rear of the wireless receiver module is lit and the setup is output from your operating environment. Caution • Do not insert a card other device that the area around the wireless receiver module location ...the TX card dedicated for 5 seconds. • Press the button until the POWER( ) indicator lights up and the "REAR CHK" message blinks on your Samsung retailer. If a steel-concrete wall or metallic wall is between the main unit and the wireless receiver. 3 Connect the left and right rear speakers to...
Quick Guide (easy Manual) (ver.1.0) (English)
Page 22
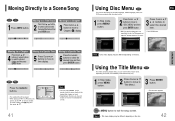
... EXIT MOVE ENTER EXIT Note • Disc menu display may vary. 1 In Stop mode, press MENU button. 2 Press Cursor , button to move to exit the setup screen. Moving to a Title/Track Press Cursor , buttons 2 or numeric buttons to select the desired item. • Press ENTER button. Using Disc Menu DVD You...
... EXIT MOVE ENTER EXIT Note • Disc menu display may vary. 1 In Stop mode, press MENU button. 2 Press Cursor , button to move to exit the setup screen. Moving to a Title/Track Press Cursor , buttons 2 or numeric buttons to select the desired item. • Press ENTER button. Using Disc Menu DVD You...
Quick Guide (easy Manual) (ver.1.0) (English)
Page 23
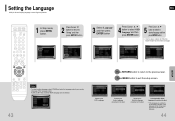
... code of your desired language. 44 Press MENU button to the previous level. MOVE SELECT RETURN EXIT Press RETURN button to return to exit the setup screen. Setting the Language ENG OSD (On-Screen Display) language is set it to your country. (See page 78 for language codes) AUDIO, ... the OSD will not change even if you set to English by default. 1 In Stop mode, press MENU button. 2 Press Cursor button to move to 'Setup' and then press ENTER button. 3 Select 'Language' and then press ENTER button Press Cursor , 4 button to select 'OSD Language' and then press ENTER button...
... code of your desired language. 44 Press MENU button to the previous level. MOVE SELECT RETURN EXIT Press RETURN button to return to exit the setup screen. Setting the Language ENG OSD (On-Screen Display) language is set it to your country. (See page 78 for language codes) AUDIO, ... the OSD will not change even if you set to English by default. 1 In Stop mode, press MENU button. 2 Press Cursor button to move to 'Setup' and then press ENTER button. 3 Select 'Language' and then press ENTER button Press Cursor , 4 button to select 'OSD Language' and then press ENTER button...

Quick Guide (easy Manual) (ver.1.0) (English)
Page 24
...TVs is called the aspect ratio. MOVE ENTER RETURN EXIT MOVE SELECT RETURN EXIT ENG Adjusting the TV Aspect Ratio (Screen Size) The horizontal to 'Setup' and then press ENTER button. Select "16:9" if you will look different depending on a conventional TV. • You can select the TV...Press Cursor button to move to the previous screen. Press Cursor , 4 button to select the desired item and then press ENTER button. • Once the setup is in the 4:3 ratio, you should adjust the aspect ratio to fit your widescreen TV. • You can enjoy the widescreen aspect. 4:3LB (4:3 ...
...TVs is called the aspect ratio. MOVE ENTER RETURN EXIT MOVE SELECT RETURN EXIT ENG Adjusting the TV Aspect Ratio (Screen Size) The horizontal to 'Setup' and then press ENTER button. Select "16:9" if you will look different depending on a conventional TV. • You can select the TV...Press Cursor button to move to the previous screen. Press Cursor , 4 button to select the desired item and then press ENTER button. • Once the setup is in the 4:3 ratio, you should adjust the aspect ratio to fit your widescreen TV. • You can enjoy the widescreen aspect. 4:3LB (4:3 ...
Quick Guide (easy Manual) (ver.1.0) (English)
Page 25
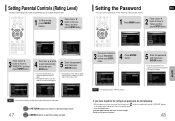
... for longer than 5 seconds. Do not use this to 'PARENTAL' and then press ENTER button. Setting the Password ENG You can set to 'Setup' and then press ENTER button. MOVE ENTER EXIT MOVE ENTER EXIT Press Cursor button to 3 move to "7890" by default. • Once the... setup is complete. "INITIALIZE" appears 48 button for the Parental (rating level) setting. 1 Press MENU button. 2 Press Cursor button to move to 'PASSWORD' and ...
... for longer than 5 seconds. Do not use this to 'PARENTAL' and then press ENTER button. Setting the Password ENG You can set to 'Setup' and then press ENTER button. MOVE ENTER EXIT MOVE ENTER EXIT Press Cursor button to 3 move to "7890" by default. • Once the... setup is complete. "INITIALIZE" appears 48 button for the Parental (rating level) setting. 1 Press MENU button. 2 Press Cursor button to move to 'PASSWORD' and ...

Quick Guide (easy Manual) (ver.1.0) (English)
Page 26
Select this to set the Samsung Logo image as your wallpaper. MOVE ENTER RETURN EXIT MOVE SELECT RETURN EXIT Press RETURN button to return to exit the setup screen. 50 Setting the Wallpaper 1During playback, press PLAY/PAUSE button when an image you like as background wallpaper. ENG ...• You can set the image you like appears. 2 Press LOGO button. • "COPY LOGO DATA" will be displayed on the TV screen. SETUP MOVE ENTER EXIT 4 Press to select the desired 'USER', and then press ENTER. • This selects one of the 3 wallpaper screens MOVE ENTER EXIT ...
Select this to set the Samsung Logo image as your wallpaper. MOVE ENTER RETURN EXIT MOVE SELECT RETURN EXIT Press RETURN button to return to exit the setup screen. 50 Setting the Wallpaper 1During playback, press PLAY/PAUSE button when an image you like as background wallpaper. ENG ...• You can set the image you like appears. 2 Press LOGO button. • "COPY LOGO DATA" will be displayed on the TV screen. SETUP MOVE ENTER EXIT 4 Press to select the desired 'USER', and then press ENTER. • This selects one of the 3 wallpaper screens MOVE ENTER EXIT ...
Quick Guide (easy Manual) (ver.1.0) (English)
Page 27
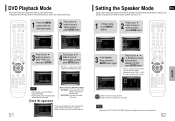
...Audio. Note • Depending on demand format. Setting the Speaker Mode ENG Signal outputs and frequency responses from the speakers will automatically switch to 'Setup' and then press ENTER button. DivX (R) registration When Selecting DVD Play Mode: • DVD VIDEO : set to play the DVD video ... set to play the default DVD audio. • Please use the Registration code to your speaker configuration and whether certain speakers are connected. SETUP 51 MOVE ENTER EXIT Press Cursor 3 button to move to 'DVD TYPE' and then press ENTER MOVE ENTER EXIT 4 Press Cursor ,...
...Audio. Note • Depending on demand format. Setting the Speaker Mode ENG Signal outputs and frequency responses from the speakers will automatically switch to 'Setup' and then press ENTER button. DivX (R) registration When Selecting DVD Play Mode: • DVD VIDEO : set to play the DVD video ... set to play the default DVD audio. • Please use the Registration code to your speaker configuration and whether certain speakers are connected. SETUP 51 MOVE ENTER EXIT Press Cursor 3 button to move to 'DVD TYPE' and then press ENTER MOVE ENTER EXIT 4 Press Cursor ,...
Quick Guide (easy Manual) (ver.1.0) (English)
Page 28
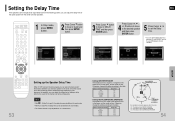
MOVE ENTER EXIT MOVE ENTER EXIT MOVE ENTER RETURN EXIT MOVE SELECT RETURN EXIT MOVE CHANGE RETURN EXIT SETUP 53 Setting up the Speaker Delay Time When 5.1CH Surround Sound is played, you can enjoy the best sound if the distance between you and ...
MOVE ENTER EXIT MOVE ENTER EXIT MOVE ENTER RETURN EXIT MOVE SELECT RETURN EXIT MOVE CHANGE RETURN EXIT SETUP 53 Setting up the Speaker Delay Time When 5.1CH Surround Sound is played, you can enjoy the best sound if the distance between you and ...
Quick Guide (easy Manual) (ver.1.0) (English)
Page 29
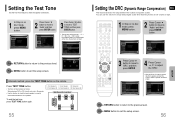
...10141; C ➝ R ➝ SR ➝ SL ➝ SW in Stop mode. • Use this time, the test tone will be sent to exit the setup screen. 56 MOVE ENTER EXIT 2 Press Cursor button to move to 'Audio' and then press ENTER button. 3 Press Cursor button to move to 'DRC' and...press MENU button. Press MENU button to the previous level. MOVE ENTER RETURN EXIT CHANGE RETURN EXIT Press RETURN button to return to exit the setup screen. SETUP MOVE ENTER EXIT MOVE ENTER EXIT 3 Press Cursor button to move to 'TEST TONE' and then press ENTER button. • The test...
...10141; C ➝ R ➝ SR ➝ SL ➝ SW in Stop mode. • Use this time, the test tone will be sent to exit the setup screen. 56 MOVE ENTER EXIT 2 Press Cursor button to move to 'Audio' and then press ENTER button. 3 Press Cursor button to move to 'DRC' and...press MENU button. Press MENU button to the previous level. MOVE ENTER RETURN EXIT CHANGE RETURN EXIT Press RETURN button to return to exit the setup screen. SETUP MOVE ENTER EXIT MOVE ENTER EXIT 3 Press Cursor button to move to 'TEST TONE' and then press ENTER button. • The test...
Quick Guide (easy Manual) (ver.1.0) (English)
Page 30
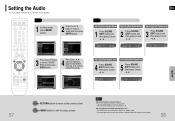
... Subwoofer Speaker Level 4 Press SOUND EDIT button and then press Cursor , . 5 Press SOUND EDIT button and then press Cursor , . Press the , buttons to exit the setup screen. MOVE ENTER EXIT MOVE ENTER EXIT 3 Press Cursor button to move closer to select and adjust the desired item.... SETUP 57 MOVE ENTER RETURN EXIT MOVE CHANGE RETURN EXIT Press RETURN button to return to 'Audio' and then press ENTER button. Adjusting Front Speaker Balance ...
... Subwoofer Speaker Level 4 Press SOUND EDIT button and then press Cursor , . 5 Press SOUND EDIT button and then press Cursor , . Press the , buttons to exit the setup screen. MOVE ENTER EXIT MOVE ENTER EXIT 3 Press Cursor button to move closer to select and adjust the desired item.... SETUP 57 MOVE ENTER RETURN EXIT MOVE CHANGE RETURN EXIT Press RETURN button to return to 'Audio' and then press ENTER button. Adjusting Front Speaker Balance ...
Quick Guide (easy Manual) (ver.1.0) (English)
Page 31
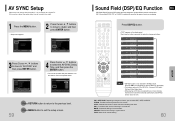
... the genre of being in a concert hall. Sound Field (DSP)/EQ Function ENG DSP(Digital Signal Processor) DSP modes have been designed to exit the setup screen. EQ: You can select ROCK, POP, or CLASSIC to optimize the sound for normal listening. 60 STUDIO : Provides a sense of a movie theater. ...if listening in a grand church. PASS: Select this occurs, adjust the audio delay time to to match the video. 1 Press the MENU button. • Setup menu appears. 2 Press Cursor , buttons to move to 'AV-SYNC' and then press ENTER button. 4 Press Cursor , buttons to select the AV-SYNC Delay...
... the genre of being in a concert hall. Sound Field (DSP)/EQ Function ENG DSP(Digital Signal Processor) DSP modes have been designed to exit the setup screen. EQ: You can select ROCK, POP, or CLASSIC to optimize the sound for normal listening. 60 STUDIO : Provides a sense of a movie theater. ...if listening in a grand church. PASS: Select this occurs, adjust the audio delay time to to match the video. 1 Press the MENU button. • Setup menu appears. 2 Press Cursor , buttons to move to 'AV-SYNC' and then press ENTER button. 4 Press Cursor , buttons to select the AV-SYNC Delay...
Quick Guide (easy Manual) (ver.1.0) (English)
Page 32
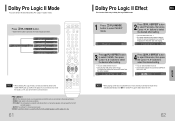
... Cursor , buttons to select the desired setting. • You can experience sound effects as if you cannot listen to only one of the center image. SETUP Note • When playing a DVD disc encoded with side wall imaging. 3 Press PL II EFFECT button to select C-Width, then press Cursor , buttons to include...
... Cursor , buttons to select the desired setting. • You can experience sound effects as if you cannot listen to only one of the center image. SETUP Note • When playing a DVD disc encoded with side wall imaging. 3 Press PL II EFFECT button to select C-Width, then press Cursor , buttons to include...

Quick Guide (easy Manual) (ver.1.0) (English)
Page 39
...Antenna. And depending on . Can't receive radio broadcast. If the problem you selected the mode(TV/DVD) functions of the DVD. Is the speaker setup correctly customized? • Is the disc severely damaged? • When listening to a CD or radio, sound is not produced, or the disc ...the power cord plugged securely into the outlet? • Turn off the unit, disconnect the power cord, and contact the nearest authorized dealer or Samsung Electronics Service Center. Dolby Digital 5.1 CH Surround Sound is produced only if the disc is recorded with 5.1 channel sound. • Is the ...
...Antenna. And depending on . Can't receive radio broadcast. If the problem you selected the mode(TV/DVD) functions of the DVD. Is the speaker setup correctly customized? • Is the disc severely damaged? • When listening to a CD or radio, sound is not produced, or the disc ...the power cord plugged securely into the outlet? • Turn off the unit, disconnect the power cord, and contact the nearest authorized dealer or Samsung Electronics Service Center. Dolby Digital 5.1 CH Surround Sound is produced only if the disc is recorded with 5.1 channel sound. • Is the ...


