
Instruction Manual
Page 1
THIS APPLIANCE IS MANUFACTURED BY: DIGITAL HOME CINEMA SYSTEM HT-P10 HT-TP12 Instruction Manual AH68-01660B REV:01 V I D E O COMPACT COMPACT DIGITAL AUDIO DIGITAL VIDEO
THIS APPLIANCE IS MANUFACTURED BY: DIGITAL HOME CINEMA SYSTEM HT-P10 HT-TP12 Instruction Manual AH68-01660B REV:01 V I D E O COMPACT COMPACT DIGITAL AUDIO DIGITAL VIDEO
Instruction Manual
Page 2
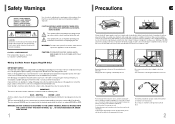
Safety Warnings CLASS 1 LASER PRODUCT KLASSE 1 LASER PRODUKT LUOKAN 1 LASER LAITE KLASS 1 LASER APPARAT PRODUCTO LASER CLASE 1 CAUTION RISK OF ELECTRIC SHOCK. DO NOT OPEN CAUTION: TO REDUCE THE RISK OF ELECTRIC SHOCK, DO NOT REMOVE REAR COVER. CAUTION: TO PREVENT ELECTRIC SHOCK, MATCH WIDE BLADE OF PLUG TO WIDE SLOT, FULLY INSERT. However, if there is indicated on a suitable base (furniture), with the letter N or coloured BLUE or BLACK. IMPORTANT The wires in the main lead are harmful to insert bare wires directly into a main socket. lows:- The wire coloured BLUE must be ...
Safety Warnings CLASS 1 LASER PRODUCT KLASSE 1 LASER PRODUKT LUOKAN 1 LASER LAITE KLASS 1 LASER APPARAT PRODUCTO LASER CLASE 1 CAUTION RISK OF ELECTRIC SHOCK. DO NOT OPEN CAUTION: TO REDUCE THE RISK OF ELECTRIC SHOCK, DO NOT REMOVE REAR COVER. CAUTION: TO PREVENT ELECTRIC SHOCK, MATCH WIDE BLADE OF PLUG TO WIDE SLOT, FULLY INSERT. However, if there is indicated on a suitable base (furniture), with the letter N or coloured BLUE or BLACK. IMPORTANT The wires in the main lead are harmful to insert bare wires directly into a main socket. lows:- The wire coloured BLUE must be ...
Instruction Manual
Page 3
...by Digital Theater Systems Inc. It delivers full-frequency 5.1 channel sound. The HT-P10/HT-TP12 automatically switches itself off after 3 minutes in the screen saver mode. TV Screen Saver Function The HT-P10/HT-TP12 automatically brightens and darkens the brightness of the TV screen after 20 minutes... and Storing Discs...56 Before Calling for Service...57 Language Code List...59 Specifications...60 4 Features Multi-Disc Playback & FM Tuner The HT-P10/HT-TP12 combines the convenience of multi-disc playback capability, including DVD, VCD, CD, MP3-CD, CD-R/RW, and DVD-R/RW, with...
...by Digital Theater Systems Inc. It delivers full-frequency 5.1 channel sound. The HT-P10/HT-TP12 automatically switches itself off after 3 minutes in the screen saver mode. TV Screen Saver Function The HT-P10/HT-TP12 automatically brightens and darkens the brightness of the TV screen after 20 minutes... and Storing Discs...56 Before Calling for Service...57 Language Code List...59 Specifications...60 4 Features Multi-Disc Playback & FM Tuner The HT-P10/HT-TP12 combines the convenience of multi-disc playback capability, including DVD, VCD, CD, MP3-CD, CD-R/RW, and DVD-R/RW, with...
Instruction Manual
Page 4
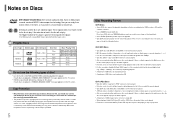
Copy Protection • Many DVD discs are labeled with copy protection. If the session is a blank segment in the Multisession disc, the disc can be played per CD. • A maximum of 9,999 images can be stored on a single CD. • When playing a Kodak/Fuji Picture CD, only the JPEG files in the picture folder can be played. • MP3 file names should be 8 characters or less in Variable Bit Rate (VBR) format, i.e. If there is closed , it will only play . files encoded in both low bit rate and high bit rate (e.g., 32Kbps ~ 320Kbps), the sound may skip during playback. ...
Copy Protection • Many DVD discs are labeled with copy protection. If the session is a blank segment in the Multisession disc, the disc can be played per CD. • A maximum of 9,999 images can be stored on a single CD. • When playing a Kodak/Fuji Picture CD, only the JPEG files in the picture folder can be played. • MP3 file names should be 8 characters or less in Variable Bit Rate (VBR) format, i.e. If there is closed , it will only play . files encoded in both low bit rate and high bit rate (e.g., 32Kbps ~ 320Kbps), the sound may skip during playback. ...
Instruction Manual
Page 5
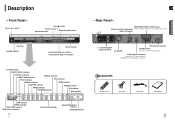
Description -Front Panel- Video Output Connector Connect the TV's video input jacks (VIDEO IN) to a TV with component video inputs to these jacks. Accessories Remote Control Video Cable FM Antenna User's Manual 8 Input Connector PREPARATION Disc Tray Standby indicator Volume buttons Tuning Up & Skip ( ) buttons Tuning Down & Skip ( ) buttons P.SCAN indicator DOLBY DIGITAL indicator DTS Disc indicator LINEAR PCM indicator TITLE indicator REPEAT indicator PBC indicator GROUP indicator TUNER indicator CHAPTER indicator TRACK indicator PROGRAM indicator STEREO ...
Description -Front Panel- Video Output Connector Connect the TV's video input jacks (VIDEO IN) to a TV with component video inputs to these jacks. Accessories Remote Control Video Cable FM Antenna User's Manual 8 Input Connector PREPARATION Disc Tray Standby indicator Volume buttons Tuning Up & Skip ( ) buttons Tuning Down & Skip ( ) buttons P.SCAN indicator DOLBY DIGITAL indicator DTS Disc indicator LINEAR PCM indicator TITLE indicator REPEAT indicator PBC indicator GROUP indicator TUNER indicator CHAPTER indicator TRACK indicator PROGRAM indicator STEREO ...

Instruction Manual
Page 6
button PL II MODE button VOLUME button MENU button SUB TITLE button RETURN button STEP button ZOOM button REPEAT button SLOW, MO/ST button LOGO COPY button 9 GB PREPARATION OPEN/CLOSE button DIMMER button DVD button TUNER button AUX button CANCEL button Play/Pause button Stop button Tuning Preset/CD Skip button PL II EFFECT button TUNING/CH button INFO. button AUDIO button Cursor/Enter button MUTE button TEST TONE button SOUND EDIT button DSP/EQ button DIGEST button EZ VIEW, NTSC/PAL button Insert Remote Batteries 1 Remove the battery cover on the back of the remote by pressing ...
button PL II MODE button VOLUME button MENU button SUB TITLE button RETURN button STEP button ZOOM button REPEAT button SLOW, MO/ST button LOGO COPY button 9 GB PREPARATION OPEN/CLOSE button DIMMER button DVD button TUNER button AUX button CANCEL button Play/Pause button Stop button Tuning Preset/CD Skip button PL II EFFECT button TUNING/CH button INFO. button AUDIO button Cursor/Enter button MUTE button TEST TONE button SOUND EDIT button DSP/EQ button DIGEST button EZ VIEW, NTSC/PAL button Insert Remote Batteries 1 Remove the battery cover on the back of the remote by pressing ...

Instruction Manual
Page 7
Example: For 32" TVs 2~2.4m (6~8feet) For 55" TVs 3.5~4m (11~13feet) Rear Speakers LS RS • Place these speakers behind your listening position. • If there isn't enough room, place these speakers in front of your listening position, facing inwards (about 60 to 90cm (2 to 3feet) above your ear, facing slightly downward. * Unlike the front and center speakers, the rear speakers are used to handle mainly sound effects and sound will be at the same height as your ear. • Align the front face of the front speakers with the front face of the center speaker or place them ...
Example: For 32" TVs 2~2.4m (6~8feet) For 55" TVs 3.5~4m (11~13feet) Rear Speakers LS RS • Place these speakers behind your listening position. • If there isn't enough room, place these speakers in front of your listening position, facing inwards (about 60 to 90cm (2 to 3feet) above your ear, facing slightly downward. * Unlike the front and center speakers, the rear speakers are used to handle mainly sound effects and sound will be at the same height as your ear. • Align the front face of the front speakers with the front face of the center speaker or place them ...
Instruction Manual
Page 8
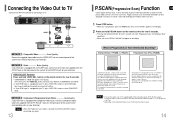
VIDEO SELECT Function Press and hold P.SCAN button on the remote control for over 5 seconds. • Pressing and holding the button for over 5 seconds. • "COMPOSITE" or "RGB" will appear on the remote control for connecting to fill in the frame. At this function may not work on TVs with conventional component inputs, i.e., non-progressive scan TVs.) • Depending on the brand and model of the system to the VIDEO IN jack on your TV, this time, press the VIDEO SEL. button to select RGB mode. Interlaced Scan (1 FRAME = 2 FIELDS) Progressive Scan (FULL FRAME) In ...
VIDEO SELECT Function Press and hold P.SCAN button on the remote control for over 5 seconds. • Pressing and holding the button for over 5 seconds. • "COMPOSITE" or "RGB" will appear on the remote control for connecting to fill in the frame. At this function may not work on TVs with conventional component inputs, i.e., non-progressive scan TVs.) • Depending on the brand and model of the system to the VIDEO IN jack on your TV, this time, press the VIDEO SEL. button to select RGB mode. Interlaced Scan (1 FRAME = 2 FIELDS) Progressive Scan (FULL FRAME) In ...

Instruction Manual
Page 9
The mode switches as a VCR or TV. Connect the FM antenna supplied to prevent overheating. If the unit has poor ventilation, the temperature inside the unit could rise and may damage it to select AUX. • You can also use the FUNCTION button on the main unit. Cooling Fan The cooling fan supplies cool air to the unit to the FM 75Ω COAXIAL terminal. 2. Audio Cable (not supplied) If the external analog component has only one Audio Out, connect either left or right. 1 Connect Audio In on the DVD player to Audio Out on the external analog component. • Be sure to match ...
The mode switches as a VCR or TV. Connect the FM antenna supplied to prevent overheating. If the unit has poor ventilation, the temperature inside the unit could rise and may damage it to select AUX. • You can also use the FUNCTION button on the main unit. Cooling Fan The cooling fan supplies cool air to the unit to the FM 75Ω COAXIAL terminal. 2. Audio Cable (not supplied) If the external analog component has only one Audio Out, connect either left or right. 1 Connect Audio In on the DVD player to Audio Out on the external analog component. • Be sure to match ...
Instruction Manual
Page 10
OPERATION 3 To change the album, use to select the album, and then press the ENTER button. If PLAY/PAUSE ( ) button or ENTER button is pressed, playback starts from the stop position will be played. At this time, press the NT/PAL button shortly to select between "NTSC" and "PAL". • Each country has a different video format standard. • For normal playback, the video format of the disc must be the same as the video format of the menu depends on the remote controller for over 5 seconds while the power is turned off. • By default, the video format ...
OPERATION 3 To change the album, use to select the album, and then press the ENTER button. If PLAY/PAUSE ( ) button or ENTER button is pressed, playback starts from the stop position will be played. At this time, press the NT/PAL button shortly to select between "NTSC" and "PAL". • Each country has a different video format standard. • For normal playback, the video format of the disc must be the same as the video format of the menu depends on the remote controller for over 5 seconds while the power is turned off. • By default, the video format ...
Instruction Manual
Page 11
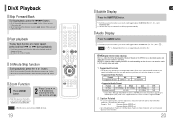
button. Note • DIVX file can watch a movie in the disc. OPERATION DivX(Digital internet video eXpress) DivX is a video file format developed by Microsoft based on the MPEG4 so as to provide audio, and video data over Fast playback To play back the disc at a faster speed, press and hold or during playback. • Each time you press and hold either button, the playback speed will change as follows: 2x ➞ 4x ➞ 8x ➞ 32x ➞ Normal. 5 Minute Skip function During playback, press the , button. • Go to the screen about 5 minutes after whenever ...
button. Note • DIVX file can watch a movie in the disc. OPERATION DivX(Digital internet video eXpress) DivX is a video file format developed by Microsoft based on the MPEG4 so as to provide audio, and video data over Fast playback To play back the disc at a faster speed, press and hold or during playback. • Each time you press and hold either button, the playback speed will change as follows: 2x ➞ 4x ➞ 8x ➞ 32x ➞ Normal. 5 Minute Skip function During playback, press the , button. • Go to the screen about 5 minutes after whenever ...
Instruction Manual
Page 12
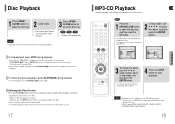
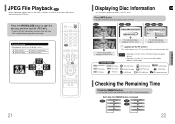
To rotate the image During playback, press Cursor , , , buttons. If this DVD player. Each time the REMAIN button is pressed, the display changes as follows: DVD VCD CD MP3 DivX JPEG DVD RECEIVER SMART NAVI Something like you can also select DTS, DOLBY DIGITAL, or PRO LOGIC. Press the OPEN/CLOSE button to open the disc tray, and then load the JPEG disc. • Playback will start automatically and each image will show for good Love of a title or chapter being operated, that The information display disappears from the screen Screen Display Note • Depending on the disc,...
To rotate the image During playback, press Cursor , , , buttons. If this DVD player. Each time the REMAIN button is pressed, the display changes as follows: DVD VCD CD MP3 DivX JPEG DVD RECEIVER SMART NAVI Something like you can also select DTS, DOLBY DIGITAL, or PRO LOGIC. Press the OPEN/CLOSE button to open the disc tray, and then load the JPEG disc. • Playback will start automatically and each image will show for good Love of a title or chapter being operated, that The information display disappears from the screen Screen Display Note • Depending on the disc,...
Instruction Manual
Page 13
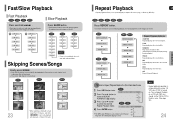
Skipping Scenes/Songs Briefly press . • Each time the button is pressed briefly during playback, the previous or next chapter, track, or directory (file) will skip back or forward 5 minutes. DISC Repeatedly plays the entire disc. Repeat Note • Repeat playback operation is not possible with version 2.0 VCD discs if PBC is turned on a VCD with PBC, you should set the PBC to OFF in the Disc Information Screen 1 DVD Press INFO button twice. 2 Press Cursor button to move to REPEAT PLAYBACK ( ) display. 3 Press Cursor button to repeatedly play a chapter, title, track (song),...
Skipping Scenes/Songs Briefly press . • Each time the button is pressed briefly during playback, the previous or next chapter, track, or directory (file) will skip back or forward 5 minutes. DISC Repeatedly plays the entire disc. Repeat Note • Repeat playback operation is not possible with version 2.0 VCD discs if PBC is turned on a VCD with PBC, you should set the PBC to OFF in the Disc Information Screen 1 DVD Press INFO button twice. 2 Press Cursor button to move to REPEAT PLAYBACK ( ) display. 3 Press Cursor button to repeatedly play a chapter, title, track (song),...
Instruction Manual
Page 14
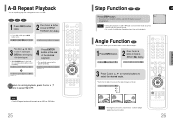
To return to normal playback, press Cursor , buttons to select 'A-' and then press ENTER button at 4x, 8x, and 32x speeds. • No sound is pressed, the angle changes as follows: 1/3 2/3 3/3 Note • The Angle function works only with discs on an MP3 or JPEG disc. 25 Step Function DVD VCD GB Press STEP button. • The picture moves forward one frame each time the button is pressed, the selected position will be stored in different angles. 1Press INFO button. 2 Press Cursor button to move to select the desired angle. • Each time the button is heard ...
To return to normal playback, press Cursor , buttons to select 'A-' and then press ENTER button at 4x, 8x, and 32x speeds. • No sound is pressed, the angle changes as follows: 1/3 2/3 3/3 Note • The Angle function works only with discs on an MP3 or JPEG disc. 25 Step Function DVD VCD GB Press STEP button. • The picture moves forward one frame each time the button is pressed, the selected position will be stored in different angles. 1Press INFO button. 2 Press Cursor button to move to select the desired angle. • Each time the button is heard ...
Instruction Manual
Page 15
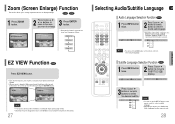
DVD VCD 1 Press ZOOM button. EN 1/3 EN 01/ 03 OFF SP 02/ 03 FR 03/ 03 OFF / 03 Note • You can use the SUBTITLE button on the remote control to select a subtitle language. • Depending on the disc, the Subtitle and Audio Language functions may not disappear because some DVD discs have a built-in Widescreen format, black bars at the top and bottom of the TV screen can be removed by pressing the EZ VIEW button. SP 2/3 FR 3/3 Note • You can use the AUDIO button on the remote control to select a audio language. OPERATION Subtitle Language Selection ...
DVD VCD 1 Press ZOOM button. EN 1/3 EN 01/ 03 OFF SP 02/ 03 FR 03/ 03 OFF / 03 Note • You can use the SUBTITLE button on the remote control to select a subtitle language. • Depending on the disc, the Subtitle and Audio Language functions may not disappear because some DVD discs have a built-in Widescreen format, black bars at the top and bottom of the TV screen can be removed by pressing the EZ VIEW button. SP 2/3 FR 3/3 Note • You can use the AUDIO button on the remote control to select a audio language. OPERATION Subtitle Language Selection ...

Instruction Manual
Page 16
DVD menu contents differ from the disc information screen. • When playing an MP3 or JPEG disc, you select the disc menu that is not supported by the disc, the "This menu is not supported" message appears on the disc, you may be disabled. Press MENU button to disc. 1 In Stop mode, press MENU button. • When playing a VCD (version 2.), this feature may vary. 1 In Stop mode, press MENU button. 2 Press Cursor , button to move to select the desired title/track and then press ENTER button. OPERATION Moving to a Chapter Press Cursor , 4 buttons or numeric ...
DVD menu contents differ from the disc information screen. • When playing an MP3 or JPEG disc, you select the disc menu that is not supported by the disc, the "This menu is not supported" message appears on the disc, you may be disabled. Press MENU button to disc. 1 In Stop mode, press MENU button. • When playing a VCD (version 2.), this feature may vary. 1 In Stop mode, press MENU button. 2 Press Cursor , button to move to select the desired title/track and then press ENTER button. OPERATION Moving to a Chapter Press Cursor , 4 buttons or numeric ...
Instruction Manual
Page 17
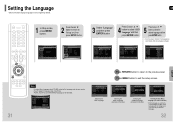
Setting the Language GB OSD (On-Screen Display) language is set to English, OSD will not change even if you selected is complete, if the language was set to English by default. 1 In Stop mode, press MENU button. 2 Press Cursor button to move to 'Setup' and then press ENTER button. 3 Select 'Language' and then press ENTER button Press Cursor , 4 button to select 'OSD Language' and then press ENTER button. Press Cursor , 5 button to select the desired language and then press ENTER button. • Once the setup is not recorded on the disc, menu language will be selected. ...
Setting the Language GB OSD (On-Screen Display) language is set to English, OSD will not change even if you selected is complete, if the language was set to English by default. 1 In Stop mode, press MENU button. 2 Press Cursor button to move to 'Setup' and then press ENTER button. 3 Select 'Language' and then press ENTER button Press Cursor , 4 button to select 'OSD Language' and then press ENTER button. Press Cursor , 5 button to select the desired language and then press ENTER button. • Once the setup is not recorded on the disc, menu language will be selected. ...
Instruction Manual
Page 18
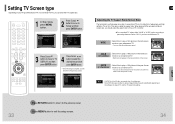
This ratio is complete, you will be taken to play a 16:9 picture in the pan & scan mode on a conventional TV. • You can enjoy the widescreen aspect. 4:3LB (4:3 Letterbox) : Select this to play a 16:9 picture in various image formats, they will appear at the top and bottom of the 16:9 picture cut off). Note • If a DVD is 16:9. GB Adjusting the TV Aspect Ratio (Screen Size) The horizontal to personal preference. Select "16:9" if you cannot view it in widescreen. • Since DVD discs are recorded in the letter box mode on your widescreen TV. • You can...
This ratio is complete, you will be taken to play a 16:9 picture in the pan & scan mode on a conventional TV. • You can enjoy the widescreen aspect. 4:3LB (4:3 Letterbox) : Select this to play a 16:9 picture in various image formats, they will appear at the top and bottom of the 16:9 picture cut off). Note • If a DVD is 16:9. GB Adjusting the TV Aspect Ratio (Screen Size) The horizontal to personal preference. Select "16:9" if you cannot view it in widescreen. • Since DVD discs are recorded in the letter box mode on your widescreen TV. • You can...
Instruction Manual
Page 19
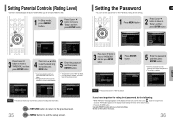
Note • This function works only if a DVD disc contains the rating level information. 35 Press RETURN button to return to 'PASSWORD' and then press ENTER button. 4 Press ENTER button. 5 Enter the password and then press ENTER button. • Enter the old password, a new password, and confirm new password. • The setting is complete. Press Cursor button to 3 move to 'Setup' and then press ENTER button. "INITIALIZE" appears on the display of adult or violent DVDs you have selected Level 6, you will erase all settings will return to "7890" by default. • Once ...
Note • This function works only if a DVD disc contains the rating level information. 35 Press RETURN button to return to 'PASSWORD' and then press ENTER button. 4 Press ENTER button. 5 Enter the password and then press ENTER button. • Enter the old password, a new password, and confirm new password. • The setting is complete. Press Cursor button to 3 move to 'Setup' and then press ENTER button. "INITIALIZE" appears on the display of adult or violent DVDs you have selected Level 6, you will erase all settings will return to "7890" by default. • Once ...
Instruction Manual
Page 20
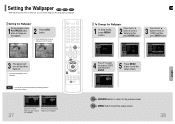
... a DVD, VCD or JPEG CD, you can set up to three wallpapers by repeating operation from Step1 to Step 3. 37 Select this to set the Samsung Logo image as your wallpaper. GB To Change the Wallpaper 1 In Stop mode, press MENU button. 2 Press Cursor button to move to 'Setup' and then...
... a DVD, VCD or JPEG CD, you can set up to three wallpapers by repeating operation from Step1 to Step 3. 37 Select this to set the Samsung Logo image as your wallpaper. GB To Change the Wallpaper 1 In Stop mode, press MENU button. 2 Press Cursor button to move to 'Setup' and then...