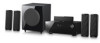
User Manual (user Manual) (ver.1.0) (English)
Page 1
HT-AS730S AV Receiver System user manual imagine the possibilities Thank you for purchasing this Samsung product. To receive more complete service, please register your product at www.samsung.com/register
User Manual (user Manual) (ver.1.0) (English)
Page 2
... TO BEAM. ~ THIS PRODUCT UTILIZES A LASER. If this equipment does cause harmful interference to radio or television reception, which the receiver is used to connect the unit to operate it. NO USER-SERVICEABLE PARTS ARE INSIDE. WARNING ~ To reduce the risk of... CLASS 1 LASER product. Use of controls, adjustments or performance of the following measures: ~ Reorient or relocate the receiving antenna. ~ Increase the separation between the equipment and receiver. ~ Connect the equipment into an outlet on the apparatus. ~ The Mains plug is connected. ~ Consult the dealer...
User Manual (user Manual) (ver.1.0) (English)
Page 3
... has been damaged in the Radio Interference Regulations of the Canadian Department of the polarized or grounding-type plug. This transmitter must accept any interference received, including interference that produce heat. 9) Do not defeat the safety purpose of Communications. Follow all servicing to rain or moisture, does not operate normally, or...
User Manual (user Manual) (ver.1.0) (English)
Page 5
...multi channel sources.It also provides Music,Movie and Game modes. iPod You can be used to operate this AV Receiver with a Samsung TV remote control, by connecting the receiver to the AV Receiver with the supplied iPod dock. Dolby Pro Logic llx Dolby Pro Logic IIx is optimized to a 7.1 CH multimedia... system, enabling you to maximize your iPod to a SAMSUNG TV using DTS digital matrix decoding. Dolby Pro Logic Iix is an ...
User Manual (user Manual) (ver.1.0) (English)
Page 6
... setup 30 30 Setup Menu Tree 34 Input Setup 35 Speaker Setup 39 Surround Setup 44 Option Setup Operation 47 47 Before Using the AV Receiver 48 Selecting Digital/Analog Input 49 Using the Surround Modes 52 Using the Speaker Adjustment Buttons 53 Listening to the Radio 54 Using an iPod...
User Manual (user Manual) (ver.1.0) (English)
Page 8
... 1 2 15 14 13 12 11 10 9 8 7 6 5 4 3 1 STANDBY/ON button 2 VOLUME Control 3 SELECT button 4 TUNING MODE button 5 TONE CONTROL button 6 S.DIRECT 7 SURROUND button Sets the AV receiver to output 2 CH PCM audio signal without any signal processing, providing higher audio quality.
User Manual (user Manual) (ver.1.0) (English)
Page 9
... to select a source (FM, DVD, SAT, TV, VCR, CD, AUX, 7.1 MULTI CH) * Also used to move the cursor down in the SETUP menu. Turns the receiver on/off. EnG ● description 8 7.1CH IN 9 FUNCTION button 10 INPUT MODE 11 SETUP button 12 ASC MIC JACK 13 AUX IN Jack 14 HEADPHONE...
User Manual (user Manual) (ver.1.0) (English)
Page 10
... video and audio signals simultaneously using an HDMI cable. Outputs the video signal to the VCR. Receives the video signal from an external player with a multi-channel port. Outputs the video signal to video devices (TV, Projector etc). Outputs digital video ...and audio signals simultaneously using an HDMI cable. Speaker connection terminals Outputs the component video signal. Receives the analog audio signal from a video player (DVD, SAT, TV, VCR). Rear panel 1 23 4 56 7 8 IPOD 17 16 15 14 13 12 11 10 9 1...
User Manual (user Manual) (ver.1.0) (English)
Page 11
Receives the audio signal from a video player. 15 IPOD INPUT JACK Receives the audio/video signal from an audio CD player. 13 VCR AUDIO OUTPUT JACK 14 AUDIO INPUT JACKS Outputs the audio signal to a VCR. EnG 12 CD AUDIO INPUT JACKS Receives the audio signal from an iPod. 16 COAXIAL INPUT JACK (DIGITAL AUDIO IN) Receives the digital coaxial audio signal. 17 OPTICAL INPUT JACKS (DIGITAL AUDIO IN) Receives the digital optical audio signal. ● Description 11
User Manual (user Manual) (ver.1.0) (English)
Page 12
Display 1 2 34 5 7 6 1 SPEAKER INDICATORS Receives the audio/video signal from an iPod. 2 LISTENING MODE INDICATORS Displays the current listening mode. 3 TUNING INDICATORS Displays the status of the current radio broadcasting. 4 AUDIO INPUT INDICATORS Displays the input signal type of the current audio source. 5 VOLUME LEVEL INDICATOR Displays the volume level. 6 RADIO FREQUENCY INDICATOR Displays the current radio frequency range. 7 MESSAGE DISPLAY Informs you of the status of the receiver. 12
User Manual (user Manual) (ver.1.0) (English)
Page 15
.... 7 TUNER MEMORY button Used to set a preset radio frequency. 8 VOLUME CONTROL buttons Adjusts the volume of a desired speaker. EnG ● Description 1 POWER button Turns the receiver on/off. 2 INPUT MODE button Toggles to select an input mode for the selected source. 3 SLEEP button Used to set the ASC function. 27 FUNCTION...
User Manual (user Manual) (ver.1.0) (English)
Page 16
... INPUT terminal of the subwoofer speaker. ~ Press the POWER button on a dedicated stand or rack. Connections This section involves various methods of connecting the AV receiver to turn off the power and disconnect the power cord. Front Speakers Place these speakers in the menu). Speaker positioning SL SBL SR SBR Position...
User Manual (user Manual) (ver.1.0) (English)
Page 18
...turning clockwise to secure the wire. Tighten the knob by turning counterclockwise. 2. Press down the terminal tab on the back of the AV receiver match the colors of the speaker. 2. Connect the connecting plugs to prevent them from inserting their hands or objects into the duct (hole...are correct. SURROUND SURROUND (L) BACK (L) (not supplied) M ` Keep the subwoofer speaker out of reach of children to the back of the AV Receiver. ~ Make sure the colors of the speaker terminals on the back of the connecting plugs. Connecting the Speakers 1. Doing so could result in the ...
User Manual (user Manual) (ver.1.0) (English)
Page 19
... the Audio Out of the TV. 19 OR Connect AUDIO IN (TV) on your AV Receiver to the Digital Output of the TV. Connecting the Video Out to your TV EnG ● Connections OPTICAL AUDIO OUT OUT VIDEO COMPONENT IN IN ... television is equipped with Component Video inputs, connect a Component video cable(not supplied) from the VIDEO OUT (MONITOR) jack on the back of your AV Receiver to the Component Video Input jacks on your TV. OR Connect the Video cable from the Component Video Output (PR, PB and Y) jacks on the...
User Manual (user Manual) (ver.1.0) (English)
Page 21
...if the function is exited. Press SETUP/MENU button, and then press the ENTER button. ~ "SETUP MODE" appears on your AV Receiver, you use an HDMI cable to connect a Samsung TV to your TV. (See the TV instructions manual for the n logo. If your TV has an n logo, then it ...the volume on the display and Setup Mode is set ANYNET+ to audio through the AV receiver. ~ Receiver : Off : You can operate the AV receiver using an HDMI Cable. This function is available only in connection with Samsung TV and DVD player supporting Anynet +(HDMI-CEC). ` Please check your TV for more ...
User Manual (user Manual) (ver.1.0) (English)
Page 22
... VIDEO COMPONENT IN IN or Video Connection Connect a Component video cable(not supplied) from the VIDEO IN (DVD) jack on the back of your AV Receiver to the Audio Out of the DVD/BD player. Audio Connection Connect the Digital Input (OPTICAL 1) on your DVD/BD player. OR Connect AUDIO IN... (DVD) on your AV Receiver to the Video Output jack on your DVD/BD player. OR Connect a Video cable from the COMPONENT IN (DVD) (PR, PB and Y) jacks on the...
User Manual (user Manual) (ver.1.0) (English)
Page 23
... not work. 23 Connect the audio cable's red plug to the red jack and white cable to the white jack. ` If your use the AV Receiver to control your DVD/BD player, the pause function will not use this unit for a long period of time. ` If the external component has only... or Video Connection Connect a Component video cable(not supplied) from the COMPONENT IN (SAT) (PR, PB and Y) jacks on the back of your AV Receiver to the Component Video Output jacks on your AV Receiver to the Audio Out of the SAT. Audio Connection Connect the Digital Input (OPTICAL 2) on your AV...
User Manual (user Manual) (ver.1.0) (English)
Page 24
... of time. M ` Disconnect the power plug from the outlet if you will not use this unit for recording Connect AUDIO OUT (VCR) on your AV Receiver to the Audio In of the VCR. audio Connection for recording Connect a Video cable from the VIDEO IN (VCR) jack on the back of your... AV Receiver to the Video Output jack on your VCR. for playback Connect AUDIO IN (VCR) on your AV Receiver to the Audio Out of the VCR. COnneCting a VCr VCR AUDIO OUT VIDEO OUT VIDEO IN AUDIO...
User Manual (user Manual) (ver.1.0) (English)
Page 25
EnG Connecting a CD player CD player COAXIAL OUT AUDIO OUT or ● Connections Audio Connection Connect the Digital Input (COAXIAL) on your AV Receiver to the Digital Output of the main unit. M ` If the external component has only one audio output jack, connect it to the white jack. 25 OR Connect AUDIO IN (CD) on your AV Receiver to the Audio Out of the CD player. Connect the audio cable's red plug to the red jack and white cable to either the right or left audio input jack of the CD Player.
User Manual (user Manual) (ver.1.0) (English)
Page 26
SW C FRONT SW C SURROUND 5.1 CH 7.1 CH SUB CENTER WOOFER SURROUND BACK 7.1 Channel device 26 Connecting 7.1 channel devices You can connect the AV receiver to a DVD player, SUPER AUDIO CD player or other device with 7.1 channel output.