User Manual (ENGLISH)
Page 6
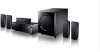
... sound. DTS (Digital Theater Systems) DTS plays back 5.1 channel sound with less compression than Dolby Digital for more realistic surround sound with Samsung TV and DVD player supporting Anynet+(HDMI-CEC).) 6 Anynet+ (HDMI-CEC) Function Anynet+ is a function that provides discrete 7.1 channel ...connection with normal stereo audio sources. In addition, it can be used to a SAMSUNG TV using a high precision DTS digital matrix. DTS 96/24 DTS is compatible with a Samsung TV remote control, by connecting the receiver to operate this AV Receiver with existing DTS Digital Sound...
... sound. DTS (Digital Theater Systems) DTS plays back 5.1 channel sound with less compression than Dolby Digital for more realistic surround sound with Samsung TV and DVD player supporting Anynet+(HDMI-CEC).) 6 Anynet+ (HDMI-CEC) Function Anynet+ is a function that provides discrete 7.1 channel ...connection with normal stereo audio sources. In addition, it can be used to a SAMSUNG TV using a high precision DTS digital matrix. DTS 96/24 DTS is compatible with a Samsung TV remote control, by connecting the receiver to operate this AV Receiver with existing DTS Digital Sound...
User Manual (ENGLISH)
Page 7
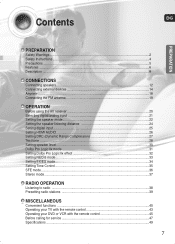
... SFE mode...36 Stereo mode ...37 RADIO OPERATION Listening to radio ...38 Presetting radio stations 39 MISCELLANEOUS Convenient functions ...40 Operating your TV with the remote control 43 Operating your DVD or VCR with the remote control 45 Before calling for service 47 Specifications ...49 7
... SFE mode...36 Stereo mode ...37 RADIO OPERATION Listening to radio ...38 Presetting radio stations 39 MISCELLANEOUS Convenient functions ...40 Operating your TV with the remote control 43 Operating your DVD or VCR with the remote control 45 Before calling for service 47 Specifications ...49 7
User Manual (ENGLISH)
Page 8
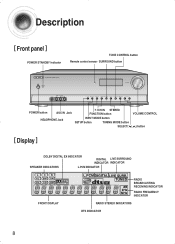
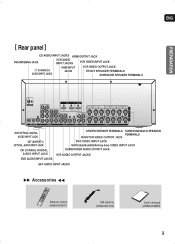
Description [ Front panel ] POWER STANDBY Indicator TONE CONTROL button Remote control sensor SURROUND button POWER button AUX IN Jack HEADPHONE Jack 7.1CH IN STEREO FUNCTION button INPUT MODE button SETUP button TUNING MODE button SELECT( VOLUME CONTROL , ) button [ Display ] DOLBY DIGITAL EX INDICATOR DIGITAL LIVE SURROUND INDICATOR INDICATOR SPEAKER INDICATORS L.PCM INDICATOR FRONT DISPLAY RADIO BROADCASTING RECEIVING INDICATOR RADIO FREQUENCY INDICATOR RADIO STEREO INDICATORS DTS INDICATOR 8
Description [ Front panel ] POWER STANDBY Indicator TONE CONTROL button Remote control sensor SURROUND button POWER button AUX IN Jack HEADPHONE Jack 7.1CH IN STEREO FUNCTION button INPUT MODE button SETUP button TUNING MODE button SELECT( VOLUME CONTROL , ) button [ Display ] DOLBY DIGITAL EX INDICATOR DIGITAL LIVE SURROUND INDICATOR INDICATOR SPEAKER INDICATORS L.PCM INDICATOR FRONT DISPLAY RADIO BROADCASTING RECEIVING INDICATOR RADIO FREQUENCY INDICATOR RADIO STEREO INDICATORS DTS INDICATOR 8
User Manual (ENGLISH)
Page 9
...(Cable/Satellite/Set-top box) VIDEO INPUT JACK SUBWOOFER AUDIO OUTPUT JACK VCR AUDIO OUTPUT JACKS SAT AUDIO INPUT JACKS √√ Accessories œœ Remote control (AH59-01867F) FM antenna (AH42-00017A) User's manual (AH68-01989R) 9
...(Cable/Satellite/Set-top box) VIDEO INPUT JACK SUBWOOFER AUDIO OUTPUT JACK VCR AUDIO OUTPUT JACKS SAT AUDIO INPUT JACKS √√ Accessories œœ Remote control (AH59-01867F) FM antenna (AH42-00017A) User's manual (AH68-01989R) 9
User Manual (ENGLISH)
Page 10
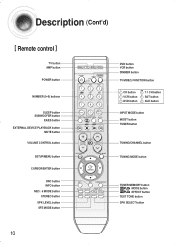
Description (Cont'd) [ Remote control ] TV button AMP button POWER button NUMBER (0~9) buttons SLEEP button SUBWOOFER button EX/ES button EXTERNAL DEVICE PLAYBACK button MUTE button VOLUME CONTROL button ...
Description (Cont'd) [ Remote control ] TV button AMP button POWER button NUMBER (0~9) buttons SLEEP button SUBWOOFER button EX/ES button EXTERNAL DEVICE PLAYBACK button MUTE button VOLUME CONTROL button ...
User Manual (ENGLISH)
Page 11
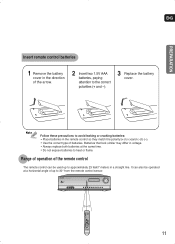
...at the same time. • Do not expose batteries to the correct polarities (+ and -). 3 Replace the battery cover. ENG PREPARATION Insert remote control batteries 1 Remove the battery cover in the direction of the arrow. 2 Insert two 1.5V AAA batteries, paying attention to heat or ... that look similar may differ in a straight line. Follow these precautions to avoid leaking or cracking batteries: • Place batteries in the remote control so they match the polarity:(+) to (+)and (-)to approximately 23 feet/7 meters in voltage. • Always replace both batteries at a...
...at the same time. • Do not expose batteries to the correct polarities (+ and -). 3 Replace the battery cover. ENG PREPARATION Insert remote control batteries 1 Remove the battery cover in the direction of the arrow. 2 Insert two 1.5V AAA batteries, paying attention to heat or ... that look similar may differ in a straight line. Follow these precautions to avoid leaking or cracking batteries: • Place batteries in the remote control so they match the polarity:(+) to (+)and (-)to approximately 23 feet/7 meters in voltage. • Always replace both batteries at a...
User Manual (ENGLISH)
Page 17
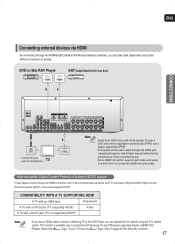
...To play a DVD disk whose copyright is available only in connection with an HDMI jack. COMPATIBILITY WITH A TV SUPPORTING HDMI A TV with Samsung TV and DVD player supporting Anynet +(HDMI-CEC). • Please check the logo. This function is protected by the performance of the connected... Connecting external devices via HDMI By connecting through the HDMI(High-Definition Multimedia Interface) interface, you can operate the AV receiver using the TV's remote control. Video/Audio A TV with a DVI-D jack (TV supporting HDCP) Video A TV with a DVI-D jack (TV not supporting HDCP) ...
...To play a DVD disk whose copyright is available only in connection with an HDMI jack. COMPATIBILITY WITH A TV SUPPORTING HDMI A TV with Samsung TV and DVD player supporting Anynet +(HDMI-CEC). • Please check the logo. This function is protected by the performance of the connected... Connecting external devices via HDMI By connecting through the HDMI(High-Definition Multimedia Interface) interface, you can operate the AV receiver using the TV's remote control. Video/Audio A TV with a DVI-D jack (TV supporting HDCP) Video A TV with a DVI-D jack (TV not supporting HDCP) ...
User Manual (ENGLISH)
Page 18
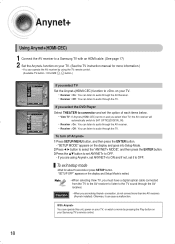
...audio through the AV Receiver. • Receiver : Off : You can listen to audio through the TV. Caution • When you are using the TV remote control. (Available TV button : VOLUME , button.) MMOOVVEE EENNTTEERR EEXXIITT MOVE ENTER EXIT If you are making Anynet+ connection, do not connect more information.) &#...Anynet+, set ANYNET+ to ON and if not, set it can cause a malfunction. Anynet+ Using Anynet+(HDMI-CEC) 1 Connect the AV receiver to a Samsung TV with an HDMI cable. (See page 17) 2 Set the Anynet+ function on your TV. (See the TV instruction manual for about 5 seconds or...
...audio through the AV Receiver. • Receiver : Off : You can listen to audio through the TV. Caution • When you are using the TV remote control. (Available TV button : VOLUME , button.) MMOOVVEE EENNTTEERR EEXXIITT MOVE ENTER EXIT If you are making Anynet+ connection, do not connect more information.) &#...Anynet+, set ANYNET+ to ON and if not, set it can cause a malfunction. Anynet+ Using Anynet+(HDMI-CEC) 1 Connect the AV receiver to a Samsung TV with an HDMI cable. (See page 17) 2 Set the Anynet+ function on your TV. (See the TV instruction manual for about 5 seconds or...
User Manual (ENGLISH)
Page 20
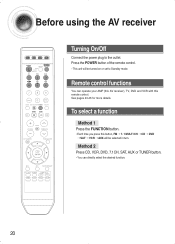
Before using the AV receiver Turning On/Off Connect the power plug to Standby mode. Press the POWER button of the remote control. • This unit will be turned on or set to the outlet. Method 2 Press CD, VCR, DVD, 7.1CH, SAT, AUX or TUNER button. • ... ➝ SAT ➝ VCR ➝ AUX will be selected in turn. To select a function Method 1 Press the FUNCTION button. • Each time you press this remote control. Remote control functions You can directly select the desired function. 20 See pages 43-46 for more details.
Before using the AV receiver Turning On/Off Connect the power plug to Standby mode. Press the POWER button of the remote control. • This unit will be turned on or set to the outlet. Method 2 Press CD, VCR, DVD, 7.1CH, SAT, AUX or TUNER button. • ... ➝ SAT ➝ VCR ➝ AUX will be selected in turn. To select a function Method 1 Press the FUNCTION button. • Each time you press this remote control. Remote control functions You can directly select the desired function. 20 See pages 43-46 for more details.
User Manual (ENGLISH)
Page 21
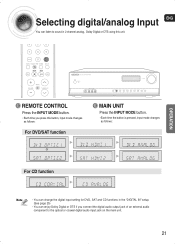
... you connect the digital audio output jack of an external audio component to sound in 2 channel analog , Dolby Digital or DTS using this unit. OPERATION REMOTE CONTROL Press the INPUT MODE button. • Each time you press this button, input mode changes as follows: For DVD/SAT function √ or √...
... you connect the digital audio output jack of an external audio component to sound in 2 channel analog , Dolby Digital or DTS using this unit. OPERATION REMOTE CONTROL Press the INPUT MODE button. • Each time you press this button, input mode changes as follows: For DVD/SAT function √ or √...
User Manual (ENGLISH)
Page 22
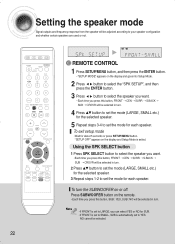
Press SUBWOOFER button on the remote. • Each time you press this button, SUB : YES, SUB : NO will be selected in turn. • If FRONT is set to LARGE, you can ... Signal outputs and frequency response from the speaker will be adjusted according to your speaker configuration and whether certain speakers are used or not. √ REMOTE CONTROL 1 Press SETUP/MENU button, and then press the ENTER button. • "SETUP MODE" appears on the display and goes into Setup Mode. 2 Press button...
Press SUBWOOFER button on the remote. • Each time you press this button, SUB : YES, SUB : NO will be selected in turn. • If FRONT is set to LARGE, you can ... Signal outputs and frequency response from the speaker will be adjusted according to your speaker configuration and whether certain speakers are used or not. √ REMOTE CONTROL 1 Press SETUP/MENU button, and then press the ENTER button. • "SETUP MODE" appears on the display and goes into Setup Mode. 2 Press button...
User Manual (ENGLISH)
Page 31
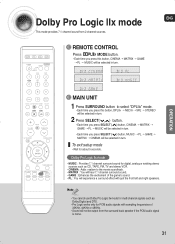
... exit setup mode • Wait for PCM audio signals with sampling frequencies of 32KHz, 44KHz or 48KHz. • Sound will be output from 2 channel sources. REMOTE CONTROL Press MODE button. • Each time you press this button, DPLIIx ➝ NEO:6 ➝ SFE ➝ STEREO will be selected in turn. 2 Press SELECT...
... exit setup mode • Wait for PCM audio signals with sampling frequencies of 32KHz, 44KHz or 48KHz. • Sound will be output from 2 channel sources. REMOTE CONTROL Press MODE button. • Each time you press this button, DPLIIx ➝ NEO:6 ➝ SFE ➝ STEREO will be selected in turn. 2 Press SELECT...
User Manual (ENGLISH)
Page 33
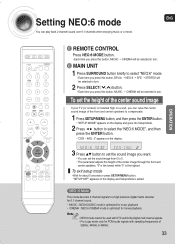
... Dolby Digital multi channel signals. • Pro Logic works only for about 5 seconds or press SETUP/MENU button. "0" is the lowest while "5" is exited. OPERATION REMOTE CONTROL Press NEO:6 MODE button. • Each time you want. • You can play back 2 channel sound over 6.1 channels when enjoying music or a movie. IMG...
... Dolby Digital multi channel signals. • Pro Logic works only for about 5 seconds or press SETUP/MENU button. "0" is the lowest while "5" is exited. OPERATION REMOTE CONTROL Press NEO:6 MODE button. • Each time you want. • You can play back 2 channel sound over 6.1 channels when enjoying music or a movie. IMG...
User Manual (ENGLISH)
Page 34
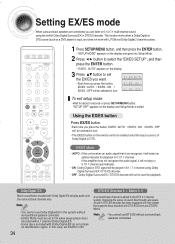
... display and Setup Mode is input, and does not work with Dolby Digital-EX do not contain an identification signal. "SETUP OFF" appears on the remote control is enabled only if the input source is added to set to 6.1 or 7.1 multi-channel sound using the built-in Dolby Digital Surround EX...
... display and Setup Mode is input, and does not work with Dolby Digital-EX do not contain an identification signal. "SETUP OFF" appears on the remote control is enabled only if the input source is added to set to 6.1 or 7.1 multi-channel sound using the built-in Dolby Digital Surround EX...
User Manual (ENGLISH)
Page 36
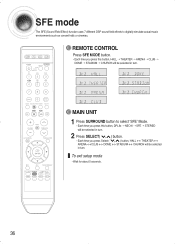
... setup mode • Wait for about 5 seconds. 36 MAIN UNIT 1 Press SURROUND button to digitally simulate actual music environments such as concert halls or cinemas. REMOTE CONTROL Press SFE MODE button. • Each time you press this button, DPLIIx ➝ NEO:6 ➝ SFE ➝ STEREO will be selected in turn. 2 Press...
... setup mode • Wait for about 5 seconds. 36 MAIN UNIT 1 Press SURROUND button to digitally simulate actual music environments such as concert halls or cinemas. REMOTE CONTROL Press SFE MODE button. • Each time you press this button, DPLIIx ➝ NEO:6 ➝ SFE ➝ STEREO will be selected in turn. 2 Press...
User Manual (ENGLISH)
Page 37
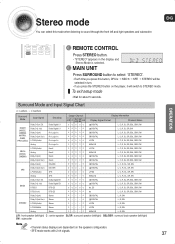
... and Input Signal Chart o = active, - = inactive Surround Mode Input Signal DOLBY (MUSIC, CINEMA, MATRIX, GAME, PRO LOGIC) Dolby D Surr. O O OO - O O OO O O O OO O O O OO O O O OO O O O-- - OPERATION REMOTE CONTROL Press STEREO button. • "STEREO" appears in turn. • If you press this mode when listening to STEREO mode. O Display Information Display Signal Format...
... and Input Signal Chart o = active, - = inactive Surround Mode Input Signal DOLBY (MUSIC, CINEMA, MATRIX, GAME, PRO LOGIC) Dolby D Surr. O O OO - O O OO O O O OO O O O OO O O O OO O O O-- - OPERATION REMOTE CONTROL Press STEREO button. • "STEREO" appears in turn. • If you press this mode when listening to STEREO mode. O Display Information Display Signal Format...

User Manual (ENGLISH)
Page 38
To Listen to mono/stereo Press MO/ST button on the remote. • Each time you select MONO in frequency. • Manual tuning : 1) Press TUNING MODE button to select MANUAL. 2) Press TUNING/CH ( , ) button briefly to the ... select MANUAL. 2) Press TUNING/CH ( , ) button briefly to reduce noise. • This function works only with the Remote Control. 38 Listening to radio You can listen to increase or decrease the frequency step by step. REMOTE CONTROL 1 Press TUNER button. 2 Selected frequency. • Automatic tuning 1 : 1) Press TUNING MODE button to select PRESET...
To Listen to mono/stereo Press MO/ST button on the remote. • Each time you select MONO in frequency. • Manual tuning : 1) Press TUNING MODE button to select MANUAL. 2) Press TUNING/CH ( , ) button briefly to the ... select MANUAL. 2) Press TUNING/CH ( , ) button briefly to reduce noise. • This function works only with the Remote Control. 38 Listening to radio You can listen to increase or decrease the frequency step by step. REMOTE CONTROL 1 Press TUNER button. 2 Selected frequency. • Automatic tuning 1 : 1) Press TUNING MODE button to select PRESET...
User Manual (ENGLISH)
Page 39
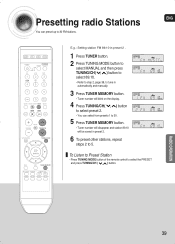
...; You can preset up to select the PRESET and press TUNING/CH ( , ) button. To Listen to Preset Station • Press TUNING MODE button of the remote control to 30 FM stations. E.g.: Setting station FM 89.10 in preset 2 . 1 Press TUNER button. 2 Press TUNING MODE button to select MANUAL and then press...
...; You can preset up to select the PRESET and press TUNING/CH ( , ) button. To Listen to Preset Station • Press TUNING MODE button of the remote control to 30 FM stations. E.g.: Setting station FM 89.10 in preset 2 . 1 Press TUNER button. 2 Press TUNING MODE button to select MANUAL and then press...
User Manual (ENGLISH)
Page 40
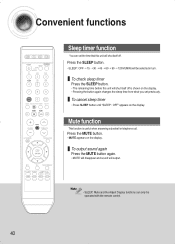
... the display. • Pressing the button again changes the sleep time from what you set the time that this unit will be operated with the remote control. 40 To cancel sleep timer • Press SLEEP button until "SLEEP : OFF" appears on the display. Press the SLEEP button. • SLEEP : OFF ➝...
... the display. • Pressing the button again changes the sleep time from what you set the time that this unit will be operated with the remote control. 40 To cancel sleep timer • Press SLEEP button until "SLEEP : OFF" appears on the display. Press the SLEEP button. • SLEEP : OFF ➝...
User Manual (ENGLISH)
Page 41
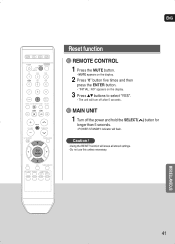
MAIN UNIT 1 Turn off the power and hold the SELECT( longer than 5 seconds. • POWER STANDBY indicator will flash. ) button for Caution! • Using the RESET function will turn off after 5 seconds. MISCELLANEOUS 41 ENG Reset function REMOTE CONTROL 1 Press the MUTE button. • MUTE appears on the display. 2 Press "0" button five times and then press the ENTER button. • "INITIAL : NO" appears on the display. 3 Press ...† buttons to select "YES". • The unit will erase all stored settings. • Do not use this unless necessary.
MAIN UNIT 1 Turn off the power and hold the SELECT( longer than 5 seconds. • POWER STANDBY indicator will flash. ) button for Caution! • Using the RESET function will turn off after 5 seconds. MISCELLANEOUS 41 ENG Reset function REMOTE CONTROL 1 Press the MUTE button. • MUTE appears on the display. 2 Press "0" button five times and then press the ENTER button. • "INITIAL : NO" appears on the display. 3 Press ...† buttons to select "YES". • The unit will erase all stored settings. • Do not use this unless necessary.

