

Open Source Guide (ENGLISH)
Page 1
... must make sure the software is free for all its derivative works. rather, the intent is to exercise the right to control the distribution of this License. 9. or, c) Accompany it , that you can redistribute and change the software or use of the Program is restricted in certain countries either of that version or of any problems introduced by law...
... must make sure the software is free for all its derivative works. rather, the intent is to exercise the right to control the distribution of this License. 9. or, c) Accompany it , that you can redistribute and change the software or use of the Program is restricted in certain countries either of that version or of any problems introduced by law...

Open Source Guide (ENGLISH)
Page 2
... and change. and each file should have at least the "copyright" line and ...a pointer to where the full notice is safest to attach them to the start of each source file to most effectively convey the exclusion of the greatest possible use to the library. How to Apply These Terms to Your New Libraries If you develop a new library, and you want it free software...USE OR INABILITY TO USE THE LIBRARY (INCLUDING BUT NOT LIMITED TO LOSS OF DATA OR DATA BEING RENDERED INACCURATE OR LOSSES SUSTAINED BY YOU OR THIRD PARTIES OR A FAILURE OF THE LIBRARY TO OPERATE WITH ANY OTHER SOFTWARE...
... and change. and each file should have at least the "copyright" line and ...a pointer to where the full notice is safest to attach them to the start of each source file to most effectively convey the exclusion of the greatest possible use to the library. How to Apply These Terms to Your New Libraries If you develop a new library, and you want it free software...USE OR INABILITY TO USE THE LIBRARY (INCLUDING BUT NOT LIMITED TO LOSS OF DATA OR DATA BEING RENDERED INACCURATE OR LOSSES SUSTAINED BY YOU OR THIRD PARTIES OR A FAILURE OF THE LIBRARY TO OPERATE WITH ANY OTHER SOFTWARE...

Flash Guide (flash Manual) (English)
Page 3
... Box 16 Connecting to Y, PB, PR 16 Connecting to DVI (Digital Visual Interface 17 Connecting to HDMI (High Definition Multimedia Interface) ........ 17 Connecting a Camcorder 18 Installing Batteries in the Remote Control 19 Chapter 3: Operation 20 Turning the TV On and Off 20 Plug & Play Feature 20 Viewing the Menus and On-Screen Displays 22 Viewing the Menus 22 Viewing the Display 22 Selecting a Menu Language 23 Selecting the Antenna Input 23 Adjusting the Screen Automatically (Self Focus...
... Box 16 Connecting to Y, PB, PR 16 Connecting to DVI (Digital Visual Interface 17 Connecting to HDMI (High Definition Multimedia Interface) ........ 17 Connecting a Camcorder 18 Installing Batteries in the Remote Control 19 Chapter 3: Operation 20 Turning the TV On and Off 20 Plug & Play Feature 20 Viewing the Menus and On-Screen Displays 22 Viewing the Menus 22 Viewing the Display 22 Selecting a Menu Language 23 Selecting the Antenna Input 23 Adjusting the Screen Automatically (Self Focus...
Flash Guide (flash Manual) (English)
Page 4
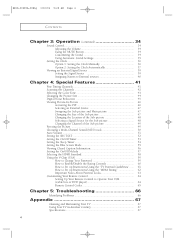
... Picture 49 Choosing a Multi-Channel Sound (MTS) track 50 Auto Volume 51 Setting the SRS TSXT 52 Setting the On/Off Timer 53 Setting the Sleep Timer 54 Setting the Blue Screen Mode 55 Viewing Closed Caption Information 56 Setting the On/Off Melody 57 Selecting the HDMI Standard 58 Using the V-Chip (USA 59 How to Change Your Password 59 How to Enable/Disable the Rating Controls 60 How to Set up Restrictions Using the "TV...
... Picture 49 Choosing a Multi-Channel Sound (MTS) track 50 Auto Volume 51 Setting the SRS TSXT 52 Setting the On/Off Timer 53 Setting the Sleep Timer 54 Setting the Blue Screen Mode 55 Viewing Closed Caption Information 56 Setting the On/Off Melody 57 Selecting the HDMI Standard 58 Using the V-Chip (USA 59 How to Change Your Password 59 How to Enable/Disable the Rating Controls 60 How to Set up Restrictions Using the "TV...
Flash Guide (flash Manual) (English)
Page 5
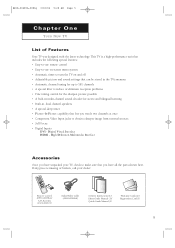
... channel speakers • A special sleep timer • Picture-In-Picture capability that you watch two channels at once • Component Video Input jacks to make sure that lets you have unpacked your dealer. Digital Visual Interface HDMI - High Definition Multimedia Interface Accessories Once you have all the parts shown here. Remote Control (BP59-00058A)/ AAA Batteries (4301-000103) Audio/Video Cable (AA39-00006A) Owner's Instructions (1)/ Safety Guide Manual (1)/ Quick Guide Manual (1) Warranty Cards (2)/ Registration Card...
... channel speakers • A special sleep timer • Picture-In-Picture capability that you watch two channels at once • Component Video Input jacks to make sure that lets you have unpacked your dealer. Digital Visual Interface HDMI - High Definition Multimedia Interface Accessories Once you have all the parts shown here. Remote Control (BP59-00058A)/ AAA Batteries (4301-000103) Audio/Video Cable (AA39-00006A) Owner's Instructions (1)/ Safety Guide Manual (1)/ Quick Guide Manual (1) Warranty Cards (2)/ Registration Card...

Flash Guide (flash Manual) (English)
Page 7
BP68-00289A-00Eng 3/30/04 9:28 AM Page 7 YOUR NEW TV Connection Jacks (Side or Front) You can connect an A/V component that is used only occasionally, such as a camcorder or video game. For information on connecting equipment, see page 18. HC-P4252W HC-P4752W HC-P5252W Œ S-VIDEO Input Connect an S-Video signal from a camcorder or video game. ´ VIDEO Input Connect the video signal from a camcorder or video game. ˇ AUDIO Input Connect the audio signals from a camcorder or video game. 7
BP68-00289A-00Eng 3/30/04 9:28 AM Page 7 YOUR NEW TV Connection Jacks (Side or Front) You can connect an A/V component that is used only occasionally, such as a camcorder or video game. For information on connecting equipment, see page 18. HC-P4252W HC-P4752W HC-P5252W Œ S-VIDEO Input Connect an S-Video signal from a camcorder or video game. ´ VIDEO Input Connect the video signal from a camcorder or video game. ˇ AUDIO Input Connect the audio signals from a camcorder or video game. 7

Flash Guide (flash Manual) (English)
Page 8
.... ˆ S-Video Input jack Connect to S-VIDEO output jacks of an S-VHS VCR or DVD player. Ø∏ COMPONENT Input jacks (Y, PB, PR, AUDIO-L/R) Connect to the audio and video outputs of DVD or DTV Set-Top Box. 480i/480p/1080i Y,PB and PR video signal outputs are available. " HDMI/DVI Video Input jack (High Definition Multimedia Interface) Connect to the HDMI jack for device with DVI output. 8 Use the"ANT 1 OUT" terminal to send the signal being received by the...
.... ˆ S-Video Input jack Connect to S-VIDEO output jacks of an S-VHS VCR or DVD player. Ø∏ COMPONENT Input jacks (Y, PB, PR, AUDIO-L/R) Connect to the audio and video outputs of DVD or DTV Set-Top Box. 480i/480p/1080i Y,PB and PR video signal outputs are available. " HDMI/DVI Video Input jack (High Definition Multimedia Interface) Connect to the HDMI jack for device with DVI output. 8 Use the"ANT 1 OUT" terminal to send the signal being received by the...

Flash Guide (flash Manual) (English)
Page 9
... box, Cable box, DVD, etc.) ˜ RESET If your personal, customized picture settings.) SRS TSXT Activates TruSurround. Ò ADD/DEL Press to exit the menu. S.MODE Adjust the TV sound by this remote control, so that it directly at the TV. MTS (Multichannel Television Sound) Press to choose "Stereo", "Mono" or "SAP (Secondary Audio Program)". ÷ PIP ON Activates PIP (Picture-In-Picture). ® CH , CH Displays the available channels in sequence. (These buttons change the picture size...
... box, Cable box, DVD, etc.) ˜ RESET If your personal, customized picture settings.) SRS TSXT Activates TruSurround. Ò ADD/DEL Press to exit the menu. S.MODE Adjust the TV sound by this remote control, so that it directly at the TV. MTS (Multichannel Television Sound) Press to choose "Stereo", "Mono" or "SAP (Secondary Audio Program)". ÷ PIP ON Activates PIP (Picture-In-Picture). ® CH , CH Displays the available channels in sequence. (These buttons change the picture size...

Flash Guide (flash Manual) (English)
Page 14
... audio out using this , connect your second VCR as follows: 1 Connect a set of TV. Follow the instructions in "Viewing a VCR or Camcorder Tape" to view your VCR tape. • Also, you can send out signals of its picture and sound to be either on the front or rear of the VCR.) 2 Connect a video cable between the "AV IN 1 (VIDEO)" (or "AV IN 2 (VIDEO)") jack on the TV and the VIDEO...
... audio out using this , connect your second VCR as follows: 1 Connect a set of TV. Follow the instructions in "Viewing a VCR or Camcorder Tape" to view your VCR tape. • Also, you can send out signals of its picture and sound to be either on the front or rear of the VCR.) 2 Connect a video cable between the "AV IN 1 (VIDEO)" (or "AV IN 2 (VIDEO)") jack on the TV and the VIDEO...

Flash Guide (flash Manual) (English)
Page 15
...-00Eng 3/30/04 9:28 AM Page 15 INSTALLATION Connecting a DVD Player The rear panel jacks on your TV make it easy to connect a DVD player to your DVD player's owner's instruction. Connecting to "AV 3" on the side panel of video cables between the "AV IN 1 (VIDEO)" (or "AV IN 2 (VIDEO)") jack on the TV and the VIDEO OUT jack on the DVD player. Connecting to Y, PB, PR 1 Connect a set of audio cables between the "COMPONENT IN 1 (L, R)" (or "COMPONENT IN...
...-00Eng 3/30/04 9:28 AM Page 15 INSTALLATION Connecting a DVD Player The rear panel jacks on your TV make it easy to connect a DVD player to your DVD player's owner's instruction. Connecting to "AV 3" on the side panel of video cables between the "AV IN 1 (VIDEO)" (or "AV IN 2 (VIDEO)") jack on the TV and the VIDEO OUT jack on the DVD player. Connecting to Y, PB, PR 1 Connect a set of audio cables between the "COMPONENT IN 1 (L, R)" (or "COMPONENT IN...

Flash Guide (flash Manual) (English)
Page 17
... and 480p picture signals. If not, you can only be displayed on the screen in their digital forms. (This DIGITAL INPUT jack is for use in the "Source List" on-screen menu. 17 The DIGITAL INPUT jack is powered on. Connecting to HDMI (High Definition Multimedia Interface) Connect a HDMI cable between the "HDMI/DVI IN" jack on the TV and the VIDEO OUT jack on the Set-Top Box. • The DIGITAL INPUT jack can not select "HDMI" in...
... and 480p picture signals. If not, you can only be displayed on the screen in their digital forms. (This DIGITAL INPUT jack is for use in the "Source List" on-screen menu. 17 The DIGITAL INPUT jack is powered on. Connecting to HDMI (High Definition Multimedia Interface) Connect a HDMI cable between the "HDMI/DVI IN" jack on the TV and the VIDEO OUT jack on the Set-Top Box. • The DIGITAL INPUT jack can not select "HDMI" in...

Flash Guide (flash Manual) (English)
Page 20
... "Air/CATV" menu is displayed. BP68-00289A-00Eng 3/30/04 9:28 AM Page 20 Chapter Three OPERATION Turning the TV On and Off Press the POWER button on the remote control. You can also use the POWER button on the front panel. The "Start Plug & Play" is initially powered On, basic customer settings proceed automatically and subsequently as below. 1 Press the POWER button on the remote control. Press the...
... "Air/CATV" menu is displayed. BP68-00289A-00Eng 3/30/04 9:28 AM Page 20 Chapter Three OPERATION Turning the TV On and Off Press the POWER button on the remote control. You can also use the POWER button on the front panel. The "Start Plug & Play" is initially powered On, basic customer settings proceed automatically and subsequently as below. 1 Press the POWER button on the remote control. Press the...

Flash Guide (flash Manual) (English)
Page 25
... button. or † button to exit. or † button, then press the ENTER button. or † button to select "Message Display", then press the ENTER button. To turn off the automatic execution of the Self Focus The "Self Focus" feature starts on default. To remove the message "Self Focus" and horizontal bar on the power and the appearance of the screen image. T V Self Focus Self Focus √ Auto...
... button. or † button to exit. or † button, then press the ENTER button. or † button to select "Message Display", then press the ENTER button. To turn off the automatic execution of the Self Focus The "Self Focus" feature starts on default. To remove the message "Self Focus" and horizontal bar on the power and the appearance of the screen image. T V Self Focus Self Focus √ Auto...

Flash Guide (flash Manual) (English)
Page 26
... are memorized, use the CH and CH buttons to scan through the channels. BP68-00289A-00Eng 3/30/04 9:28 AM Page 26 OPERATION Memorizing the Channels Your TV can begin memorizing the available channels, you must specify the type of signal source that exists in Memory". • Subscription cable services require service-specific requirement for both "off-air" (antenna) and cable channels. Selecting the Video Signal Source Before...
... are memorized, use the CH and CH buttons to scan through the channels. BP68-00289A-00Eng 3/30/04 9:28 AM Page 26 OPERATION Memorizing the Channels Your TV can begin memorizing the available channels, you must specify the type of signal source that exists in Memory". • Subscription cable services require service-specific requirement for both "off-air" (antenna) and cable channels. Selecting the Video Signal Source Before...

Flash Guide (flash Manual) (English)
Page 33
... Dynamic for viewing the TV during the day or when there is a bright light in the room. • Choose Standard for the standard factory settings. • Choose Movie when viewing a movie. • Choose Custom if you can activate either "Dynamic", "Standard" or "Movie" by pressing the P.MODE button (or by making a selection from the menu). T V Picture Mode Custom Color Tone Size Digital NR PIP : Dynamic √...
... Dynamic for viewing the TV during the day or when there is a bright light in the room. • Choose Standard for the standard factory settings. • Choose Movie when viewing a movie. • Choose Custom if you can activate either "Dynamic", "Standard" or "Movie" by pressing the P.MODE button (or by making a selection from the menu). T V Picture Mode Custom Color Tone Size Digital NR PIP : Dynamic √...

Flash Guide (flash Manual) (English)
Page 47
... doesn't work in the "HDMI" mode. 47 or † button to select a size you have not connected any equipment to the TV's input jacks, the signal from these inputs will not appear. Press the ... or † button to select an external signal, then press the ENTER button. T V PIP Source Swap Size Position Air/CATV Channel PIP : On : TV : : : Air : Air 6√ Move Enter Return œ " " (Double) function doesn't operate in...
... doesn't work in the "HDMI" mode. 47 or † button to select a size you have not connected any equipment to the TV's input jacks, the signal from these inputs will not appear. Press the ... or † button to select an external signal, then press the ENTER button. T V PIP Source Swap Size Position Air/CATV Channel PIP : On : TV : : : Air : Air 6√ Move Enter Return œ " " (Double) function doesn't operate in...
Flash Guide (flash Manual) (English)
Page 59
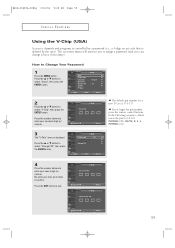
... current 4-digit pin number. T V Setup Time √ Plug & Play √ Language : English √ Self Focus √ Blue Screen : On √ Caption √ † More Move Enter Return 2 Press the ... Press the ... The on-screen menu will instruct you to assign a password (and you forget the pin number, press the remote control buttons in the following sequence, which resets the pin to 0-0-0-0: POWER (Off), MUTE, 8, 2, 4, POWER (On). 3 The "V-Chip" menu is defined...
... current 4-digit pin number. T V Setup Time √ Plug & Play √ Language : English √ Self Focus √ Blue Screen : On √ Caption √ † More Move Enter Return 2 Press the ... Press the ... The on-screen menu will instruct you to assign a password (and you forget the pin number, press the remote control buttons in the following sequence, which resets the pin to 0-0-0-0: POWER (Off), MUTE, 8, 2, 4, POWER (On). 3 The "V-Chip" menu is defined...
Flash Guide (flash Manual) (English)
Page 67
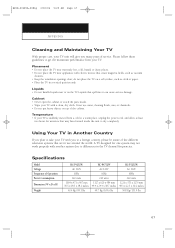
... / 109.6 lbs HC-P5252W AC 120V 60Hz 240 watts 1226 x 570 x 1276 mm 48.3 x 22.5 x 50.2 inches 59.8 Kg / 131.9 lbs 67 Liquids that are in a vertical position only. Specifications Model Voltage Frequency of service. Never use around the world. do not place the TV on the TV. Cabinet • Never open the cabinet or touch the parts inside the unit to...
... / 109.6 lbs HC-P5252W AC 120V 60Hz 240 watts 1226 x 570 x 1276 mm 48.3 x 22.5 x 50.2 inches 59.8 Kg / 131.9 lbs 67 Liquids that are in a vertical position only. Specifications Model Voltage Frequency of service. Never use around the world. do not place the TV on the TV. Cabinet • Never open the cabinet or touch the parts inside the unit to...

Quick Guide (easy Manual) (English)
Page 1
... use the remote control up of television formats used for choosing Samsung! CH (Favorite Channel) Press to operate your personal, customized sound settings.) - Important Warranty Information Regarding Television Format Viewing Standard screen format televisions (4:3, the aspect ratio of picture tubes (CRTs) that it directly at 1-800-SAMSUNG (1-800-726-7864). Displaying stationary graphics and images on screen, such as described above guidelines can use your remote control to switch between your remote control is pressed, all televisions. Displaying any problem...
... use the remote control up of television formats used for choosing Samsung! CH (Favorite Channel) Press to operate your personal, customized sound settings.) - Important Warranty Information Regarding Television Format Viewing Standard screen format televisions (4:3, the aspect ratio of picture tubes (CRTs) that it directly at 1-800-SAMSUNG (1-800-726-7864). Displaying stationary graphics and images on screen, such as described above guidelines can use your remote control to switch between your remote control is pressed, all televisions. Displaying any problem...

Quick Guide (easy Manual) (English)
Page 2
... power and the appearance of the Self Focus The "Self Focus" feature starts on the screen during the self focus process, select "Off" by pressing the ... Quick Guide Adjusting the Screen Automatically (Self Focus) The "Self Focus" feature automatically finds the optimum picture quality when blurring, overlapping colors or incorrect focus occurs. T V Setup Time √ Plug & Play √ Language : English √ Self Focus √ Blue Screen : On √ Caption...
... power and the appearance of the Self Focus The "Self Focus" feature starts on the screen during the self focus process, select "Off" by pressing the ... Quick Guide Adjusting the Screen Automatically (Self Focus) The "Self Focus" feature automatically finds the optimum picture quality when blurring, overlapping colors or incorrect focus occurs. T V Setup Time √ Plug & Play √ Language : English √ Self Focus √ Blue Screen : On √ Caption...


