

Open Source Guide (ENGLISH)
Page 1
... source code. we are distributed under the OpenSSL Project. SHOULD THE PROGRAM PROVE DEFECTIVE, YOU ASSUME THE COST OF ALL NECESSARY SERVICING, REPAIR OR CORRECTION. 12. By contrast, the GNU General Public License is not required to print an announcement.) These requirements apply to the modified work based on the Program) on a medium customarily used to address new problems...
... source code. we are distributed under the OpenSSL Project. SHOULD THE PROGRAM PROVE DEFECTIVE, YOU ASSUME THE COST OF ALL NECESSARY SERVICING, REPAIR OR CORRECTION. 12. By contrast, the GNU General Public License is not required to print an announcement.) These requirements apply to the modified work based on the Program) on a medium customarily used to address new problems...

Open Source Guide (ENGLISH)
Page 2
...start of each file should have at least the "copyright" line and a pointer to the library. You can redistribute and change. How to Apply These Terms to Your New Libraries If you develop a new library, and you want it free software that everyone can do so by permitting redistribution under the terms...OR CONSEQUENTIAL DAMAGES ARISING OUT OF THE USE OR INABILITY TO USE THE LIBRARY (INCLUDING BUT NOT LIMITED TO LOSS OF DATA OR DATA BEING RENDERED INACCURATE OR LOSSES SUSTAINED BY YOU OR THIRD PARTIES OR A FAILURE OF THE LIBRARY TO OPERATE WITH ANY OTHER SOFTWARE), EVEN IF SUCH HOLDER OR OTHER ...
...start of each file should have at least the "copyright" line and a pointer to the library. You can redistribute and change. How to Apply These Terms to Your New Libraries If you develop a new library, and you want it free software that everyone can do so by permitting redistribution under the terms...OR CONSEQUENTIAL DAMAGES ARISING OUT OF THE USE OR INABILITY TO USE THE LIBRARY (INCLUDING BUT NOT LIMITED TO LOSS OF DATA OR DATA BEING RENDERED INACCURATE OR LOSSES SUSTAINED BY YOU OR THIRD PARTIES OR A FAILURE OF THE LIBRARY TO OPERATE WITH ANY OTHER SOFTWARE), EVEN IF SUCH HOLDER OR OTHER ...
Quick Guide (easy Manual) (ver.1.0) (English)
Page 1
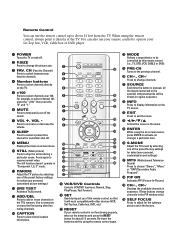
... operate your favorite channels. ¨ Number buttons Press to select channels directly on and off the sound. ∏ VOL +, VOL - Use to memorize or erase the fine tuning after fine tuning channels. Ú CAPTION Press to select channels over 100. CH (Favorite Channel) Press to switch between your Set-Top box, VCR, Cable box or DVD player. Œ POWER Turns the TV on the TV. ˆ +100 Press to view closed caption information. Æ VCR/DVD Controls Controls...
... operate your favorite channels. ¨ Number buttons Press to select channels directly on and off the sound. ∏ VOL +, VOL - Use to memorize or erase the fine tuning after fine tuning channels. Ú CAPTION Press to select channels over 100. CH (Favorite Channel) Press to switch between your Set-Top box, VCR, Cable box or DVD player. Œ POWER Turns the TV on the TV. ˆ +100 Press to view closed caption information. Æ VCR/DVD Controls Controls...

Quick Guide (easy Manual) (ver.1.0) (English)
Page 2
..." (1 or 2) terminal on the TV and the ANTENNA OUT terminal on the VCR. Skip step 1 if you can send out signals of its picture and sound to your local electronics store). 2 Connect a set of the VCR.) 2 Connect a video cable between the "AV OUT (L, R)" jacks on the TV and the AUDIO IN jacks on the VCR. (The VCR input jacks might be recorded by...
..." (1 or 2) terminal on the TV and the ANTENNA OUT terminal on the VCR. Skip step 1 if you can send out signals of its picture and sound to your local electronics store). 2 Connect a set of the VCR.) 2 Connect a video cable between the "AV OUT (L, R)" jacks on the TV and the AUDIO IN jacks on the VCR. (The VCR input jacks might be recorded by...

Quick Guide (easy Manual) (ver.1.0) (English)
Page 3
... the DVD player. • Also, you can connect to "AV 3" on the side panel of TV. Connecting to Y, PB, PR 1 Connect a set of audio cables between the "COMPONENT IN 1 (L, R)" (or "COMPONENT IN 2 or 3 (L, R)") jacks on the TV and the AUDIO OUT jacks on the DVD player. 2 Connect a set of Component video, see your TV. Connecting a DVD Player The rear panel jacks on your TV make it easy to connect a DVD player to your DVD player's owner's instruction. For an explanation of audio cables...
... the DVD player. • Also, you can connect to "AV 3" on the side panel of TV. Connecting to Y, PB, PR 1 Connect a set of audio cables between the "COMPONENT IN 1 (L, R)" (or "COMPONENT IN 2 or 3 (L, R)") jacks on the TV and the AUDIO OUT jacks on the DVD player. 2 Connect a set of Component video, see your TV. Connecting a DVD Player The rear panel jacks on your TV make it easy to connect a DVD player to your DVD player's owner's instruction. For an explanation of audio cables...

Quick Guide (easy Manual) (ver.1.0) (English)
Page 5
... decoders, DVD players and D-VHS are put on the market.) 1 Connect a set of a PC. The DIGITAL INPUT jack is powered on. Connecting to DVI (Digital Visual Interface) By inputting a high-bandwidth digital content protection high-definition picture source to the DIGITAL INPUT jack on the TV, high-definition pictures can be used with the picture signal of audio cables between the "DVI IN (AUDIO-L, R)" jacks on the TV and the AUDIO OUT jacks on the Set-Top Box. 2 Connect a video cable between the "HDMI/DVI IN...
... decoders, DVD players and D-VHS are put on the market.) 1 Connect a set of a PC. The DIGITAL INPUT jack is powered on. Connecting to DVI (Digital Visual Interface) By inputting a high-bandwidth digital content protection high-definition picture source to the DIGITAL INPUT jack on the TV, high-definition pictures can be used with the picture signal of audio cables between the "DVI IN (AUDIO-L, R)" jacks on the TV and the AUDIO OUT jacks on the Set-Top Box. 2 Connect a video cable between the "HDMI/DVI IN...

Flash Guide (flash Manual) (English)
Page 3
... Box 16 Connecting to Y, PB, PR 16 Connecting to DVI (Digital Visual Interface 17 Connecting to HDMI (High Definition Multimedia Interface) ........ 17 Connecting a Camcorder 18 Installing Batteries in the Remote Control 19 Chapter 3: Operation 20 Turning the TV On and Off 20 Plug & Play Feature 20 Viewing the Menus and On-Screen Displays 22 Viewing the Menus 22 Viewing the Display 22 Selecting a Menu Language 23 Selecting the Antenna Input 23 Adjusting the Screen Automatically (Self Focus...
... Box 16 Connecting to Y, PB, PR 16 Connecting to DVI (Digital Visual Interface 17 Connecting to HDMI (High Definition Multimedia Interface) ........ 17 Connecting a Camcorder 18 Installing Batteries in the Remote Control 19 Chapter 3: Operation 20 Turning the TV On and Off 20 Plug & Play Feature 20 Viewing the Menus and On-Screen Displays 22 Viewing the Menus 22 Viewing the Display 22 Selecting a Menu Language 23 Selecting the Antenna Input 23 Adjusting the Screen Automatically (Self Focus...
Flash Guide (flash Manual) (English)
Page 4
... Picture 49 Choosing a Multi-Channel Sound (MTS) track 50 Auto Volume 51 Setting the SRS TSXT 52 Setting the On/Off Timer 53 Setting the Sleep Timer 54 Setting the Blue Screen Mode 55 Viewing Closed Caption Information 56 Setting the On/Off Melody 57 Selecting the HDMI Standard 58 Using the V-Chip (USA 59 How to Change Your Password 59 How to Enable/Disable the Rating Controls 60 How to Set up Restrictions Using the "TV...
... Picture 49 Choosing a Multi-Channel Sound (MTS) track 50 Auto Volume 51 Setting the SRS TSXT 52 Setting the On/Off Timer 53 Setting the Sleep Timer 54 Setting the Blue Screen Mode 55 Viewing Closed Caption Information 56 Setting the On/Off Melody 57 Selecting the HDMI Standard 58 Using the V-Chip (USA 59 How to Change Your Password 59 How to Enable/Disable the Rating Controls 60 How to Set up Restrictions Using the "TV...

Flash Guide (flash Manual) (English)
Page 9
... Audio Program)". ÷ PIP ON Activates PIP (Picture-In-Picture). ® CH , CH Displays the available channels in the PIP window only.) ∑ SELF FOCUS Press to adjust for about 23 feet from the TV. MTS (Multichannel Television Sound) Press to view closed caption information. Æ VCR/DVD Controls Controls VCR/DVD functions: Rewind, Stop, Play/Pause, Fast Forward. ı SET Used during a particular scene. See pages 64~65 for automatic shut off. ' MENU Displays the...
... Audio Program)". ÷ PIP ON Activates PIP (Picture-In-Picture). ® CH , CH Displays the available channels in the PIP window only.) ∑ SELF FOCUS Press to adjust for about 23 feet from the TV. MTS (Multichannel Television Sound) Press to view closed caption information. Æ VCR/DVD Controls Controls VCR/DVD functions: Rewind, Stop, Play/Pause, Fast Forward. ı SET Used during a particular scene. See pages 64~65 for automatic shut off. ' MENU Displays the...

Flash Guide (flash Manual) (English)
Page 14
... connected to Record from the TV Your TV can connect to "AV 3" on the side panel of its picture and sound to VCR audio out using this , connect your second VCR as follows: 1 Connect a set of the VCR.) 2 Connect a video cable between the "AV IN 1 (L, R)" (or "AV IN 2 (L, R)") jacks on the TV and AUDIO OUT jacks on pages 10-13). Connecting a Second VCR to an antenna or a cable system. 1 Connect a coaxial cable...
... connected to Record from the TV Your TV can connect to "AV 3" on the side panel of its picture and sound to VCR audio out using this , connect your second VCR as follows: 1 Connect a set of the VCR.) 2 Connect a video cable between the "AV IN 1 (L, R)" (or "AV IN 2 (L, R)") jacks on the TV and AUDIO OUT jacks on pages 10-13). Connecting a Second VCR to an antenna or a cable system. 1 Connect a coaxial cable...

Flash Guide (flash Manual) (English)
Page 15
... Page 15 INSTALLATION Connecting a DVD Player The rear panel jacks on your TV make it easy to connect a DVD player to your DVD player's owner's instruction. Connecting to Regular Audio and Video jacks 1 Connect a set of audio cables between the "AV IN 1 (L, R)" (or "AV IN 2 (L, R)") jacks on the TV and the AUDIO OUT jacks on the DVD player. 2 Connect a video cable between the "AV IN 1 (VIDEO)" (or "AV IN 2 (VIDEO)") jack on the TV and the VIDEO OUT jack on the DVD player. •...
... Page 15 INSTALLATION Connecting a DVD Player The rear panel jacks on your TV make it easy to connect a DVD player to your DVD player's owner's instruction. Connecting to Regular Audio and Video jacks 1 Connect a set of audio cables between the "AV IN 1 (L, R)" (or "AV IN 2 (L, R)") jacks on the TV and the AUDIO OUT jacks on the DVD player. 2 Connect a video cable between the "AV IN 1 (VIDEO)" (or "AV IN 2 (VIDEO)") jack on the TV and the VIDEO OUT jack on the DVD player. •...

Flash Guide (flash Manual) (English)
Page 17
Please check that the HDMI source is powered on -screen menu. 17 Connecting to HDMI (High Definition Multimedia Interface) Connect a HDMI cable between the "HDMI/DVI IN" jack on the TV and the VIDEO OUT jack on the Set-Top Box. • The DIGITAL INPUT jack can only be displayed on the screen in their digital forms. (This DIGITAL INPUT jack is not compatible with 1080i and 480p picture signals. If not, you can not select "HDMI" in...
Please check that the HDMI source is powered on -screen menu. 17 Connecting to HDMI (High Definition Multimedia Interface) Connect a HDMI cable between the "HDMI/DVI IN" jack on the TV and the VIDEO OUT jack on the Set-Top Box. • The DIGITAL INPUT jack can only be displayed on the screen in their digital forms. (This DIGITAL INPUT jack is not compatible with 1080i and 480p picture signals. If not, you can not select "HDMI" in...

Flash Guide (flash Manual) (English)
Page 25
... turn off the automatic execution of the screen image. Press the EXIT button to select "Self Focus", then press the ENTER button. To remove the message "Self Focus" and horizontal bar on default. T V Self Focus Self Focus √ Auto : On √ Message Display : On Off √ On Move Enter Return 25 T V Setup Time √ Plug & Play √ Language : English √ Self Focus √ Blue Screen : On √ Caption...
... turn off the automatic execution of the screen image. Press the EXIT button to select "Self Focus", then press the ENTER button. To remove the message "Self Focus" and horizontal bar on default. T V Self Focus Self Focus √ Auto : On √ Message Display : On Off √ On Move Enter Return 25 T V Setup Time √ Plug & Play √ Language : English √ Self Focus √ Blue Screen : On √ Caption...

Flash Guide (flash Manual) (English)
Page 26
... of cable system that is connected to change channels by entering the channel digits. Proceed to an antenna, press the ... or † button to select "Air". œ If you must specify the type of signal source that exists in Memory". • Subscription cable services require service-specific requirement for both "off-air" (antenna) and cable channels. This eliminates the need to the TV (i.e., an antenna or a cable system). 1 Press the MENU button.
... of cable system that is connected to change channels by entering the channel digits. Proceed to an antenna, press the ... or † button to select "Air". œ If you must specify the type of signal source that exists in Memory". • Subscription cable services require service-specific requirement for both "off-air" (antenna) and cable channels. This eliminates the need to the TV (i.e., an antenna or a cable system). 1 Press the MENU button.
Flash Guide (flash Manual) (English)
Page 59
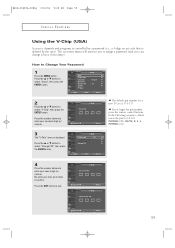
... TV set is "0 0 0 0". œ If you forget the pin number, press the remote control buttons in the following sequence, which resets the pin to channels and programs is controlled by a password (i.e., a 4-digit secret code that is displayed. BP68-00289A-00Eng 3/30/04 9:28 AM Page 59 SPECIAL FEATURES Using the V-Chip (USA) Access to 0-0-0-0: POWER (Off), MUTE, 8, 2, 4, POWER (On). 3 The "V-Chip" menu is defined by the user). The on-screen menu will instruct you can change...
... TV set is "0 0 0 0". œ If you forget the pin number, press the remote control buttons in the following sequence, which resets the pin to channels and programs is controlled by a password (i.e., a 4-digit secret code that is displayed. BP68-00289A-00Eng 3/30/04 9:28 AM Page 59 SPECIAL FEATURES Using the V-Chip (USA) Access to 0-0-0-0: POWER (Off), MUTE, 8, 2, 4, POWER (On). 3 The "V-Chip" menu is defined by the user). The on-screen menu will instruct you can change...

User Manual (user Manual) (ver.1.0) (English)
Page 3
... Box 16 Connecting to Y, PB, PR 16 Connecting to DVI (Digital Visual Interface 17 Connecting to HDMI (High Definition Multimedia Interface) ........ 17 Connecting a Camcorder 18 Installing Batteries in the Remote Control 19 Chapter 3: Operation 20 Turning the TV On and Off 20 Plug & Play Feature 20 Viewing the Menus and On-Screen Displays 22 Viewing the Menus 22 Viewing the Display 22 Selecting a Menu Language 23 Selecting the Antenna Input 23 Adjusting the Screen Automatically (Self Focus...
... Box 16 Connecting to Y, PB, PR 16 Connecting to DVI (Digital Visual Interface 17 Connecting to HDMI (High Definition Multimedia Interface) ........ 17 Connecting a Camcorder 18 Installing Batteries in the Remote Control 19 Chapter 3: Operation 20 Turning the TV On and Off 20 Plug & Play Feature 20 Viewing the Menus and On-Screen Displays 22 Viewing the Menus 22 Viewing the Display 22 Selecting a Menu Language 23 Selecting the Antenna Input 23 Adjusting the Screen Automatically (Self Focus...

User Manual (user Manual) (ver.1.0) (English)
Page 4
... picture 48 Selecting a Signal Source for the Sub picture 48 Changing the Channel of the Sub picture 49 Freezing the Picture 49 Choosing a Multi-Channel Sound (MTS) track 50 Auto Volume 51 Setting the SRS TSXT 52 Setting the On/Off Timer 53 Setting the Sleep Timer 54 Setting the Blue Screen Mode 55 Viewing Closed Caption Information 56 Setting the On/Off Melody 57 Selecting the HDMI Standard 58 Using the V-Chip 59 How to Change Your Password...
... picture 48 Selecting a Signal Source for the Sub picture 48 Changing the Channel of the Sub picture 49 Freezing the Picture 49 Choosing a Multi-Channel Sound (MTS) track 50 Auto Volume 51 Setting the SRS TSXT 52 Setting the On/Off Timer 53 Setting the Sleep Timer 54 Setting the Blue Screen Mode 55 Viewing Closed Caption Information 56 Setting the On/Off Melody 57 Selecting the HDMI Standard 58 Using the V-Chip 59 How to Change Your Password...

User Manual (user Manual) (ver.1.0) (English)
Page 9
... the TV's memory. Control the cursor in the menu. ≠ ENTER While using the remote control, always point it will be shown in sequence. (These buttons change ) a particular item. - MTS (Multichannel Television Sound) Press to choose "Stereo", "Mono" or "SAP (Secondary Audio Program)". ÷ PIP ON Activates PIP (Picture-In-Picture). ® CH , CH Displays the available channels in regular sequence. ˛ INFO Press to display information on the TV screen...
... the TV's memory. Control the cursor in the menu. ≠ ENTER While using the remote control, always point it will be shown in sequence. (These buttons change ) a particular item. - MTS (Multichannel Television Sound) Press to choose "Stereo", "Mono" or "SAP (Secondary Audio Program)". ÷ PIP ON Activates PIP (Picture-In-Picture). ® CH , CH Displays the available channels in regular sequence. ˛ INFO Press to display information on the TV screen...

User Manual (user Manual) (ver.1.0) (English)
Page 15
... the DVD player. Connecting to Regular Audio and Video jacks 1 Connect a set of Component video, see your TV. For an explanation of video cables between the "AV IN 1 (VIDEO)" (or "AV IN 2 (VIDEO)") jack on the TV and the VIDEO OUT jack on the DVD player. • Also, you can connect to "AV 3" on the side panel of TV. 15 INSTALLATION Connecting a DVD Player The rear panel jacks on your TV make it easy to connect a DVD player to your DVD player's owner's instruction.
... the DVD player. Connecting to Regular Audio and Video jacks 1 Connect a set of Component video, see your TV. For an explanation of video cables between the "AV IN 1 (VIDEO)" (or "AV IN 2 (VIDEO)") jack on the TV and the VIDEO OUT jack on the DVD player. • Also, you can connect to "AV 3" on the side panel of TV. 15 INSTALLATION Connecting a DVD Player The rear panel jacks on your TV make it easy to connect a DVD player to your DVD player's owner's instruction.

User Manual (user Manual) (ver.1.0) (English)
Page 59
... TV set is "0 0 0 0". œ If you can change it later, if necessary). or † button to select "V-Chip", then press the ENTER button. The on-screen menu will instruct you to assign a password (and you forget the pin number, press the remote control buttons in the following sequence, which resets the pin to 0-0-0-0: POWER (Off), MUTE, 8, 2, 4, POWER (On). 3 The "V-Chip" menu is defined by the user). Re-enter your new 4-digit...
... TV set is "0 0 0 0". œ If you can change it later, if necessary). or † button to select "V-Chip", then press the ENTER button. The on-screen menu will instruct you to assign a password (and you forget the pin number, press the remote control buttons in the following sequence, which resets the pin to 0-0-0-0: POWER (Off), MUTE, 8, 2, 4, POWER (On). 3 The "V-Chip" menu is defined by the user). Re-enter your new 4-digit...


