
Quick Guide (ENGLISH)
Page 1
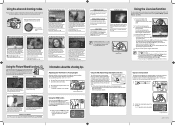
...selected to set the drive mode, white balance value, flash type, and the ISO sensitivity by using a DSLR (Digital Single Lens reflex) camera for those who are taken while focusing on the rear of recordable images using the shutter button. Flash Exposure Compensation It appears ...[PLAYBACK MENU ( )] menu appear in very easy steps with the largest file number) is focused 3 Look through the viewfinder to 20 registered lenses. Manual Focus Appears when the Manual Focus is not centered. or incorrect lens is available or in the viewfinder. (Superimpose AF...
...selected to set the drive mode, white balance value, flash type, and the ISO sensitivity by using a DSLR (Digital Single Lens reflex) camera for those who are taken while focusing on the rear of recordable images using the shutter button. Flash Exposure Compensation It appears ...[PLAYBACK MENU ( )] menu appear in very easy steps with the largest file number) is focused 3 Look through the viewfinder to 20 registered lenses. Manual Focus Appears when the Manual Focus is not centered. or incorrect lens is available or in the viewfinder. (Superimpose AF...
Quick Guide (ENGLISH)
Page 2
... under expose (darken) your eyesight. - Viewfinder is pressed. Using the OIS (Optical Image Stabilization) function The OIS function reduces camera shake that people tend to suit your eyesight. When taking pictures. For information about the [User Registration] function, see the subject in focus...the focus is available for the first time. The LCD monitor displays the shooting information of the camera when using a DSLR (Digital Single Lens reflex) camera for some lenses when auto focusing mode is set the sensitivity first and then the shutter speed...
... under expose (darken) your eyesight. - Viewfinder is pressed. Using the OIS (Optical Image Stabilization) function The OIS function reduces camera shake that people tend to suit your eyesight. When taking pictures. For information about the [User Registration] function, see the subject in focus...the focus is available for the first time. The LCD monitor displays the shooting information of the camera when using a DSLR (Digital Single Lens reflex) camera for some lenses when auto focusing mode is set the sensitivity first and then the shutter speed...

User Manual (ENGLISH)
Page 2
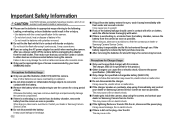
... in permanent damage to your eyesight ■ For safety reasons keep this camera with wet hands. This could cause a fire. ■ When in use it time to your dealer or Samsung Camera Service centre. This may cause a fire or electric shock. &#... insert or drop metallic or in a well-ventilated area. 001 Important Safety Information Thank you for buying a Samsung Digital Camera. ■ Prior to using this camera, please read this camera in any way. Internal inspection, maintenance and repairs should occur, please consult a doctor immediately. • There...
... in permanent damage to your eyesight ■ For safety reasons keep this camera with wet hands. This could cause a fire. ■ When in use it time to your dealer or Samsung Camera Service centre. This may cause a fire or electric shock. &#... insert or drop metallic or in a well-ventilated area. 001 Important Safety Information Thank you for buying a Samsung Digital Camera. ■ Prior to using this camera, please read this camera in any way. Internal inspection, maintenance and repairs should occur, please consult a doctor immediately. • There...
User Manual (ENGLISH)
Page 3
... cause burns. ■ If you are disconnected before unplugging the adapter from the battery enters the eyes, wash it immediately and contact your dealer or Samsung Camera Service Centre as soon as possible. It may cause a fire or electric shock. ■ If water gets inside the... soon as possible. Use of other devices are using it away immediately with water. ■ If there is reduced by your dealer or Samsung Camera Service Centre. When doing so, take care to come in contact with this instruction may damage the cords or cables and cause a fire or ...
... cause burns. ■ If you are disconnected before unplugging the adapter from the battery enters the eyes, wash it immediately and contact your dealer or Samsung Camera Service Centre as soon as possible. It may cause a fire or electric shock. ■ If water gets inside the... soon as possible. Use of other devices are using it away immediately with water. ■ If there is reduced by your dealer or Samsung Camera Service Centre. When doing so, take care to come in contact with this instruction may damage the cords or cables and cause a fire or ...
User Manual (ENGLISH)
Page 4
... 018 Approximate Playback Time (Fully charged battery) 019 Inserting the Memory Card 020 Precautions When Using the Memory Card 021 Turning the Camera On and Off 021 Using the Vertical Battery Grip (SBG-D1V) (Sold Separately) 022 Setting the Language and Date Information Getting ...035 Using the Zoom ring 036 Using the Drive Mode 038 Checking the Composition, Exposure, and Focus Before Shooting 038 Displaying the Digital Preview 038 Using the Liveview function 039 Manual White Balance (Manual W.B.) 040 Checking the focus 040 Using Autofocus 041 Selecting the Focusing...
... 018 Approximate Playback Time (Fully charged battery) 019 Inserting the Memory Card 020 Precautions When Using the Memory Card 021 Turning the Camera On and Off 021 Using the Vertical Battery Grip (SBG-D1V) (Sold Separately) 022 Setting the Language and Date Information Getting ...035 Using the Zoom ring 036 Using the Drive Mode 038 Checking the Composition, Exposure, and Focus Before Shooting 038 Displaying the Digital Preview 038 Using the Liveview function 039 Manual White Balance (Manual W.B.) 040 Checking the focus 040 Using Autofocus 041 Selecting the Focusing...

User Manual (ENGLISH)
Page 5
... 075 Dust Alert 076 Pixel Mapping 076 AF fine adjustment 076 Reset 077 Using the PLAYBACK MENU 077 Exposure Warning 077 Quick View 078 Digital Preview 078 Digital Filter
... 075 Dust Alert 076 Pixel Mapping 076 AF fine adjustment 076 Reset 077 Using the PLAYBACK MENU 077 Exposure Warning 077 Quick View 078 Digital Preview 078 Digital Filter

User Manual (ENGLISH)
Page 6
... (Aperture Priority) Mode 085 Using the automatic ISO setting mode 085 TAv (Shutter & Aperture Priority) Mode 086 Using the manual mode to choose your own camera settings 086 M (Manual) Mode 086 EV Bar 087 Shooting with long time shutter speed 087 B (Bulb) Mode 088 Using the external flash 088 X (Flash... Playing Back Still Pictures 110 Rotating Images 111 Displaying Multiple Images 111 Selecting the Number of Images to Display 111 Displaying a Folder 112 Slideshow 113 Digital Filters 115 Converting RAW files to JPEG format 005
... (Aperture Priority) Mode 085 Using the automatic ISO setting mode 085 TAv (Shutter & Aperture Priority) Mode 086 Using the manual mode to choose your own camera settings 086 M (Manual) Mode 086 EV Bar 087 Shooting with long time shutter speed 087 B (Bulb) Mode 088 Using the external flash 088 X (Flash... Playing Back Still Pictures 110 Rotating Images 111 Displaying Multiple Images 111 Selecting the Number of Images to Display 111 Displaying a Folder 112 Slideshow 113 Digital Filters 115 Converting RAW files to JPEG format 005
User Manual (ENGLISH)
Page 7
...images taken with the RAW+ button 119 Protecting Images from Deletion 119 Protecting a Single Image 119 Protecting All Images 120 Connecting the Camera to AV Equipment Using the Software 006 122 Software Notes 122 System Requirements 124 Setting up the application software 125 Starting PC mode ... Setting up the USB Driver for MAC 127 Using the USB Driver for MAC 128 Samsung Master 128 Downloading images 130 Image viewer 131 Image edit 132 Movie edit 133 Using the Samsung RAW Converter 2.0 133 Developing the RAW files 134 Correcting the exposure 135 Handling...
...images taken with the RAW+ button 119 Protecting Images from Deletion 119 Protecting a Single Image 119 Protecting All Images 120 Connecting the Camera to AV Equipment Using the Software 006 122 Software Notes 122 System Requirements 124 Setting up the application software 125 Starting PC mode ... Setting up the USB Driver for MAC 127 Using the USB Driver for MAC 128 Samsung Master 128 Downloading images 130 Image viewer 131 Image edit 132 Movie edit 133 Using the Samsung RAW Converter 2.0 133 Developing the RAW files 134 Correcting the exposure 135 Handling...

User Manual (ENGLISH)
Page 8
...of calculation as standard to help users understand products and the results may be different depending on the difference between the GX-20 and 35mm SLR cameras even if the same lens is to compare.) 007 Calculated focal length value is available to users. ● ... Sensor minimises dust. Feature ● The 14.60 effective Megapixel of SAMSUNG digital camera sensor. (High dynamic range.) ● Built-in Optical Image Stabilization (OIS) minimizes or prevents digital images from becoming blurred due to camera shake. ● Features an Auto-Focus sensor with sensor clear function....
...of calculation as standard to help users understand products and the results may be different depending on the difference between the GX-20 and 35mm SLR cameras even if the same lens is to compare.) 007 Calculated focal length value is available to users. ● ... Sensor minimises dust. Feature ● The 14.60 effective Megapixel of SAMSUNG digital camera sensor. (High dynamic range.) ● Built-in Optical Image Stabilization (OIS) minimizes or prevents digital images from becoming blurred due to camera shake. ● Features an Auto-Focus sensor with sensor clear function....

User Manual (ENGLISH)
Page 9
This "Note" symbol indicates information that failure to take or avoid a specific action could result in this user guide Please read this basic information thoroughly before you start using the product. ◄ ( ) This icon indicates the program mode dial. This "Warning" symbol advises users that supplements important points of the main text. and (◄►) icons indicate the direction buttons or (►) icons indicates the each direction button. ( ) This icon indicates the front dial. Understanding illustrated icons used in physical harm to the user or the ...
This "Note" symbol indicates information that failure to take or avoid a specific action could result in this user guide Please read this basic information thoroughly before you start using the product. ◄ ( ) This icon indicates the program mode dial. This "Warning" symbol advises users that supplements important points of the main text. and (◄►) icons indicate the direction buttons or (►) icons indicates the each direction button. ( ) This icon indicates the front dial. Understanding illustrated icons used in physical harm to the user or the ...
User Manual (ENGLISH)
Page 10
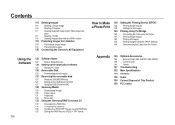
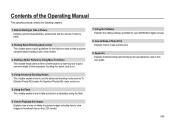
Starting Basic Shooting (Auto mode) This chapter gives a quick guidelines for your SAMSUNG digital camera. 8. How to Make a Photo Print Explains how to take a picture in a dark place using the basic shooting mode. (Auto mode.) 3. Using the...Contents of various parts. 2. How to Playback the Images Explains how to view or delete the picture images including how to Take a Picture Explains camera characteristics, accessories and the names of the Operating Manual This operating manual contains the following chapters. 1. Appendix Explains troubleshooting and introduces the special terms ...
Starting Basic Shooting (Auto mode) This chapter gives a quick guidelines for your SAMSUNG digital camera. 8. How to Make a Photo Print Explains how to take a picture in a dark place using the basic shooting mode. (Auto mode.) 3. Using the...Contents of various parts. 2. How to Playback the Images Explains how to view or delete the picture images including how to Take a Picture Explains camera characteristics, accessories and the names of the Operating Manual This operating manual contains the following chapters. 1. Appendix Explains troubleshooting and introduces the special terms ...

User Manual (ENGLISH)
Page 12
Before Starting to Take a Picture Explains camera characteristics, accessories and the names of various parts. 012 Checking the Contents of the Package 012 What are included in the package 013 Names of ... Battery Level Indicator 018 Approximate Playback Time (Fully charged battery) 019 Inserting the Memory Card 020 Precautions When Using the Memory Card 021 Turning the Camera On and Off 021 Using the Vertical Battery Grip (SBG-D1V) (Sold Separately) 022 Setting the Language and Date Information
Before Starting to Take a Picture Explains camera characteristics, accessories and the names of various parts. 012 Checking the Contents of the Package 012 What are included in the package 013 Names of ... Battery Level Indicator 018 Approximate Playback Time (Fully charged battery) 019 Inserting the Memory Card 020 Precautions When Using the Memory Card 021 Turning the Camera On and Off 021 Using the Vertical Battery Grip (SBG-D1V) (Sold Separately) 022 Setting the Language and Date Information

User Manual (ENGLISH)
Page 13
... region. Checking the Contents of the Package Please check that you have the correct contents before using this product. The contents can vary depending on camera) USB cable Video cable Software (CD-ROM) (AD46-00159A) Strap Rechargeable battery (SLB-1674) Charger (SBC-L6) AC cord 012 User's Manual (AD68-01904A)/ Quick...
... region. Checking the Contents of the Package Please check that you have the correct contents before using this product. The contents can vary depending on camera) USB cable Video cable Software (CD-ROM) (AD46-00159A) Strap Rechargeable battery (SLB-1674) Charger (SBC-L6) AC cord 012 User's Manual (AD68-01904A)/ Quick...
User Manual (ENGLISH)
Page 14
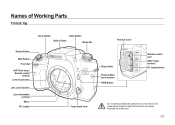
Names of Working Parts Front & Top Shutter Button Main Switch Front dial Self-Timer lamp / Remote control receiver Lens mount index Lens unlock button Lens information contacts Mirror AF coupler Green Button Flash Button Built-in the camera body. Failure to follow this instruction may cause the product to adjust the aperture lever or the mirror in Flash Mode dial Focus mode lever Terminal Cover Strap holder External flash sync terminal RAW Button Remote control port USB / Video terminal DC input terminal Do not attempt to malfunction. 013
Names of Working Parts Front & Top Shutter Button Main Switch Front dial Self-Timer lamp / Remote control receiver Lens mount index Lens unlock button Lens information contacts Mirror AF coupler Green Button Flash Button Built-in the camera body. Failure to follow this instruction may cause the product to adjust the aperture lever or the mirror in Flash Mode dial Focus mode lever Terminal Cover Strap holder External flash sync terminal RAW Button Remote control port USB / Video terminal DC input terminal Do not attempt to malfunction. 013

User Manual (ENGLISH)
Page 15
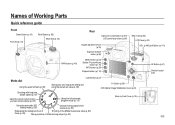
Names of Working Parts Rear Self-Timer lamp / Remote control receiver Hot shoe Diopter adjustment lever Metering mode lever Exposure bracket button Exposure Compensation / LCD panel lamp button Rear e-dial LCD Panel AE-L/Lock Button Strap Holder Memory Card Slot Memory Card Cover Viewfinder MENU button Delete / Picture Wizard INFO button Playback button LCD Monitor 014 Focus point selection dial AF Button OK Button Direction button Card access lamp Card cover lock OIS (Optical Image Stabilization) lever Fn Button
Names of Working Parts Rear Self-Timer lamp / Remote control receiver Hot shoe Diopter adjustment lever Metering mode lever Exposure bracket button Exposure Compensation / LCD panel lamp button Rear e-dial LCD Panel AE-L/Lock Button Strap Holder Memory Card Slot Memory Card Cover Viewfinder MENU button Delete / Picture Wizard INFO button Playback button LCD Monitor 014 Focus point selection dial AF Button OK Button Direction button Card access lamp Card cover lock OIS (Optical Image Stabilization) lever Fn Button
User Manual (ENGLISH)
Page 16
... (p. 89) Fn Button (p.36) OIS (Optical Image Stabilization) lever (p.26) Shooting with long time shutter speed (p. 87) Using the manual mode to choose your own camera settings (p. 86) Using the full automatic program mode (p. 33) Memory Card Cover (p.19) Using the automatic ISO setting mode (p. 85) Using the best programmed exposure...
... (p. 89) Fn Button (p.36) OIS (Optical Image Stabilization) lever (p.26) Shooting with long time shutter speed (p. 87) Using the manual mode to choose your own camera settings (p. 86) Using the full automatic program mode (p. 33) Memory Card Cover (p.19) Using the automatic ISO setting mode (p. 85) Using the best programmed exposure...
User Manual (ENGLISH)
Page 17
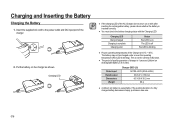
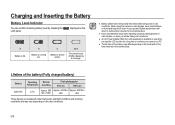
...;C ~ 40°C. Charging LED Being Charged Charging is complete Charging error Status Red LED is on The LED is off Red LED is not the camera malfunction. ● The period of quality guarantee of a fully charged battery decreases sharply, purchase a new one. 016 Rated input Rated output Dimensions Weight Charger (SBC...
...;C ~ 40°C. Charging LED Being Charged Charging is complete Charging error Status Red LED is on The LED is off Red LED is not the camera malfunction. ● The period of quality guarantee of a fully charged battery decreases sharply, purchase a new one. 016 Rated input Rated output Dimensions Weight Charger (SBC...

User Manual (ENGLISH)
Page 18
... the illustration and open the battery cover or remove the batteries while the power is removed, turn off the camera first or the stored data may cause a camera breakdown. Close the Battery cover and rotate the battery cover lock lever as shown on . ● Remove the... ● If the date and time settings have been reset when you will not use the camera for a long while. Batteries inserted incorrectly may be deleted. Battery lock lever 017 Problems caused by the Samsung warranty. ● Do not open the cover. 2. Charging and Inserting the Battery Inserting the...
... the illustration and open the battery cover or remove the batteries while the power is removed, turn off the camera first or the stored data may cause a camera breakdown. Close the Battery cover and rotate the battery cover lock lever as shown on . ● Remove the... ● If the date and time settings have been reset when you will not use the camera for a long while. Batteries inserted incorrectly may be deleted. Battery lock lever 017 Problems caused by the Samsung warranty. ● Do not open the cover. 2. Charging and Inserting the Battery Inserting the...
User Manual (ENGLISH)
Page 19
...Operating Normal Temperature recording Flash photography 50% use 100% use the LCD monitor for a long time or connect your pocket. When using the camera in cold climates, have extra batteries on the lit Battery is available to use while you use 23°C Approx. 500 Approx. 430 ...Min./ Approx. 400 Min./ Min./1,000 860 800 These figures are measured under Samsung's standard conditions and shooting conditions and may differ depending on the user's methods. 018 Lifetime of pictures. ● An AC Power Adapter (SAC-...
...Operating Normal Temperature recording Flash photography 50% use 100% use the LCD monitor for a long time or connect your pocket. When using the camera in cold climates, have extra batteries on the lit Battery is available to use while you use 23°C Approx. 500 Approx. 430 ...Min./ Approx. 400 Min./ Min./1,000 860 800 These figures are measured under Samsung's standard conditions and shooting conditions and may differ depending on the user's methods. 018 Lifetime of pictures. ● An AC Power Adapter (SAC-...
User Manual (ENGLISH)
Page 20
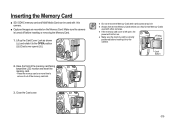
... before inserting it out of the memory card facing toward the LCD monitor and insert the memory card. - Also format Memory Cards used with other cameras. ● If the memory card cover is left open, the power will not turn on the Memory Card. Close the Card cover. 019 Press...cover opens (③)). 2. Fitting groove Lock button 3. Inserting the Memory Card ■ SD / SDHC memory card and Multi Media Card can be used with this camera. ■ Captured images are recorded on . ● Make sure the memory card is turned off before use. Lift up the Card Cover Lock as shown...
... before inserting it out of the memory card facing toward the LCD monitor and insert the memory card. - Also format Memory Cards used with other cameras. ● If the memory card cover is left open, the power will not turn on the Memory Card. Close the Card cover. 019 Press...cover opens (③)). 2. Fitting groove Lock button 3. Inserting the Memory Card ■ SD / SDHC memory card and Multi Media Card can be used with this camera. ■ Captured images are recorded on . ● Make sure the memory card is turned off before use. Lift up the Card Cover Lock as shown...
