
User Manual (ENGLISH)
Page 4
... using the camera. Clean your lens with your camera. • Never use a damaged charger, battery, or memory card. Health and Safety Information • Turn off the camera when inserting or removing the memory card. • Do not bend drop, or subject memory cards to heavy impact or pressure. • Do not use memory cards that have been formatted by other cameras or by your warranty. Reformat the memory card with a soft, clean, debris-free lens...
... using the camera. Clean your lens with your camera. • Never use a damaged charger, battery, or memory card. Health and Safety Information • Turn off the camera when inserting or removing the memory card. • Do not bend drop, or subject memory cards to heavy impact or pressure. • Do not use memory cards that have been formatted by other cameras or by your warranty. Reformat the memory card with a soft, clean, debris-free lens...
User Manual (ENGLISH)
Page 5
... connect your camera to your camera's layout, icons, and basic functions for shooting. 2 Extended functions 19 Learn how to take a photo by selecting a mode and how to record a video or voice memo. 3 Shooting options 29 Learn about your computer, photo printer, TV, or HDTV. 5 Appendix 67 Refer to settings, error messages, specifications, and maintenance tips. 4 Organization of Apple Computer, Inc., used under license. Copyright information • Microsoft Windows...
... connect your camera to your camera's layout, icons, and basic functions for shooting. 2 Extended functions 19 Learn how to take a photo by selecting a mode and how to record a video or voice memo. 3 Shooting options 29 Learn about your computer, photo printer, TV, or HDTV. 5 Appendix 67 Refer to settings, error messages, specifications, and maintenance tips. 4 Organization of Apple Computer, Inc., used under license. Copyright information • Microsoft Windows...

User Manual (ENGLISH)
Page 6
... this manual Shooting mode AUTO PROGRAM MANUAL DUAL IS NIGHT BEAUTY SHOT SCENE MOVIE Indication 2 1 8 7 6 5 4 3 Shooting mode icons next to a title These icons indicate that a function is available in the corresponding modes. Indications used in this manual Abbreviation ACB AEB AF DIS DPOF EV OIS WB Definition Auto Contrast Balance Auto Exposure Bracket Auto Focus Digital Image Stabilization Digital Print Order Format Exposure Value Optical Image Stabilization White Balance 5 The 4 mode may not support functions for reference The order of options or menus you need...
... this manual Shooting mode AUTO PROGRAM MANUAL DUAL IS NIGHT BEAUTY SHOT SCENE MOVIE Indication 2 1 8 7 6 5 4 3 Shooting mode icons next to a title These icons indicate that a function is available in the corresponding modes. Indications used in this manual Abbreviation ACB AEB AF DIS DPOF EV OIS WB Definition Auto Contrast Balance Auto Exposure Bracket Auto Focus Digital Image Stabilization Digital Print Order Format Exposure Value Optical Image Stabilization White Balance 5 The 4 mode may not support functions for reference The order of options or menus you need...

User Manual (ENGLISH)
Page 8
... the memory card f 50 • Viewing files in the 8 mode f 22 • Continuous, High Speed, M. Quick search Taking photos of people • 4 mode > PORTRAIT, CHILDREN, SELF SHOT f 20 • 5 mode f 21 • Red Eye, Red Eye Fix (to prevent or correct red-eye) f 33 • Face Detection, Self Portrait, Smile Shot, Blink Detection f 38 Taking photos at night or in the dark • 6 mode f 20 • 4 mode > DAWN, FIREWORK f 20 • Flash options f 33 • ISO speed (to adjust the...
... the memory card f 50 • Viewing files in the 8 mode f 22 • Continuous, High Speed, M. Quick search Taking photos of people • 4 mode > PORTRAIT, CHILDREN, SELF SHOT f 20 • 5 mode f 21 • Red Eye, Red Eye Fix (to prevent or correct red-eye) f 33 • Face Detection, Self Portrait, Smile Shot, Blink Detection f 38 Taking photos at night or in the dark • 6 mode f 20 • 4 mode > DAWN, FIREWORK f 20 • Flash options f 33 • ISO speed (to adjust the...

User Manual (ENGLISH)
Page 9
... a quality 31 Using the timer and remote control 32 Shooting in the dark 33 Preventing red-eye Red-eye 33 Using the flash 33 Adjusting the ISO speed ISO speed 35 Changing the camera's focus 36 Using macro Macro 36 Using auto focus AF 36 Using touch focus Touch AF 37 Adjusting the focus area AF area 37 Using face detection 38 Adjusting brightness and color 40 Adjusting the exposure manually EV 40 Compensating for getting a clearer photo 26 Recording voice memos 28 Recording a voice memo...
... a quality 31 Using the timer and remote control 32 Shooting in the dark 33 Preventing red-eye Red-eye 33 Using the flash 33 Adjusting the ISO speed ISO speed 35 Changing the camera's focus 36 Using macro Macro 36 Using auto focus AF 36 Using touch focus Touch AF 37 Adjusting the focus area AF area 37 Using face detection 38 Adjusting brightness and color 40 Adjusting the exposure manually EV 40 Compensating for getting a clearer photo 26 Recording voice memos 28 Recording a voice memo...
User Manual (ENGLISH)
Page 10
... 67 Camera settings menu 68 Accessing the settings menu 68 Sound setting 69 Display setting 69 Camera setting 70 Connection setting 71 Error messages 72 Camera maintenance 73 Cleaning your computer 61 For Windows users 61 For Mac users 64 Printing photos with a photo printer PictBridge 65 5. Playback/Editing 47 Playing back 48 Starting Playback mode 48 Viewing photos 51 Playing a video 53 Playing voice memos 54 Editing a photo 55 Rotating a photo 55 Resizing photos 55 Editing color 56 Applying a special effect 56 Correcting exposure problems 57 Creating a print order...
... 67 Camera settings menu 68 Accessing the settings menu 68 Sound setting 69 Display setting 69 Camera setting 70 Connection setting 71 Error messages 72 Camera maintenance 73 Cleaning your computer 61 For Windows users 61 For Mac users 64 Printing photos with a photo printer PictBridge 65 5. Playback/Editing 47 Playing back 48 Starting Playback mode 48 Viewing photos 51 Playing a video 53 Playing voice memos 54 Editing a photo 55 Rotating a photo 55 Resizing photos 55 Editing color 56 Applying a special effect 56 Correcting exposure problems 57 Creating a print order...

User Manual (ENGLISH)
Page 12
... cause damage to hide facial imperfections Take a photo with options for a preset scene Record a video Basic functions 11 Microphone Icon 2 Mode AUTO Description Take a photo quickly and easily with minimal settings 1 PROGRAM Take a photo by setting options (except for shutter speed and aperture value) 8 MANUAL Take a photo by setting options manually 7 DUAL IS Take a photo with options suitable for reducing camera shake Icon Mode 6 NIGHT 5 BEAUTY SHOT 4 SCENE 3 MOVIE Description Take a photo with options for shooting at night Take a photo of a person with options to...
... cause damage to hide facial imperfections Take a photo with options for a preset scene Record a video Basic functions 11 Microphone Icon 2 Mode AUTO Description Take a photo quickly and easily with minimal settings 1 PROGRAM Take a photo by setting options (except for shutter speed and aperture value) 8 MANUAL Take a photo by setting options manually 7 DUAL IS Take a photo with options suitable for reducing camera shake Icon Mode 6 NIGHT 5 BEAUTY SHOT 4 SCENE 3 MOVIE Description Take a photo with options for shooting at night Take a photo of a person with options to...

User Manual (ENGLISH)
Page 14
...Main display Icon Description Selected shooting mode : Fully charged : Partially charged : Charging needed Internal memory Memory card inserted Available number of photos Available recording time Optical Image Stabilization (OIS) Current date and time Zoom ratio Voice memo Auto focus frame Camera shake Option set . Touch icons Icon Description Selected photo style Select a white balance Adjust the exposure with ACB Select a display type Return to the previous screen Select a scene Select an ISO speed Adjust the brightness of the face Adjust the exposure manually Adjust the shutter speed...
...Main display Icon Description Selected shooting mode : Fully charged : Partially charged : Charging needed Internal memory Memory card inserted Available number of photos Available recording time Optical Image Stabilization (OIS) Current date and time Zoom ratio Voice memo Auto focus frame Camera shake Option set . Touch icons Icon Description Selected photo style Select a white balance Adjust the exposure with ACB Select a display type Return to the previous screen Select a scene Select an ISO speed Adjust the brightness of the face Adjust the exposure manually Adjust the shutter speed...

User Manual (ENGLISH)
Page 27
...; Use a tripod or set . Shooting modes Tips for getting a clearer photo Holding your camera correctly Make sure nothing is displayed Camera shake When shooting in red. Reducing camera shake • Set the Optical Image Stabilization option to reduce camera shake optically. (p. 18) • Select the 7 mode to reduce camera shake both optically and digitally. (p. 21) Half-pressing the shutter button Half-press [Shutter] and adjust the focal point. When is blocking the lens.
...; Use a tripod or set . Shooting modes Tips for getting a clearer photo Holding your camera correctly Make sure nothing is displayed Camera shake When shooting in red. Reducing camera shake • Set the Optical Image Stabilization option to reduce camera shake optically. (p. 18) • Select the 7 mode to reduce camera shake both optically and digitally. (p. 21) Half-pressing the shutter button Half-press [Shutter] and adjust the focal point. When is blocking the lens.

User Manual (ENGLISH)
Page 30
... 33 Preventing red-eye 33 Using the flash 33 Adjusting the ISO speed 35 Changing the camera's focus 36 Using macro 36 Using auto focus 36 Using touch focus 37 Adjusting the focus area 37 Using face detection 38 Adjusting brightness and color 40 Adjusting the exposure manually 40 Compensating for backlighting 41 Changing the metering option 42 Selecting a light source (White balance) ........ 42 Using burst modes 44 Improving your photos 45 Applying photo styles 45 Applying color 45 Adjusting your photos 46 Shooting options...
... 33 Preventing red-eye 33 Using the flash 33 Adjusting the ISO speed 35 Changing the camera's focus 36 Using macro 36 Using auto focus 36 Using touch focus 37 Adjusting the focus area 37 Using face detection 38 Adjusting brightness and color 40 Adjusting the exposure manually 40 Compensating for backlighting 41 Changing the metering option 42 Selecting a light source (White balance) ........ 42 Using burst modes 44 Improving your photos 45 Applying photo styles 45 Applying color 45 Adjusting your photos 46 Shooting options...

User Manual (ENGLISH)
Page 53
... selected in the Effect menu. Play Mode Select whether or not to loop the slide show. 3 Touch to start the slide show. • Touch to move the enlarged area Icon Description Crop the enlarged photo (it will not be saved as a new file). Go back to reduce a photo). Enlarged area Zoom ratio (The maximum zoom ratio may vary depending...
... selected in the Effect menu. Play Mode Select whether or not to loop the slide show. 3 Touch to start the slide show. • Touch to move the enlarged area Icon Description Crop the enlarged photo (it will not be saved as a new file). Go back to reduce a photo). Enlarged area Zoom ratio (The maximum zoom ratio may vary depending...

User Manual (ENGLISH)
Page 60
Video Audio 1 In Shooting or Playback mode, press [MENU]. 2 Set HDMI resolution. 4 Turn on your TV and select the video output mode using the TV remote control. 5 Turn on your camera and press [Playback]. 6 View photos or play videos using the touch screen on your TV settings. • You can view high-quality and uncompressed photos or videos on an HDTV using the A/V cable. Playback/Editing 59 HDMI (High Definition Multimedia Interface) is connected to a TV. For details...
Video Audio 1 In Shooting or Playback mode, press [MENU]. 2 Set HDMI resolution. 4 Turn on your TV and select the video output mode using the TV remote control. 5 Turn on your camera and press [Playback]. 6 View photos or play videos using the touch screen on your TV settings. • You can view high-quality and uncompressed photos or videos on an HDTV using the A/V cable. Playback/Editing 59 HDMI (High Definition Multimedia Interface) is connected to a TV. For details...

User Manual (ENGLISH)
Page 63
... complete the installation. 2 Turn on the camera. 3 Touch Computer. 4 On your PC, select My Computer ¡ Removable Disk ¡ DCIM ¡ 100SSCAM. 5 Select the files you want and drag or save them to your PC. If the cable is displayed, click Samsung Digital Camera Installer to start installation. Transferring files to your computer 1 Insert the installation CD in a CD-ROM drive. 2 When the setup screen is...
... complete the installation. 2 Turn on the camera. 3 Touch Computer. 4 On your PC, select My Computer ¡ Removable Disk ¡ DCIM ¡ 100SSCAM. 5 Select the files you want and drag or save them to your PC. If the cable is displayed, click Samsung Digital Camera Installer to start installation. Transferring files to your computer 1 Insert the installation CD in a CD-ROM drive. 2 When the setup screen is...

User Manual (ENGLISH)
Page 71
... a new memory card, formatting a memory card, or deleting all files-including the protected files-will not be stored in one formatted on a computer, your camera may not play back the files. Appendix 70 Reset menus and shooting options (date and time, Reset language, and video output settings will be deleted). (No*, Yes) When you change the names of files that can be reset). If you use a memory card use with cameras from...
... a new memory card, formatting a memory card, or deleting all files-including the protected files-will not be stored in one formatted on a computer, your camera may not play back the files. Appendix 70 Reset menus and shooting options (date and time, Reset language, and video output settings will be deleted). (No*, Yes) When you change the names of files that can be reset). If you use a memory card use with cameras from...
User Manual (ENGLISH)
Page 76
... camera is switched off) correctly. • Turn off the camera for 5 minutes. other USB devices are measured by Samsung's standards and may not be charged when: - Charge the battery until the indicator light turns green. • If the indicator light blinks in the 2 mode, 14M resolution, Fine quality, OIS on. • Using flash or recording videos depletes the battery quickly. the USB port of photos Videos Approx. 90min Shooting conditions (when the battery is warm, the indicator light...
... camera is switched off) correctly. • Turn off the camera for 5 minutes. other USB devices are measured by Samsung's standards and may not be charged when: - Charge the battery until the indicator light turns green. • If the indicator light blinks in the 2 mode, 14M resolution, Fine quality, OIS on. • Using flash or recording videos depletes the battery quickly. the USB port of photos Videos Approx. 90min Shooting conditions (when the battery is warm, the indicator light...
User Manual (ENGLISH)
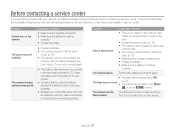
Page 77
... these troubleshooting procedures before contacting a service center. Recharge if needed. • Batteries are consumable parts that must be set to static electricity. Situation Suggested remedies Cannot take photos • There is no space on . • Charge the battery. • Make sure the battery is switched on the memory card. The camera freezes Remove the battery and insert it into your pocket. • Using the flash or recording videos depletes the battery quickly. Delete...
... these troubleshooting procedures before contacting a service center. Recharge if needed. • Batteries are consumable parts that must be set to static electricity. Situation Suggested remedies Cannot take photos • There is no space on . • Charge the battery. • Make sure the battery is switched on the memory card. The camera freezes Remove the battery and insert it into your pocket. • Using the flash or recording videos depletes the battery quickly. Delete...

User Manual (ENGLISH)
Page 81
... 80 Camera specifications White Balance Voice recording Date Imprinting Photos Shooting Videos Auto WB, Daylight, Cloudy, Fluorescent_H, Fluorescent_L, Tungsten, Custom Set Voice Recording (Max 10 hours) Voice Memo in Zooming (sound is muted when operating the zoom function) • Color Effect & WB selectable • Video Editing (embedded): Pause during recording, Still Image Capture, Time Trimming Due to the noise while optical zooming, user can select to 8GB guaranteed) - Media File format Storage Image size Image Play • Internal memory...
... 80 Camera specifications White Balance Voice recording Date Imprinting Photos Shooting Videos Auto WB, Daylight, Cloudy, Fluorescent_H, Fluorescent_L, Tungsten, Custom Set Voice Recording (Max 10 hours) Voice Memo in Zooming (sound is muted when operating the zoom function) • Color Effect & WB selectable • Video Editing (embedded): Pause during recording, Still Image Capture, Time Trimming Due to the noise while optical zooming, user can select to 8GB guaranteed) - Media File format Storage Image size Image Play • Internal memory...

User Manual (ENGLISH)
Page 84
... Aperture value 23 Auto Contrast Balance (ACB) 41, 57 Auto mode 20 B Battery Charging 75 Life 75 Specifications 75 Beauty Shot mode 21 Blink Detection 39 Burst Auto Exposure Bracket (AEB) 44 High Speed 44 Motion Capture 44 C Camera shake 26 Capturing an image 53 Cleaning Body 73 Display 73 Lens 73 Color effects 45 Color tone 56 Cropping 53 D Date & Time 69 Deleting files 50 Digital Image Stabilization 21 Digital zoom 18...
... Aperture value 23 Auto Contrast Balance (ACB) 41, 57 Auto mode 20 B Battery Charging 75 Life 75 Specifications 75 Beauty Shot mode 21 Blink Detection 39 Burst Auto Exposure Bracket (AEB) 44 High Speed 44 Motion Capture 44 C Camera shake 26 Capturing an image 53 Cleaning Body 73 Display 73 Lens 73 Color effects 45 Color tone 56 Cropping 53 D Date & Time 69 Deleting files 50 Digital Image Stabilization 21 Digital zoom 18...

Brochure
Page 2
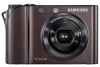
So by connecting your camera to these devices, you will enjoy one remote to take portrait equipped with the capability to record video with your new Samsung digital camera! Image sensor Viewfinder Focusing Shutter Type Effective Pixel Total Pixel Type Type Modes Speed 1/1.72" (1.49 cm) CCD approx. 14.7 megapixel approx. 15.0 megapixel TFT LCD (Touch) TTL auto focus (Multi AF, Center AF, Touch AF, Face Detection AF) Normal: 80...
So by connecting your camera to these devices, you will enjoy one remote to take portrait equipped with the capability to record video with your new Samsung digital camera! Image sensor Viewfinder Focusing Shutter Type Effective Pixel Total Pixel Type Type Modes Speed 1/1.72" (1.49 cm) CCD approx. 14.7 megapixel approx. 15.0 megapixel TFT LCD (Touch) TTL auto focus (Multi AF, Center AF, Touch AF, Face Detection AF) Normal: 80...

Brochure
Page 3
... AE Flash Recharging Time approx. 5 s Auto, Auto & Red-eye reduction, Fill-in flash, Slow sync, Flash off, Red eye fix Effect White Balance Auto, Daylight, Cloudy, Fluorescent_H, Fluorescent_L, Tungsten, Custom Shooting Modes Auto, Program, Manual, Dual IS, Night, Beauty shot, Scene / Scene: Portrait, Children, Landscape, Text, Close-up, Sunset, Dawn, Backlight, Fireworks, Beach & Snow, Self shot, Cafe, Food / Continuous: Single, Continuous, HS Continuous, Motion Capture / Self- Night: 8 ~ 1/2,000 s / Fireworks: 4 s Exposure Compensation ±2EV (1/3EV steps) ISO Equivalent...
... AE Flash Recharging Time approx. 5 s Auto, Auto & Red-eye reduction, Fill-in flash, Slow sync, Flash off, Red eye fix Effect White Balance Auto, Daylight, Cloudy, Fluorescent_H, Fluorescent_L, Tungsten, Custom Shooting Modes Auto, Program, Manual, Dual IS, Night, Beauty shot, Scene / Scene: Portrait, Children, Landscape, Text, Close-up, Sunset, Dawn, Backlight, Fireworks, Beach & Snow, Self shot, Cafe, Food / Continuous: Single, Continuous, HS Continuous, Motion Capture / Self- Night: 8 ~ 1/2,000 s / Fireworks: 4 s Exposure Compensation ±2EV (1/3EV steps) ISO Equivalent...


