User Manual
Page 2
... this manual are subject to change without prior notice for upgrading the camera functions. Ä Microsoft, Windows and Windows logo are registered trademarks of Microsoft Corporation incorporated in the United States and/or other countries. Ä Adobe and Reader are registered trademarks of images on the memory card due to the use a card reader to copy the images on . If the Check the camera's power power is operating...
... this manual are subject to change without prior notice for upgrading the camera functions. Ä Microsoft, Windows and Windows logo are registered trademarks of Microsoft Corporation incorporated in the United States and/or other countries. Ä Adobe and Reader are registered trademarks of images on the memory card due to the use a card reader to copy the images on . If the Check the camera's power power is operating...

User Manual
Page 4
... injury. - Use battery with the correct specification for a long period of features 008 Front & Top 009 Back 010 Bottom 010 5 Function button 011 Self-timer lamp 011 Camera Status Lamp 011 Mode icon 012 Connecting to a Power Source 014 Inserting the memory card 015 Instructions on , if you may experience the following. Do not touch the flash after image on the LCD monitor...
... injury. - Use battery with the correct specification for a long period of features 008 Front & Top 009 Back 010 Bottom 010 5 Function button 011 Self-timer lamp 011 Camera Status Lamp 011 Mode icon 012 Connecting to a Power Source 014 Inserting the memory card 015 Instructions on , if you may experience the following. Do not touch the flash after image on the LCD monitor...

User Manual
Page 5
... ZOOM button 029 Info (DISP) / Up button 029 Macro / Down button 031 Focus lock 031 Flash / Left button 033 Self-timer / Right button 035 MENU button 035 OK button 035 Functions 036 How to Enable Functions Using the MENU Button 036 Exposure compensation 037 White balance 038 ISO 4 038 Face Detection 040 Face Tone 040 Face Retouch 041 Image Size 041 Quality / Frame rate 042 ACB 042 Metering 043 Drive mode 043 Auto Focus type 044 Photo Style Selector 045 Image Adjust...
... ZOOM button 029 Info (DISP) / Up button 029 Macro / Down button 031 Focus lock 031 Flash / Left button 033 Self-timer / Right button 035 MENU button 035 OK button 035 Functions 036 How to Enable Functions Using the MENU Button 036 Exposure compensation 037 White balance 038 ISO 4 038 Face Detection 040 Face Tone 040 Face Retouch 041 Image Size 041 Quality / Frame rate 042 ACB 042 Metering 043 Drive mode 043 Auto Focus type 044 Photo Style Selector 045 Image Adjust...

User Manual
Page 6
... Quick view 050 Display SAVE 051 Settings 051 Formatting a memory 051 Initialisation 052 Setting up the Date / Time / Date type 052 Time Zone 052 File name 053 Imprinting the recording date 053 Auto power off 054 Auto Focus lamp 054 Selecting Video out type 055 Setting the USB PLAY 056 056 056 057 057 058 Starting play mode Playing back a still image Playing back a movie clip Movie clip capture function Playing back a recorded voice Playing back a voice memo 058 LCD monitor Indicator 059 Using the camera buttons to set the camera 059 Play mode button...
... Quick view 050 Display SAVE 051 Settings 051 Formatting a memory 051 Initialisation 052 Setting up the Date / Time / Date type 052 Time Zone 052 File name 053 Imprinting the recording date 053 Auto power off 054 Auto Focus lamp 054 Selecting Video out type 055 Setting the USB PLAY 056 056 056 057 057 058 Starting play mode Playing back a still image Playing back a movie clip Movie clip capture function Playing back a recorded voice Playing back a voice memo 058 LCD monitor Indicator 059 Using the camera buttons to set the camera 059 Play mode button...

User Manual
Page 21
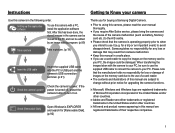
... shooting texts in the internal memory. Press the power button to capture an image clearly. å Avoid obstructing the lens or the flash when you press the shutter button down half way, it means that the camera cannot focus on the camera. 5. Select the Auto mode by using the mode dial. 6. Press the shutter button to capture an image. å If the auto focus frame turns to insert the memory card. Starting the recording mode Each...
... shooting texts in the internal memory. Press the power button to capture an image clearly. å Avoid obstructing the lens or the flash when you press the shutter button down half way, it means that the camera cannot focus on the camera. 5. Select the Auto mode by using the mode dial. 6. Press the shutter button to capture an image. å If the auto focus frame turns to insert the memory card. Starting the recording mode Each...

User Manual
Page 27
... scene shooting mode (see page 42) function. å Avoid obstructing the lens or the flash when you capture an image. å Compose the image by using the LCD monitor. 26 To take pictures against the light, please use a tripod, support the camera on a solid surface or change to take the picture. [Lightly press the shutter button] [Press the shutter button] å Under certain conditions the auto focus system may appear on shooting conditions and camera settings...
... scene shooting mode (see page 42) function. å Avoid obstructing the lens or the flash when you capture an image. å Compose the image by using the LCD monitor. 26 To take pictures against the light, please use a tripod, support the camera on a solid surface or change to take the picture. [Lightly press the shutter button] [Press the shutter button] å Under certain conditions the auto focus system may appear on shooting conditions and camera settings...

User Manual
Page 33
... on the LCD monitor. Flash off atmospheric dust. 32 Ê Flash mode indicator Icon Flash mode Description Auto flash If the subject or background is prohibited. The speck is caused by using the red-eye reduction function. When you press the shutter button after selecting the flash, the first flash fires to obtain a balanced correct exposure. When a shot with "red eye" is weak, the charging time will...
... on the LCD monitor. Flash off atmospheric dust. 32 Ê Flash mode indicator Icon Flash mode Description Auto flash If the subject or background is prohibited. The speck is caused by using the red-eye reduction function. When you press the shutter button after selecting the flash, the first flash fires to obtain a balanced correct exposure. When a shot with "red eye" is weak, the charging time will...

User Manual
Page 40
... camera detects a target face, the white colour focus frame will focus on the face and the white focus frame turns green. å Return to its default value. Ê Self Portrait When taking a picture of smile shot, showing teethes or keeping the smiley face of the face is taken in the center. å The guiding sound can take self pictures more easily and quickly. Ä Selectable modes: Auto, Program, DUAL IS, Photo Help Guide, Beauty Shot...
... camera detects a target face, the white colour focus frame will focus on the face and the white focus frame turns green. å Return to its default value. Ê Self Portrait When taking a picture of smile shot, showing teethes or keeping the smiley face of the face is taken in the center. å The guiding sound can take self pictures more easily and quickly. Ä Selectable modes: Auto, Program, DUAL IS, Photo Help Guide, Beauty Shot...

User Manual
Page 41
... Up/Down button. 2. Functions ( ) Ê Blink Detection Ä Selectable modes: Auto, Program, Photo Help Guide, Beauty Shot, Portrait, Children, Beach & Snow If the eyes of the subject are closed when the shutter button is pressed. å Detecting the smiling face or the blinking eyes may not be available if any of the following situations occurs: - The camera takes only one picture if the eyes of the light or the...
... Up/Down button. 2. Functions ( ) Ê Blink Detection Ä Selectable modes: Auto, Program, Photo Help Guide, Beauty Shot, Portrait, Children, Beach & Snow If the eyes of the subject are closed when the shutter button is pressed. å Detecting the smiling face or the blinking eyes may not be available if any of the following situations occurs: - The camera takes only one picture if the eyes of the light or the...
User Manual
Page 50
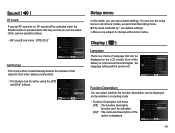
... displayed on the window in all camera modes, except Voice Recording mode. Ê The items indicated by using the [Off] and [On]* buttons. Display ( ) Language There is a choice of the option is displayed. Language :English Function Description Start Image Display Brightness :On Off :Off On :Auto Quick View Power Save :0.5sec :Off Back Set 49 Volume Start Sound Shutter Sound Beep Sound AF Sound Self-Portrait Back :Medium :Off :1 :1 Off :On On :On Set Setup menu In this mode, you can use the setup menu in recording mode. - Language Function Description Start Image...
... displayed on the window in all camera modes, except Voice Recording mode. Ê The items indicated by using the [Off] and [On]* buttons. Display ( ) Language There is a choice of the option is displayed. Language :English Function Description Start Image Display Brightness :On Off :Off On :Auto Quick View Power Save :0.5sec :Off Back Set 49 Volume Start Sound Shutter Sound Beep Sound AF Sound Self-Portrait Back :Medium :Off :1 :1 Off :On On :On Set Setup menu In this mode, you can use the setup menu in recording mode. - Language Function Description Start Image...

User Manual
Page 53
...; DST : Daylight Saving Time File name This function allows the user to 999 as follows: 100SSCAM Ã 101SSCAM Ã ~ Ã 999SSCAM. - Imprint Auto Power Off Back :Off :London :Series Reset Serie:Os ff :3 min Set numbers that will be displayed on the LCD monitor when travelling overseas. - The folder number is used with the memory card conform to display the local date and time on the captured images and set from SDC10001...
...; DST : Daylight Saving Time File name This function allows the user to 999 as follows: 100SSCAM Ã 101SSCAM Ã ~ Ã 999SSCAM. - Imprint Auto Power Off Back :Off :London :Series Reset Serie:Os ff :3 min Set numbers that will be displayed on the LCD monitor when travelling overseas. - The folder number is used with the memory card conform to display the local date and time on the captured images and set from SDC10001...

User Manual
Page 74
... Set [Voice memo menu] Start [Ready for an image to protect specific shots from the [Format] function. The startup image is recording] - And then press the Right button. 2. Select a desired sub menu by pressing the UP / DOWN button and press the OK button. [Select ] : Selection window for recording] Stop [Voice is stored in the camera's internal memory (i.e., not on the memory card) and it will not be deleted even if you protect an image, the protect icon...
... Set [Voice memo menu] Start [Ready for an image to protect specific shots from the [Format] function. The startup image is recording] - And then press the Right button. 2. Select a desired sub menu by pressing the UP / DOWN button and press the OK button. [Select ] : Selection window for recording] Stop [Voice is stored in the camera's internal memory (i.e., not on the memory card) and it will not be deleted even if you protect an image, the protect icon...
User Manual
Page 75
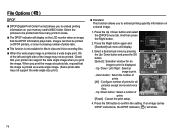
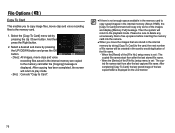
... image is printed as a wide angle print, 8% of the left and right side of photo labs. Ê This function is not available for an image to embed printing information on a stored image. 1. Zoom button : Select the number of prints. [All] : Configure number of prints [Reset] : Cancel the print setup. Delete Protect Voice mSeemleoct Image DPOF Select All Copy To Card Reset :Off Standard Index Size 3. File Options ( ) DPOF Ê DPOF(Digital Print Order Format) allows you to print is displayed...
... image is printed as a wide angle print, 8% of the left and right side of photo labs. Ê This function is not available for an image to embed printing information on a stored image. 1. Zoom button : Select the number of prints. [All] : Configure number of prints [Reset] : Cancel the print setup. Delete Protect Voice mSeemleoct Image DPOF Select All Copy To Card Reset :Off Standard Index Size 3. File Options ( ) DPOF Ê DPOF(Digital Print Order Format) allows you to print is displayed...
User Manual
Page 77
... stored image of file names will return to the playback mode. And then Protect press the Right button. Back Set - [Yes] : All images, movie clips and voice recording files saved in the internal memory are stored in the internal memory by doing [Copy To Card] to the card, the next number of the last copied folder is displayed. Please be created in the card to avoid duplication of the [File No.] setup menu is set : The copied file names start from...
... stored image of file names will return to the playback mode. And then Protect press the Right button. Back Set - [Yes] : All images, movie clips and voice recording files saved in the internal memory are stored in the internal memory by doing [Copy To Card] to the card, the next number of the last copied folder is displayed. Please be created in the card to avoid duplication of the [File No.] setup menu is set : The copied file names start from...
User Manual
Page 80
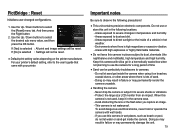
... image. - Do not use this unit in failure or may permanently damage the unit. 79 Environments where there is not waterproof. For your printer's default setting, refer to severe changes in failure or may permanently render the camera unusable. å Handling the camera - And then press File Name :Auto the Right button. This camera is high magnetism or excessive vibration. - PictBridge : Reset Initialises user-changed...
... image. - Do not use this unit in failure or may permanently damage the unit. 79 Environments where there is not waterproof. For your printer's default setting, refer to severe changes in failure or may permanently render the camera unusable. å Handling the camera - And then press File Name :Auto the Right button. This camera is high magnetism or excessive vibration. - PictBridge : Reset Initialises user-changed...

User Manual
Page 81
... to protect the memory card. å Camera Maintenance - Moisture built up can also occur on Using the Lens - If the lens is subjected to direct sunlight, it could result in the discoloration and deterioration of time. å If the camera is not a malfunction. å When images are uploaded or downloaded, the data transfer may adopt the default settings by static electricity. Take care to gently clean the lens and LCD...
... to protect the memory card. å Camera Maintenance - Moisture built up can also occur on Using the Lens - If the lens is subjected to direct sunlight, it could result in the discoloration and deterioration of time. å If the camera is not a malfunction. å When images are uploaded or downloaded, the data transfer may adopt the default settings by static electricity. Take care to gently clean the lens and LCD...

User Manual
Page 84
... date and time have been set incorrectly or the camera has adopted the default settings ÃReset the date and time correctly The camera buttons do not operate åCamera malfunction à Remove/re-insert battery and switch the camera on A card error has occurred while the memory card is in the camera. åIncorrect memory card format à Re-format the memory card The images don't play back åIncorrect file name (Violation of DCF format) à Do not change the image file name...
... date and time have been set incorrectly or the camera has adopted the default settings ÃReset the date and time correctly The camera buttons do not operate åCamera malfunction à Remove/re-insert battery and switch the camera on A card error has occurred while the memory card is in the camera. åIncorrect memory card format à Re-format the memory card The images don't play back åIncorrect file name (Violation of DCF format) à Do not change the image file name...

User Manual
Page 85
Digital Zoom : ·Still Image mode :1.0X ~ 5.0X ·Play mode : 1.0X ~ 10.2X (depends on image size) Shake Reduction - Recharging Time : Approx. 4 sec. Date, Date & Time, Off (user selectable) Shooting - ISO : Auto, 80, 100, 200, 400, 800, 1600, 3200 (Up to 3M Size) Flash - Auto, Daylight, Cloudy, Fluorescent_H, Fluorescent_L, Tungsten, Custom Voice Recording - Voice Memo in flash, Slow sync, Flash off, Red Eye Fix - Effective Pixel : Approx. 12.2 Mega-pixel - Modes : Auto, Auto & Red-eye reduction, Fill-in Still Image (max...
Digital Zoom : ·Still Image mode :1.0X ~ 5.0X ·Play mode : 1.0X ~ 10.2X (depends on image size) Shake Reduction - Recharging Time : Approx. 4 sec. Date, Date & Time, Off (user selectable) Shooting - ISO : Auto, 80, 100, 200, 400, 800, 1600, 3200 (Up to 3M Size) Flash - Auto, Daylight, Cloudy, Fluorescent_H, Fluorescent_L, Tungsten, Custom Voice Recording - Voice Memo in flash, Slow sync, Flash off, Red Eye Fix - Effective Pixel : Approx. 12.2 Mega-pixel - Modes : Auto, Auto & Red-eye reduction, Fill-in Still Image (max...
User Manual
Page 90
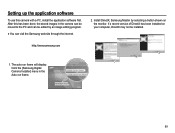
... not be edited by an image editing program. å You can be installed. Click the [Samsung Digital Camera Installer] menu in the camera can be moved to the PC and can visit the Samsung web-site through the internet. 2. Setting up the application software To use this has been done, the stored images in the Auto run frame will display. The auto run frame. 89 If...
... not be edited by an image editing program. å You can be installed. Click the [Samsung Digital Camera Installer] menu in the camera can be moved to the PC and can visit the Samsung web-site through the internet. 2. Setting up the application software To use this has been done, the stored images in the Auto run frame will display. The auto run frame. 89 If...

User Manual
Page 100
... camera. Wherever possible, connect the camera to temporarily disable the program. Case 2 The camera is connected to the PC at the same time as a removable disk. Ã Stop the security programs and connect the camera to the PC? Ã The camera may malfunction when it is an unexpected error during file transfer. Ã Turn the camera power off the camera, remove the USB cable, plug in connecting the camera to the camera. Case 4 When using the USB...
... camera. Wherever possible, connect the camera to temporarily disable the program. Case 2 The camera is connected to the PC at the same time as a removable disk. Ã Stop the security programs and connect the camera to the PC? Ã The camera may malfunction when it is an unexpected error during file transfer. Ã Turn the camera power off the camera, remove the USB cable, plug in connecting the camera to the camera. Case 4 When using the USB...


