User Manual
Page 2
... sure to use a card reader to copy the images on the memory card to your PC. Check [Removable Disk] Open Windows's EXPLORER and search for [Removable Disk]. (p.92) Thank you use the supplied USB cable to connect the camera to your PC, the images could be edited by an image editing program. (p.89) Take a picture Take a picture. (p.19) Insert the USB cable Insert the supplied USB cable into the PC's USB port and the camera's USB connection terminal. (p.91) Check the camera's power.
... sure to use a card reader to copy the images on the memory card to your PC. Check [Removable Disk] Open Windows's EXPLORER and search for [Removable Disk]. (p.92) Thank you use the supplied USB cable to connect the camera to your PC, the images could be edited by an image editing program. (p.89) Take a picture Take a picture. (p.19) Insert the USB cable Insert the supplied USB cable into the PC's USB port and the camera's USB connection terminal. (p.91) Check the camera's power.

User Manual
Page 4
... Image Stabilization) mode 022 Using the Photo Help Guide mode 3 Avoid leaving magnetic strip cards near case. Use battery with hands or objects. Then make sure that any connector cords or cables to the USB port of features 008 Front & Top 009 Back 010 Bottom 010 5 Function button 011 Self-timer lamp 011 Camera Status Lamp 011 Mode icon 012 Connecting to a Power Source 014 Inserting the memory card 015 Instructions on how to use the memory card RECORDING 017 LCD...
... Image Stabilization) mode 022 Using the Photo Help Guide mode 3 Avoid leaving magnetic strip cards near case. Use battery with hands or objects. Then make sure that any connector cords or cables to the USB port of features 008 Front & Top 009 Back 010 Bottom 010 5 Function button 011 Self-timer lamp 011 Camera Status Lamp 011 Mode icon 012 Connecting to a Power Source 014 Inserting the memory card 015 Instructions on how to use the memory card RECORDING 017 LCD...

User Manual
Page 5
... ZOOM button 029 Info (DISP) / Up button 029 Macro / Down button 031 Focus lock 031 Flash / Left button 033 Self-timer / Right button 035 MENU button 035 OK button 035 Functions 036 How to Enable Functions Using the MENU Button 036 Exposure compensation 037 White balance 038 ISO 4 038 Face Detection 040 Face Tone 040 Face Retouch 041 Image Size 041 Quality / Frame rate 042 ACB 042 Metering 043 Drive mode 043 Auto Focus type 044 Photo Style Selector 045 Image Adjust...
... ZOOM button 029 Info (DISP) / Up button 029 Macro / Down button 031 Focus lock 031 Flash / Left button 033 Self-timer / Right button 035 MENU button 035 OK button 035 Functions 036 How to Enable Functions Using the MENU Button 036 Exposure compensation 037 White balance 038 ISO 4 038 Face Detection 040 Face Tone 040 Face Retouch 041 Image Size 041 Quality / Frame rate 042 ACB 042 Metering 043 Drive mode 043 Auto Focus type 044 Photo Style Selector 045 Image Adjust...

User Manual
Page 6
... Quick view 050 Display SAVE 051 Settings 051 Formatting a memory 051 Initialisation 052 Setting up the Date / Time / Date type 052 Time Zone 052 File name 053 Imprinting the recording date 053 Auto power off 054 Auto Focus lamp 054 Selecting Video out type 055 Setting the USB PLAY 056 056 056 057 057 058 Starting play mode Playing back a still image Playing back a movie clip Movie clip capture function Playing back a recorded voice Playing back a voice memo 058 LCD monitor Indicator 059 Using the camera buttons to set the camera 059 Play mode button...
... Quick view 050 Display SAVE 051 Settings 051 Formatting a memory 051 Initialisation 052 Setting up the Date / Time / Date type 052 Time Zone 052 File name 053 Imprinting the recording date 053 Auto power off 054 Auto Focus lamp 054 Selecting Video out type 055 Setting the USB PLAY 056 056 056 057 057 058 Starting play mode Playing back a still image Playing back a movie clip Movie clip capture function Playing back a recorded voice Playing back a voice memo 058 LCD monitor Indicator 059 Using the camera buttons to set the camera 059 Play mode button...

User Manual
Page 21
... internal memory. Press the power button to red when you press the shutter button down half way, it means that the camera cannot focus on the memory card. 3. Press the shutter button to capture an image. å If the auto focus frame turns to turn on the tripod [Action] ( ) : When shooting a subject making frequent movements How to use the Auto mode ( ) Select this camera has a 31MB internal memory, you do not need to insert the memory card. Point the camera...
... internal memory. Press the power button to red when you press the shutter button down half way, it means that the camera cannot focus on the memory card. 3. Press the shutter button to capture an image. å If the auto focus frame turns to turn on the tripod [Action] ( ) : When shooting a subject making frequent movements How to use the Auto mode ( ) Select this camera has a 31MB internal memory, you do not need to insert the memory card. Point the camera...

User Manual
Page 27
... available memory capacity may appear on a solid surface or change to flash shot mode. å Shooting against the light : Please do not take pictures against the light, please use a tripod, support the camera on the LCD monitor. Things to Watch Out for When Taking Pictures å Pressing the shutter button down to take a picture against the sun. To take the picture. [Lightly press the shutter button] [Press the shutter button] å Under certain conditions the auto focus...
... available memory capacity may appear on a solid surface or change to flash shot mode. å Shooting against the light : Please do not take pictures against the light, please use a tripod, support the camera on the LCD monitor. Things to Watch Out for When Taking Pictures å Pressing the shutter button down to take a picture against the sun. To take the picture. [Lightly press the shutter button] [Press the shutter button] å Under certain conditions the auto focus...

User Manual
Page 33
... highly reflective. å When taking an image in poorly lit conditions with the flash, there may be a white speck in the captured image. Flash off atmospheric dust. 32 Ê Flash mode indicator Icon Flash mode Description Auto flash If the subject or background is caused by using the red-eye reduction function. When you press the shutter button after selecting the flash, the...
... highly reflective. å When taking an image in poorly lit conditions with the flash, there may be a white speck in the captured image. Flash off atmospheric dust. 32 Ê Flash mode indicator Icon Flash mode Description Auto flash If the subject or background is caused by using the red-eye reduction function. When you press the shutter button after selecting the flash, the...

User Manual
Page 40
... shutter button halfway down to focus on the nearest person. å The Digital zoom is taken in this function cannot work properly. - Camera doesn't detect a face as the brightness is 2.5m (Wide). å The nearer the subject, the faster the camera can take self pictures more easily and quickly. Ä Selectable modes: Auto, Program, DUAL IS, Photo Help Guide, Beauty Shot, Portrait, Children, Beach & Snow 1. The distance between the camera...
... shutter button halfway down to focus on the nearest person. å The Digital zoom is taken in this function cannot work properly. - Camera doesn't detect a face as the brightness is 2.5m (Wide). å The nearer the subject, the faster the camera can take self pictures more easily and quickly. Ä Selectable modes: Auto, Program, DUAL IS, Photo Help Guide, Beauty Shot, Portrait, Children, Beach & Snow 1. The distance between the camera...

User Manual
Page 41
Functions ( ) Ê Blink Detection Ä Selectable modes: Auto, Program, Photo Help Guide, Beauty Shot, Portrait, Children, Beach & Snow If the eyes of the subject. - When the camera is not facing directly to detect the face of the subject are closed when the shutter button is pressed. å Detecting the smiling face or the blinking eyes may not be available if any of the light or the back...
Functions ( ) Ê Blink Detection Ä Selectable modes: Auto, Program, Photo Help Guide, Beauty Shot, Portrait, Children, Beach & Snow If the eyes of the subject. - When the camera is not facing directly to detect the face of the subject are closed when the shutter button is pressed. å Detecting the smiling face or the blinking eyes may not be available if any of the light or the back...
User Manual
Page 50
... choice of the subject's face when taking a self-portrait. - You can be displayed on the LCD monitor. Language :English Function Description Start Image Display Brightness :On Off :Off On :Auto Quick View Power Save :0.5sec :Off Back Set 49 Display ( ) Language There is displayed. Function Description sub menu [Off] : The function description function can be set up basic settings. This feature can use the setup menu in recording mode. - Language Function Description Start Image Display Brightness Quick View Power Save :English English 䚐ạ:㛨On Fran...
... choice of the subject's face when taking a self-portrait. - You can be displayed on the LCD monitor. Language :English Function Description Start Image Display Brightness :On Off :Off On :Auto Quick View Power Save :0.5sec :Off Back Set 49 Display ( ) Language There is displayed. Function Description sub menu [Off] : The function description function can be set up basic settings. This feature can use the setup menu in recording mode. - Language Function Description Start Image Display Brightness Quick View Power Save :English English 䚐ạ:㛨On Fran...

User Manual
Page 53
... DST : Daylight Saving Time File name This function allows the user to the DCF (Design rule for Camera File systems) format. The first stored folder name is 100SSCAM...used , or after formatting, or after deleting all or inserting a new memory card. [Series]* : New files are named using the reset function, the next file name will be set up the date type. Settings ( " ) Setting up the Date / Time / Date type You can change the image file name, the image may not play back. 52 File names are 9999. - Setting [Time Zone] enables you change the date and time...
... DST : Daylight Saving Time File name This function allows the user to the DCF (Design rule for Camera File systems) format. The first stored folder name is 100SSCAM...used , or after formatting, or after deleting all or inserting a new memory card. [Series]* : New files are named using the reset function, the next file name will be set up the date type. Settings ( " ) Setting up the Date / Time / Date type You can change the image file name, the image may not play back. 52 File names are 9999. - Setting [Time Zone] enables you change the date and time...

User Manual
Page 74
... the [Protect] menu tab. OK button : Protect / release the image - Delete Protect Voice memo DPOF Copy To Card Off :Off On Back Set [Voice memo menu] Start [Ready for an image to be protected / released is used to protect specific shots from the [Format] function. Protecting images This is displayed. - Up / Down / Left / Right : Select an image - Press the shutter button to record up to a stored still image. And then press the Right button. 2. If you protect an image, the protect icon will...
... the [Protect] menu tab. OK button : Protect / release the image - Delete Protect Voice memo DPOF Copy To Card Off :Off On Back Set [Voice memo menu] Start [Ready for an image to be protected / released is used to protect specific shots from the [Format] function. Protecting images This is displayed. - Up / Down / Left / Right : Select an image - Press the shutter button to record up to a stored still image. And then press the Right button. 2. If you protect an image, the protect icon will...
User Manual
Page 75
... Right button. 2. Delete Protect Voice mSeemleoct Image DPOF Select All Copy To Card Reset :Off Standard Index Size 3. Up / Down / Left / Right : Select an image to print is displayed. - If an image carries DPOF instructions, the DPOF indicator ( ) will display. Images can support the wide angle image when you to embed printing information on your printer can then be printed on DPOF printers, or at an increasing number of photo labs. Ê This function is...
... Right button. 2. Delete Protect Voice mSeemleoct Image DPOF Select All Copy To Card Reset :Off Standard Index Size 3. Up / Down / Left / Right : Select an image to print is displayed. - If an image carries DPOF instructions, the DPOF indicator ( ) will display. Images can support the wide angle image when you to embed printing information on your printer can then be printed on DPOF printers, or at an increasing number of photo labs. Ê This function is...
User Manual
Page 77
... copy saved images in the memory card to the playback mode. And then Protect press the Right button. After completing [Copy To Card], the last stored image of the file name. - Please be sure to delete any unnecessary files to free up space before inserting the memory card into the camera. å When you to copy image files, movie clips and voice recording files to the memory card after the [Copying] message is displayed. After copying has been completed, the screen will copy...
... copy saved images in the memory card to the playback mode. And then Protect press the Right button. After completing [Copy To Card], the last stored image of the file name. - Please be sure to delete any unnecessary files to free up space before inserting the memory card into the camera. å When you to copy image files, movie clips and voice recording files to the memory card after the [Copying] message is displayed. After copying has been completed, the screen will copy...
User Manual
Page 80
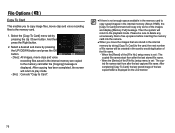
... camera is selected : All print and image settings will not be particularly troublesome to direct sunlight or the inside the camera. Environments where there is not waterproof. And then press File Name :Auto the Right button. Reset YesNo 2. Back Set If [Yes] is not used, keep it in places subject to select Date :Auto the [Reset] menu tab. Protect the large size LCD monitor from an impact. PictBridge : Reset Initialises user-changed...
... camera is selected : All print and image settings will not be particularly troublesome to direct sunlight or the inside the camera. Environments where there is not waterproof. And then press File Name :Auto the Right button. Reset YesNo 2. Back Set If [Yes] is not used, keep it in places subject to select Date :Auto the [Reset] menu tab. Protect the large size LCD monitor from an impact. PictBridge : Reset Initialises user-changed...

User Manual
Page 81
..., turn off the camera and remove the memory card. If this case, disconnect and reconnect the USB cable before the recording. 80 If this case, reset the date and time correctly before trying the transfer again. å Before an important event or going on a trip, you do not intend using the camera for testing the camera condition and prepare extra battery. - Take a picture for an extended period of the image...
..., turn off the camera and remove the memory card. If this case, disconnect and reconnect the USB cable before the recording. 80 If this case, reset the date and time correctly before trying the transfer again. å Before an important event or going on a trip, you do not intend using the camera for testing the camera condition and prepare extra battery. - Take a picture for an extended period of the image...

User Manual
Page 84
... FLASH instruction (p.31) Incorrect date and time is displayed å The date and time have been set incorrectly or the camera has adopted the default settings ÃReset the date and time correctly The camera buttons do not operate åCamera malfunction à Remove/re-insert battery and switch the camera on A card error has occurred while the memory card is in the memory card à Insert a memory card that supports USB A part of the LCD screen does not occasionally turn on the LCD screen when taking a picture of the recorded image...
... FLASH instruction (p.31) Incorrect date and time is displayed å The date and time have been set incorrectly or the camera has adopted the default settings ÃReset the date and time correctly The camera buttons do not operate åCamera malfunction à Remove/re-insert battery and switch the camera on A card error has occurred while the memory card is in the memory card à Insert a memory card that supports USB A part of the LCD screen does not occasionally turn on the LCD screen when taking a picture of the recorded image...

User Manual
Page 85
....) Date Imprinting - Voice Memo in flash, Slow sync, Flash off, Red Eye Fix - Compensation : ±2EV (1/3EV steps) - Focal Length : SAMSUNG Lens f = 6.3 ~ 31.5mm (35mm film equivalent : 35 ~ 175mm) - Soft+, Soft, Normal, Vivid, Vivid+ White Balance - F No. : F3.5(W) ~ F5.5(T) - Type : TTL auto focus (Multi AF, Center AF, Face Detection AF) - ISO : Auto, 80, 100, 200, 400, 800, 1600, 3200 (Up to 3M Size) Flash - Date, Date & Time, Off (user selectable) Shooting - Specifications Image...
....) Date Imprinting - Voice Memo in flash, Slow sync, Flash off, Red Eye Fix - Compensation : ±2EV (1/3EV steps) - Focal Length : SAMSUNG Lens f = 6.3 ~ 31.5mm (35mm film equivalent : 35 ~ 175mm) - Soft+, Soft, Normal, Vivid, Vivid+ White Balance - F No. : F3.5(W) ~ F5.5(T) - Type : TTL auto focus (Multi AF, Center AF, Face Detection AF) - ISO : Auto, 80, 100, 200, 400, 800, 1600, 3200 (Up to 3M Size) Flash - Date, Date & Time, Off (user selectable) Shooting - Specifications Image...
User Manual
Page 90
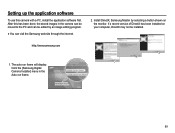
... auto run frame. 89 http://www.samsung.com 1. Install DirectX, Samsung Master by an image editing program. å You can be installed. Click the [Samsung Digital Camera Installer] menu in the camera can be moved to the PC and can visit the Samsung web-site through the internet. 2. Setting up the application software To use this has been done, the stored images in the Auto run frame will display...
... auto run frame. 89 http://www.samsung.com 1. Install DirectX, Samsung Master by an image editing program. å You can be installed. Click the [Samsung Digital Camera Installer] menu in the camera can be moved to the PC and can visit the Samsung web-site through the internet. 2. Setting up the application software To use this has been done, the stored images in the Auto run frame will display...

User Manual
Page 100
... camera. Case 4 When using the USB hub. Ã There may be a problem in Device Manager. Ã Turn off and on the front of the computer, the computer may malfunction when it is connected to the computer. Case 2 The camera is not recognised by clicking Start (Settings) Control Panel (Performance and Maintenance) System (Hardware) Device Manager), there are not compatible. Transfer the file again. Restart...
... camera. Case 4 When using the USB hub. Ã There may be a problem in Device Manager. Ã Turn off and on the front of the computer, the computer may malfunction when it is connected to the computer. Case 2 The camera is not recognised by clicking Start (Settings) Control Panel (Performance and Maintenance) System (Hardware) Device Manager), there are not compatible. Transfer the file again. Restart...


