User Manual (user Manual) (ver.1.0) (English)
Page 4
... battery life. Reformat the memory card with a soft, clean, debris-free lens cloth. Important usage information Allow only qualified personnel to service your camera. • Never use a damaged charger, battery, or memory card. After charging is finished, disconnect the cable from your camera. • Over time, unused batteries will discharge and must be recharged before using the camera in humid environments When you transfer the camera from power sources when not in use. • Use batteries...
... battery life. Reformat the memory card with a soft, clean, debris-free lens cloth. Important usage information Allow only qualified personnel to service your camera. • Never use a damaged charger, battery, or memory card. After charging is finished, disconnect the cable from your camera. • Over time, unused batteries will discharge and must be recharged before using the camera in humid environments When you transfer the camera from power sources when not in use. • Use batteries...
User Manual (user Manual) (ver.1.0) (English)
Page 5
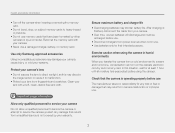
... shooting mode. Extended functions 26 Learn how to take a photo by selecting a mode and how to play back photos, videos, or voice memos and edit photos or videos. Playback/Editing 53 Learn how to record a video or voice memo. Shooting options 35 Learn about your photo printer or TV. You will also learn how to connect your camera to settings, error messages, specifications, and maintenance tips. 4 Organization of camera functions. • We recommend using your camera...
... shooting mode. Extended functions 26 Learn how to take a photo by selecting a mode and how to play back photos, videos, or voice memos and edit photos or videos. Playback/Editing 53 Learn how to record a video or voice memo. Shooting options 35 Learn about your photo printer or TV. You will also learn how to connect your camera to settings, error messages, specifications, and maintenance tips. 4 Organization of camera functions. • We recommend using your camera...
User Manual (user Manual) (ver.1.0) (English)
Page 9
... • Deleting all files on the memory card 57 • Viewing files as a slide show 58 • Viewing files on a TV 66 • Connecting your camera to a computer 67 • Adjusting sound and volume 77 • Adjusting the brightness of the display 77 • Changing the display language 78 • Setting the date and time 78 • Formatting the memory card 78 • Troubleshooting 87...
... • Deleting all files on the memory card 57 • Viewing files as a slide show 58 • Viewing files on a TV 66 • Connecting your camera to a computer 67 • Adjusting sound and volume 77 • Adjusting the brightness of the display 77 • Changing the display language 78 • Setting the date and time 78 • Formatting the memory card 78 • Troubleshooting 87...

User Manual (user Manual) (ver.1.0) (English)
Page 10
... Preventing red-eye 39 Using the flash 39 Adjusting the ISO speed 40 Changing the camera's focus 41 Using macro 41 Using auto focus 41 Using tracking auto focus 42 Adjusting the focus area 43 Using face detection 44 Detecting faces 44 Taking a self-portrait shot 45 Taking a smile shot 45 Detecting eye blinking 46 Adjusting brightness and color 47 Adjusting the exposure manually (EV 47 Compensating for backlighting (ACB 47 Changing the metering option 48 Selecting a light source (White balance 48 Using burst modes 50 Improving your photos 51...
... Preventing red-eye 39 Using the flash 39 Adjusting the ISO speed 40 Changing the camera's focus 41 Using macro 41 Using auto focus 41 Using tracking auto focus 42 Adjusting the focus area 43 Using face detection 44 Detecting faces 44 Taking a self-portrait shot 45 Taking a smile shot 45 Detecting eye blinking 46 Adjusting brightness and color 47 Adjusting the exposure manually (EV 47 Compensating for backlighting (ACB 47 Changing the metering option 48 Selecting a light source (White balance 48 Using burst modes 50 Improving your photos 51...

User Manual (user Manual) (ver.1.0) (English)
Page 11
...exposure problems 64 Creating a print order (DPOF 65 Viewing files on a TV 66 Transferring files to your Windows computer 67 Transferring files using Intelli-studio 69 Transferring files by connecting the camera as a removable disk ... 71 Disconnecting the camera (for Windows XP 72 Transferring files to your Mac computer 73 Printing photos with a PictBridge photo printer 74 Appendixes 75 Camera settings menu 76 Accessing the settings menu 76 Sound 77 Display 77 Settings 78 Error messages 81 Camera maintenance 82 Cleaning your camera 82 About memory cards 83 About the battery...
...exposure problems 64 Creating a print order (DPOF 65 Viewing files on a TV 66 Transferring files to your Windows computer 67 Transferring files using Intelli-studio 69 Transferring files by connecting the camera as a removable disk ... 71 Disconnecting the camera (for Windows XP 72 Transferring files to your Mac computer 73 Printing photos with a PictBridge photo printer 74 Appendixes 75 Camera settings menu 76 Accessing the settings menu 76 Sound 77 Display 77 Settings 78 Error messages 81 Camera maintenance 82 Cleaning your camera 82 About memory cards 83 About the battery...

User Manual (user Manual) (ver.1.0) (English)
Page 12
Unpacking 12 Camera layout 13 Inserting the battery and memory card ... ... 15 Charging the battery and turning your camera on ...... 16 Charging the battery 16 Turning on your camera's layout, icons, and basic functions for getting a clearer photo 24 Basic functions Learn about your camera 16 Learning icons 17 Selecting options 18 Setting the display and sound 20 Changing the display type 20 Setting the sound 20 Taking photos 21 Zooming 22 Reducing camera shake (OIS 23 Tips for shooting.
Unpacking 12 Camera layout 13 Inserting the battery and memory card ... ... 15 Charging the battery and turning your camera on ...... 16 Charging the battery 16 Turning on your camera's layout, icons, and basic functions for getting a clearer photo 24 Basic functions Learn about your camera 16 Learning icons 17 Selecting options 18 Setting the display and sound 20 Changing the display type 20 Setting the sound 20 Taking photos 21 Zooming 22 Reducing camera shake (OIS 23 Tips for shooting.

User Manual (user Manual) (ver.1.0) (English)
Page 15
... In Shooting mode Change the display option Change the macro option While setting Move up Move down Change the flash option Move left Change the timer option Move right Confirm the highlighted option or menu Playback Enter Playback mode • Access options in Shooting mode Function • Delete files in Playback mode Mode button: Open the list of shooting modes Icon Mode Description Smart Auto The camera automatically selects settings based on a the type of scene (Night, Portrait, Sunset, etc.) it detects. Movie Record a video...
... In Shooting mode Change the display option Change the macro option While setting Move up Move down Change the flash option Move left Change the timer option Move right Confirm the highlighted option or menu Playback Enter Playback mode • Access options in Shooting mode Function • Delete files in Playback mode Mode button: Open the list of shooting modes Icon Mode Description Smart Auto The camera automatically selects settings based on a the type of scene (Night, Portrait, Sunset, etc.) it detects. Movie Record a video...
User Manual (user Manual) (ver.1.0) (English)
Page 18
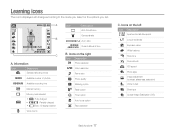
... Icon Description Aperture and shutter speed Long time shutter Exposure value White balance Face tone Face retouch ISO speed Photo style Image adjustment (contrast, sharpness, saturation) Voice muted Burst type Optical Image Stabilization (OIS) Basic functions 17 Information Icon Description Selected shooting mode Available number of photos Available recording time Internal memory Memory card inserted • : Fully charged • : Partially charged • (Red) : Charging needed Voice memo Icon Description Auto focus frame Camera shake Zoom ratio Current date and time...
... Icon Description Aperture and shutter speed Long time shutter Exposure value White balance Face tone Face retouch ISO speed Photo style Image adjustment (contrast, sharpness, saturation) Voice muted Burst type Optical Image Stabilization (OIS) Basic functions 17 Information Icon Description Selected shooting mode Available number of photos Available recording time Internal memory Memory card inserted • : Fully charged • : Partially charged • (Red) : Charging needed Voice memo Icon Description Auto focus frame Camera shake Zoom ratio Current date and time...

User Manual (user Manual) (ver.1.0) (English)
Page 25
Camera shake The camera sets the aperture value and shutter speed automatically. The aperture remains open longer and it appears in red. Tips for getting a clearer photo Holding your camera correctly Make sure nothing is displayed Half-press [Shutter] and adjust the focus. The camera adjusts the focus and exposure automatically. When shooting in the dark, avoid setting the flash option to Fill in green. • Change the frame and half-press [Shutter] again if it may...
Camera shake The camera sets the aperture value and shutter speed automatically. The aperture remains open longer and it appears in red. Tips for getting a clearer photo Holding your camera correctly Make sure nothing is displayed Half-press [Shutter] and adjust the focus. The camera adjusts the focus and exposure automatically. When shooting in the dark, avoid setting the flash option to Fill in green. • Change the frame and half-press [Shutter] again if it may...

User Manual (user Manual) (ver.1.0) (English)
Page 29
... the subject's movement. Extended functions 28 Shooting modes 4 Half-press [Shutter] to focus. 5 Press [Shutter] to the subject. • Even if you use a tripod, the camera may not detect the mode depending on the shooting condtions, such as camera shake, lighting, and distance to take the photo. Beauty Shot Frame Guide Night Portrait Children Landscape Close Up This mode is appropriate for a specific scene. 1 In Shooting mode, press [ ]. 2 Select Scene...
... the subject's movement. Extended functions 28 Shooting modes 4 Half-press [Shutter] to focus. 5 Press [Shutter] to the subject. • Even if you use a tripod, the camera may not detect the mode depending on the shooting condtions, such as camera shake, lighting, and distance to take the photo. Beauty Shot Frame Guide Night Portrait Children Landscape Close Up This mode is appropriate for a specific scene. 1 In Shooting mode, press [ ]. 2 Select Scene...

User Manual (user Manual) (ver.1.0) (English)
Page 33
... camera saves the recorded video as an H.264 (MPEG-4. AVC) file. • H.264 (MPEG-4 part10/AVC) is available only when you have activated the Optical Image Stabilization, the camera may not support high definition recording. Recording a video Record videos up to 20 minutes in length in the frame, and then half-press [Shutter] to focus. 5 Press [Shutter] to take the photo. Extended functions 32 Shooting modes Using the Program mode In the Program mode...
... camera saves the recorded video as an H.264 (MPEG-4. AVC) file. • H.264 (MPEG-4 part10/AVC) is available only when you have activated the Optical Image Stabilization, the camera may not support high definition recording. Recording a video Record videos up to 20 minutes in length in the frame, and then half-press [Shutter] to focus. 5 Press [Shutter] to take the photo. Extended functions 32 Shooting modes Using the Program mode In the Program mode...

User Manual (user Manual) (ver.1.0) (English)
Page 36
... 36 Selecting image quality 36 Using the timer 37 Shooting in shooting mode. Shooting options Learn about the options you can set in the dark 39 Preventing red-eye 39 Using the flash 39 Adjusting the ISO speed 40 Changing the camera's focus 41 Using macro 41 Using auto focus 41 Using tracking auto focus 42 Adjusting the focus area 43 Using face detection 44 Detecting faces 44 Taking a self-portrait shot 45 Taking a smile shot 45 Detecting eye blinking 46 Adjusting brightness and color 47 Adjusting the exposure manually (EV...
... 36 Selecting image quality 36 Using the timer 37 Shooting in shooting mode. Shooting options Learn about the options you can set in the dark 39 Preventing red-eye 39 Using the flash 39 Adjusting the ISO speed 40 Changing the camera's focus 41 Using macro 41 Using auto focus 41 Using tracking auto focus 42 Adjusting the focus area 43 Using face detection 44 Detecting faces 44 Taking a self-portrait shot 45 Taking a smile shot 45 Detecting eye blinking 46 Adjusting brightness and color 47 Adjusting the exposure manually (EV...

User Manual (user Manual) (ver.1.0) (English)
Page 41
... Description Red-eye Fix*: • The flash fires twice when the subject or background is dark. The options may differ depending on the brightness of the subject and lighting. • The higher ISO speed you select, the more image noise you may appear in your camera becomes. With a higher ISO speed, you can get a better photo without using the flash. 1 In Shooting mode, press [ ]. 2 Select Shooting → ISO...
... Description Red-eye Fix*: • The flash fires twice when the subject or background is dark. The options may differ depending on the brightness of the subject and lighting. • The higher ISO speed you select, the more image noise you may appear in your camera becomes. With a higher ISO speed, you can get a better photo without using the flash. 1 In Shooting mode, press [ ]. 2 Select Shooting → ISO...

User Manual (user Manual) (ver.1.0) (English)
Page 67
... buttons on your camera. Viewing files on a TV Play back photos or videos by connecting your camera to a TV using the A/V cable. 1 In Shooting or Playback mode, press [ ]. 2 Select Settings → Video Out. 3 Select a video signal output according to your country or region. 4 Turn off your camera and TV. 5 Connect your camera to a TV. 6 Turn on your TV, and then select the video output mode using the TV remote control. 7 Turn on your camera, and then press [ ]. 8 View photos or play videos using the A/V cable. Playback...
... buttons on your camera. Viewing files on a TV Play back photos or videos by connecting your camera to a TV using the A/V cable. 1 In Shooting or Playback mode, press [ ]. 2 Select Settings → Video Out. 3 Select a video signal output according to your country or region. 4 Turn off your camera and TV. 5 Connect your camera to a TV. 6 Turn on your TV, and then select the video output mode using the TV remote control. 7 Turn on your camera, and then press [ ]. 8 View photos or play videos using the A/V cable. Playback...
User Manual (user Manual) (ver.1.0) (English)
Page 69
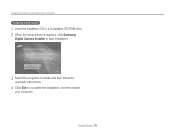
Playback/Editing 68 Transferring files to your Windows computer Installing Intelli-studio 1 Insert the installation CD in a compatible CD-ROM drive. 2 When the setup screen is appears, click Samsung Digital Camera Installer to start installation. 3 Select the programs to install, and then follow the onscreen instructions. 4 Click Exit to complete the installation, and then restart your computer.
Playback/Editing 68 Transferring files to your Windows computer Installing Intelli-studio 1 Insert the installation CD in a compatible CD-ROM drive. 2 When the setup screen is appears, click Samsung Digital Camera Installer to start installation. 3 Select the programs to install, and then follow the onscreen instructions. 4 Click Exit to complete the installation, and then restart your computer.

User Manual (user Manual) (ver.1.0) (English)
Page 72
... connected camera View files of the cable with the USB cable. Playback/Editing 71 The manufacturer is reversed, it may damage your camera. Transferring files to your Windows computer Icon 1 2 3 4 5 6 7 8 9 10 11 12 13 14 15 Description Open menus Display files in the selected folder Change to the Photo edit mode Change to the Video edit mode Change to the Sharing mode (You can send files by connecting the camera as a removable disk You can connect the camera to your computer as a removable disk. 1 Connect...
... connected camera View files of the cable with the USB cable. Playback/Editing 71 The manufacturer is reversed, it may damage your camera. Transferring files to your Windows computer Icon 1 2 3 4 5 6 7 8 9 10 11 12 13 14 15 Description Open menus Display files in the selected folder Change to the Photo edit mode Change to the Video edit mode Change to the Sharing mode (You can send files by connecting the camera as a removable disk You can connect the camera to your computer as a removable disk. 1 Connect...

User Manual (user Manual) (ver.1.0) (English)
Page 80
... printer models may not play back the files. If you focus in one at a time from SAM_0001 to SAM_9999. • The folder number increases one folder is displayed on an assistant light to help you change after replacing the battery. • The camera will not change the names of files intentionally, the camera may not print the date and time. Item Imprint Auto Power Off AF Lamp Video Out * Default Description Select whether to display the date and time on...
... printer models may not play back the files. If you focus in one at a time from SAM_0001 to SAM_9999. • The folder number increases one folder is displayed on an assistant light to help you change after replacing the battery. • The camera will not change the names of files intentionally, the camera may not print the date and time. Item Imprint Auto Power Off AF Lamp Video Out * Default Description Select whether to display the date and time on...
User Manual (user Manual) (ver.1.0) (English)
Page 88
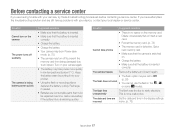
... troubleshooting solution and are consumable parts that the battery is not a malfunction. If you are Set the date and time in low temperatures (below 0° C). Keep the battery warm by putting it again. • The flash option may be in Power save mode. (p. 78) • The camera may lose power more quickly in the display settings incorrect menu. (p. 78) Appendixes 87 Get a new memory card. • Make sure that the camera is switched...
... troubleshooting solution and are consumable parts that the battery is not a malfunction. If you are Set the date and time in low temperatures (below 0° C). Keep the battery warm by putting it again. • The flash option may be in Power save mode. (p. 78) • The camera may lose power more quickly in the display settings incorrect menu. (p. 78) Appendixes 87 Get a new memory card. • Make sure that the camera is switched...
User Manual (user Manual) (ver.1.0) (English)
Page 89
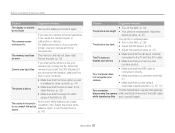
... The display or buttons do not match the actual scene An incorrect white balance can cause the camera screen to malfunction or discolor. The memory card has The memory card has not been reset. Disconnect the USB cable while transferring files and connect it again. The camera screen works poorly If you set is suitable for close-up shots. (p. 41) • Make sure that the camera is within range of your camera screen, use your camera at...
... The display or buttons do not match the actual scene An incorrect white balance can cause the camera screen to malfunction or discolor. The memory card has The memory card has not been reset. Disconnect the USB cable while transferring files and connect it again. The camera screen works poorly If you set is suitable for close-up shots. (p. 41) • Make sure that the camera is within range of your camera screen, use your camera at...
User Manual (user Manual) (ver.1.0) (English)
Page 97
... Shooting mode 52 Saturation in Playback mode 64 in Shooting mode 52 Sharpness 52 AF Lamp 79 AF Sound 77 Aperture 30 Auto Contrast Balance (ACB) 47 Specifications 84 Beauty Shot mode 29 Blink detection 46 Burst Auto Exposure Bracket (AEB) 50 Continuous 50 Motion capture 50 C Camera shake 24 Capturing an image from a video 60 Cleaning Body 82 Display 82 Lens 82 B Battery Charging 85 Life 84 D Date/Time Set 78 Date Type 78 Deleting files 57 Digital Image Stabilization 31 Digital zoom...
... Shooting mode 52 Saturation in Playback mode 64 in Shooting mode 52 Sharpness 52 AF Lamp 79 AF Sound 77 Aperture 30 Auto Contrast Balance (ACB) 47 Specifications 84 Beauty Shot mode 29 Blink detection 46 Burst Auto Exposure Bracket (AEB) 50 Continuous 50 Motion capture 50 C Camera shake 24 Capturing an image from a video 60 Cleaning Body 82 Display 82 Lens 82 B Battery Charging 85 Life 84 D Date/Time Set 78 Date Type 78 Deleting files 57 Digital Image Stabilization 31 Digital zoom...


