
User Manual
Page 2
...-24 5:59:10 Contents Contents Safety information What you need to know about the safety instructions Important safety symbols Before using your dishwasher Before you start Unpacking your dishwasher Checking parts Unsuitable items for the dishwasher Using your dishwasher Basic use of racks Detergent guidelines Touchpad responsiveness Operations Control panel Cycle overview Simple steps to start your dishwasher Settings Special features Maintenance Cleaning Long-term care Cleaning the drain pump Storing your dishwasher Troubleshooting Check these solutions if your...
...-24 5:59:10 Contents Contents Safety information What you need to know about the safety instructions Important safety symbols Before using your dishwasher Before you start Unpacking your dishwasher Checking parts Unsuitable items for the dishwasher Using your dishwasher Basic use of racks Detergent guidelines Touchpad responsiveness Operations Control panel Cycle overview Simple steps to start your dishwasher Settings Special features Maintenance Cleaning Long-term care Cleaning the drain pump Storing your dishwasher Troubleshooting Check these solutions if your...

User Manual
Page 5
....gov WARNING When using the dishwasher turn on all hot-water faucets and let the water flow from service or discarding it. locate sharp items so that has not been used for such a period, before using the dishwasher. 2. load sharp knives with the controls. 9. HYDROGEN GAS IS EXPLOSIVE. Do not touch the HEATING ELEMENT during this time. 12. Do not tamper with the handles up to reduce...
....gov WARNING When using the dishwasher turn on all hot-water faucets and let the water flow from service or discarding it. locate sharp items so that has not been used for such a period, before using the dishwasher. 2. load sharp knives with the controls. 9. HYDROGEN GAS IS EXPLOSIVE. Do not touch the HEATING ELEMENT during this time. 12. Do not tamper with the handles up to reduce...

User Manual
Page 6
..., cut, or there is no leakage from open , as this appliance, familiarize yourself with its weight. • Your dishwasher must be properly grounded. Do not wash dishes exposed to the green ground connector in the terminal box. • After the dishwasher is installed, check that the drain hose is properly connected and that can support its operations and exercise care when using electricity, water, and moving parts...
..., cut, or there is no leakage from open , as this appliance, familiarize yourself with its weight. • Your dishwasher must be properly grounded. Do not wash dishes exposed to the green ground connector in the terminal box. • After the dishwasher is installed, check that the drain hose is properly connected and that can support its operations and exercise care when using electricity, water, and moving parts...

User Manual
Page 7
... using your dishwasher, remove the door of the washing compartment or the door latch so that children or small animals cannot get trapped inside. • If the dishwasher is left unused for an extended period of time, turn off the water supply. • This dishwasher is intended for residential use the dishwasher until it is correctly installed. • Do not push down on the dishwasher door when it is open...
... using your dishwasher, remove the door of the washing compartment or the door latch so that children or small animals cannot get trapped inside. • If the dishwasher is left unused for an extended period of time, turn off the water supply. • This dishwasher is intended for residential use the dishwasher until it is correctly installed. • Do not push down on the dishwasher door when it is open...
User Manual
Page 8
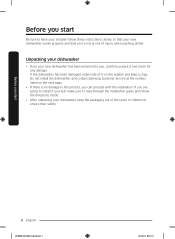
... of injury when washing dishes. Before you , carefully unpack it on the next page. • If there is no damage to the product, you are going to have your installer follow the directions inside. • After unpacking your dishwasher, keep a copy. Unpacking your dishwasher • Once your new dishwasher works properly and that your new dishwasher has been delivered to you start Be sure to...
... of injury when washing dishes. Before you , carefully unpack it on the next page. • If there is no damage to the product, you are going to have your installer follow the directions inside. • After unpacking your dishwasher, keep a copy. Unpacking your dishwasher • Once your new dishwasher works properly and that your new dishwasher has been delivered to you start Be sure to...

User Manual
Page 10
.... User/Installation manual, Installation Kit, Kick Plate. These materials will spread inside the dishwasher. • Remove food remains such as toothpicks, paper napkins, etc. from your dishes and dishwasher. 10 English DW8000R_DD68-00211A-00_EN.indd 10 2019-04-24 5:59:12 Food remains and waste can make noise, cause the dishwasher to malfunction, and damage your dishes. Before you start Before you start Accessories Upper rack Lower rack Cutlery rack 3rd rack...
.... User/Installation manual, Installation Kit, Kick Plate. These materials will spread inside the dishwasher. • Remove food remains such as toothpicks, paper napkins, etc. from your dishes and dishwasher. 10 English DW8000R_DD68-00211A-00_EN.indd 10 2019-04-24 5:59:12 Food remains and waste can make noise, cause the dishwasher to malfunction, and damage your dishes. Before you start Before you start Accessories Upper rack Lower rack Cutlery rack 3rd rack...
User Manual
Page 27
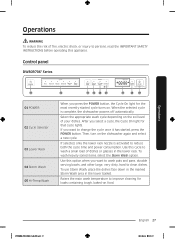
... POWER button, the Cycle On light for loads containing tough, baked-on . If selected, only the lower rack nozzle is complete, the dishwasher powers off automatically. Operations Operations WARNING To reduce the risk of fire, electric shock, or injury to clean dishes. DW8000R_DD68-00211A-00_EN.indd 27 English 27 2019-04-24 5:59:17 Control panel DW80R706* Series 01 01 POWER 02 Cycle Selector 03 Lower Rack 04 Storm Wash 05 Hi-Temp Wash...
... POWER button, the Cycle On light for loads containing tough, baked-on . If selected, only the lower rack nozzle is complete, the dishwasher powers off automatically. Operations Operations WARNING To reduce the risk of fire, electric shock, or injury to clean dishes. DW8000R_DD68-00211A-00_EN.indd 27 English 27 2019-04-24 5:59:17 Control panel DW80R706* Series 01 01 POWER 02 Cycle Selector 03 Lower Rack 04 Storm Wash 05 Hi-Temp Wash...
User Manual
Page 28
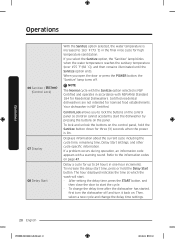
... the power is NSF Certified and operates in one-hour increments. Refer to the information codes on . Then, select a new cycle and change the delay time after the dishwasher has started, first turn the dishwasher off . Your dishwasher is increased to 24 hours in accordance with NSF/ANSI Standard 184 for high temperature sanitization. Displays information about the current cycle including the cycle time, remaining time, Delay Start settings, and other cycle-specific information. Delay a cycle...
... the power is NSF Certified and operates in one-hour increments. Refer to the information codes on . Then, select a new cycle and change the delay time after the dishwasher has started, first turn the dishwasher off . Your dishwasher is increased to 24 hours in accordance with NSF/ANSI Standard 184 for high temperature sanitization. Displays information about the current cycle including the cycle time, remaining time, Delay Start settings, and other cycle-specific information. Delay a cycle...

User Manual
Page 29
... the START button for the POWER button is reset, select a cycle and option, and then press START to restart the dishwasher. English 29 2019-04-24 5:59:18 Operations Control Lock indicator Rinse Refil indicator Lights up if the dishwasher runs out of rinse aid. When the dishwasher is in a drying portion of a cycle, the second light is illuminated. When the dishwasher is in a rinse portion of a cycle, the third light is illuminated. Progress displays DW80R7060 series DW80R7061 series Wash Rinse Dry End DW8000R_DD68...
... the START button for the POWER button is reset, select a cycle and option, and then press START to restart the dishwasher. English 29 2019-04-24 5:59:18 Operations Control Lock indicator Rinse Refil indicator Lights up if the dishwasher runs out of rinse aid. When the dishwasher is in a drying portion of a cycle, the second light is illuminated. When the dishwasher is in a rinse portion of a cycle, the third light is illuminated. Progress displays DW80R7060 series DW80R7061 series Wash Rinse Dry End DW8000R_DD68...

User Manual
Page 31
... lower rack. Add detergent to the rinse aid compartment. NOTE You should use rinse aid for a few seconds. For better results, add rinse aid to the detergent dispenser. Then, select a new cycle. • To resume after you change the cycle after draining for better drying performance. Press POWER, and then select a cycle with necessary options (Lower Rack, Storm Wash, Hi-Temp Wash, Sanitize). Simple steps to cancel the cycle. The dishwasher starts the cycle after it has started, press and hold START...
... lower rack. Add detergent to the rinse aid compartment. NOTE You should use rinse aid for a few seconds. For better results, add rinse aid to the detergent dispenser. Then, select a new cycle. • To resume after you change the cycle after draining for better drying performance. Press POWER, and then select a cycle with necessary options (Lower Rack, Storm Wash, Hi-Temp Wash, Sanitize). Simple steps to cancel the cycle. The dishwasher starts the cycle after it has started, press and hold START...

User Manual
Page 35
... some detergent, and then run the Self Clean cycle with the dishwasher empty. Protect electrical components from the cutlery pad, run an empty cycle using a stainless steel cleaner for home appliances and a clean, soft cloth. The seal keeps the inner side of the dishwasher and cause stains. • The dishwasher has electric parts inside the dishwasher. Wipe inside the dishwasher and inside the door with water. • For a stainless-steel door panel, clean using the highest rinse temperature. Maintenance Cleaning Keep the dishwasher clean to...
... some detergent, and then run the Self Clean cycle with the dishwasher empty. Protect electrical components from the cutlery pad, run an empty cycle using a stainless steel cleaner for home appliances and a clean, soft cloth. The seal keeps the inner side of the dishwasher and cause stains. • The dishwasher has electric parts inside the dishwasher. Wipe inside the dishwasher and inside the door with water. • For a stainless-steel door panel, clean using the highest rinse temperature. Maintenance Cleaning Keep the dishwasher clean to...

User Manual
Page 40
... "Filter" section to remove the cylindrical micro filter. 3. Remove any foreign matter from the drain pump, you need to store your dishwasher If you must unclog and clean the drain pump as instructed below. 1 2 1. Remove the lower rack. 2. Maintenance Cleaning the drain pump If the dishwasher fails to drain because the drain pump is clogged with foreign matter or there is an abnormal noise coming from the pump. 6. If you leave water in the direction of time, first drain...
... "Filter" section to remove the cylindrical micro filter. 3. Remove any foreign matter from the drain pump, you need to store your dishwasher If you must unclog and clean the drain pump as instructed below. 1 2 1. Remove the lower rack. 2. Maintenance Cleaning the drain pump If the dishwasher fails to drain because the drain pump is clogged with foreign matter or there is an abnormal noise coming from the pump. 6. If you leave water in the direction of time, first drain...

User Manual
Page 41
... the water supply valve is open . • • The dishwasher is • locked. Check if the water supply line is taking too long. An operation or cycle is connected to a cold water supply. Check if the supplied water pressure is required to a cold water supply. Troubleshooting Will not start. To work . • The Control Panel is connected to heat the cold water.) DW8000R_DD68-00211A-00_EN.indd 41 English 41 2019-04-24 5:59:20 See the information code...
... the water supply valve is open . • • The dishwasher is • locked. Check if the water supply line is taking too long. An operation or cycle is connected to a cold water supply. Check if the supplied water pressure is required to a cold water supply. Troubleshooting Will not start. To work . • The Control Panel is connected to heat the cold water.) DW8000R_DD68-00211A-00_EN.indd 41 English 41 2019-04-24 5:59:20 See the information code...
User Manual
Page 42
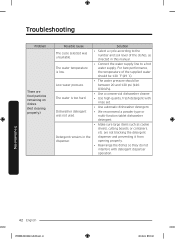
... this manual. • Connect the water supply line to a hot water supply. are food particles remaining on dishes. (Not cleaning properly.) Possible cause The cycle selected was not used. Troubleshooting 42 English DW8000R_DD68-00211A-00_EN.indd 42 2019-04-24 5:59:20 For best performance, the temperature of the dishes, as cookie sheets, cutting boards, or contaners, etc. Dishwasher detergent was unsuitable. Solution • Select a cycle according to the number...
... this manual. • Connect the water supply line to a hot water supply. are food particles remaining on dishes. (Not cleaning properly.) Possible cause The cycle selected was not used. Troubleshooting 42 English DW8000R_DD68-00211A-00_EN.indd 42 2019-04-24 5:59:20 For best performance, the temperature of the dishes, as cookie sheets, cutting boards, or contaners, etc. Dishwasher detergent was unsuitable. Solution • Select a cycle according to the number...
User Manual
Page 44
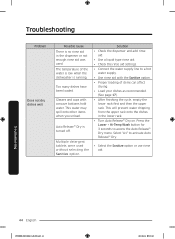
... loading of the water is low when the dishwasher is running. Press the Lower + Hi-Temp Wash button for 3 seconds to activate Auto Release™ Dry. • Select the Sanitize option or use rinse aid. This water may spill onto other items when you unload. Multiple detergent tablets were used . Solution • Check the dispenser and add rinse aid. • Use a liquid type rinse aid. • Check the rinse aid settings. • Connect the water supply line to a hot water supply. • Use rinse aid...
... loading of the water is low when the dishwasher is running. Press the Lower + Hi-Temp Wash button for 3 seconds to activate Auto Release™ Dry. • Select the Sanitize option or use rinse aid. This water may spill onto other items when you unload. Multiple detergent tablets were used . Solution • Check the dispenser and add rinse aid. • Use a liquid type rinse aid. • Check the rinse aid settings. • Connect the water supply line to a hot water supply. • Use rinse aid...
User Manual
Page 45
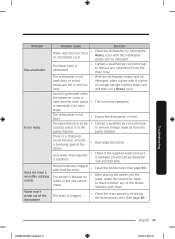
... the drain hose. The Drain Hose is in the to remove any of the dishes interfere with the dishwasher an incomplete cycle. is clogged. • Clean the drain pump by removing the drain-pump cover. (See page 40.) Troubleshooting DW8000R_DD68-00211A-00_EN.indd 45 English 45 2019-04-24 5:59:20 The drain is operating in unit too of the dishwasher. Foreign material (a screw, • Contact a qualified service technician...
... the drain hose. The Drain Hose is in the to remove any of the dishes interfere with the dishwasher an incomplete cycle. is clogged. • Clean the drain pump by removing the drain-pump cover. (See page 40.) Troubleshooting DW8000R_DD68-00211A-00_EN.indd 45 English 45 2019-04-24 5:59:20 The drain is operating in unit too of the dishwasher. Foreign material (a screw, • Contact a qualified service technician...
User Manual
Page 47
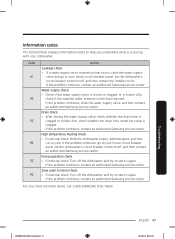
... water supply valve is closed or clogged, or is less than required. Drain check. • After closing the water supply valve, check whether the drain hose is clogged. Turn off the dishwasher and try to start it again. For any codes not listed above, call 1-800-SAMSUNG (726-7864). If the problem continues, contact an authorized Samsung service center. With the dishwasher empty, add detergent, and then run a cycle. Also, check whether the drain hole inside...
... water supply valve is closed or clogged, or is less than required. Drain check. • After closing the water supply valve, check whether the drain hose is clogged. Turn off the dishwasher and try to start it again. For any codes not listed above, call 1-800-SAMSUNG (726-7864). If the problem continues, contact an authorized Samsung service center. With the dishwasher empty, add detergent, and then run a cycle. Also, check whether the drain hole inside...
User Manual
Page 50
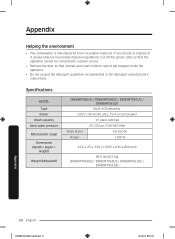
... recyclable materials. Specifications MODEL Type Power Wash capacity Used water pressure Rated power uasge Dimensions (Width × Depth × Height) Weight (Unpacked) DW80R7060UG / DW80R7060US / DW80R7061UG / DW80R7061US Built-in Dishwasher 120 V / 60 Hz AC only, 15 A circuit breaker 15 place settings 20-120 psi (140-830 kPa) Wash Motor 60-100 W Heater 1100 W 23⅞ x 25 x 33⅞ in the detergent manufacturers' instructions. Cut off the power cable so...
... recyclable materials. Specifications MODEL Type Power Wash capacity Used water pressure Rated power uasge Dimensions (Width × Depth × Height) Weight (Unpacked) DW80R7060UG / DW80R7060US / DW80R7061UG / DW80R7061US Built-in Dishwasher 120 V / 60 Hz AC only, 15 A circuit breaker 15 place settings 20-120 psi (140-830 kPa) Wash Motor 60-100 W Heater 1100 W 23⅞ x 25 x 33⅞ in the detergent manufacturers' instructions. Cut off the power cable so...
User Manual
Page 51
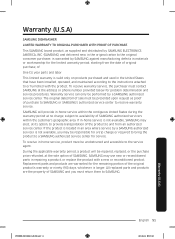
... purchase to SAMSUNG or SAMSUNG's authorized service center to receive warranty service. If in-home service is not available, SAMSUNG may use new or reconditioned parts in repairing a product, or replace the product with the product. All replaced parts and products are warranted for the remaining portion of SAMSUNG authorized servicers within the contiguous United States during the warranty period at the address or phone number provided below for problem determination and service procedures...
... purchase to SAMSUNG or SAMSUNG's authorized service center to receive warranty service. If in-home service is not available, SAMSUNG may use new or reconditioned parts in repairing a product, or replace the product with the product. All replaced parts and products are warranted for the remaining portion of SAMSUNG authorized servicers within the contiguous United States during the warranty period at the address or phone number provided below for problem determination and service procedures...

User Manual
Page 52
... customer's responsibility. damage caused by SAMSUNG; and service to correct installation not in -home instruction on how long an implied warranty lasts, so the above limitations or exclusions may also have been removed, defaced, changed in shipment, delivery, installation, and uses for assistance with electrical or plumbing codes or correction of equipment, utilities, services, parts, supplies, accessories, applications, installations, repairs, external wiring or connectors not supplied or authorized by incorrect electrical line...
... customer's responsibility. damage caused by SAMSUNG; and service to correct installation not in -home instruction on how long an implied warranty lasts, so the above limitations or exclusions may also have been removed, defaced, changed in shipment, delivery, installation, and uses for assistance with electrical or plumbing codes or correction of equipment, utilities, services, parts, supplies, accessories, applications, installations, repairs, external wiring or connectors not supplied or authorized by incorrect electrical line...


