User Manual
Page 1
Installation_DD81-02034B-020_EN.indd 1 2/51/0/82/0210717 101:05:5:55:454AAMM If you are intended for purchasing this dishwasher Please call : 1-800-SAMSUNG (726-7864) for assistance : www.samsung.com imagine the possibilities Thank you for use by qualified installers. DW80K7050 Series DW80K5050 Series DW80R5060 Series DW80R5061 Series Dishwasher installation guide STOP These installation instructions are having problems installing this Samsung product.
Installation_DD81-02034B-020_EN.indd 1 2/51/0/82/0210717 101:05:5:55:454AAMM If you are intended for purchasing this dishwasher Please call : 1-800-SAMSUNG (726-7864) for assistance : www.samsung.com imagine the possibilities Thank you for use by qualified installers. DW80K7050 Series DW80K5050 Series DW80R5060 Series DW80R5061 Series Dishwasher installation guide STOP These installation instructions are having problems installing this Samsung product.

User Manual
Page 2
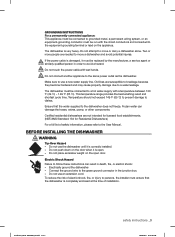
... removal of original dishwasher and the installation of fire, explosion, electric shock, or personal injury when CAUTION using the appliance. Never connect it . Call the service center for future reference. Read all possible conditions and situations that may occur. Frozen water in a location where the water may damage the dishwasher. Samsung is a fire hazard. As with its operation and exercise care when using electricity, water...
... removal of original dishwasher and the installation of fire, explosion, electric shock, or personal injury when CAUTION using the appliance. Never connect it . Call the service center for future reference. Read all possible conditions and situations that may occur. Frozen water in a location where the water may damage the dishwasher. Samsung is a fire hazard. As with its operation and exercise care when using electricity, water...
User Manual
Page 3
... to the same power outlet as the dishwasher. Ensure that the dishwasher is open door. Electric Shock Hazard Failure to follow these instructions can damage the hoses, valves, pump, or other components. Do not use a new water supply line. GROUNDING INSTRUCTIONS For a permanently connected appliance: This appliance must be connected to grounded metal, a permanent wiring system, or an equipment-grounding conductor must be replaced by the manufacturer, a service agent or CAUTION similarly...
... to the same power outlet as the dishwasher. Ensure that the dishwasher is open door. Electric Shock Hazard Failure to follow these instructions can damage the hoses, valves, pump, or other components. Do not use a new water supply line. GROUNDING INSTRUCTIONS For a permanently connected appliance: This appliance must be connected to grounded metal, a permanent wiring system, or an equipment-grounding conductor must be replaced by the manufacturer, a service agent or CAUTION similarly...
User Manual
Page 4
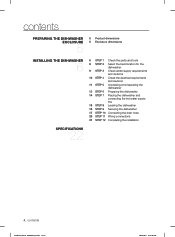
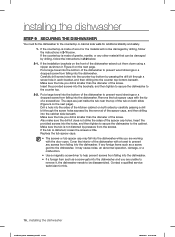
contents PREPARING THE DISHWASHER ENCLOSURE 5 5 Product dimensions 5 Enclosure dimensions INSTALLING THE DISHWASHER 6 6 STEP 1 Check the parts and tools 8 STEP 2 Select the best location for the dishwasher 9 STEP 3 Check water supply requirements and cautions 10 STEP 4 Check the electrical requirements and cautions 11 STEP 5 Unpacking and inspecting the dishwasher 12 STEP 6 Preparing the dishwasher 14 STEP 7 Placing the dishwasher and connecting the hot water supply line 15 STEP 8 Leveling the dishwasher 16 STEP 9 Securing...
contents PREPARING THE DISHWASHER ENCLOSURE 5 5 Product dimensions 5 Enclosure dimensions INSTALLING THE DISHWASHER 6 6 STEP 1 Check the parts and tools 8 STEP 2 Select the best location for the dishwasher 9 STEP 3 Check water supply requirements and cautions 10 STEP 4 Check the electrical requirements and cautions 11 STEP 5 Unpacking and inspecting the dishwasher 12 STEP 6 Preparing the dishwasher 14 STEP 7 Placing the dishwasher and connecting the hot water supply line 15 STEP 8 Leveling the dishwasher 16 STEP 9 Securing...
User Manual
Page 5
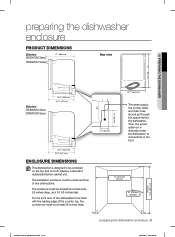
... any obstructions. The installation enclosure must be clean and free of the counter top, the counter top must be at least 24 inches wide, 24 inches deep, and 34 1/8 inches high. Then, the power cable run in channels under the dishwasher to connections in the front. 24...mm) Side view DW80K5050 Series DW80R5060 Series 20 ½" (520 mm) 24 ⅔" (627mm) 20 ½" (520 mm) 24 ¾ " (627 mm) ENCLOSURE DIMENSIONS This dishwasher is designed to be at least 25 inches deep. 2 ⅓" (60 mm) 23 7⁄8" (605 mm) The water supply line, power cable and drain hose should go ...
... any obstructions. The installation enclosure must be clean and free of the counter top, the counter top must be at least 24 inches wide, 24 inches deep, and 34 1/8 inches high. Then, the power cable run in channels under the dishwasher to connections in the front. 24...mm) Side view DW80K5050 Series DW80R5060 Series 20 ½" (520 mm) 24 ⅔" (627mm) 20 ½" (520 mm) 24 ¾ " (627 mm) ENCLOSURE DIMENSIONS This dishwasher is designed to be at least 25 inches deep. 2 ⅓" (60 mm) 23 7⁄8" (605 mm) The water supply line, power cable and drain hose should go ...
User Manual
Page 6
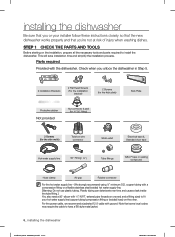
... time and cause a leak inside the tube fitting.] You also need a 90° elbow with ground. STEP 1 CHECK THE PARTS AND TOOLS Before starting on ® tape or sealing compound Hose clamp Air gap Rubber connector For the hot water supply line - external pipe threads on one end and a fitting sized to fit your installer follow these instructions closely so that the new dishwasher works properly and that some local codes...
... time and cause a leak inside the tube fitting.] You also need a 90° elbow with ground. STEP 1 CHECK THE PARTS AND TOOLS Before starting on ® tape or sealing compound Hose clamp Air gap Rubber connector For the hot water supply line - external pipe threads on one end and a fitting sized to fit your installer follow these instructions closely so that the new dishwasher works properly and that some local codes...
User Manual
Page 8
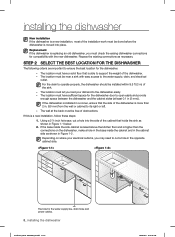
... location for the water supply line, drain hose and power cables. 8_ installing the dishwasher Installation_DD81-02034B-020_EN.indd Sec3:8 2/51/0/82/0210617 101:05:65:60:202AAMM Using a 2 ½ inch hole saw, cut a hole in the opposite cabinet side. Repace the existing connections as shown in Figure 1-2. If this is , you may need to cut a hole into the dishwasher easily. - The hole for the dishwasher: - The location...
... location for the water supply line, drain hose and power cables. 8_ installing the dishwasher Installation_DD81-02034B-020_EN.indd Sec3:8 2/51/0/82/0210617 101:05:65:60:202AAMM Using a 2 ½ inch hole saw, cut a hole in the opposite cabinet side. Repace the existing connections as shown in Figure 1-2. If this is , you may need to cut a hole into the dishwasher easily. - The hole for the dishwasher: - The location...
User Manual
Page 9
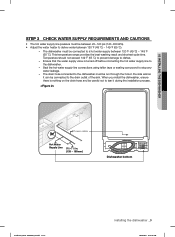
... stop any water leakage. - Seal the hot water supply line connections using teflon the drain hose and be careful not to deliver water between 120 ˚F (49 ˚C) ~ 149 ˚F (65 ˚C). 02 INSTALLING THE DISHWASHER STEP 3 CHECK WATER SUPPLY REQUIREMENTS AND CAUTIONS • The hot water supply line pressure must be between 20~120 psi (140~830 kPa). • Adjust the water heater to tear it can be connected to the dishwasher...
... stop any water leakage. - Seal the hot water supply line connections using teflon the drain hose and be careful not to deliver water between 120 ˚F (49 ˚C) ~ 149 ˚F (65 ˚C). 02 INSTALLING THE DISHWASHER STEP 3 CHECK WATER SUPPLY REQUIREMENTS AND CAUTIONS • The hot water supply line pressure must be between 20~120 psi (140~830 kPa). • Adjust the water heater to tear it can be connected to the dishwasher...
User Manual
Page 10
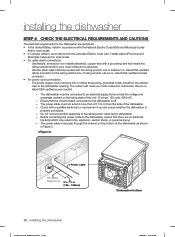
... dishwasher is off. - The dishwasher must be connected to the dishwasher is properly connected. - The power cable must plug into a mating three prong, grounded outlet, located in the cabinet next to the wiring junction box. installing the dishwasher STEP 4 CHECK THE ELECTRICAL REQUIREMENTS AND CAUTIONS The electrical requirements for your local codes and ordinances. Use a U.L.listed/CSA-certified power cord kit. - Ensure that the circuit breaker connected to an electrical supply...
... dishwasher is off. - The dishwasher must be connected to the dishwasher is properly connected. - The power cable must plug into a mating three prong, grounded outlet, located in the cabinet next to the wiring junction box. installing the dishwasher STEP 4 CHECK THE ELECTRICAL REQUIREMENTS AND CAUTIONS The electrical requirements for your local codes and ordinances. Use a U.L.listed/CSA-certified power cord kit. - Ensure that the circuit breaker connected to an electrical supply...

User Manual
Page 11
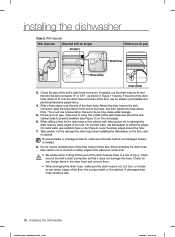
... under any signs of damage. 5. 02 INSTALLING THE DISHWASHER STEP 5 UNPACKING AND INSPECTING THE DISHWASHER Unbox the dishwasher in an open area free of obstruction both around the dishwasher inside the carton top, inspecting them for use caution to remove. Put the straps and all the visible components...the dishwasher. ※ The upper side of the hinges, and confirm the door is intact 2. We recommend that it for any circumstances, remove the sound-absorbent padding that you can level and secure the dishwasher. 3. The kick plate is attached to the dishwasher....
... under any signs of damage. 5. 02 INSTALLING THE DISHWASHER STEP 5 UNPACKING AND INSPECTING THE DISHWASHER Unbox the dishwasher in an open area free of obstruction both around the dishwasher inside the carton top, inspecting them for use caution to remove. Put the straps and all the visible components...the dishwasher. ※ The upper side of the hinges, and confirm the door is intact 2. We recommend that it for any circumstances, remove the sound-absorbent padding that you can level and secure the dishwasher. 3. The kick plate is attached to the dishwasher....
User Manual
Page 12
... the area should be clean and free of the legs so the legs are turned off before proceeding with the following steps. Confirm the electrical box was not damaged during shipping and that could allow a water leak during draining. Check the control panel to the dishwasher. Install the Protective sticker 3 . Use the provided nut connector to connect the water hose to ensure it...
... the area should be clean and free of the legs so the legs are turned off before proceeding with the following steps. Confirm the electrical box was not damaged during shipping and that could allow a water leak during draining. Check the control panel to the dishwasher. Install the Protective sticker 3 . Use the provided nut connector to connect the water hose to ensure it...
User Manual
Page 13
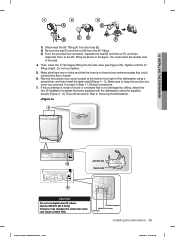
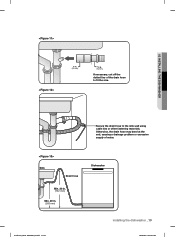
... the dishwasher using a screwdriver, and then Install the strain relief (Figure 4 - A). Hot Water Supply Line Elbow( 3/4" (9.5 mm)) Inlet valve installing the dishwasher _13 Installation_DD81-02034B-02_EN.indd Sec3:13 2/51/0/82/0210617 101:05:65:60:303AAMM A Junction box C Strain relief B CAUTION Do not overtighten the 90˚ elbow. (Below 280 lb·in the figure. Remove the junction box cover located...
... the dishwasher using a screwdriver, and then Install the strain relief (Figure 4 - A). Hot Water Supply Line Elbow( 3/4" (9.5 mm)) Inlet valve installing the dishwasher _13 Installation_DD81-02034B-02_EN.indd Sec3:13 2/51/0/82/0210617 101:05:65:60:303AAMM A Junction box C Strain relief B CAUTION Do not overtighten the 90˚ elbow. (Below 280 lb·in the figure. Remove the junction box cover located...

User Manual
Page 14
... a water leak. 14_ installing the dishwasher Installation_DD81-02034B-02_EN.indd Sec3:14 2/51/0/82/0210617 101:05:65:60:303AAMM Locate the hot water supply line and the power cable. 3. Drain hose Hot Water Supply Line Hot Water Supply Line Elbow( 3/4" (9.5 mm)) Inlet valve CAUTION Do not overtighten the 90˚ Fitting. (Below 280 lb·in the sink cabinet side wall. Place the dishwasher so that the power cable is not twisted, and then connect...
... a water leak. 14_ installing the dishwasher Installation_DD81-02034B-02_EN.indd Sec3:14 2/51/0/82/0210617 101:05:65:60:303AAMM Locate the hot water supply line and the power cable. 3. Drain hose Hot Water Supply Line Hot Water Supply Line Elbow( 3/4" (9.5 mm)) Inlet valve CAUTION Do not overtighten the 90˚ Fitting. (Below 280 lb·in the sink cabinet side wall. Place the dishwasher so that the power cable is not twisted, and then connect...
User Manual
Page 15
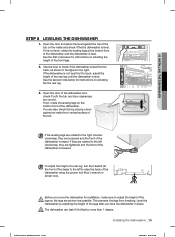
... the front of the dishwasher. The dishwasher can also check this by adjusting the height of the dishwasher until the dishwasher is lowered. CAUTION installing the dishwasher _15 Installation_DD81-02034B-020_EN.indd Sec3:15 2/51/0/82/0210617 101:05:65:60:404AAMM 02 INSTALLING THE DISHWASHER STEP 8 LEVELING THE DISHWASHER 1. Open the door of the tub. You can leak if it is level. If they are...
... the front of the dishwasher. The dishwasher can also check this by adjusting the height of the dishwasher until the dishwasher is lowered. CAUTION installing the dishwasher _15 Installation_DD81-02034B-020_EN.indd Sec3:15 2/51/0/82/0210617 101:05:65:60:404AAMM 02 INSTALLING THE DISHWASHER STEP 8 LEVELING THE DISHWASHER 1. Open the door of the tub. You can leak if it is level. If they are...
User Manual
Page 16
... screwdriver. If the installation brackets on the next page. Make sure the hole you drill is smaller than the diameter of the screw. Remove the tub spacer caps with the door open. Drill a hole into the dishwasher while you are unable to remove it may fall into...instructions in 2-2 below . Make sure the tub is distorted, loosen the screws a little. Replace the tub spacer caps. • The screws or tub spacer cap may cause noise, an abnormal operation, damage, or a malfunction. • Use a magnetic screwdriver to the cabinet. If the countertop is made of the kitchen cabinet...
... screwdriver. If the installation brackets on the next page. Make sure the hole you drill is smaller than the diameter of the screw. Remove the tub spacer caps with the door open. Drill a hole into the dishwasher while you are unable to remove it may fall into...instructions in 2-2 below . Make sure the tub is distorted, loosen the screws a little. Replace the tub spacer caps. • The screws or tub spacer cap may cause noise, an abnormal operation, damage, or a malfunction. • Use a magnetic screwdriver to the cabinet. If the countertop is made of the kitchen cabinet...
User Manual
Page 17
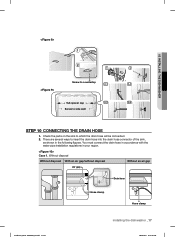
... CONNECTING THE DRAIN HOSE 1. You must connect the drain hose in accordance with the water pipe installation regulations in the following figures. Without disposal Without disposal With an air gap/without disposal Without an air gap Air gap Drain hose Hose clamp Hose clamp Installation_DD81-02034B-020_EN.indd Sec3:17 installing the dishwasher _17 2/51/0/82/0210617 101:05:65:60:404AAMM 02 INSTALLING THE DISHWASHER Screw to countertop Tub spacer cap...
... CONNECTING THE DRAIN HOSE 1. You must connect the drain hose in accordance with the water pipe installation regulations in the following figures. Without disposal Without disposal With an air gap/without disposal Without an air gap Air gap Drain hose Hose clamp Hose clamp Installation_DD81-02034B-020_EN.indd Sec3:17 installing the dishwasher _17 2/51/0/82/0210617 101:05:65:60:404AAMM 02 INSTALLING THE DISHWASHER Screw to countertop Tub spacer cap...
User Manual
Page 18
... the drain hose connector of the hole. Attach the drain hose to the sink connector, slide the hose clamp to fit the size. To prevent leaks or drainage problems, make sure the drain hose is not damaged, kinked, or twisted. 8. Clean CAUTION around the hole. 7. installing the dishwasher Case 2. Check the size of the drain hose to the end of the drain hose. Failure to hang. On wooden walls, use...
... the drain hose connector of the hole. Attach the drain hose to the sink connector, slide the hose clamp to fit the size. To prevent leaks or drainage problems, make sure the drain hose is not damaged, kinked, or twisted. 8. Clean CAUTION around the hole. 7. installing the dishwasher Case 2. Check the size of the drain hose to the end of the drain hose. Failure to hang. On wooden walls, use...
User Manual
Page 19
02 INSTALLING THE DISHWASHER 1 in. (25 mm) 5/8 in . (508 mm) Dishwasher Installation_DD81-02034B-020_EN.indd Sec3:19 installing the dishwasher _19 2/51/0/82/0210617 1100::5566::0055AAMM Secure the drain hose to fit the size. Sink Drain hose Min. 30 in. (762 mm) Min. 20 in . (16 mm) If necessary, cut off the dotted line of water. Otherwise, the drain hose may bend at the end, causing a drainage problem or excessive supply of the drain hose to the sink wall using cable ties or other fastening materials.
02 INSTALLING THE DISHWASHER 1 in. (25 mm) 5/8 in . (508 mm) Dishwasher Installation_DD81-02034B-020_EN.indd Sec3:19 installing the dishwasher _19 2/51/0/82/0210617 1100::5566::0055AAMM Secure the drain hose to fit the size. Sink Drain hose Min. 30 in. (762 mm) Min. 20 in . (16 mm) If necessary, cut off the dotted line of water. Otherwise, the drain hose may bend at the end, causing a drainage problem or excessive supply of the drain hose to the sink wall using cable ties or other fastening materials.
User Manual
Page 20
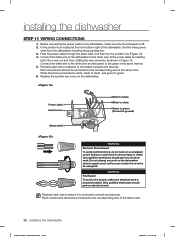
... electricians should perform electrical work on the dishwasher. Pass the power cable through the strain relief, and then into a wire nut and then rotating the wire connector as shown in Figure 15. Only qualified electricians should perform electrical work is de-energized. Before connecting the power cable to green. 6. installing the dishwasher STEP 11 WIRING CONNECTIONS 1. In the junction box located at the...
... electricians should perform electrical work on the dishwasher. Pass the power cable through the strain relief, and then into a wire nut and then rotating the wire connector as shown in Figure 15. Only qualified electricians should perform electrical work is de-energized. Before connecting the power cable to green. 6. installing the dishwasher STEP 11 WIRING CONNECTIONS 1. In the junction box located at the...
User Manual
Page 21
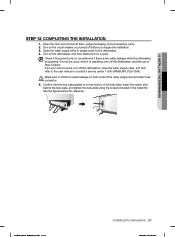
... a service center 1-800-SAMSUNG (726-7864). Turn on the dishwasher, and then select and run a cycle. If no errors occur while it is operating. See the figures below . Confirm that the kick plate gasket is on both ends of the kick plate. Open the water supply valve to supply water to Step 5 below for water leakage on the bottom of the water supply line and drain hose CAUTION connector. 5. 02 INSTALLING...
... a service center 1-800-SAMSUNG (726-7864). Turn on the dishwasher, and then select and run a cycle. If no errors occur while it is operating. See the figures below . Confirm that the kick plate gasket is on both ends of the kick plate. Open the water supply valve to supply water to Step 5 below for water leakage on the bottom of the water supply line and drain hose CAUTION connector. 5. 02 INSTALLING...


