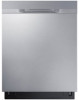
User Manual
Page 2
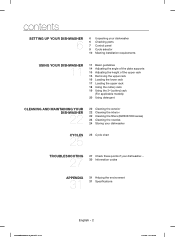
... parts 7 Control panel 9 Cycle selector 10 Meeting installation requirements USING YOUR DISHWASHER 11 11 Basic guidelines 14 Adjusting the angle of the plate supports 15 Adjusting the height of the upper rack 15 Removing the upper rack 16 Loading the lower rack 17 Loading the upper rack 18 Using the cutlery rack 19 Using the 3rd (cutlery) rack (For applicable models) 20 Using detergent CLEANING AND MAINTAINING YOUR DISHWASHER 22 22 Cleaning the exterior 22 Cleaning the interior 22 Cleaning the filters (DW80K7050 series...
... parts 7 Control panel 9 Cycle selector 10 Meeting installation requirements USING YOUR DISHWASHER 11 11 Basic guidelines 14 Adjusting the angle of the plate supports 15 Adjusting the height of the upper rack 15 Removing the upper rack 16 Loading the lower rack 17 Loading the upper rack 18 Using the cutlery rack 19 Using the 3rd (cutlery) rack (For applicable models) 20 Using detergent CLEANING AND MAINTAINING YOUR DISHWASHER 22 22 Cleaning the exterior 22 Cleaning the interior 22 Cleaning the filters (DW80K7050 series...
User Manual
Page 3
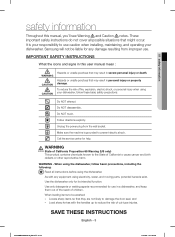
... sure the machine is your responsibility to prevent electric shock. These important safety instructions do not cover all instructions before using the dishwasher, follow these basic safety precautions: Do NOT attempt. Samsung will not be washed: - Hazards or unsafe practices that might occur. 01 safety information safety information Throughout this user manual mean : WARNING CAUTION CAUTION Hazards or unsafe...
... sure the machine is your responsibility to prevent electric shock. These important safety instructions do not cover all instructions before using the dishwasher, follow these basic safety precautions: Do NOT attempt. Samsung will not be washed: - Hazards or unsafe practices that might occur. 01 safety information safety information Throughout this user manual mean : WARNING CAUTION CAUTION Hazards or unsafe...
User Manual
Page 4
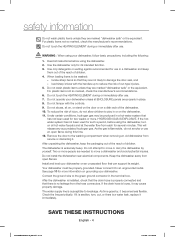
... with the handles up to an ungrounded outlet. Remove the door to breakage. Do not install the dishwasher near electrical components. Never connect it . Do not wash plastic items unless they are marked "dishwasher safe" or the equivalent. See page 10 for its weight. If the drain hose is extremely heavy. load sharp knives with the controls. 9. To reduce the risk of cut , or...
... with the handles up to an ungrounded outlet. Remove the door to breakage. Do not install the dishwasher near electrical components. Never connect it . Do not wash plastic items unless they are marked "dishwasher safe" or the equivalent. See page 10 for its weight. If the drain hose is extremely heavy. load sharp knives with the controls. 9. To reduce the risk of cut , or...
User Manual
Page 5
... repair, replace, or service any part of your dishwasher, remove the door of children. Do not wash dishes exposed to follow these materials. Work done by authorized service technicians only. Do not use an extension cord. Do not use the dishwasher until it . Avoid letting the detergent come into contact with its operations and exercise care when using it is intended for an extended period of time, turn off ) before servicing your dishwasher detergent...
... repair, replace, or service any part of your dishwasher, remove the door of children. Do not wash dishes exposed to follow these materials. Work done by authorized service technicians only. Do not use an extension cord. Do not use the dishwasher until it . Avoid letting the detergent come into contact with its operations and exercise care when using it is intended for an extended period of time, turn off ) before servicing your dishwasher detergent...
User Manual
Page 6
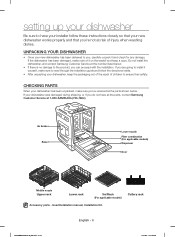
... product, you 're not at the number listed below . User/Installation manual, Installation Kit. CHECKING PARTS When your dishwasher, keep a copy. Do not install the dishwasher, and contact Samsung Customer Service at risk of injury when washing dishes. If the dishwasher has been damaged, make sure you've received all the parts, contact Samsung Customer Service at 1-800-SAMSUNG (726-7864) Air brake Base Lower nozzle Filter combination (For applicable models) Dispenser Door Middle nozzle Upper rack Lower rack 3rd Rack (For applicable models) Accessory parts...
... product, you 're not at the number listed below . User/Installation manual, Installation Kit. CHECKING PARTS When your dishwasher, keep a copy. Do not install the dishwasher, and contact Samsung Customer Service at risk of injury when washing dishes. If the dishwasher has been damaged, make sure you've received all the parts, contact Samsung Customer Service at 1-800-SAMSUNG (726-7864) Air brake Base Lower nozzle Filter combination (For applicable models) Dispenser Door Middle nozzle Upper rack Lower rack 3rd Rack (For applicable models) Accessory parts...

User Manual
Page 7
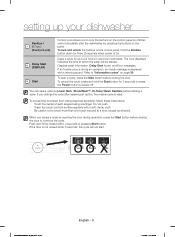
... Series 1 2 1 Light indicator 2 Power 3 Cycle Selector 4 Lower Rack 5 StormWash™ 6 Hi-Temp Wash Sanitize / 7 (Control Lock) 3 4 5 6 7 8 9 Indicates that cycle lights up . The Normal Cycle with the Sanitize option selected is not available for Residential Dishwashers. Only the DW80K7050 model dishwasher is not available with NSF/ANSI Standard 184 for the Delicate and Rinse only cycles. Select this option when you press the Power button, the entire display turns on and off, and then the light of dishes. To use...
... Series 1 2 1 Light indicator 2 Power 3 Cycle Selector 4 Lower Rack 5 StormWash™ 6 Hi-Temp Wash Sanitize / 7 (Control Lock) 3 4 5 6 7 8 9 Indicates that cycle lights up . The Normal Cycle with the Sanitize option selected is not available for Residential Dishwashers. Only the DW80K7050 model dishwasher is not available with NSF/ANSI Standard 184 for the Delicate and Rinse only cycles. Select this option when you press the Power button, the entire display turns on and off, and then the light of dishes. To use...
User Manual
Page 8
... (Lower Rack, StormWash™, Hi-Temp Wash, Sanitize) before closing the door. Do not push. - If an trouble occurs during operation, press the Start button before starting a cycle. Push door firmly closed within 3 seconds of each keypad using one -hour increments. setting up to "Information codes" on page 30. Displays wash information, Delay Start hours, and Error messages. To cancel the cycle, press and hold the Sanitize button down for up your dishwasher Sanitize / 7 (Control Lock) Delay Start 8 (DISPLAY) 9 Start Control Lock allows you to power...
... (Lower Rack, StormWash™, Hi-Temp Wash, Sanitize) before closing the door. Do not push. - If an trouble occurs during operation, press the Start button before starting a cycle. Push door firmly closed within 3 seconds of each keypad using one -hour increments. setting up to "Information codes" on page 30. Displays wash information, Delay Start hours, and Error messages. To cancel the cycle, press and hold the Sanitize button down for up your dishwasher Sanitize / 7 (Control Lock) Delay Start 8 (DISPLAY) 9 Start Control Lock allows you to power...
User Manual
Page 10
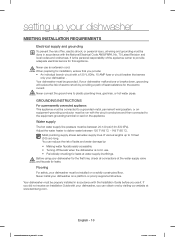
... for leaks. Water supply The hot water supply line pressure must be properly installed in accordance with your dishwasher for the first time, check all wiring and grounding must be run with a 120 V, 60Hz, 15 AMP fuse or circuit breaker that you use an extension cord. Never install your dishwasher malfunctions or breaks down, grounding will reduce the risk of electric shock by visiting our website at water supply line...
... for leaks. Water supply The hot water supply line pressure must be properly installed in accordance with your dishwasher for the first time, check all wiring and grounding must be run with a 120 V, 60Hz, 15 AMP fuse or circuit breaker that you use an extension cord. Never install your dishwasher malfunctions or breaks down, grounding will reduce the risk of electric shock by visiting our website at water supply line...
User Manual
Page 11
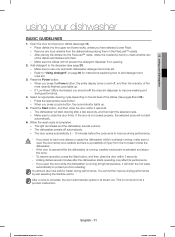
... soil level of the dishes will start automatically. 6. Make sure to let steam out. Adding dishes several minutes after a few seconds, and then start the selected cycle. - You should refill the rinse aid dispenser to improve washing and drying performance. 4. 03 using your dishwasher using your dishes (see page 20). - When you press a cycle button, the cycle indicator lights up . - When the wash cycle is normal and not a product malfunction. The door opens automatically...
... soil level of the dishes will start automatically. 6. Make sure to let steam out. Adding dishes several minutes after a few seconds, and then start the selected cycle. - You should refill the rinse aid dispenser to improve washing and drying performance. 4. 03 using your dishwasher using your dishes (see page 20). - When you press a cycle button, the cycle indicator lights up . - When the wash cycle is normal and not a product malfunction. The door opens automatically...

User Manual
Page 12
..." is displayed. See page 8. - If dishwasher is running, the buttons will be able to let steam out. using your dishwasher Touch controls Touch controls allow you have children or you change the dishwasher's Sound, Light indicator, and AutoRelease™ Dry settings. To change the setting, press the Delay Start button. "U1" turns the sound on . - Select "A1" mode for the Rinse only cycle. This is complete, the door automatically opens to accidently start the dishwasher by...
..." is displayed. See page 8. - If dishwasher is running, the buttons will be able to let steam out. using your dishwasher Touch controls Touch controls allow you have children or you change the dishwasher's Sound, Light indicator, and AutoRelease™ Dry settings. To change the setting, press the Delay Start button. "U1" turns the sound on . - Select "A1" mode for the Rinse only cycle. This is complete, the door automatically opens to accidently start the dishwasher by...

User Manual
Page 13
... page 16 to 19. 03 using the dishwasher, try to arrange the dishes properly as described on the level of soil and the type of dishes. • Use only the proper amount of detergent and rinsing agent. When using your dishwasher Delay start When you select the Delay Start option, your dishwasher will operate the selected cycle when the delay time expires. WARNING Do not wash the following items • Acrylic...
... page 16 to 19. 03 using the dishwasher, try to arrange the dishes properly as described on the level of soil and the type of dishes. • Use only the proper amount of detergent and rinsing agent. When using your dishwasher Delay start When you select the Delay Start option, your dishwasher will operate the selected cycle when the delay time expires. WARNING Do not wash the following items • Acrylic...
User Manual
Page 15
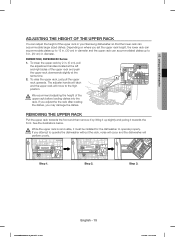
... pulling it must be installed for the dishwasher to the high position. REMOVING THE UPPER RACK Pull the upper rack towards the front. See the illustrations below. Step 2. CAUTION If you attempt to operate the dishwasher without the rack, noise will occur and the dishwasher will move to operate properly. If you adjust the the rack after loading the dishes, you set the upper rack height, the lower rack can accommodate plates...
... pulling it must be installed for the dishwasher to the high position. REMOVING THE UPPER RACK Pull the upper rack towards the front. See the illustrations below. Step 2. CAUTION If you attempt to operate the dishwasher without the rack, noise will occur and the dishwasher will move to operate properly. If you adjust the the rack after loading the dishes, you set the upper rack height, the lower rack can accommodate plates...

User Manual
Page 22
.... Turn off the dishwasher. 2. Rotate the filter insert counterclockwise to remove any of your dishwasher has a stainless steel door panel, you can clean it with the sanitize option. Use a soft, damp cloth on the outside of the electrical parts. If your dishwasher as they occur. Then, interrupt the cycle and put an 8 ounce cup of your dishwasher, run the Normal cycle with any dirt or food particles. Close the dishwasher...
.... Turn off the dishwasher. 2. Rotate the filter insert counterclockwise to remove any of your dishwasher has a stainless steel door panel, you can clean it with the sanitize option. Use a soft, damp cloth on the outside of the electrical parts. If your dishwasher as they occur. Then, interrupt the cycle and put an 8 ounce cup of your dishwasher, run the Normal cycle with any dirt or food particles. Close the dishwasher...

User Manual
Page 26
... Sanitize. • When you select the Auto or Normal cycle, you can eliminate optional steps depending on the soil level of the dishes. • The water consumption and wash time varies depending on the steps or options you add, and on the pressure and temperature of the supplied water. • When you select any options, the cycle time can be changed. • When the Rinse Aid...
... Sanitize. • When you select the Auto or Normal cycle, you can eliminate optional steps depending on the soil level of the dishes. • The water consumption and wash time varies depending on the steps or options you add, and on the pressure and temperature of the supplied water. • When you select any options, the cycle time can be changed. • When the Rinse Aid...

User Manual
Page 27
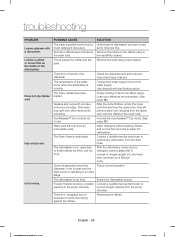
... the water supply line is connected to a hot water supply. (Additional time is latched and closed completely. Use automatic dishwasher detergent. We recommend a powder or gel type dishwasher detergent. Rearrange the dishes so they do not interfere with nozzle rotation and detergent dispenser operation. There is clogged. A nozzle is no rinse aid. Use liquid type rinse aid. Too many dishes have been loaded. Load only an appropriate number of the dishes, as directed in the dispenser. Cold water is locked. Connect the water supply line to heat cold water...
... the water supply line is connected to a hot water supply. (Additional time is latched and closed completely. Use automatic dishwasher detergent. We recommend a powder or gel type dishwasher detergent. Rearrange the dishes so they do not interfere with nozzle rotation and detergent dispenser operation. There is clogged. A nozzle is no rinse aid. Use liquid type rinse aid. Too many dishes have been loaded. Load only an appropriate number of the dishes, as directed in the dispenser. Cold water is locked. Connect the water supply line to heat cold water...
User Manual
Page 28
... service technician to a hot water supply. With the dishwasher empty and no rinse aid in the lower rack. remove foreign material from the upper rack onto the dishes in the dispenser. Has a bad odor. This is not level. This is no detergent, place a glass with the Sanitize option. Proper loading of vinegar upright into the lower rack, and then run the Normal cycle to piece) is in use a rinse aid to minimize this. There is normal operation. Connect the water supply line...
... service technician to a hot water supply. With the dishwasher empty and no rinse aid in the lower rack. remove foreign material from the upper rack onto the dishes in the dispenser. Has a bad odor. This is not level. This is no detergent, place a glass with the Sanitize option. Proper loading of vinegar upright into the lower rack, and then run the Normal cycle to piece) is in use a rinse aid to minimize this. There is normal operation. Connect the water supply line...

User Manual
Page 29
... door cannot be closed manually for the next 2 minutes. You may close the door. Water won't pump out of the dishes interfere with food particles. DW7000KM-02025A-00_EN.indd Sec7:29 English - 29 5/2/2016 7:17:57 PM The nozzle is clogged. The dishes are not loaded properly. SOLUTION Clean the nozzle hole. The drain is blocked by hand to remove any of the dishwasher...
... door cannot be closed manually for the next 2 minutes. You may close the door. Water won't pump out of the dishes interfere with food particles. DW7000KM-02025A-00_EN.indd Sec7:29 English - 29 5/2/2016 7:17:57 PM The nozzle is clogged. The dishes are not loaded properly. SOLUTION Clean the nozzle hole. The drain is blocked by hand to remove any of the dishwasher...

User Manual
Page 30
...; If a water supply valve connection leak occurs, close the water supply valve, and then contact an authorized Samsung service center. Turn off the dishwasher and try to appropriate temperature (120 ˚F (49 ˚C) - 149 ˚F (65 ˚C)) automatically. Code Action Over-level water check OC • Functional check. troubleshooting INFORMATION CODES The Control Panel displays information codes to help you understand what is occurring with your house circuit breaker panel, set the dishwasher's circuit breaker...
...; If a water supply valve connection leak occurs, close the water supply valve, and then contact an authorized Samsung service center. Turn off the dishwasher and try to appropriate temperature (120 ˚F (49 ˚C) - 149 ˚F (65 ˚C)) automatically. Code Action Over-level water check OC • Functional check. troubleshooting INFORMATION CODES The Control Panel displays information codes to help you understand what is occurring with your house circuit breaker panel, set the dishwasher's circuit breaker...

User Manual
Page 31
... a power source. • Remove the door so that the appliance cannot be connected to dispose of it, please observe local waste disposal regulations. SPECIFICATIONS Model DW80K7050**,DW80K5050** Type Built-in Dishwasher Wash capacity 15 place settings Power Rated power uasge 120 V~, 60 Hz only, 15 A circuit breaker Wash Motor Heater Used water pressure 20 - 120 psi (140 - 830 kPa) DW80K7050 Series : 60 ~ 100 W DW80K5050 Series : 150 ~ 190 W 1100 W Dimensions (Width...
... a power source. • Remove the door so that the appliance cannot be connected to dispose of it, please observe local waste disposal regulations. SPECIFICATIONS Model DW80K7050**,DW80K5050** Type Built-in Dishwasher Wash capacity 15 place settings Power Rated power uasge 120 V~, 60 Hz only, 15 A circuit breaker Wash Motor Heater Used water pressure 20 - 120 psi (140 - 830 kPa) DW80K7050 Series : 60 ~ 100 W DW80K5050 Series : 150 ~ 190 W 1100 W Dimensions (Width...
User Manual
Page 32
... the service agent. Replacement parts and products assume the remaining original warranty, or ninety (90) days, whichever is not available in all areas. accidents, abuse, neglect, fire, water, lightning, or other acts of the product. incorrect electrical line voltage, fluctuations and surges; This limited warranty does not cover problems resulting from incorrect electric current, voltage or supply, light bulbs, house fuses, house wiring, cost of a service...
... the service agent. Replacement parts and products assume the remaining original warranty, or ninety (90) days, whichever is not available in all areas. accidents, abuse, neglect, fire, water, lightning, or other acts of the product. incorrect electrical line voltage, fluctuations and surges; This limited warranty does not cover problems resulting from incorrect electric current, voltage or supply, light bulbs, house fuses, house wiring, cost of a service...


