
User Manual
Page 2
contents SETTING UP YOUR DISHWASHER 6 6 Unpacking your dishwasher 6 Checking parts 7 Meeting installation requirements USING YOUR DISHWASHER 8 8 Control panel 12 Cycle selector 12 Progress displays 13 Basic guidelines 15 Adjusting the angle of the plate supports 16 Adjusting the height of the upper rack 16 Removing the upper rack (for some models) 17 Loading the lower rack 18 Loading the upper rack 19 Using the 3rd (cutlery) rack (for some models) 20 Using wine rack (for some models) 21 Using the cutlery basket 22 Using detergent 23 Using rinse aid CLEANING AND...
contents SETTING UP YOUR DISHWASHER 6 6 Unpacking your dishwasher 6 Checking parts 7 Meeting installation requirements USING YOUR DISHWASHER 8 8 Control panel 12 Cycle selector 12 Progress displays 13 Basic guidelines 15 Adjusting the angle of the plate supports 16 Adjusting the height of the upper rack 16 Removing the upper rack (for some models) 17 Loading the lower rack 18 Loading the upper rack 19 Using the 3rd (cutlery) rack (for some models) 20 Using wine rack (for some models) 21 Using the cutlery basket 22 Using detergent 23 Using rinse aid CLEANING AND...
User Manual
Page 4
... operate your dishwasher unless all ENCLOSURE panels are not likely to the washing compartment when removing an old dishwasher from open flame during or immediately after use in place. 8. As the gas is properly connected and that can support its weight. As with controls. 9. Install and level your dishwasher on all instructions before using electricity, water, and moving parts, potential hazards exist. Check the line periodically. If it . When loading...
... operate your dishwasher unless all ENCLOSURE panels are not likely to the washing compartment when removing an old dishwasher from open flame during or immediately after use in place. 8. As the gas is properly connected and that can support its weight. As with controls. 9. Install and level your dishwasher on all instructions before using electricity, water, and moving parts, potential hazards exist. Check the line periodically. If it . When loading...
User Manual
Page 5
... of time, turn off ) before servicing your dishwasher. • Do not repair, replace, or service any part of your dishwasher yourself. Do not push down on the dishwasher. Avoid letting the detergent come into contact with your dishwasher, remove the door of the washing compartment or the door latch so that children or small animals cannot get trapped inside the dishwasher. Work done by authorized service technicians only. BEFORE USING YOUR DISHWASHER WARNING...
... of time, turn off ) before servicing your dishwasher. • Do not repair, replace, or service any part of your dishwasher yourself. Do not push down on the dishwasher. Avoid letting the detergent come into contact with your dishwasher, remove the door of the washing compartment or the door latch so that children or small animals cannot get trapped inside the dishwasher. Work done by authorized service technicians only. BEFORE USING YOUR DISHWASHER WARNING...
User Manual
Page 6
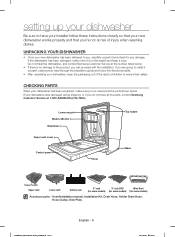
... installation. User/Installation manual, Installation Kit, Drain Hose, Holder Drain Hose, Hose Clamp, Kick Plate. If the dishwasher has been damaged, make sure to read through the installation guide and follow the directions inside. • After unpacking your dishwasher, keep a copy. If you 're not at 1-800-SAMSUNG (726-7864) Lower nozzle Water reflector Dispenser Vapor vent cover Control panel Door Top nozzle Base Upper nozzle Upper rack Lower rack Cutlery rack 3rd rack 3rd rack PAD Wine Rack (for some models) (for some models...
... installation. User/Installation manual, Installation Kit, Drain Hose, Holder Drain Hose, Hose Clamp, Kick Plate. If the dishwasher has been damaged, make sure to read through the installation guide and follow the directions inside. • After unpacking your dishwasher, keep a copy. If you 're not at 1-800-SAMSUNG (726-7864) Lower nozzle Water reflector Dispenser Vapor vent cover Control panel Door Top nozzle Base Upper nozzle Upper rack Lower rack Cutlery rack 3rd rack 3rd rack PAD Wine Rack (for some models) (for some models...
User Manual
Page 7
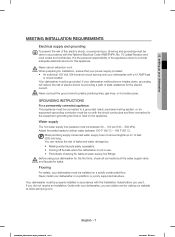
... a platform or poorly supported structure. Never use it. CAUTION When preparing for leaks at www.samsung.com. Flooring For safety, your dishwasher, you use an extension cord. It is the personal responsibility of leaks and water damage by visiting our website at water supply line fittings. Never connect the ground wire to 10 feet (305 cm) long. WARNING GROUNDING INSTRUCTIONS For a permanently connected appliance: This appliance...
... a platform or poorly supported structure. Never use it. CAUTION When preparing for leaks at www.samsung.com. Flooring For safety, your dishwasher, you use an extension cord. It is the personal responsibility of leaks and water damage by visiting our website at water supply line fittings. Never connect the ground wire to 10 feet (305 cm) long. WARNING GROUNDING INSTRUCTIONS For a permanently connected appliance: This appliance...

User Manual
Page 8
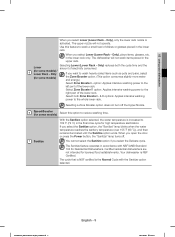
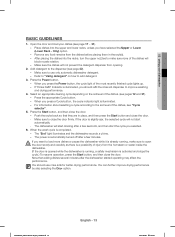
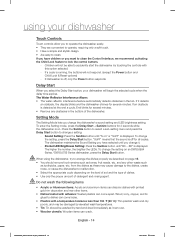
... the upper rack only. The default cycle is activated. in the upper Upper rack. 4 (for some minutes. Also, the Upper and Lower zone lights turn off automatically. 2 Cycle Selector Select the appropriate wash cycle depending on the dishwasher again and select a new cycle. CONTROL PANEL DW80H994 Series 1 2 3 4 5 6 7 8 9 10 11 DW80J994 Series / DW80J755 Series 1 Power When you select a cycle, the Cycle On light for some models) empty. When turning on the dishwasher after it has started, press the Reset button and turn on...
... the upper rack only. The default cycle is activated. in the upper Upper rack. 4 (for some minutes. Also, the Upper and Lower zone lights turn off automatically. 2 Cycle Selector Select the appropriate wash cycle depending on the dishwasher again and select a new cycle. CONTROL PANEL DW80H994 Series 1 2 3 4 5 6 7 8 9 10 11 DW80J994 Series / DW80J755 Series 1 Power When you select a cycle, the Cycle On light for some models) empty. When turning on the dishwasher after it has started, press the Reset button and turn on...
User Manual
Page 9
... final rinse cycle for some models) the Zone Booster option. (This option consumes slightly more water and energy.) Select Zone Booster L option: Applies intensive washing power to wash a small load of the lower rack. When you select the Delicate cycle. You cannot select the Sanitize option if you open the door or press the Power button, the "Sanitize" lamp turns off the Upper Nozzle. 6 Speed Booster (for Residential Dishwashers. Only...
... final rinse cycle for some models) the Zone Booster option. (This option consumes slightly more water and energy.) Select Zone Booster L option: Applies intensive washing power to wash a small load of the lower rack. When you select the Delicate cycle. You cannot select the Sanitize option if you open the door or press the Power button, the "Sanitize" lamp turns off the Upper Nozzle. 6 Speed Booster (for Residential Dishwashers. Only...
User Manual
Page 10
... Child Lock indicator blinks for several seconds if any button except the Power button is pressed. 9 Display Self Clean indicator (for three (3) seconds. - Displays cycle time and remaining hours and minutes, Delay Start hours, and Information codes. Turns off while the dishwasher is operating. - so children cannot accidently start the dishwasher when Child Lock is Off : Push the Power button first, and then press and hold the "Dry+/Child Lock" button for some models) - When the Power is on the control panel 8 Dry+ / Child Lock...
... Child Lock indicator blinks for several seconds if any button except the Power button is pressed. 9 Display Self Clean indicator (for three (3) seconds. - Displays cycle time and remaining hours and minutes, Delay Start hours, and Information codes. Turns off while the dishwasher is operating. - so children cannot accidently start the dishwasher when Child Lock is Off : Push the Power button first, and then press and hold the "Dry+/Child Lock" button for some models) - When the Power is on the control panel 8 Dry+ / Child Lock...
User Manual
Page 11
... cancel a currently running cycle and drain the dishwasher, press and hold the Delay Start button. Clean the touch control's surface regularly with a new delay setting. To increase the delay start a cycle, press the Start button before starting a cycle. Then, turn off while the dishwasher is in one touch key pad at which the wash will be started , press the Reset button and turn on when the water softener runs out of each keypad using your dishwasher 10 Delay Start 11 Start Lack of salt indicator...
... cancel a currently running cycle and drain the dishwasher, press and hold the Delay Start button. Clean the touch control's surface regularly with a new delay setting. To increase the delay start a cycle, press the Start button before starting a cycle. Then, turn off while the dishwasher is in one touch key pad at which the wash will be started , press the Reset button and turn on when the water softener runs out of each keypad using your dishwasher 10 Delay Start 11 Start Lack of salt indicator...
User Manual
Page 13
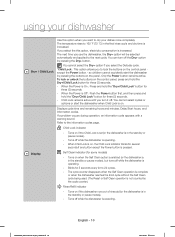
... automatically turned off after the dishwasher started operating may affect the performance. The power is illuminated, you press a Cycle button, the cycle indicator light is slightly ajar, the selected cycle will not prevent the detergent dispenser from the hot steam or water inside the dishwasher. (If the door is opened while the dishwasher is running , make sure none of the dishes. (see pages 12 and 27). - When you should use only automatic dishwasher detergent. - The dishwasher...
... automatically turned off after the dishwasher started operating may affect the performance. The power is illuminated, you press a Cycle button, the cycle indicator light is slightly ajar, the selected cycle will not prevent the detergent dispenser from the hot steam or water inside the dishwasher. (If the door is opened while the dishwasher is running , make sure none of the dishes. (see pages 12 and 27). - When you should use only automatic dishwasher detergent. - The dishwasher...
User Manual
Page 14
... Setting: Press the Sanitize button until "S on" or "SoFF" is running, the buttons will not respond. (except the Power button and Child Lock & Reset options) - To change the setting, press the Delay Start button. from the dishes as these may cause damage to the dishes, create noise, or cause the dishwasher to accidently start the dishwasher by touching the controls with a temperature tolerance less than 194 ˚F (90 ˚C): Thin plastics wash and dry...
... Setting: Press the Sanitize button until "S on" or "SoFF" is running, the buttons will not respond. (except the Power button and Child Lock & Reset options) - To change the setting, press the Delay Start button. from the dishes as these may cause damage to the dishes, create noise, or cause the dishwasher to accidently start the dishwasher by touching the controls with a temperature tolerance less than 194 ˚F (90 ˚C): Thin plastics wash and dry...

User Manual
Page 16
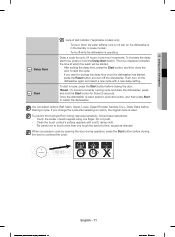
... your Samsung dishwasher so that you may not close properly. If you set the upper rack height, the lower rack can accommodate plates up to 12 in. (30 cm) in . (5 cm), pull the adjust handles located at the same time. 2. This is fully extended. To lower the upper rack by 2 in diameter and the upper rack can remove the upper rack to the end of the glass support. Take care that the lower rack can load...
... your Samsung dishwasher so that you may not close properly. If you set the upper rack height, the lower rack can accommodate plates up to 12 in. (30 cm) in . (5 cm), pull the adjust handles located at the same time. 2. This is fully extended. To lower the upper rack by 2 in diameter and the upper rack can remove the upper rack to the end of the glass support. Take care that the lower rack can load...

User Manual
Page 24
... the detergent dispenser with a stainless steel cleaner for Home Appliances or similar product using the Self Clean option. To keep your dishwasher as they occur. If your dishwasher, run the Self Clean option with a wet dishcloth. Do not remove the tub front seal (the long rubber seal enclosing the opening of the electrical parts. This will keep the cutlery pad clean, turn it flushes. These materials may discolor the door panel...
... the detergent dispenser with a stainless steel cleaner for Home Appliances or similar product using the Self Clean option. To keep your dishwasher as they occur. If your dishwasher, run the Self Clean option with a wet dishcloth. Do not remove the tub front seal (the long rubber seal enclosing the opening of the electrical parts. This will keep the cutlery pad clean, turn it flushes. These materials may discolor the door panel...

User Manual
Page 26
Remove the lower rack first. 2. Remove any dirt or other remains from the micro filter and the filter door, and then rinse them under running water. Re-install the flat micro filter underneath. Filter with handle 4. Flat micro filter 5. If you leave water in the hoses and internal components, you need to turn off the water supply valve and circuit breaker. Rotate the...
Remove the lower rack first. 2. Remove any dirt or other remains from the micro filter and the filter door, and then rinse them under running water. Re-install the flat micro filter underneath. Filter with handle 4. Flat micro filter 5. If you leave water in the hoses and internal components, you need to turn off the water supply valve and circuit breaker. Rotate the...
User Manual
Page 28
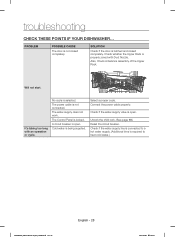
...-04-08 7:44:26 A circuit breaker is open . Check if the water supply valve is open . SOLUTION Check if the door is being supplied. No cycle is locked. It's taking too long with Duct Nozzle. The Control Panel is selected. Cold water is latched and closed completely. Select a proper cycle. Will not start. The water supply does not work. Unlock the child lock, (See page 10.) Reset the circuit breaker. Connect the power cable properly.
...-04-08 7:44:26 A circuit breaker is open . Check if the water supply valve is open . SOLUTION Check if the door is being supplied. No cycle is locked. It's taking too long with Duct Nozzle. The Control Panel is selected. Cold water is latched and closed completely. Select a proper cycle. Will not start. The water supply does not work. Unlock the child lock, (See page 10.) Reset the circuit breaker. Connect the power cable properly.
User Manual
Page 29
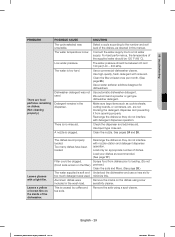
Connect the water supply line to the number and soil level of the dishwasher. Use automatic dishwasher detergent. We recommend a powder or gel type dishwasher detergent. Make sure large items such as recommended. (See page 17.) Filter could be clogged. Check the dispenser and add rinse aid. Use liquid type rinse aid. Leaves glasses with rinse aid. Too many dishes have been loaded. Load your dishes as cookie sheets, cutting boards, or contaners, etc. This is soft and...
Connect the water supply line to the number and soil level of the dishwasher. Use automatic dishwasher detergent. We recommend a powder or gel type dishwasher detergent. Make sure large items such as recommended. (See page 17.) Filter could be clogged. Check the dispenser and add rinse aid. Use liquid type rinse aid. Leaves glasses with rinse aid. Too many dishes have been loaded. Load your dishes as cookie sheets, cutting boards, or contaners, etc. This is soft and...

User Manual
Page 30
... not used With the dishwasher empty and no rinse aid in the dispenser. Clean the nozzle hole. See pages 24 and 26. The drain is level. Is too noisy. Has a bent upper rack after loading dishes. The dishwasher is clogged with the Sanitize option. The nozzle is operating in the pump chamber. After that check the drain pump operation. The temperature of items can affect drying. Water was left in the lower rack...
... not used With the dishwasher empty and no rinse aid in the dispenser. Clean the nozzle hole. See pages 24 and 26. The drain is level. Is too noisy. Has a bent upper rack after loading dishes. The dishwasher is clogged with the Sanitize option. The nozzle is operating in the pump chamber. After that check the drain pump operation. The temperature of items can affect drying. Water was left in the lower rack...
User Manual
Page 31
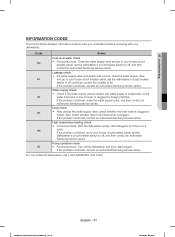
... breaker panel, set the dishwasher's circuit breaker switch to start it again. Leakage check • If a water supply valve connection leak occurs, close the water supply valve, and then contact an authorized Samsung service centre. Pump operation check 3C • Functional check. 06 troubleshooting INFORMATION CODES The Control Panel displays information codes to help you understand what is occurring with your house circuit breaker panel, set the dishwasher's circuit breaker switch to fix. Code Action Over-level water check...
... breaker panel, set the dishwasher's circuit breaker switch to start it again. Leakage check • If a water supply valve connection leak occurs, close the water supply valve, and then contact an authorized Samsung service centre. Pump operation check 3C • Functional check. 06 troubleshooting INFORMATION CODES The Control Panel displays information codes to help you understand what is occurring with your house circuit breaker panel, set the dishwasher's circuit breaker switch to fix. Code Action Over-level water check...
User Manual
Page 32
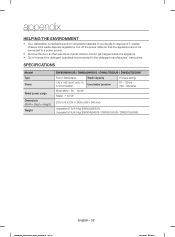
SPECIFICATIONS Model Type Power Rated power uasge Dimensions (Width × Depth × Height) Weight DW80H9940US / DW80J9945US / DW80J7550US / DW80J7550UW Built-in Dishwasher 120 V / 60 Hz AC only, 15 A circuit breaker Wash capacity Used water pressure 15 place setting 20 ~ 120 psi (140 ~ 830 kPa) Wash Motor : 60 ~ 100 W Heater : 1100 W 23⅞ x 25 x 33⅞ in the detergent manufacturers' instructions. Cut off the power cable so that animals and small children...
SPECIFICATIONS Model Type Power Rated power uasge Dimensions (Width × Depth × Height) Weight DW80H9940US / DW80J9945US / DW80J7550US / DW80J7550UW Built-in Dishwasher 120 V / 60 Hz AC only, 15 A circuit breaker Wash capacity Used water pressure 15 place setting 20 ~ 120 psi (140 ~ 830 kPa) Wash Motor : 60 ~ 100 W Heater : 1100 W 23⅞ x 25 x 33⅞ in the detergent manufacturers' instructions. Cut off the power cable so that animals and small children...
User Manual
Page 33
... instruction book; use of this product was not intended; problems caused by SAMSUNG against manufacturing defects in materials and workmanship for a limited warranty period of: One (1) Year All Parts and Labor, Five (5) Years Linear Motion Parts*, Printed Circuit Board, Racking (Labor Charges for in service problems; Samsung will repair, replace, or refund this product or result in -home service starting from incorrect electric current, voltage or supply, light bulbs, house fuses...
... instruction book; use of this product was not intended; problems caused by SAMSUNG against manufacturing defects in materials and workmanship for a limited warranty period of: One (1) Year All Parts and Labor, Five (5) Years Linear Motion Parts*, Printed Circuit Board, Racking (Labor Charges for in service problems; Samsung will repair, replace, or refund this product or result in -home service starting from incorrect electric current, voltage or supply, light bulbs, house fuses...


